
1. Introduction
The EPOMAKER TH99 PRO is a versatile 96% mechanical keyboard designed for both productivity and gaming. It features a compact layout with a full numeric keypad, a customizable screen, and a multi-function knob. This manual provides detailed instructions for setting up, operating, and maintaining your keyboard.

Image: The EPOMAKER TH99 PRO keyboard showcasing its 1800 layout.
2. Package Contents
Please ensure all items are present in your package:
- EPOMAKER TH99 PRO Mechanical Keyboard
- A 2-in-1 Switch-and-Keycap Puller
- A USB A-to-C Cable
- A Wireless 2.4Ghz Receiver (stored under the left kick-stand)
- A Multilingual Manual and A LOGO Card
- Some Extra Switches
3. Setup
3.1 Connectivity Modes
The TH99 PRO supports three connectivity modes: Wired (USB-C), 2.4GHz Wireless, and Bluetooth 5.0. You can switch between these modes using the toggle switches located on the keyboard.

Image: Close-up of the connectivity switches and USB-C port on the EPOMAKER TH99 PRO.
3.1.1 Wired Connection (USB-C)
- Connect the provided USB A-to-C cable to the keyboard's USB-C port.
- Plug the other end of the cable into your computer's USB port.
- Ensure the keyboard's mode switch is set to 'USB'.
3.1.2 2.4GHz Wireless Connection
- Locate the 2.4GHz wireless receiver, typically stored under the left kick-stand of the keyboard.
- Plug the receiver into an available USB port on your device.
- Set the keyboard's mode switch to '2.4G'.
- Press Fn + R to activate 2.4GHz pairing mode if needed.
3.1.3 Bluetooth 5.0 Connection
- Set the keyboard's mode switch to 'BT'.
- Press Fn + Q, Fn + W, or Fn + E to select one of three available Bluetooth channels. The screen will indicate the selected channel.
- Hold the selected Fn + Q/W/E key combination for 3-5 seconds until the screen indicates pairing mode.
- On your device, search for Bluetooth devices and select 'EPOMAKER TH99 PRO' to connect.
3.2 Operating System Compatibility
The keyboard features a switch to toggle between Windows and Mac layouts, ensuring full compatibility with both operating systems.
Image: The Mac/Win toggle switch on the EPOMAKER TH99 PRO.
4. Operating Instructions
4.1 Multi-Function Knob and Screen Control
The keyboard features a smart screen and a multi-function knob for quick adjustments and information display.

Image: The dual-function knob and screen on the EPOMAKER TH99 PRO.
- Toggle Mode: Press Fn + Knob to switch between volume control mode and screen control mode.
- Volume Control Mode: Rotate the knob to adjust system volume. Press the knob to mute/unmute.
- Screen Control Mode:
- Rotate clockwise to select the menu to the right.
- Rotate counter-clockwise to select the menu to the left.
- Short press the knob to confirm selection.
- The screen displays keyboard status, battery, time, and allows RGB control and GIF display.
Video: How to Toggle RGB Effects
Video Description: This video demonstrates how to toggle between volume control and screen control modes using the Fn key and the knob, and how to navigate RGB lighting effects on the screen.
4.2 RGB Backlight Control
The TH99 PRO features per-key adjustable RGB illumination. You can customize the lighting effects, colors, brightness, and speed directly from the keyboard or using the software.

Image: The EPOMAKER TH99 PRO keyboard displaying dynamic RGB backlighting.
- Brightness: Use the knob in screen control mode to adjust brightness.
- Speed: Use the knob in screen control mode to adjust effect speed.
- Effects & Colors: Navigate through the screen menu to select various lighting effects and colors.
Video: Clean Lights in Sunlight
Video Description: This video demonstrates the visibility and vibrancy of the keyboard's RGB lighting in a brightly lit environment.
Video: Vibrant Lights in Darkness
Video Description: This video showcases the vividness and dynamic effects of the keyboard's RGB lighting in a dark environment.
4.3 Software Customization
The EPOMAKER TH99 PRO utilizes Chrome-based software for advanced customization. This software allows you to remap keys, record macros, adjust RGB settings, and upload custom GIFs to the screen.

Image: Screenshot of the EPOMAKER TH99 PRO's Chrome-based customization software.
Video: How to Customize Your TH99 PRO
Video Description: This video provides a comprehensive guide on using the EPOMAKER TH99 PRO's customization software to remap keys, set macros, and personalize the screen display.
4.3.1 Macro Setup
The software allows you to record and assign complex macros to any key, automating repetitive tasks or multi-key combinations.
- Connect the keyboard via USB-C to your computer.
- Access the Chrome-based software (available online and offline).
- Navigate to the 'Macro Manager' section.
- Follow the on-screen instructions to record and assign your desired macros.
5. Features
5.1 Gasket-Mount Structure
The TH99 PRO features a sophisticated multi-layer sound-optimized gasket-mount design, including PORON, Latex, IXPE, and silicones. This design acts as a shock absorber, reducing vibrations and metallic ping for a soft, cushioned typing feel.

Image: Diagram illustrating the multi-layer gasket-mount structure of the EPOMAKER TH99 PRO.
5.2 Hot-Swappable Switches
The keyboard is hot-swappable, allowing you to easily change switches without soldering. It supports both 3-pin and 5-pin mechanical switches, offering flexibility for future customization.
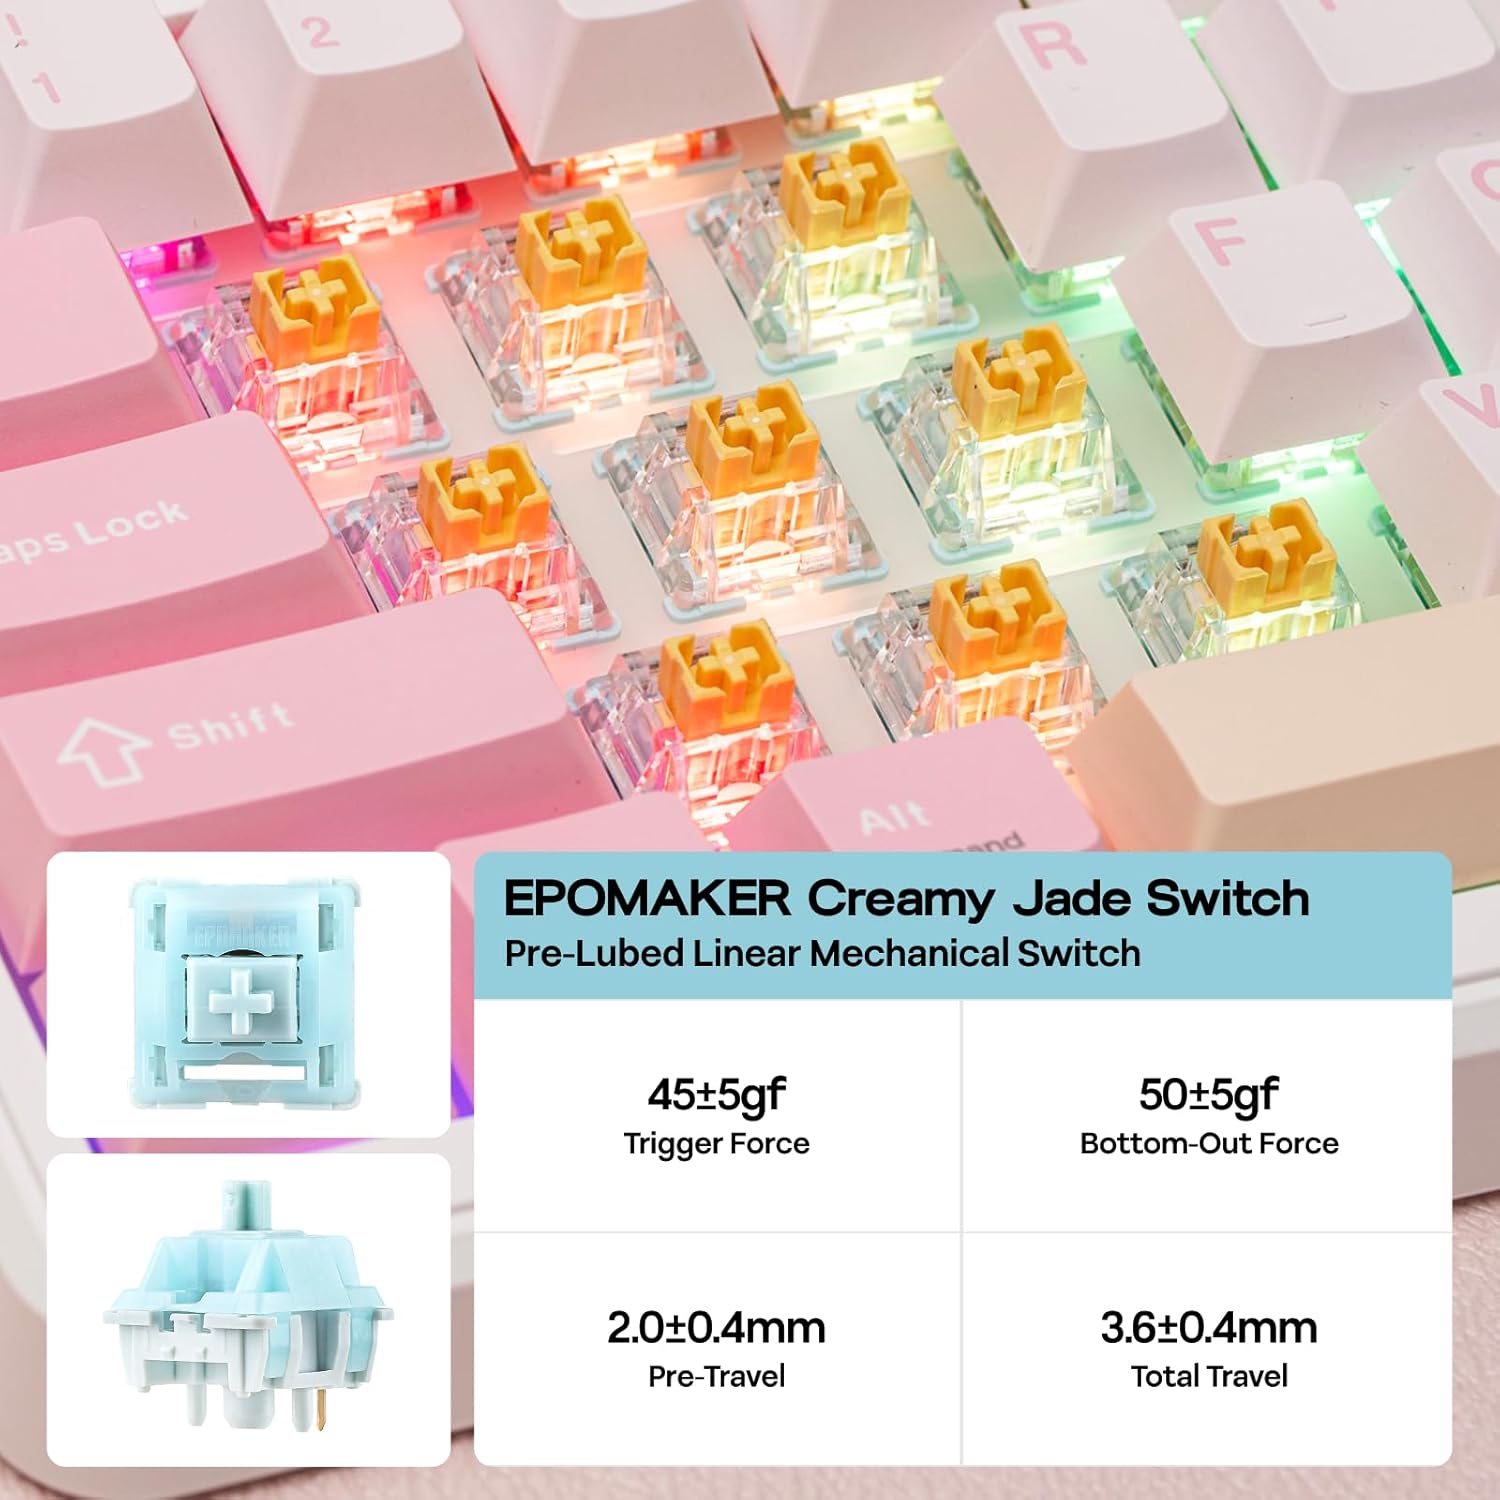
Image: A hand using a switch puller to remove a switch from the hot-swappable PCB of the EPOMAKER TH99 PRO.
5.3 Battery Life
Equipped with a 10,000mAh battery, the TH99 PRO offers extended usage. Expect 150-200 hours with RGB lighting off, and over 40 hours with RGB lighting and screen display active.

Image: Visual representation of the EPOMAKER TH99 PRO's battery life with and without RGB lighting.
5.4 PBT Keycaps
The keyboard comes with premium PBT keycaps, known for their durability and resistance to shine over time, maintaining a fresh appearance.
5.5 Switch Options
The TH99 PRO is available with Creamy Jade or Sea Salt Silent switches, offering distinct typing experiences. Both are pre-lubed for smooth operation.

Image: Specifications for the EPOMAKER Creamy Jade linear mechanical switch.
Video: TH99 Pro Typing with Creamy Jade Switch
Video Description: This video demonstrates the typing sound and feel of the EPOMAKER TH99 PRO keyboard equipped with Creamy Jade switches.
Video: Sea Salt Silent VS CreamyJade Switch Typing
Video Description: This video compares the typing sounds of the EPOMAKER TH99 PRO with both Sea Salt Silent and Creamy Jade switches.
5.6 96% Layout
The 96% layout provides a compact form factor while retaining a full numeric keypad, offering both functionality and desk space efficiency.
5.7 Low-Latency Performance
The keyboard offers low-latency performance across all connectivity modes:
- USB-C Wired: 1000Hz polling rate, 2ms response time.
- 2.4GHz Wireless: 1000Hz polling rate, 5ms response time.
- Bluetooth: 125Hz polling rate, 11ms response time.

Image: Diagram illustrating the low-latency performance across USB-C, 2.4GHz, and Bluetooth connections.
6. Specifications
| Feature | Detail |
|---|---|
| Product Dimensions | 16.14 x 5.71 x 1.85 inches |
| Item Weight | 2.2 pounds |
| Item Model Number | TH99 PRO |
| Battery | 10000mAh (1 D battery included) |
| Connectivity Technology | 2.4Ghz Wireless, BT5.0, USB-C |
| Keyboard Description | Wireless Mechanical Keyboard |
| Keyboard Backlighting | RGB |
| Special Features | Backlit, Ergonomic, Hot-Swappable, Rechargeable, Smart Screen & Metal Knob |
| Compatible Devices | Gaming Console, Laptop, PC, Smartphone, Tablet |
7. Maintenance
7.1 Cleaning
- Regularly clean the keyboard with a soft, dry cloth.
- For deeper cleaning, use the provided keycap puller to remove keycaps and clean dust or debris with compressed air or a small brush.
- Avoid using harsh chemicals or abrasive materials that could damage the keyboard's finish or keycap legends.
7.2 Switch and Keycap Care
- When removing switches, use the switch puller carefully to avoid bending the pins.
- Ensure switches are aligned correctly before pressing them into the hot-swap sockets.
- Store extra switches and keycaps in a safe, dry place.
8. Troubleshooting
8.1 Connectivity Issues
- Keyboard not responding: Ensure the keyboard is charged and the correct connectivity mode (USB, 2.4G, BT) is selected. Try reconnecting the cable or dongle, or re-pairing Bluetooth.
- 2.4GHz connection unstable: Ensure the receiver is plugged into a direct USB port, not a hub, and is close to the keyboard. Avoid interference from other wireless devices.
- Bluetooth pairing failed: Make sure the keyboard is in pairing mode (holding Fn + Q/W/E). Remove previous pairings from your device and try again.
8.2 RGB Lighting Problems
- Lights not working: Check brightness settings via the knob or software. Ensure the keyboard is not in a low-power mode.
- Inconsistent lighting: Update keyboard firmware via the software. If specific keys are affected, check the switch and socket for damage.
8.3 Software Not Detecting Keyboard
- Ensure the keyboard is connected via USB-C. The software requires a wired connection for full functionality and firmware updates.
- Verify your browser allows HID device access if using the online Chrome-based software.
9. Warranty and Support
For warranty information, please refer to the documentation included with your purchase or visit the official EPOMAKER website. If you encounter any issues not covered in this manual, please contact EPOMAKER customer support for assistance.
You can find more information and support resources on the EPOMAKER Store on Amazon.


