
1. Introduction
The Bonseor HT Automatic Digital Multimeter TM-510 is a smart, automatic ranging digital multimeter designed for accurate and efficient electrical measurements. It simplifies testing by automatically identifying measurement types such as AC/DC voltage, resistance, and continuity, eliminating the need for manual mode selection. This device is suitable for various applications, including household electrical checks, automotive diagnostics, and general electronics work.
2. Safety Information
WARNING: Always exercise extreme caution when working with electricity. Failure to follow safety precautions can result in serious injury or death.
- Do not exceed the maximum input values specified for each measurement function.
- Ensure the test leads are in good condition, free from cracks or damage.
- Never use the multimeter if it appears damaged or is not operating correctly.
- Avoid touching exposed wires or circuit components while testing.
- Always disconnect power to the circuit before making resistance or continuity measurements.
- Use appropriate personal protective equipment (PPE), such as safety glasses and insulated gloves.
- Do not operate the multimeter in wet environments or explosive atmospheres.
3. Package Contents
Verify that all items are present in the package:
- 1 x Bonseor HT Automatic Digital Multimeter TM-510
- 1 x Pair of Test Leads (Red and Black)
- 1 x User Manual
4. Product Overview
Familiarize yourself with the components of your digital multimeter:

Figure 4.1: Front and back view of the Bonseor TM-510 Multimeter with labeled components.
- Induction area of NCV: Used for Non-Contact Voltage detection.
- Indicator light: Provides visual feedback during operation, such as NCV detection.
- Display: LCD screen showing measurement values, units, and modes.
- Power key: Turns the device ON/OFF.
- Hold / NCV key: Toggles data hold function or activates NCV mode.
- Backlight / Flashlight key: Activates the display backlight or the integrated flashlight.
- COM socket: Common input terminal for the black test lead.
- Signal input socket: Input terminal for the red test lead for most measurements.
- Battery cover: Located on the back for battery access.
- Protective cover: Silicone cover for enhanced durability and grip.
5. Specifications
| Parameter | Value |
|---|---|
| DC Voltage Range | 0.8V - 600V |
| AC Voltage Range | 0.8V - 600V |
| Resistance Range | 600kΩ |
| Display Counts | 4000 Counts |
| Non-Contact Voltage (NCV) | Yes |
| Data Hold | Yes |
| Backlight | Yes |
| Flashlight | Yes |
| Low Battery Indication | Yes |
| Auto Power-off | Yes |
| Material | ABS |
| Power Supply | 2 x 1.5V AAA Batteries (not included) |
| Item Dimensions (L x W x H) | 122 x 61 x 29 mm (4.81 x 2.40 x 1.14 inches) |
| Minimum Operating Voltage | 0.8 Volts (DC) |
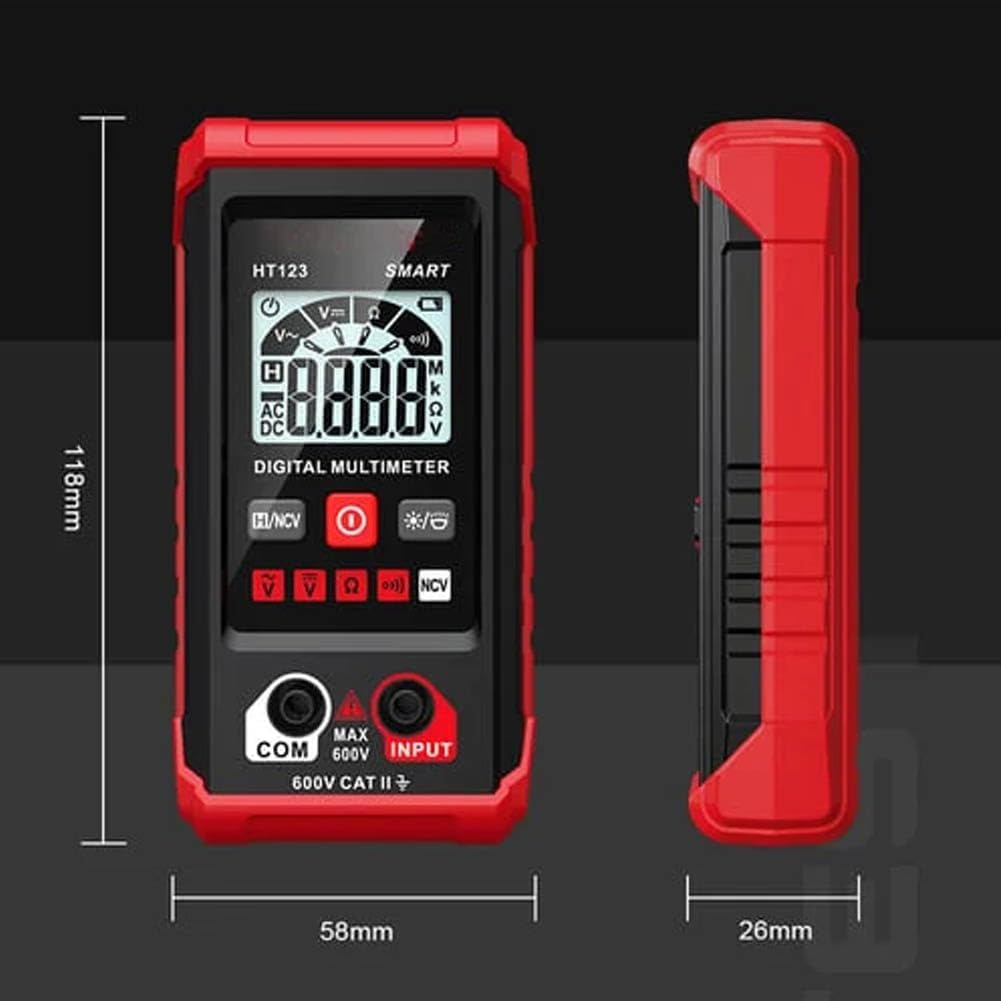
Figure 5.1: Physical dimensions of the multimeter.
6. Setup
6.1 Battery Installation
- Ensure the multimeter is powered off.
- Carefully remove the protective rubber sleeve from the back of the multimeter.
- Locate and open the battery compartment cover on the back of the device.
- Insert two (2) 1.5V AAA batteries, observing the correct polarity markings (+ and -).
- Replace the battery compartment cover and reattach the rubber sleeve.
7. Operating Instructions
7.1 General Operation (Automatic Mode)
- Press the Power key to turn on the multimeter.
- Insert the black test lead into the COM socket and the red test lead into the Signal input socket.
- Briefly touch the tips of the test leads together for self-calibration.
- The multimeter will automatically detect the type of measurement (AC/DC voltage, resistance, or continuity) when the test leads are connected to the circuit or component.
7.2 AC/DC Voltage Measurement
To measure AC or DC voltage:
- Ensure the multimeter is ON and test leads are correctly inserted.
- Connect the test leads across the component or circuit where you want to measure voltage. The multimeter will automatically display the voltage type (AC or DC) and value.

Figure 7.1: Measuring household AC voltage. The display shows 220.3V.
7.3 Resistance Measurement
To measure resistance:
- Ensure the circuit or component is de-energized before measuring resistance.
- Connect the test leads across the component. The multimeter will automatically display the resistance value in Ohms (Ω).
7.4 Continuity Measurement
To check for continuity:
- Ensure the circuit or component is de-energized.
- Connect the test leads across the points you wish to test. If continuity exists (resistance below 50 Ohms), the multimeter will emit an audible beep and the green indicator light will turn on.

Figure 7.2: Performing a continuity test. An audible alarm and green light indicate continuity.
7.5 Non-Contact Voltage (NCV) Function
The NCV function allows for safe detection of AC voltage without direct contact:
- Press the Hold / NCV key to activate NCV mode. The display may show 'NCV'.
- Move the top part of the multimeter (NCV induction area) near an AC power source or live wire.
- If AC voltage is detected, the multimeter will emit an audible alarm and the indicator light will flash.

Figure 7.3: Using the NCV function to detect live AC voltage.
7.6 Data Hold
To freeze the current reading on the display:
- During a measurement, press the Hold / NCV key briefly. The reading will be held on the display.
- Press the key again to release the hold and resume live measurements.
7.7 Backlight and Flashlight
For improved visibility in low-light conditions:
- Press the Backlight / Flashlight key briefly to turn on the display backlight. Press again to turn it off.
- Press and hold the Backlight / Flashlight key to activate the integrated LED flashlight. Release to turn it off.

Figure 7.4: The multimeter features a clear, backlit LCD screen and an LED flashlight for dark environments.
8. Maintenance
8.1 Cleaning
- Wipe the multimeter casing with a damp cloth and mild detergent. Do not use abrasive cleaners or solvents.
- Ensure the device is completely dry before storage or next use.
8.2 Battery Replacement
Replace batteries when the low battery indicator appears on the display. Refer to Section 6.1 for battery installation instructions.
8.3 Storage
- If the multimeter will not be used for an extended period, remove the batteries to prevent leakage.
- Store the device in a cool, dry place, away from direct sunlight and extreme temperatures.
9. Troubleshooting
| Problem | Possible Cause | Solution |
|---|---|---|
| Multimeter does not power on. | Dead or incorrectly installed batteries. | Check battery polarity; replace batteries if necessary. |
| Inaccurate readings. | Damaged test leads; incorrect connection; exceeding measurement range. | Inspect test leads; ensure proper connection; verify measurement is within specified range. |
| No NCV detection. | NCV function not activated; weak signal. | Ensure NCV mode is active; move closer to the AC source. |
10. Warranty Information
This product is covered by a manufacturer's warranty. For specific details regarding warranty terms, duration, and claims, please refer to the warranty card included with your purchase or contact the seller directly. Keep your proof of purchase for warranty service.
11. Support Information
For technical assistance, product inquiries, or support, please contact your retailer or the manufacturer. Refer to the product packaging or the seller's information for contact details.