
1. Introduction
Thank you for choosing the MZK 20V 13-inch Cordless Electric Lawn Mower. This manual provides essential information for the safe assembly, operation, and maintenance of your new lawn mower. Please read it thoroughly before use and keep it for future reference. This mower is designed for residential lawn care, offering a powerful brushless motor, adjustable cutting heights, and a convenient grass collection system.

Figure 1: MZK 20V 13-inch Cordless Electric Lawn Mower. This image shows the complete lawn mower from a slight angle, highlighting its red and black design and the grass collection bag.
2. Important Safety Information
Always follow basic safety precautions to reduce the risk of fire, electric shock, and personal injury. Read all instructions before using this appliance.
- Wear appropriate personal protective equipment (PPE) including eye protection, hearing protection, and sturdy footwear.
- Keep children and bystanders away from the operating area.
- Do not operate the mower in wet conditions or rain.
- Inspect the area to be mowed and remove any objects that could be thrown by the blade.
- Ensure all guards and safety devices are in place and functioning correctly before operation.
- Never place hands or feet near rotating parts.
- Disconnect the battery pack before cleaning, servicing, or when the mower is not in use.
- Use only MZK approved battery packs and chargers.
3. Package Contents
Verify that all items listed below are included in your package:
- MZK 20V 13-inch Cordless Electric Lawn Mower unit
- Handle assembly (upper and lower sections)
- Grass collection bag
- 2 x 4.0Ah Lithium-ion Batteries
- Battery Charger
- Instruction Manual
- Assembly hardware (knobs, bolts, cable clips)
4. Setup
4.1 Handle Assembly
- Attach the lower handle section to the mower base using the provided bolts and knobs. Ensure they are securely tightened.
- Connect the upper handle section to the lower handle section, securing it with the remaining bolts and knobs.
- Route the power cable along the handle and secure it with the cable clips to prevent snagging.
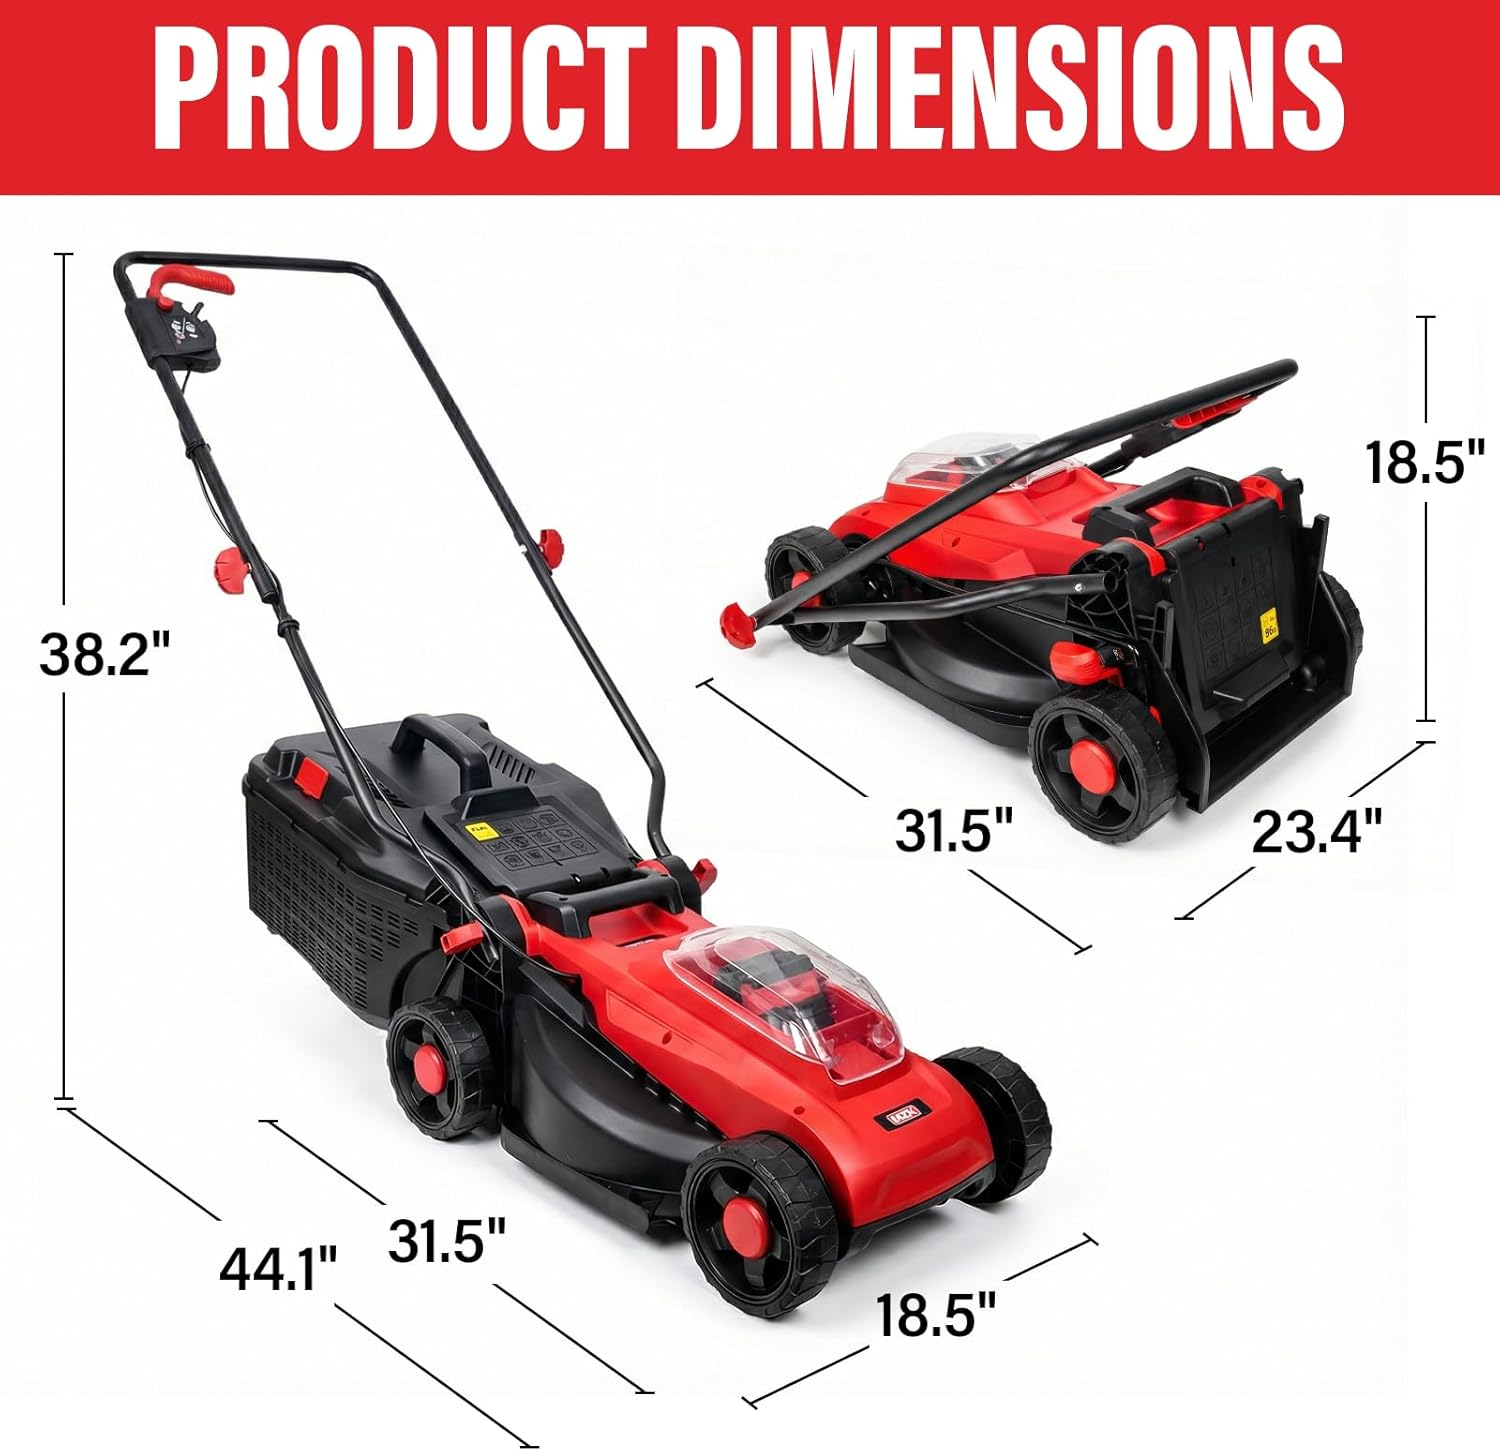
Figure 2: Product dimensions of the MZK lawn mower, showing its height, width, and length in both operating and folded positions. This illustrates the compact design for storage.
4.2 Grass Collection Bag Assembly
Assemble the grass collection bag by attaching the fabric bag to the frame. Lift the rear discharge flap on the mower and hook the grass bag onto the mower chassis.

Figure 3: A hand holding the 8-gallon grass collection bag, full of cut grass, next to the lawn mower. This demonstrates the bag's capacity and ease of removal.
4.3 Battery Installation and Charging
- Before first use, fully charge both 4.0Ah Lithium-ion batteries using the provided charger. Insert the battery into the charger until it clicks. The indicator light will show charging status.
- Once charged, open the battery compartment cover on the mower.
- Insert both charged batteries into their respective slots until they click into place. Ensure they are seated firmly.
- Close the battery compartment cover.
4.4 Adjusting Cutting Height
The mower features 4 adjustable cutting heights, ranging from 1.2 inches (33mm) to 2.56 inches (65mm). To adjust the cutting height:
- Ensure the mower is turned off and the batteries are removed for safety.
- Locate the height adjustment levers on each wheel.
- Pull the lever outwards and move it to the desired height setting. Ensure all four wheels are set to the same height.

Figure 4: Close-up view of the mower's wheel and the height adjustment lever, showing the four distinct cutting height settings (33mm, 42mm, 52mm, 65mm).
5. Operating Instructions
5.1 Starting the Mower (2-Step Easy Start)
- Ensure the batteries are fully charged and correctly installed.
- Press and hold the safety button located on the handle.
- While holding the safety button, pull the bail switch lever towards the handle. The motor will start.
- Release the safety button once the motor is running.

Figure 5: A close-up of a hand demonstrating the 2-step easy start mechanism on the mower handle, showing the safety button and bail switch.
5.2 Stopping the Mower
Release the bail switch lever to stop the motor. The blade will cease rotation within a few seconds.
5.3 Mowing Techniques
- For best results, mow dry grass.
- Overlap cutting swaths slightly to ensure an even cut.
- Avoid overloading the motor by cutting excessively long or wet grass. Adjust cutting height if necessary.
- The 13-inch cutting blade is ideal for small to medium-sized lawns.

Figure 6: A view of the mower from behind, showing the 13-inch cutting blade in action on a lawn, emphasizing its cutting width.
5.4 Emptying the Grass Bag
When the grass bag is full, the mower's performance may decrease. Turn off the mower, remove the batteries, lift the rear discharge flap, and detach the grass bag to empty its contents. Reattach securely before resuming operation.
6. Maintenance
Regular maintenance ensures optimal performance and extends the life of your lawn mower.
6.1 Cleaning
- Always remove batteries before cleaning.
- Clean the mower deck and blade area after each use to prevent grass buildup. Use a brush or cloth; do not use water directly on electrical components.
- Wipe down the exterior with a damp cloth.
6.2 Blade Care
- Periodically inspect the blade for sharpness and damage. A dull blade can tear grass, leading to an unhealthy lawn.
- If the blade is damaged or excessively dull, it should be replaced by a qualified service technician.
6.3 Storage
Store the mower in a dry, secure location, out of reach of children. The handle can be folded for compact storage.

Figure 7: A person carrying the MZK lawn mower in its compact, folded state, demonstrating its ease of transport and space-saving storage.
7. Troubleshooting
| Problem | Possible Cause | Solution |
|---|---|---|
| Mower does not start | Batteries not installed correctly or discharged. Safety button/bail switch not engaged. | Ensure batteries are fully charged and properly inserted. Engage safety button then pull bail switch. |
| Mower stops during operation | Overload protection activated. Batteries discharged. | Reduce load by raising cutting height or mowing smaller sections. Recharge/replace batteries. |
| Uneven cut | Blade dull or damaged. Cutting height set unevenly. | Inspect and replace blade if necessary. Ensure all wheels are set to the same cutting height. |
| Excessive vibration | Damaged or unbalanced blade. Loose components. | Inspect blade for damage; replace if bent or broken. Check all fasteners for tightness. |
8. Specifications
| Feature | Detail |
|---|---|
| Brand | MZK |
| Model Number | ET2601 |
| Power Source | Battery Powered (2 x 20V 4.0Ah Lithium-ion) |
| Motor Type | Brushless Motor |
| Cutting Width | 13 inches |
| Cutting Heights | 4 positions (1.2" to 2.56" / 33mm to 65mm) |
| Grass Bag Capacity | 8 Gallons (30 Liters) |
| Item Weight | 16.5 pounds |
| Product Dimensions | 30"D x 40"W x 15"H (Operating) |
| Battery Life (Runtime) | Up to 30 minutes (per charge, with dual batteries) |

Figure 8: An internal view of the mower highlighting the high-performance 3400 RPM brushless motor, indicating its power and efficiency.
9. Warranty and Support
MZK products are manufactured to high-quality standards. For warranty information, technical support, or to order replacement parts, please refer to the contact information provided with your purchase documentation or visit the official MZK website. Keep your proof of purchase for warranty claims.