1. Introduction
This manual provides essential information for the safe operation, assembly, and maintenance of your VEVOR 10-Inch Two-Speed Benchtop Band Saw HBS250. Please read and understand all instructions before operating the machine to ensure personal safety and optimal performance.

Figure 1: VEVOR 10-Inch Two-Speed Benchtop Band Saw HBS250 with Stand
2. Safety Information
WARNING: Always follow basic safety precautions to reduce the risk of fire, electric shock, and serious personal injury.
- Wear Eye Protection: Always wear safety goggles or safety glasses with side shields.
- Wear Hearing Protection: Use earplugs or earmuffs during operation.
- Keep Work Area Clean: Cluttered areas invite accidents.
- Avoid Dangerous Environment: Do not use power tools in damp or wet locations, or expose them to rain.
- Keep Children Away: All visitors should be kept a safe distance from the work area.
- Secure Workpiece: Always use clamps or a vise to hold the workpiece.
- Maintain Tools With Care: Keep cutting tools sharp and clean for better and safer performance.
- Disconnect Power: Always disconnect the power plug from the power source before making any adjustments, changing accessories, or storing the tool.
- Use Correct Tool: Do not force small tools or attachments to do the job of a heavy-duty tool.
- Check for Damaged Parts: Before using any tool, any part that is damaged should be carefully checked to determine that it will operate properly and perform its intended function.
3. Product Overview and Components
Familiarize yourself with the various parts of your VEVOR Band Saw for proper operation and maintenance.
3.1 Key Features
- Two-Speed Operation: Allows for efficient cutting of various materials.
- Tilting Cast Iron Table: Provides stability and allows for angled cuts.
- 360° LED Work Light: Illuminates the cutting area for improved visibility.
- Adjustable Fence and Miter Gauge: Enhances cutting precision.
3.2 Components
The VEVOR HBS250 Band Saw includes the following main components:
- Band Saw Unit
- Stand
- Miter Gauge
- Fence
- Work Light
- Blade (pre-installed or included separately)
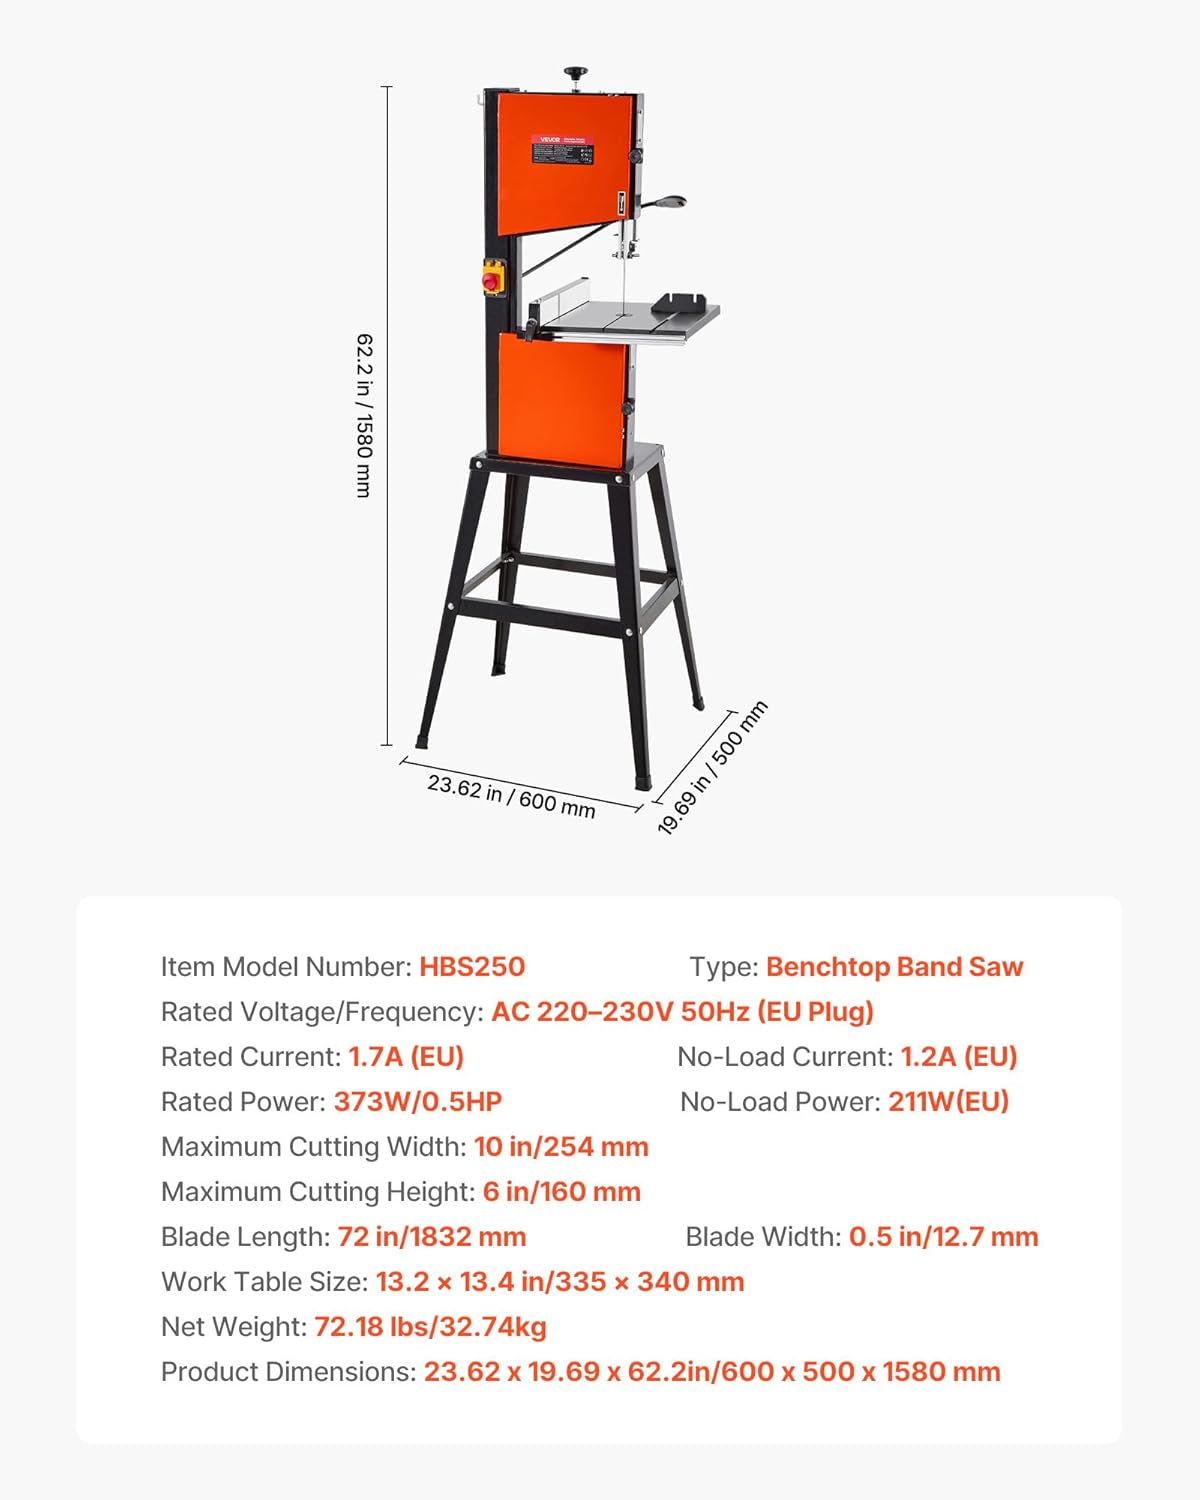
Figure 2: VEVOR Band Saw HBS250 Dimensions
4. Setup
4.1 Stand Assembly
Assemble the stand according to the included hardware and instructions. Ensure all bolts are securely tightened for stability.
4.2 Band Saw Unit Installation
Carefully mount the band saw unit onto the assembled stand. Secure it using the provided fasteners. Verify that the unit is stable and level.
4.3 Blade Installation/Adjustment
- Ensure the power is disconnected.
- Open the blade covers.
- Carefully place the blade around the wheels, ensuring the teeth are pointing downwards towards the table.
- Adjust the blade tension using the tension knob until the blade is taut but not overly stressed.
- Adjust the blade guides to ensure the blade runs smoothly and is properly supported.
- Close the blade covers securely.
4.4 Miter Gauge and Fence Installation
Insert the miter gauge into the slot on the table. Position the fence as needed for straight cuts and secure it in place.

Figure 3: Miter Gauge and Fence on Cast Iron Table
5. Operating Instructions
5.1 Power On/Off
Connect the power cord to a suitable electrical outlet. The machine is equipped with a main power switch and an emergency stop button. Press the main power switch to turn on the machine. In case of emergency, press the emergency stop button to immediately cut power.
5.2 Speed Adjustment
The VEVOR HBS250 features two speeds for optimal cutting performance:
- Low Speed: Ideal for cutting harder materials.
- High Speed: Suitable for softer materials.
Refer to the speed selection guide on the machine or in the specifications section for recommended speeds based on material type.

Figure 4: Two-Speed Operation for Different Materials
5.3 Cutting Operations
The band saw can perform various cuts:
- Straight Cuts: Use the fence to guide the workpiece for precise straight cuts.
- Curved Cuts: Guide the workpiece freehand for curved shapes.
- Bevel Cuts: Adjust the table tilt for angled cuts. The table can tilt 5° left and 45° right.

Figure 5: Tilting Table for Multi-Angle Cuts
5.4 Work Light Usage
Activate the integrated 360° LED work light to illuminate the cutting area, reducing shadows and improving visibility for accurate cuts.

Figure 6: 360° LED Work Light in Operation
6. Maintenance
Regular maintenance ensures the longevity and safe operation of your band saw.
- Blade Replacement: Replace dull or damaged blades promptly. Follow the blade installation steps in Section 4.3.
- Cleaning: Regularly clean sawdust and debris from the machine, especially around the blade, guides, and motor vents. Use compressed air or a brush.
- Lubrication: Periodically lubricate moving parts as indicated in the detailed product manual (if applicable).
- Inspection: Before each use, inspect the power cord, blade, and all moving parts for any signs of wear or damage.
7. Troubleshooting
This section addresses common issues you might encounter with your band saw.
- Machine Does Not Start:
- Check if the power cord is securely plugged in.
- Ensure the main power switch is ON.
- Verify that the emergency stop button is not engaged.
- Check the circuit breaker or fuse.
- Blade Drifts or Cuts Unevenly:
- Check blade tension; it might be too loose.
- Inspect blade guides for proper alignment and wear.
- Ensure the blade is sharp and free of damage.
- Verify the fence is securely locked and parallel to the blade.
- Excessive Vibration or Noise:
- Check blade tension and ensure it is correctly installed.
- Inspect blade for damage or bent teeth.
- Ensure all mounting bolts for the saw and stand are tight.
If the issue persists after troubleshooting, contact VEVOR customer support.
8. Specifications
| Feature | Specification |
|---|---|
| Item Model Number | HBS250 |
| Type | Benchtop Band Saw |
| Rated Power | 373W / 0.5HP |
| Maximum Cutting Width | 10 in / 254 mm |
| Maximum Cutting Height | 6 in / 160 mm |
| Blade Length | 72 in / 1832 mm |
| Blade Width | 0.5 in / 12.7 mm |
| Work Table Size | 13.2 x 13.4 in / 335 x 340 mm |
| Net Weight | 72.18 lbs / 32.74 kg |
| Product Dimensions | 23.62 x 19.69 x 62.2 in / 600 x 500 x 1580 mm |
| Power Source | Corded Electric |
| Blade Material | Metal |
9. Warranty and Support
VEVOR products are designed for durability and performance. For warranty information or technical support, please refer to the official VEVOR website or contact their customer service directly. Keep your purchase receipt as proof of purchase for any warranty claims.
Customer Support: For assistance, please visit the VEVOR Store on Amazon or the official VEVOR website.


