1. Product Overview
The YESWELDER LYG-Q800D-FS Auto Darkening Welding Helmet is designed to provide advanced eye protection and enhanced visibility for various welding applications. Featuring a panoramic view, true color technology, and multiple process modes, this helmet ensures comfort, durability, and safety for professional and hobbyist welders.
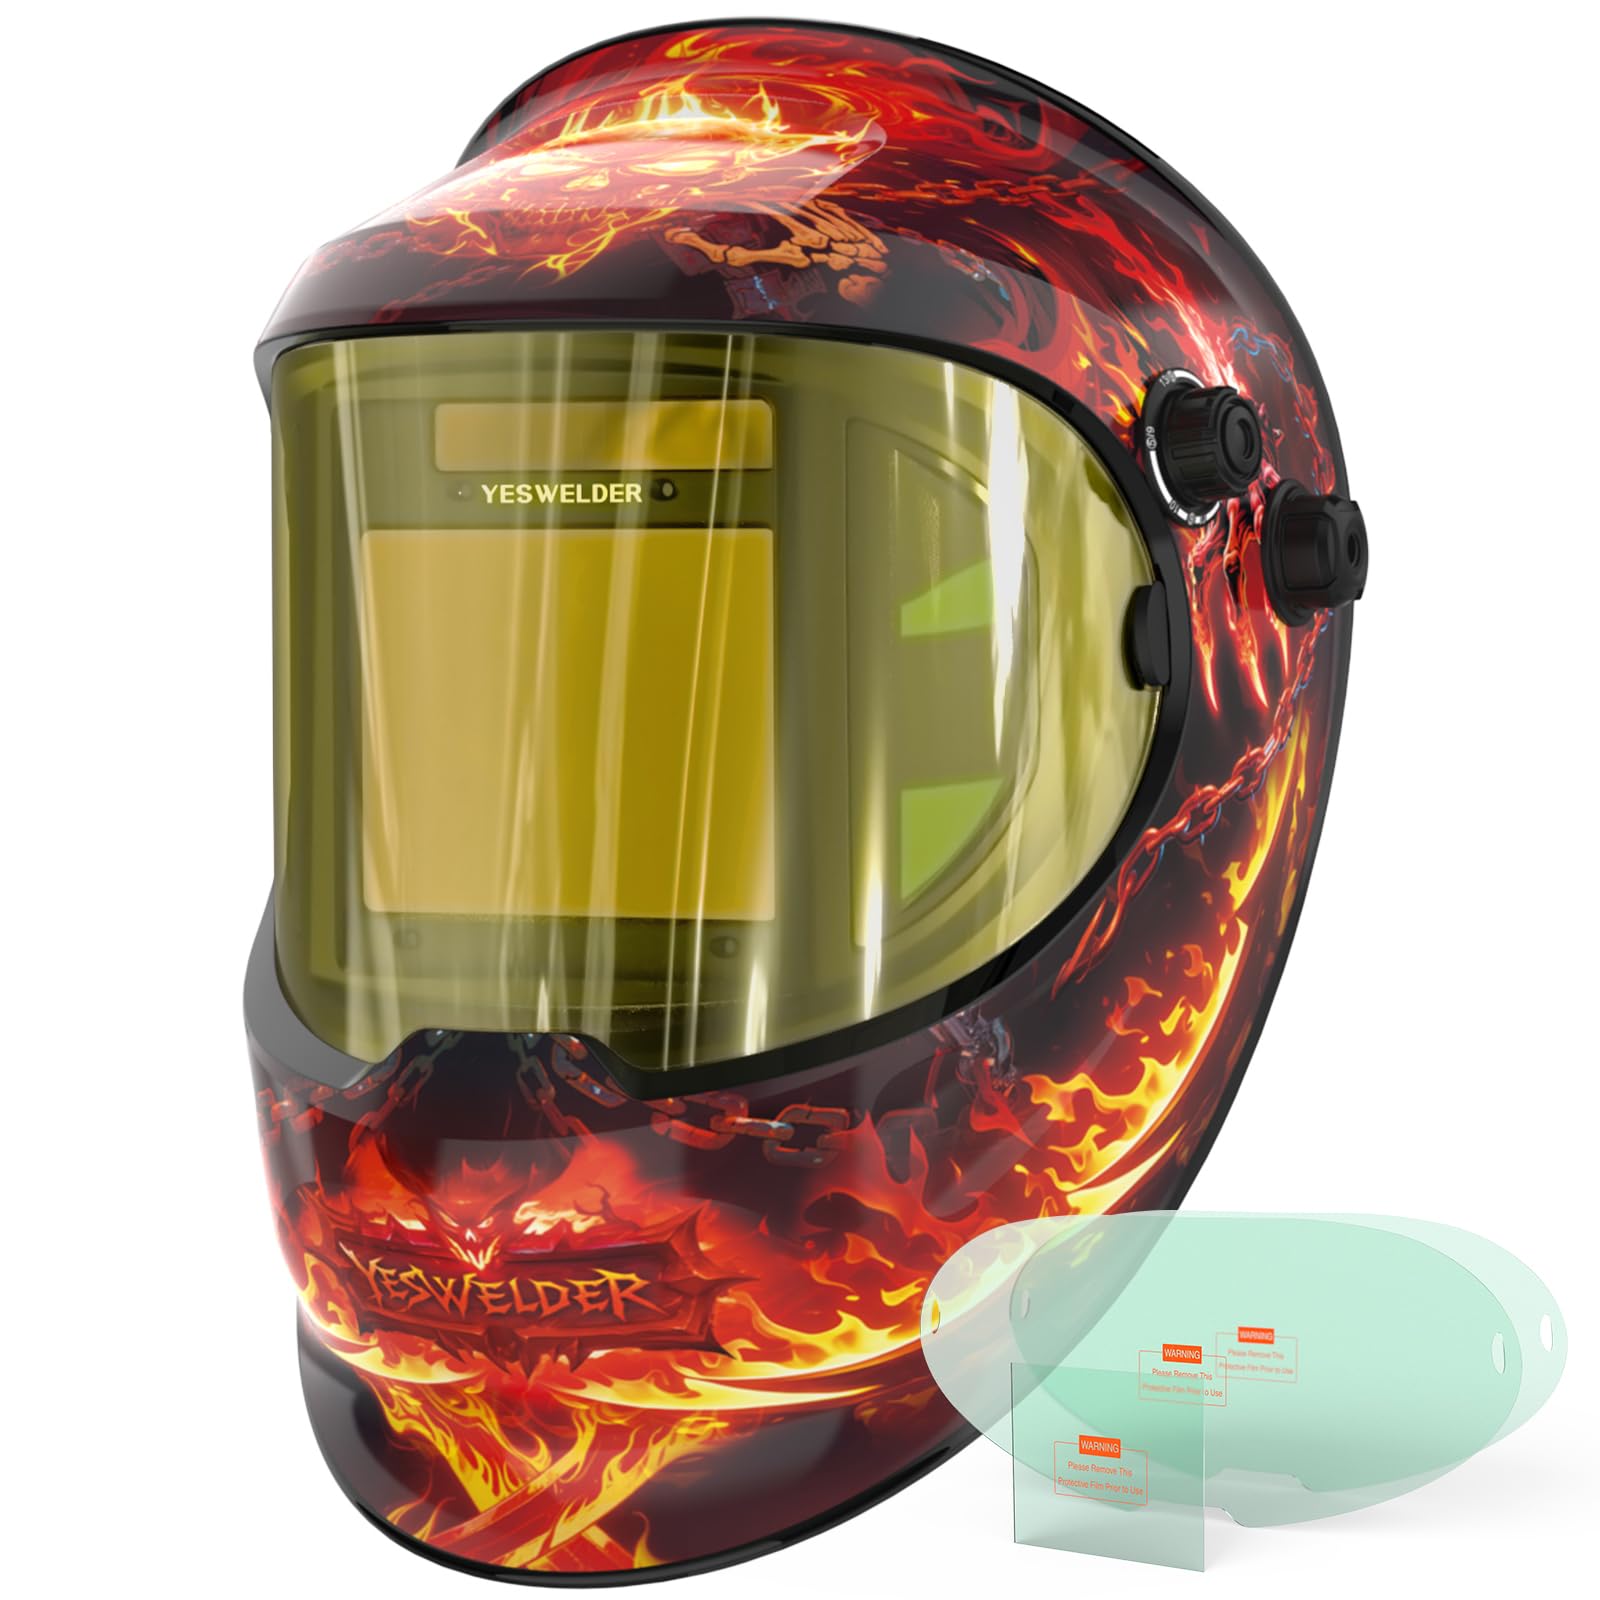
Figure 1: YESWELDER Auto Darkening Welding Helmet LYG-Q800D-FS, showcasing its sleek design and large viewing area.
Key Features:
- Advanced Eye Protection: Features a Blue Light Blocking outer lens to shield eyes from harmful blue light, ensuring long-lasting comfort and safety during extended welding sessions.
- Panoramic Large View: Equipped with a 3.94" x 3.23" main viewing area and side views (DIN5, non-auto-darkening) for a 180° panoramic field of vision, featuring 1/1/1/1 optical clarity and True Color technology.
- Multi-Process Capability: Offers a versatile Shade Range (3/5-9/9-13) suitable for Professional Welding (TIG, MIG, MMA), CUT, and GRIND modes. Compatible with magnifying lenses for detailed work.
- Fast Auto-Darkening: Utilizes 4 Arc Sensors for reliable arc detection, ultra-fast switching (1/30000 sec), and adjustable Sensitivity and Delay controls.
- Comfort & Durability: Designed with pivot-style headgear for superior comfort, a secure fit, and balanced weight. Constructed from reinforced PP Materials with a thicker design for exceptional durability.
- Long Service Life: Powered by solar panel technology and a replaceable CR2450 lithium battery, promoting energy conservation.
Video 1: Official YESWELDER overview of the Panoramic View Welding Helmet, highlighting its key features and design.
2. Safety Information
Always prioritize safety when welding. This helmet provides essential protection, but it must be used correctly and in conjunction with other safety measures.
- Eye Protection: The auto-darkening filter protects against harmful UV/IR radiation even in the light state. However, always ensure the helmet is functioning correctly before welding.
- Head Protection: The helmet shell provides protection against sparks, spatter, and impact.
- Ventilation: Ensure adequate ventilation in your work area to avoid inhaling hazardous fumes.
- Proper Attire: Wear appropriate welding gloves, protective clothing, and safety footwear.
- Inspection: Regularly inspect the helmet for any damage, cracks, or loose parts. Replace damaged components immediately.
- Temperature: Do not use the helmet outside its specified operating temperature range.

Figure 2: The passive UV/IR filter provides continuous protection against harmful radiation, even without power.

Figure 3: Blue light blocking technology filters harmful high-energy blue light rays, reducing eye fatigue.
3. Setup
3.1 Headgear Adjustment
Adjust the headgear for a comfortable and secure fit. The pivot-style headgear allows for extensive adjustments to suit various head sizes and preferences.
- Size Adjustment: Use the headband's adjustable top strap to fit different heads for comfort.
- Tightness Adjustment: Rotate the knob at the back of the headgear to adjust tightness and prevent falling off.
- Angle Adjustment: Adjust the helmet's angle to any desired position.
- Distance Adjustment: Adjust the welding helmet's distance from your face for optimal observation.

Figure 4: Various adjustment points on the headgear for a customized and comfortable fit.
3.2 Protective Film Removal
Before first use, remove the protective films from both sides of the inner and outer lenses. Be careful not to scratch the lenses during removal.
3.3 Battery Installation
The helmet is powered by a solar panel and a replaceable CR2450 lithium battery. Ensure the battery is correctly installed for optimal performance.
- Locate the battery holder on the auto-darkening filter cartridge.
- Insert the CR2450 battery with the correct polarity (+/-).
- The solar panel continuously charges the battery during use, extending its life.
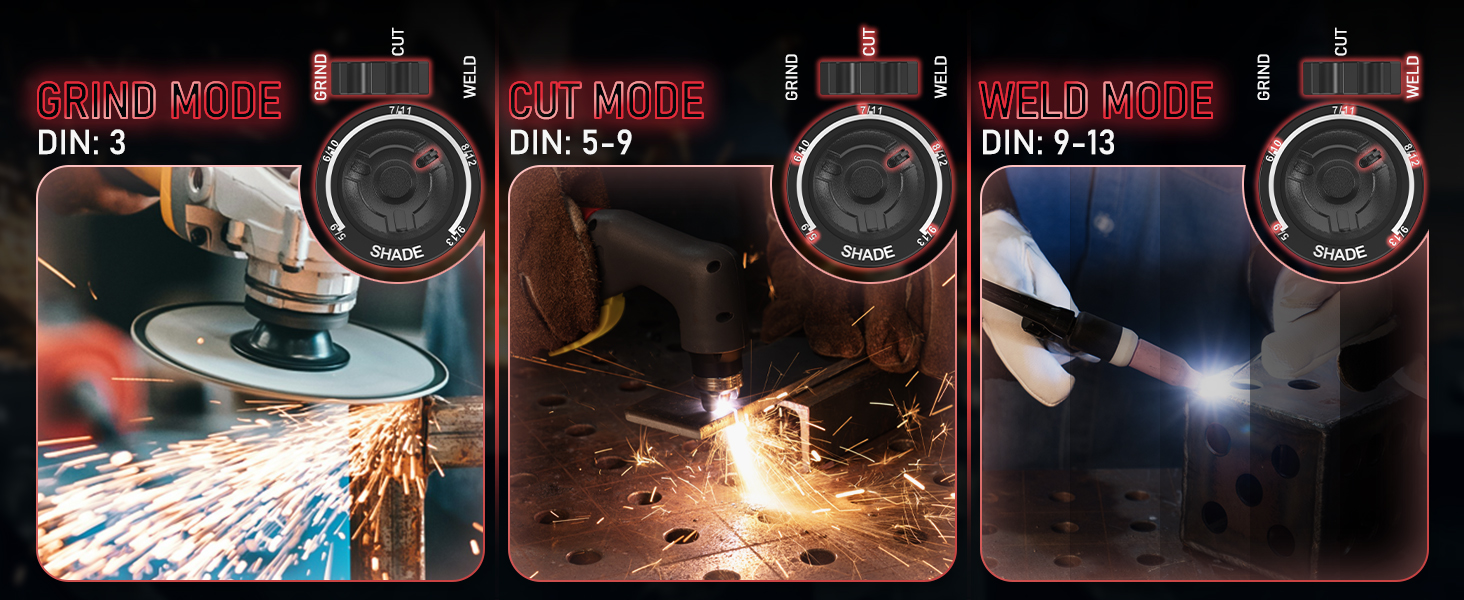
Figure 5: The auto-darkening lens unit showing the battery holder and solar panel for dual power sources.
4. Operating Instructions
4.1 Mode Selection
Select the appropriate mode for your task using the slide knob on the auto-darkening filter cartridge:
- WELD Mode: For TIG, MIG, and MMA welding.
- CUT Mode: For plasma cutting.
- GRIND Mode: For grinding operations (filter remains in light state DIN 3).

Figure 6: Visual representation of Grind, Cut, and Weld modes with their respective DIN shade ranges.
4.2 Shade, Sensitivity, and Delay Adjustment
Adjust these settings to match your welding process and personal preference:
- Shade Control: Adjust the shade level from 4/5-9/9-13 using the external knob.
- Sensitivity Control: Adjust how sensitive the sensors are to the welding arc. Higher sensitivity is useful for low amperage TIG welding.
- Delay Control: Adjust the time the filter stays dark after the arc stops. A longer delay is useful for high amperage welding to prevent eye fatigue.
Figure 7: Close-up of the auto-darkening filter showing the Test button, Low Battery Indicator, Mode Slide Knob, Sensitivity Control, and Delay Control.
4.3 True Color Technology
The 1/1/1/1 True Color technology enhances clarity by 15% and reduces the traditional lime green tint, providing a more natural view of your work area.

Figure 8: Comparison illustrating the enhanced clarity and reduced green tint provided by True Color lens technology.
4.4 Magnifying Lens Compatibility
The helmet is compatible with magnifying lenses, which are ideal for welders with near-sightedness. Magnifying lenses are not included with the helmet.

Figure 9: The auto-darkening filter is designed to accommodate magnifying lenses for improved visibility during intricate work.
5. Maintenance
5.1 Cleaning
- Clean the helmet shell with mild soap and water. Avoid harsh solvents.
- Clean the inner and outer protective lenses with a soft, clean cloth. Do not use abrasive cleaners.
- Regularly clean the auto-darkening filter surface with a soft cloth to ensure optimal performance.
5.2 Lens Replacement
Replace the outer and inner protective lenses when they become scratched, pitted, or too dirty to clean effectively. The helmet comes with replacement lenses.
5.3 Battery Replacement
If the low battery indicator illuminates, replace the CR2450 lithium battery. The solar panel helps prolong battery life, but eventual replacement is necessary.
6. Troubleshooting
- Helmet not darkening: Check battery level, ensure sensors are clean and unobstructed, adjust sensitivity.
- Poor visibility: Clean lenses, replace scratched lenses, adjust shade level.
- Helmet feels loose: Adjust headgear tightness and distance settings.
7. Specifications

Figure 10: Overview of key specifications and included items.
| Feature | Detail |
|---|---|
| Manufacturer | YESWELDER |
| Item Model Number | LYG-Q800D-FS |
| Item Weight | 2.6 pounds |
| Package Dimensions | 13.5 x 10 x 8 inches |
| Power Source | Battery Powered (Solar Panel + CR2450 Lithium Battery) |
| Battery Cell Type | Lithium Ion |
| Viewing Size | 3.94" x 3.23" (Main View) |
| True Color View | 1-1-1-1 Optical Clarity |
| Operating Temperature | 14°F ~ 131°F (-10°C ~ +55°C) |
| Switching Time | 1/30000s |
| Standard Compliance | ANSI Z87.1 / EN379 CE / CSA Z94.3 |
| Included Components | 1 x Welding Helmet |
8. Warranty & Support
For warranty information, product support, or to purchase replacement parts, please refer to the official YESWELDER website or contact their customer service directly. Keep your purchase receipt for warranty claims.
Contact Information: Please visit the YESWELDER Store on Amazon or their official website for the most up-to-date support details.


