
1. Introduction
The Enbrighten 800 Series Z-Wave On/Off Toggle Switch is designed to provide smart control over your lights, fans, and other fixtures. This in-wall smart switch integrates with compatible Z-Wave hubs, offering both local and remote operation. Featuring Z-Wave Plus Long Range technology, it ensures extended wireless coverage and enhanced security for your smart home system. This manual provides detailed instructions for installation, operation, and troubleshooting to ensure optimal performance of your device.
2. Safety Information
WARNING: RISK OF ELECTRIC SHOCK. This product requires installation involving 120V wiring. Improper installation can result in serious injury or death. Always turn off power at the circuit breaker or fuse box before installation. Consult a qualified electrician if you are unsure about any part of the installation process.
- DO NOT use this switch to control a receptacle.
- DO NOT use this switch to control a motor-driven appliance.
- DO NOT use this switch with a load exceeding 960W incandescent, 1800W (15A) resistive, or 1/2 HP motor.
- Install in a standard indoor wall box only.
- Ensure all wire connections are secure and properly insulated.
- This device is intended for installation in accordance with the National Electric Code and local regulations.
3. Product Overview
The Enbrighten 800 Series Z-Wave On/Off Toggle Switch offers advanced features for smart home integration and ease of installation.
Key Features:
- Z-Wave Plus Long Range (800LR): Provides extended wireless range up to 1,300ft (400m) from the controller, ideal for larger homes or commercial spaces.
- QuickFit Design: Features a 20% reduced housing depth and no break-off tabs, allowing for easier installation in crowded electrical boxes.
- SimpleWire Technology: Patented auto-detect line/load terminals eliminate wiring guesswork, simplifying the installation process. Includes dual, offset ground ports and markings for precise wire stripping.
- Multi-Switch Capable: Supports single-pole or multi-switch configurations with up to four compatible add-on switches, or one standard 3-way switch for ON/OFF control.
- Voice Control Compatibility: Works with Amazon Alexa and Google Assistant when paired with a compatible Z-Wave certified hub (e.g., SmartThings, Ring Alarm, Wink, ADT Pulse, ADT Command, Trane, Vivint, Nexia, Honeywell, HomeSeer, Ezlo).
- Customizable Toggle Guide Light: The white toggle switch illuminates with eight color options and four operation modes, serving as a personalized LED indicator.
- SmartStart and S2 Security: Supports SmartStart for easy pairing via QR code and S2 security for enhanced 128-bit protection against unauthorized access.
Component Identification:

Image: Switch Components
This image illustrates the key components of the Enbrighten Z-Wave Toggle Switch:
1. Air Gap Switch: Used to remove power to the connected load or reset the switch.
2. LED Indicator: Offers four operation options and eight color choices for customization.
3. Mode Button: Allows local changes to features not supported by the hub.
4. SmartStart: Features a QR code and Device Specific Key (DSK) for easy and secure pairing.
5. S2 Security: Provides industry-standard, 128-bit security to protect against unauthorized access.
4. Installation
Before beginning installation, ensure the power is turned OFF at the circuit breaker for the switch location. A neutral wire is required for this switch to function.
4.1 Wiring Requirements
- Neutral Wire: Required for operation.
- Wire Gauge: Use 14 AWG or 12 AWG copper wire suitable for at least 90°C.
- Load Compatibility: Compatible with LED, CFL, incandescent, and halogen bulbs.
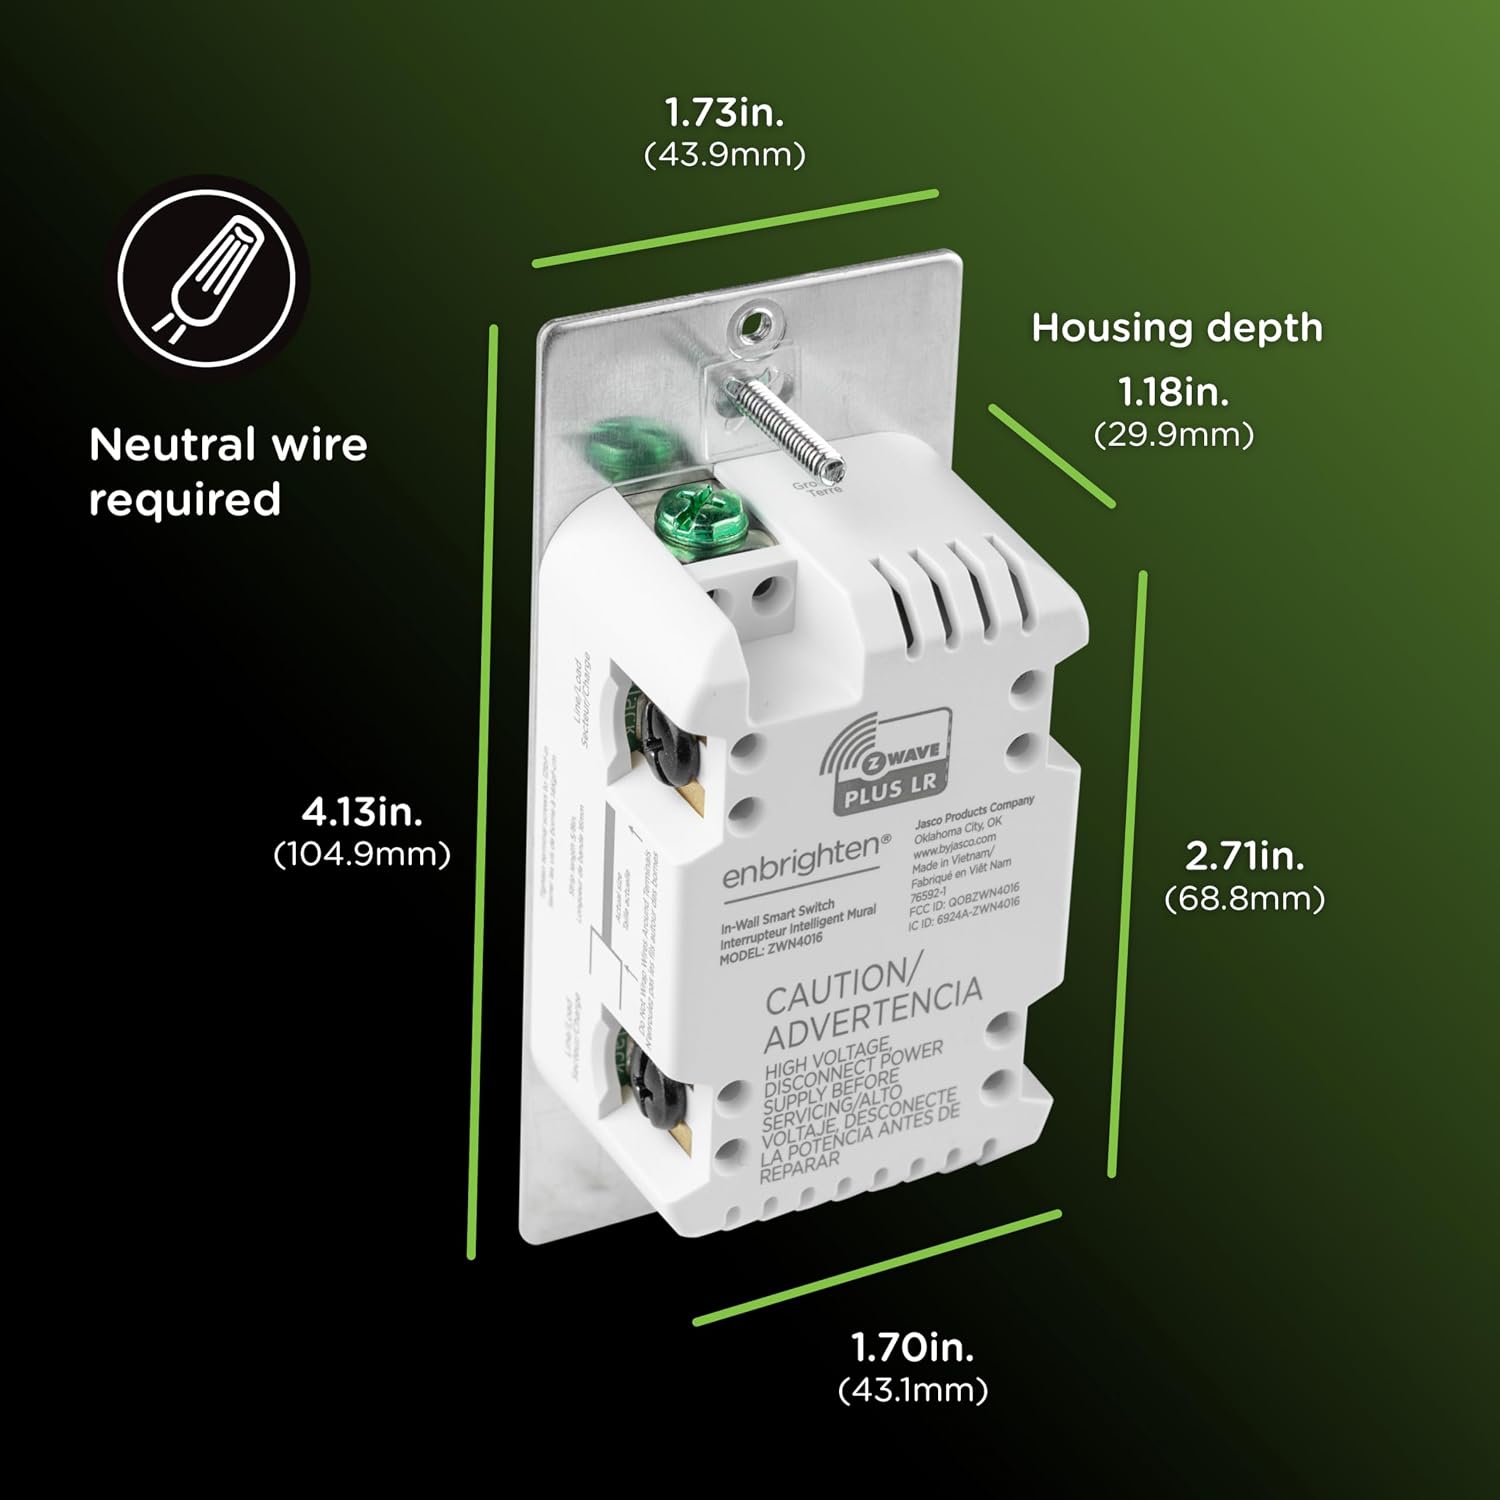
Image: Dimensions and Neutral Wire Requirement
This image displays the physical dimensions of the switch (4.13in H, 1.73in W, 1.18in D) and highlights the requirement for a neutral wire for proper installation.
4.2 QuickFit and SimpleWire Technologies

Image: QuickFit and SimpleWire Features
This image demonstrates the QuickFit and SimpleWire technologies. QuickFit allows the switch to fit easily into crowded switch boxes due to its 20% reduced housing and lack of break-off tabs. SimpleWire ensures faster installation with patented auto-detect line/load terminals, dual offset ground ports, and markings to quickly strip wires to the correct length.
4.3 Wiring Diagrams
The Enbrighten Z-Wave switch can be installed in single-pole or 3-way configurations. Always ensure power is OFF before wiring.
Single-Pole Installation:
For single-pole setups, connect the Line (hot), Load, Neutral, and Ground wires to the corresponding terminals on the smart switch. The SimpleWire technology will automatically detect the line and load connections.
3-Way Installation:
This switch supports 3-way installations using either a standard 3-way switch or up to four Enbrighten add-on switches. When using a standard 3-way switch, ensure it is wired for ON/OFF operation. The traveler wire connects the smart switch to the auxiliary switch.

Image: 3-Way Ready and Compatible Bulbs
This image confirms the switch's compatibility with standard 3-way switches or up to four add-on switches for multi-location control. It also lists compatible bulb types: LED, CFL, incandescent, and halogen.
4.4 Mounting
After wiring, carefully push the switch into the wall box. Secure it with the provided screws. Install the wall plate (sold separately) over the switch.
5. Z-Wave Pairing and Configuration
This Enbrighten switch is a Z-Wave certified device and can be included in any Z-Wave network with other Z-Wave certified devices from other manufacturers. It supports Z-Wave Plus Long Range (Z-Wave LR) and Z-Wave Classic inclusion.
5.1 Inclusion (Pairing)
- Ensure your Z-Wave hub is in inclusion (pairing) mode. Refer to your hub's manual for specific instructions.
- On the Enbrighten switch, press the top or bottom of the toggle switch once. The LED indicator will begin to flash, indicating it is attempting to pair.
- If successful, the LED will stop flashing and remain solid for a few seconds before returning to its previous state. Your hub should confirm the device has been added.
5.2 SmartStart Inclusion
SmartStart enabled products can be added into a Z-Wave network by scanning the Z-Wave QR Code present on the product or on the packaging with a controller providing SmartStart inclusion. No further action is required and the SmartStart product will be added automatically within 10 minutes of being switched on in the network vicinity.
5.3 Exclusion (Unpairing)
- Ensure your Z-Wave hub is in exclusion (unpairing) mode. Refer to your hub's manual for specific instructions.
- On the Enbrighten switch, press the top or bottom of the toggle switch once. The LED indicator will begin to flash.
- If successful, the LED will stop flashing and turn off. Your hub should confirm the device has been removed.
5.4 Z-Wave Plus Long Range (LR)

Image: Z-Wave Plus Long Range
This image highlights the Z-Wave Plus Long Range (LR) feature, which provides enhanced signal reach. This makes the switch ideal for multi-dwelling units (MDUs), commercial installations, and large complexes by extending the wireless communication range.
The switch supports Z-Wave LR and Z-Wave Classic inclusion based on your gateway's capabilities. When paired as a Z-Wave LR device, it connects to the hub up to 1,300ft. (400m) and offers improved wall penetration, reducing interference. If paired as Z-Wave Classic, it is backward compatible with all generations and extends the mesh network range by up to 150ft.
5.5 LED Indicator Customization
The toggle guide light can be customized with eight color options and four operation modes. Refer to your Z-Wave hub's advanced settings or the manufacturer's website for specific instructions on how to configure these options via Z-Wave parameters.
6. Operation
6.1 Manual Control
- ON: Press the top of the toggle switch to turn the connected light or fixture ON.
- OFF: Press the bottom of the toggle switch to turn the connected light or fixture OFF.
6.2 Voice Control
Once paired with a compatible Z-Wave hub that supports voice assistants, you can control your switch using voice commands through Amazon Alexa or Google Assistant.

Image: Voice Control Compatibility
This image illustrates the voice control capabilities of the switch, showing compatibility with Amazon Alexa and Google Home. A compatible gateway (sold separately) is required for mobile device control.
Example commands (may vary based on hub and device naming):
- "Alexa, turn on kitchen lights."
- "Hey Google, turn off living room lamp."
6.3 Air Gap Switch
The Air Gap switch (located at the bottom of the toggle) can be pulled out to completely disconnect power to the connected load, allowing for safe bulb replacement or maintenance without turning off the circuit breaker. Push it back in to restore power.
7. Care and Maintenance
- Clean the switch with a soft, dry cloth. Do not use abrasive cleaners or solvents.
- Ensure the switch is kept free from dust and debris to maintain optimal performance.
- Periodically check wire connections for tightness, especially after initial installation.
8. Troubleshooting
| Problem | Possible Cause | Solution |
|---|---|---|
| Light does not turn ON/OFF from the switch. | 1. Power is OFF at the circuit breaker. 2. Loose wiring connections. 3. Air Gap switch is pulled out. 4. Bulb is burnt out or incompatible. | 1. Turn ON power at the circuit breaker. 2. Turn OFF power, check and secure all wiring. 3. Push the Air Gap switch fully in. 4. Replace bulb or ensure compatibility. |
| Switch cannot be paired with Z-Wave hub. | 1. Hub is not in inclusion mode. 2. Switch is too far from the hub. 3. Interference from other devices. 4. Incorrect QR code used (if applicable). | 1. Ensure hub is in inclusion mode. 2. Move hub closer or use a Z-Wave repeater. 3. Try pairing again after moving other wireless devices. 4. Use the QR code printed directly on the device. |
| Remote control (via app/voice) does not work. | 1. Switch is not successfully paired to the hub. 2. Hub is offline or not connected to the internet. 3. Voice assistant not linked to the hub. | 1. Perform Z-Wave inclusion again. 2. Check hub's internet connection and status. 3. Ensure Alexa/Google Home is properly linked to your Z-Wave hub account. |
| 3-way functionality is not working as expected. | 1. Incorrect wiring for 3-way setup. 2. Incompatible add-on switch. | 1. Review 3-way wiring diagram and ensure correct connections. Ensure the main switch is ON for the second switch to function. 2. Use only compatible Enbrighten add-on switches or a standard 3-way switch. |
9. Specifications
| Attribute | Value |
|---|---|
| Model Number | 76592 |
| Power | 120VAC, 60Hz |
| Signal (Frequency) | Z-Wave 908.4/916MHz (US) |
| Maximum Load | 960W Incandescent, 1800W (15A) Resistive, 1/2 HP Motor |
| Operating Temperature | 32-104° F (0-40° C) |
| Connectivity Protocol | Z-Wave |
| Wireless Range | Up to 1,300ft (400m) with Z-Wave LR; Up to 150ft with Z-Wave Classic |
| Circuit Type | 3-way |
| Mounting Type | Wall Mount |
| Dimensions (L x W x H) | 4.2 x 1.81 x 1.7 inches (106.7 x 46 x 43.2 mm) |
| Certifications | ETL, Z-Wave Certified |
10. Warranty and Support
Enbrighten products are manufactured by Jasco Products Company, LLC. For warranty information, technical support, or to register your product, please visit the official Enbrighten website or contact Jasco customer service directly. Keep your proof of purchase for warranty claims.
Contact Information: Refer to the product packaging or the manufacturer's website for the most current contact details.


