
DEWIN DIN Rail Digital Programmable Timer Switch
Model: XQIABBXDC-DC24V
Introduction
This manual provides comprehensive instructions for the installation, operation, and programming of your DEWIN DIN Rail Digital Programmable Timer Switch. This electronic timer is designed for precise, automated control of various electrical devices, offering daily and weekly scheduling capabilities.
The timer features a high-precision industrial-grade chip, an easy-to-read LCD display, and supports up to 16 ON/OFF settings for repeating programs. Its robust design ensures strong anti-interference ability and a long service life.

Setup
1. Initial Power-Up and Battery Charging
When using the timer switch for the first time, connect it to a power source to charge the internal battery. Allow sufficient time for the battery to charge. After charging is complete, press the RESET button to clear any previous settings and initialize the device.
2. Clock Setting
The timer switch defaults to a 24-hour display mode. To switch to 12-hour mode (AM/PM display), press and hold the CLOCK button (located at the bottom left, next to the RESET button) for approximately 5 seconds until "AM" appears on the display. To revert to 24-hour mode, press and hold the CLOCK button again for 5 seconds.
To adjust the current time, press the CLOCK button, then use the D+ (Day), H+ (Hour), and M+ (Minute) buttons to set the correct day, hour, and minute. If the display is locked, press the CLOCK button and the D+, H+, M+ buttons simultaneously to unlock and adjust the time.

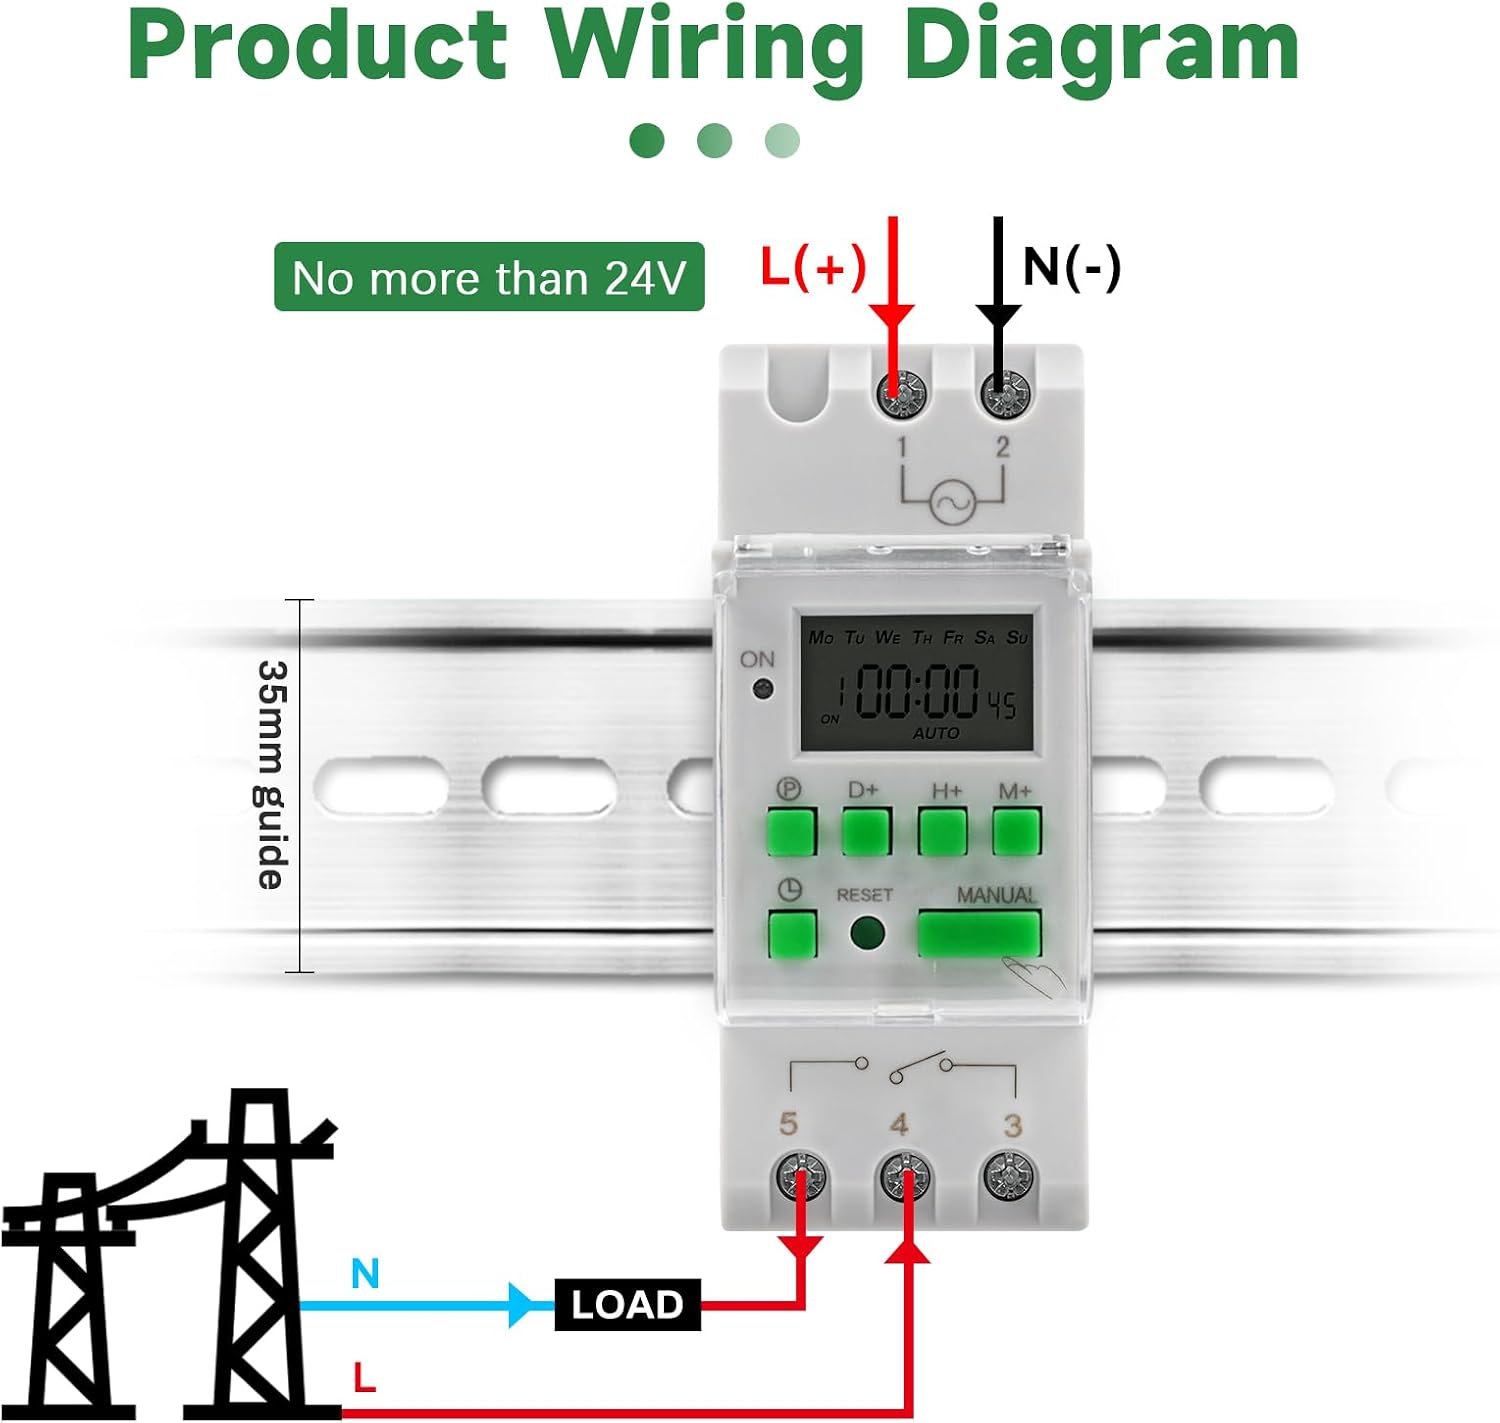
3. Wiring Diagram
Ensure proper wiring according to the diagram below. Connect the input power (L(+) and N(-)) to terminals 1 and 2. Connect the load to terminals 3 and 4. Terminal 5 is typically for a common connection or an alternative output, depending on the specific application. Always ensure the input voltage does not exceed 24V DC for this model.
Operating Instructions
Manual Control
Press the MANUAL button to cycle through the operating modes: ON, AUTO, and OFF. In AUTO mode, the timer will follow the programmed schedules. In ON mode, the output is continuously on. In OFF mode, the output is continuously off.
Programming ON/OFF Schedules
The timer allows for up to 16 ON/OFF programs. Follow these steps to set your desired schedules:
- Press the PROGRAM button (often labeled with a 'P' or 'Timer' icon). The display will show '1 ON'.
- Use the D+, H+, and M+ buttons to set the desired ON time for the first program.
- Press the PROGRAM button again. The display will show '1 OFF'.
- Use the D+, H+, and M+ buttons to set the desired OFF time for the first program.
- Repeat steps 1-4 for additional ON/OFF programs (up to 16).
- After setting all desired programs, press the CLOCK button to exit programming mode and return to the current time display. Ensure the timer is in AUTO mode for programs to execute.
You can select specific days of the week for each program using the D+ button during the programming steps. Options typically include individual days, weekdays, weekends, or all days.

Maintenance
The DEWIN timer switch is designed for reliable operation with minimal maintenance. Keep the device clean and free from dust. Use a soft, dry cloth for cleaning. Do not use abrasive cleaners or solvents.
The internal battery is designed for long-term use. If the display becomes dim or loses time frequently, the internal battery may require recharging or replacement. Ensure the device is connected to power regularly to keep the battery charged.
Troubleshooting
- Timer not responding: Ensure the device is properly connected to power and the internal battery is charged. Press the RESET button.
- Programs not executing: Verify that the timer is set to AUTO mode. Check that the programmed ON/OFF times are correctly set and do not conflict.
- Incorrect time display: Re-set the current time using the CLOCK, D+, H+, and M+ buttons. Ensure the 12/24-hour mode is set as desired.
- Display is blank: Check power connection. If power is present, the internal battery might be completely discharged or faulty. Allow it to charge or consider professional service.
Specifications
| Feature | Specification |
|---|---|
| Input Voltage | DC 24V |
| Contact Voltage Rating | DC 24V |
| Load Capacity | 16A 240VAC (Resistive Load) |
| On/Off Operations | 16 ON and 16 OFF settings (Manual/Auto) |
| Display | LCD |
| Power Consumption | 4.5VA (max) |
| Accuracy | ≤2 seconds/day (at 25°C) |
| Installation Method | DIN Rail (not included) |
| Timing Range | 1 minute to 168 hours |
| Operating Temperature | -10°C to 55°C |
| Dimensions | 86 x 36 x 65 mm (approx. 90D x 40W x 70H mm) |
| Weight | 103g |
| Model Number | XQIABBXDC-DC24V |

Warranty and Support
This product is typically covered by a standard return policy, such as a 30-day return window from the date of purchase. For specific warranty details, technical support, or service inquiries, please refer to the retailer's policy or contact DEWIN customer service through their official channels.