
Introduction
The ORICO IT28E-C is a versatile HDD/SSD clone stand designed for efficient data management. It supports both NVMe M.2 SSDs and 2.5/3.5-inch SATA HDDs/SSDs, offering high-speed data transfer and convenient offline cloning capabilities. This manual provides detailed instructions for setting up, operating, and maintaining your device.
Product Overview
Package Contents
Before you begin, please ensure all items are present in the package:
- 1 x HDD Docking Station
- 1 x SSD Enclosure
- 1 x Cooling Vest (Heatsink)
- 1 x Silicone Thermal Pad
- 1 x Plastic Stopper
- 1 x Power Adapter (12V/3A)
- 1 x 2-in-1 USB Cable (USB Type-A to Type-C and Type-C to Type-C, 1m)

Image: All components included in the ORICO IT28E-C package, laid out for inspection.
Device Layout
Familiarize yourself with the ports and indicators on the device:
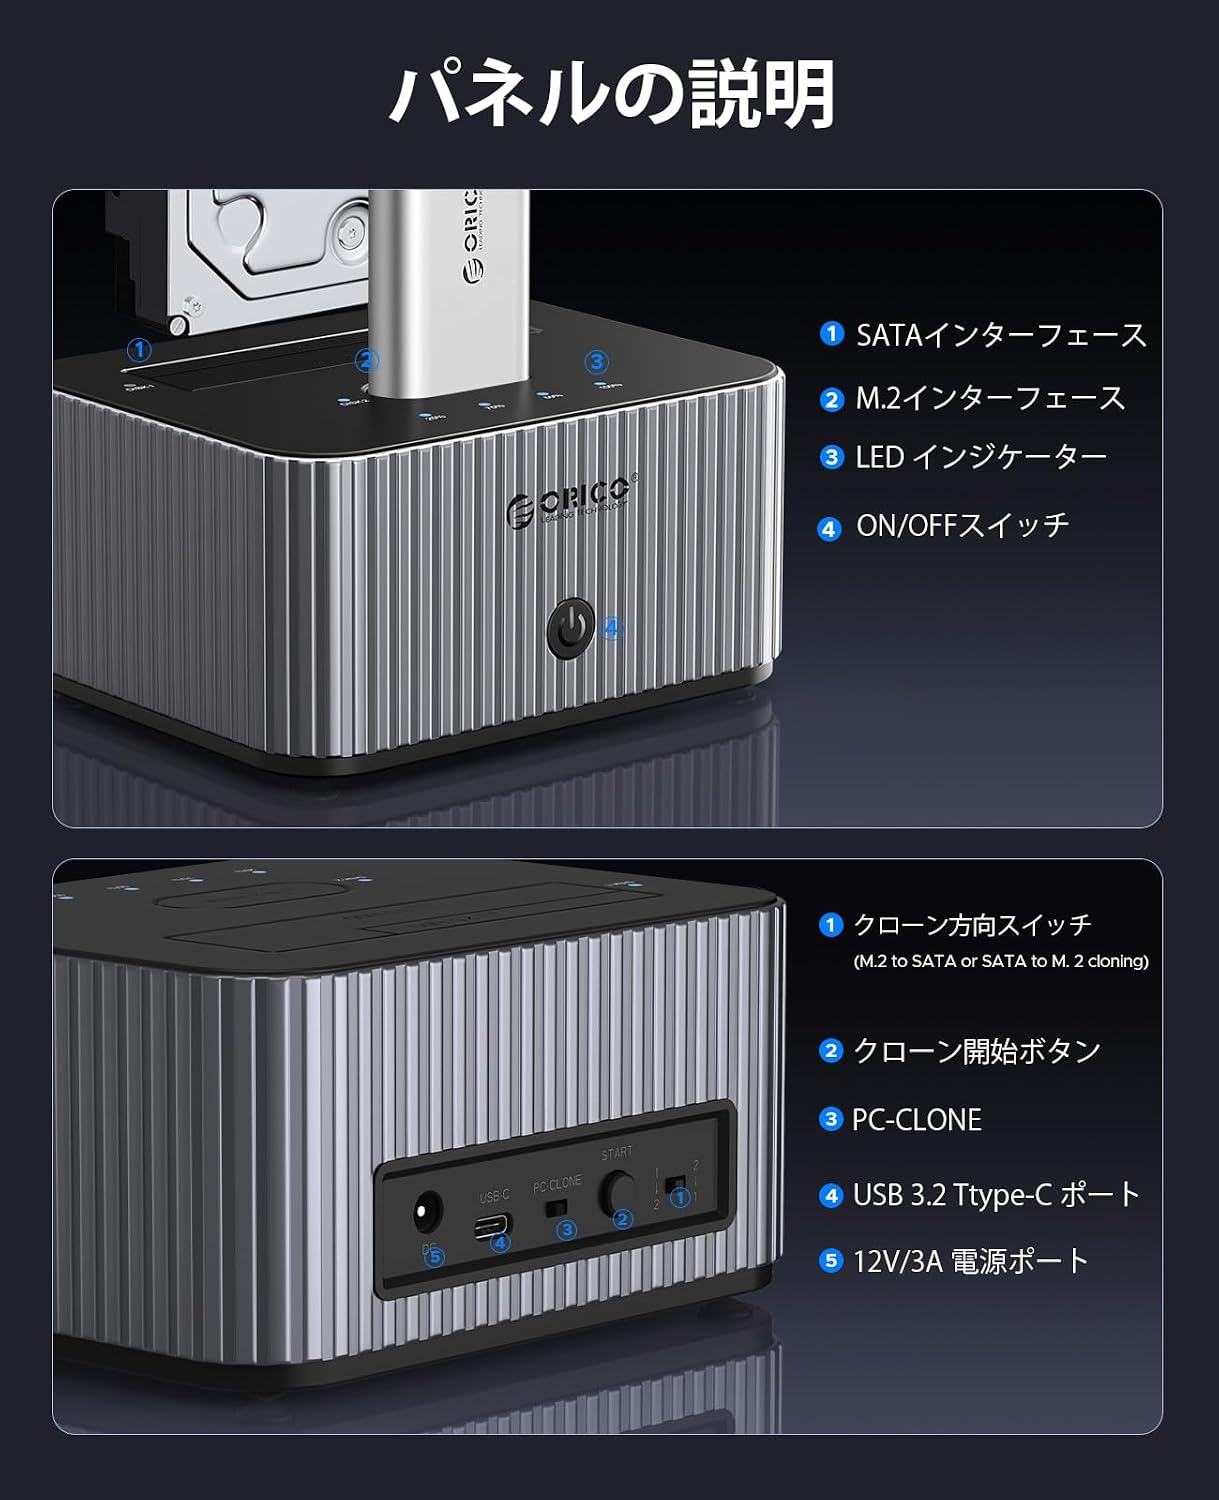
Image: Detailed view of the ORICO IT28E-C docking station, highlighting the SATA interface, M.2 interface, LED indicators, ON/OFF switch, clone direction switch, clone start button, USB 3.2 Type-C ports, and 12V/3A power port.
- Front Panel:
- 1. SATA Interface: For 2.5-inch or 3.5-inch SATA HDDs/SSDs.
- 2. M.2 Interface: For NVMe M-Key SSDs.
- 3. LED Indicators: Show power status, disk activity, and cloning progress.
- 4. ON/OFF Switch: Powers the device on or off.
- Rear Panel:
- 1. Clone Direction Switch: Selects cloning direction (M.2 to SATA or SATA to M.2).
- 2. Clone Start Button: Initiates the offline cloning process.
- 3. PC-CLONE (USB 3.2 Type-C Port): Connects to a computer for data transfer.
- 4. USB 3.2 Type-C Port: Additional port for data transfer.
- 5. 12V/3A Power Port: Connects to the external power adapter.
Setup
Follow these steps to set up your ORICO IT28E-C clone stand:
- Connect Power: Connect the included 12V/3A power adapter to the 12V/3A Power Port on the rear of the docking station, then plug it into a power outlet.
- Insert Drives:
- For 2.5/3.5-inch SATA drives: Gently insert the SATA HDD/SSD into the SATA Interface slot until it is firmly seated.
- For M.2 NVMe SSDs: Insert the M.2 NVMe SSD into the SSD Enclosure, secure it with the plastic stopper, and apply the silicone thermal pad and cooling vest for optimal heat dissipation. Then, insert the assembled SSD Enclosure into the M.2 Interface slot.

Image: The ORICO IT28E-C docking station showing compatibility with 2.5-inch and 3.5-inch SATA drives, and M.2 NVMe SSDs (2230/2242/2260/2280 sizes).

Image: An exploded view of the ORICO SSD enclosure, showing the M.2 SSD, silicone thermal pad, and cooling vest for efficient heat dissipation.
- Connect to PC (Optional, for data transfer mode): If you intend to use the device as a docking station for data transfer with a computer, connect the 2-in-1 USB cable from the PC-CLONE (USB 3.2 Type-C) port on the docking station to an available USB port on your computer.
- Power On: Press the ON/OFF Switch to power on the device. The power LED indicator will light up.
Operating Instructions
Data Transfer (Docking Station Mode)
To use the ORICO IT28E-C as an external drive enclosure:
- Ensure the device is powered on and connected to your computer via the USB cable.
- Insert your desired HDD/SSD into the appropriate slot (SATA or M.2).
- Your computer should detect the drive(s) as external storage. You can now access, read, and write data to the drive(s) as usual.

Image: The ORICO IT28E-C docking station with a 3.5-inch SATA HDD and an M.2 NVMe SSD enclosure inserted, ready for use.

Image: The ORICO IT28E-C docking station connected to its 12V/3A power adapter, ensuring stable power for operations.
Offline Cloning
Important: Ensure the device is NOT connected to a computer during the offline cloning process. The target disk capacity must be equal to or greater than the source disk capacity.
- Prepare Drives: Insert the source disk (the disk you want to copy from) into its designated slot (SATA or M.2). Insert the target disk (the disk you want to copy to) into the other slot.
- Select Clone Direction: Use the Clone Direction Switch on the rear panel to select the desired cloning direction (e.g., SATA to NVMe or NVMe to SATA).
- Initiate Cloning: Press and hold the Clone Start Button for approximately 5 seconds. The device will beep, and the two disk slot indicators will light up.
- Confirm Cloning: Within 5 seconds of the indicators lighting up, tap the Clone Start Button again to begin the cloning process.
- Monitor Progress: The LED indicators will show the cloning progress (25%, 50%, 75%, 100%). When all four indicators are lit and the device beeps, the cloning process is complete.
- Safely Remove Drives: After cloning is complete, turn off the ON/OFF Switch, disconnect the power adapter, and then safely remove the hard drives.

Image: The ORICO IT28E-C demonstrating bidirectional offline cloning between a SATA HDD and an M.2 NVMe SSD, with progress indicators.
Maintenance
To ensure the longevity and optimal performance of your ORICO IT28E-C clone stand, follow these maintenance guidelines:
- Cleaning: Use a soft, dry cloth to clean the exterior of the device. Avoid using liquid cleaners or solvents, as they may damage the finish or internal components.
- Storage: Store the device in a cool, dry place away from direct sunlight, extreme temperatures, and high humidity.
- Handling: Handle the device with care. Avoid dropping it or subjecting it to strong impacts, which can damage internal circuitry or connectors.
- Ventilation: Ensure the device has adequate ventilation during operation to prevent overheating, especially during prolonged cloning or data transfer tasks.
Troubleshooting
If you encounter issues with your ORICO IT28E-C, refer to the following common problems and solutions:
| Problem | Possible Cause | Solution |
|---|---|---|
| Device does not power on. | Power adapter not connected or faulty; ON/OFF switch not pressed. | Ensure the power adapter is securely connected to both the device and a working power outlet. Press the ON/OFF switch. |
| Drives not recognized by computer. | USB cable not connected properly; drive not seated correctly; drive not formatted; incompatible drive type. | Check USB cable connection to both the device and computer. Ensure drives are fully inserted into their slots. Verify the drive is formatted (new drives may need initialization). Confirm the drive is either SATA or NVMe M-Key (M.2 SATA SSDs are not supported). |
| Offline cloning fails or does not start. | Device connected to computer; target disk capacity too small; incorrect cloning procedure; faulty drive. | Disconnect the USB cable from the computer. Ensure the target disk capacity is equal to or greater than the source disk. Follow the offline cloning steps precisely, including holding and tapping the clone button. Test drives individually on a computer to check for faults. |
| Slow data transfer speeds. | Connected to a USB 2.0 or 3.0 port; drive performance limitations. | Ensure the device is connected to a USB 3.2 Gen2 (10Gbps) compatible port on your computer for optimal speeds. Note that SATA drives have a maximum speed of 5Gbps. Drive performance can also affect transfer rates. |
Specifications
Here are the technical specifications for the ORICO IT28E-C HDD SSD Clone Stand:
- Model: IT28E
- Brand: ORICO
- Material: Aluminum Alloy
- Color: Silver
- Supported Drive Types: M.2 NVMe M-Key SSD (2230/2242/2260/2280), 2.5-inch SATA HDD/SSD, 3.5-inch SATA HDD
- Maximum Capacity: Up to 8TB for M.2 NVMe, up to 22TB for 2.5/3.5-inch SATA (Total combined capacity up to 30TB)
- Interface: USB 3.2 Gen2 Type-C
- Data Transfer Rate: Up to 10Gbps (for NVMe), up to 5Gbps (for SATA)
- Cloning Function: Offline Bidirectional Cloning (SATA to NVMe, NVMe to SATA)
- Power Supply: 12V/3A External Power Adapter
- Compatibility: Windows, Mac OS, Linux
- Dimensions: Approximately 23.5 x 15.7 x 8 cm
- Weight: Approximately 500 g

Image: A visual representation of the ORICO IT28E-C's 10Gbps high-speed data transfer capability, showing benchmark results for NVMe and SATA drives.
Warranty and Support
ORICO products are designed for reliability and performance. This product comes with a standard manufacturer's warranty. For specific warranty terms and conditions, please refer to the warranty card included in your package or visit the official ORICO website.
If you encounter any issues or have questions regarding the use of your ORICO IT28E-C HDD SSD Clone Stand, please contact ORICO customer support through their official website or the retailer where you purchased the product. Please have your model number (IT28E) and purchase information ready when contacting support.

