
1. Introduction
This manual provides detailed instructions for the installation, operation, and maintenance of your Unifit Digital Thermostat Control Board. This control board is designed as a replacement part specifically for Pit Boss 2 Series Digital Electric Vertical Smokers, including models like the PBV2D1. Please read this manual thoroughly before installation and use to ensure proper function and safety.

Figure 1: Unifit Digital Thermostat Control Board, showing the display, buttons, and wiring.

Figure 2: Illustration of the control board's compatibility and placement within a Pit Boss 2 Series Digital Electric Vertical Smoker.
2. Safety Information
Always observe the following safety precautions when installing or operating the control board:
- Disconnect Power: Ensure the smoker is completely unplugged from the power source before attempting any installation, maintenance, or repair.
- Qualified Personnel: Installation should be performed by individuals familiar with electrical components and smoker assembly.
- Proper Tools: Use appropriate tools for installation to prevent damage to the control board or smoker.
- Environmental Conditions: Do not expose the control board to excessive moisture or extreme temperatures outside of normal operating conditions.
- Original Smoker Manual: Refer to your original Pit Boss smoker manual for additional safety guidelines specific to your appliance.
3. Package Contents
Your package should contain the following item:
- 1x Unifit Digital Thermostat Control Board
Note: Meat probes are not included with this control board and must be purchased separately if needed.
4. Product Features
The Unifit Digital Thermostat Control Board offers the following features:
- Bright LED Display: Provides clear visibility of settings and temperatures, even in direct sunlight.
- Durable Construction: Designed for high-temperature resistance and extended service life.
- Temperature Monitoring: Displays internal smoker temperatures and supports two wired meat probes (probes not included).
- Four Cooking Modes: Select from smoking, basing, braising, and roasting modes.
- Temperature Range: Adjustable temperature settings from 100°F to 400°F.
- Digital Control: Push-button interface for precise temperature and time adjustments.
5. Installation Instructions
This section outlines the general steps for replacing the control board. Always refer to your specific Pit Boss smoker's service manual for detailed disassembly and reassembly procedures.
- Power Disconnection: Ensure the Pit Boss smoker is unplugged from the electrical outlet.
- Access Old Control Board: Locate and carefully remove the existing control board from your smoker. This typically involves unscrewing fasteners and disconnecting wiring harnesses.
- Disconnect Wiring: Systematically disconnect all wires from the old control board. It is recommended to take photos or label wires to ensure correct re-connection.
- Connect New Control Board: Connect the wiring harnesses from the smoker to the new Unifit Digital Thermostat Control Board. Ensure all connections are secure and match the original configuration.
- Secure New Control Board: Mount the new control board into the smoker's designated slot and secure it with the appropriate fasteners.
- Final Check: Double-check all connections and ensure no wires are pinched or exposed.
- Power On: Plug the smoker back into a grounded electrical outlet.
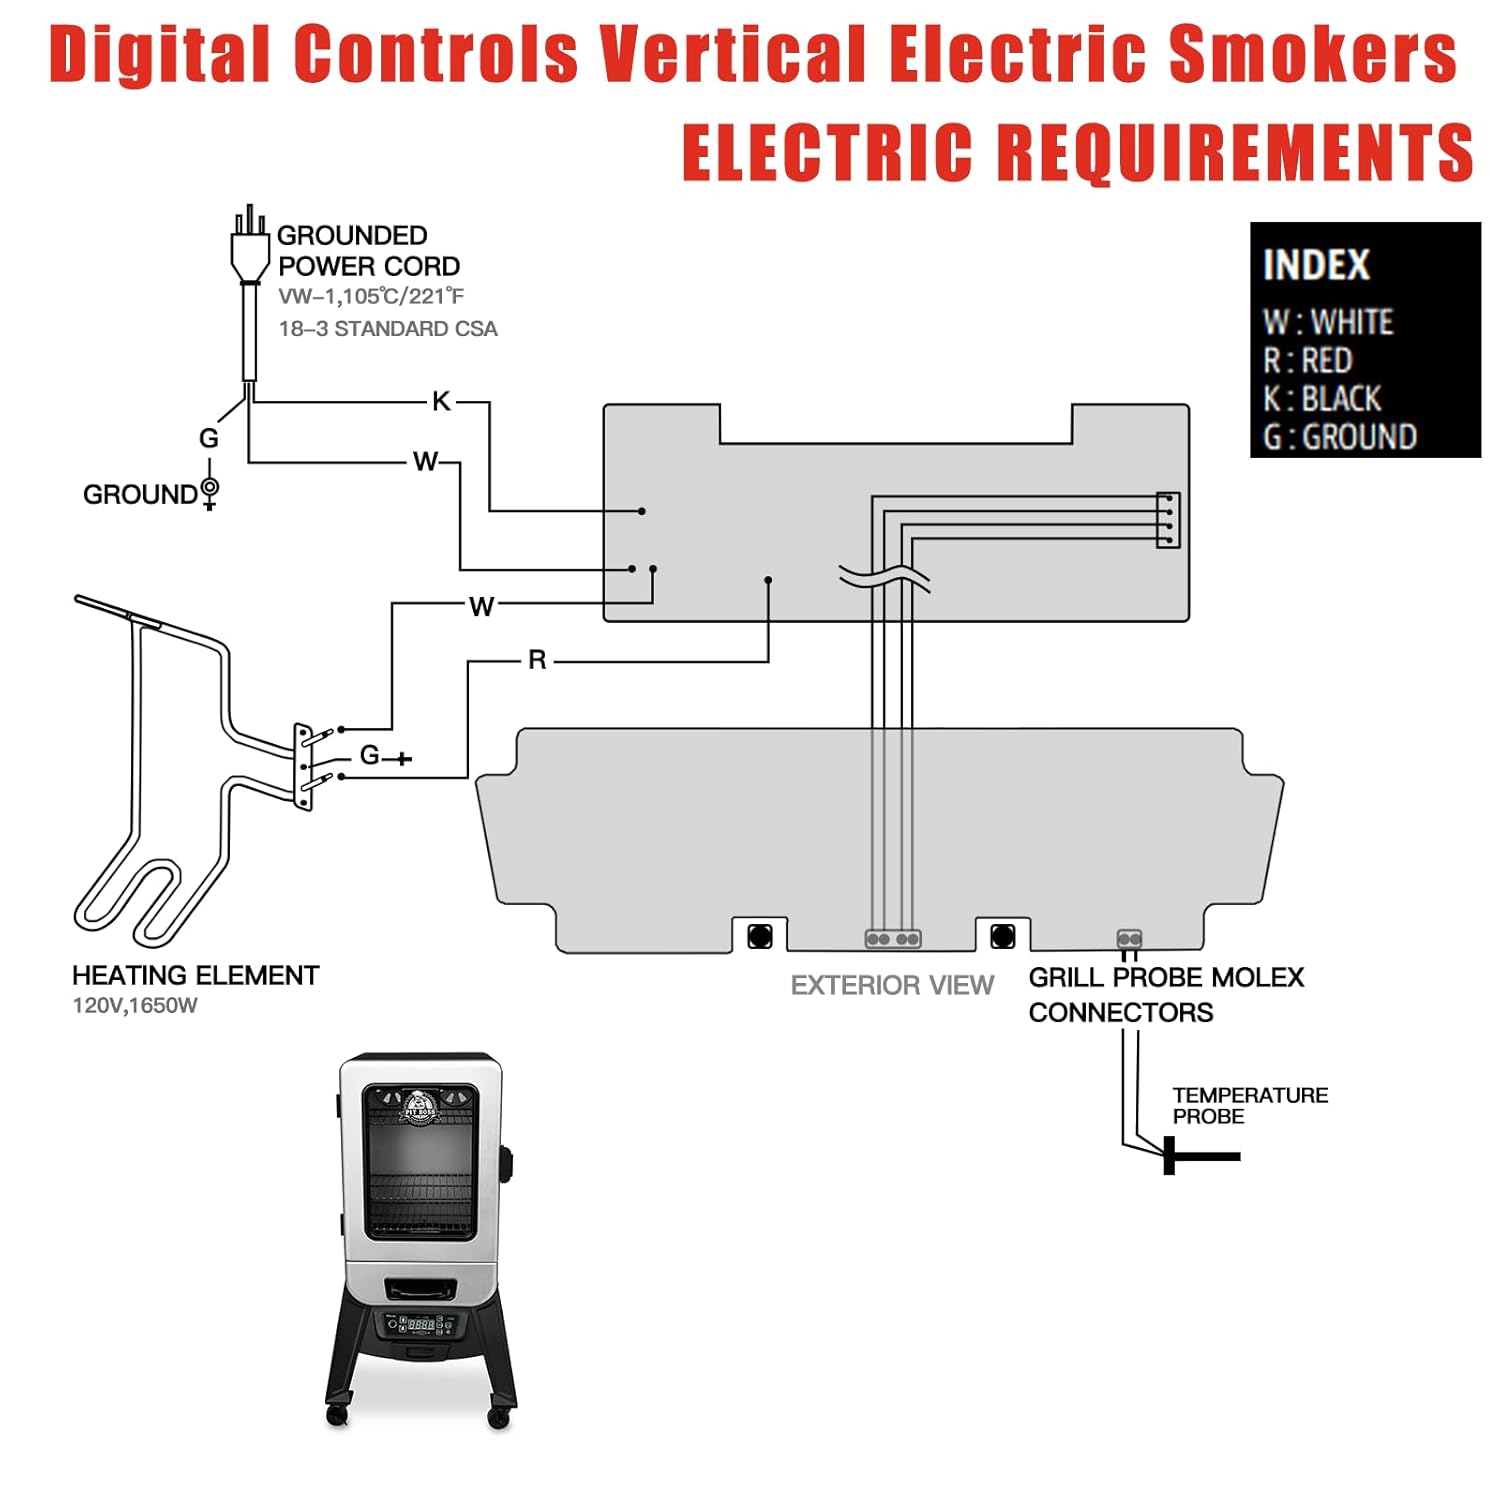
Figure 3: Electrical wiring diagram for digital controls in vertical electric smokers, showing connections for the grounded power cord, heating element, and grill probe molex connectors.

Figure 4: Close-up view of the Unifit control panel installed in a smoker, displaying temperature and probe readings.
6. Operating Instructions
Familiarize yourself with the control panel buttons and their functions:

Figure 5: Diagram illustrating the functions of the control panel buttons, including Power, Temp, Time, Set/Act, Smoke, and Adjustment Arrows.
- Power Button: Press to turn the smoker on or off.
- Temp Button: Press to adjust the desired cooking temperature. Use the Up and Down arrows to change the value.
- Time Button: Press to set the cooking timer. Use the Up and Down arrows to change the value.
- Set/Act Button: After setting temperature or time, press this button immediately to confirm and activate the setting.
- Smoke Button: Activates the smoking mode.
- F/C Button: Press to switch the temperature display between Fahrenheit (°F) and Celsius (°C). The default setting is Fahrenheit.
- Element Light Indicator: Illuminates when the heating element is active.
Setting Temperature and Time:
- Press the Temp button.
- Use the Up or Down arrows to select your desired temperature (100°F – 400°F).
- Immediately press the Set/Act button to confirm the temperature.
- To set a timer, press the Time button.
- Use the Up or Down arrows to set the desired cooking duration.
- Immediately press the Set/Act button to confirm the timer.
Important Note: The window of time to press the Set/Act button after adjusting temperature or time is brief. Ensure you press it promptly to save your settings.
7. Maintenance
To ensure the longevity and proper function of your control board:
- Cleaning: Wipe the control panel surface clean with a soft, damp cloth. Do not use abrasive cleaners or immerse the unit in water.
- Inspection: Periodically inspect the wiring connections for any signs of wear or damage.
- Storage: If the smoker is stored for an extended period, ensure the control board is clean and dry.
8. Troubleshooting
This section addresses common issues you might encounter.
| Problem | Possible Cause | Solution |
|---|---|---|
| Display is blank or dim. | No power, loose connection, or display issue. |
|
| Temperature or time settings do not save. | "Set/Act" button not pressed promptly. |
|
| Smoker not heating. | Heating element issue, wiring problem, or incorrect temperature setting. |
|
9. Specifications

Figure 6: Detailed dimensions of the Unifit Digital Thermostat Control Board, showing length, width, and height measurements.
| Feature | Detail |
|---|---|
| Brand | Unifit |
| Model Compatibility | Pit Boss 2 Series Digital Electric Vertical Smokers (e.g., PBV2D1) |
| Temperature Range | 100°F – 400°F |
| Display Type | Digital LED |
| Connectivity Technology | Wired |
| Outer Material | Plastic |
| Included Components | 1x Controller |
| Product Care | Wipe Clean |
| Dimensions (Approx.) | 10.94 x 6.1 x 3.74 inches (Package) |
10. Warranty and Support
For warranty information or technical support regarding your Unifit Digital Thermostat Control Board, please refer to the documentation provided with your purchase or contact the manufacturer directly. Keep your purchase receipt for warranty claims.