
1. Introduction
This manual provides essential instructions for the safe and efficient operation, setup, and maintenance of your BEILOCKERY 1100°C Laboratory Resistance Furnace. Please read this manual thoroughly before operating the furnace to ensure proper use and to prevent injury or damage to the equipment.
Safety Warnings
- High Temperature: The furnace operates at extremely high temperatures (up to 1100°C / 2012°F). Always use appropriate personal protective equipment (PPE), including heat-resistant gloves and eye protection, when operating or near the furnace.
- Electrical Hazard: Ensure the furnace is properly grounded and connected to a dedicated power supply matching the specified voltage (110V) and current requirements. Do not operate with damaged cords or plugs.
- Ventilation: Operate the furnace in a well-ventilated area. The furnace includes a smoke exhaust outlet; ensure it is properly connected and vented to prevent accumulation of fumes.
- Flammable Materials: Do not place flammable materials near the furnace during operation.
- Cooling: Allow the furnace to cool completely before performing any maintenance or cleaning.
2. Product Overview
The BEILOCKERY 1100°C Laboratory Resistance Furnace is a compact, all-in-one benchtop muffle furnace designed for various high-temperature applications in laboratories, dental practices, and jewelry making. It features precise temperature control, efficient heating, and a robust design.
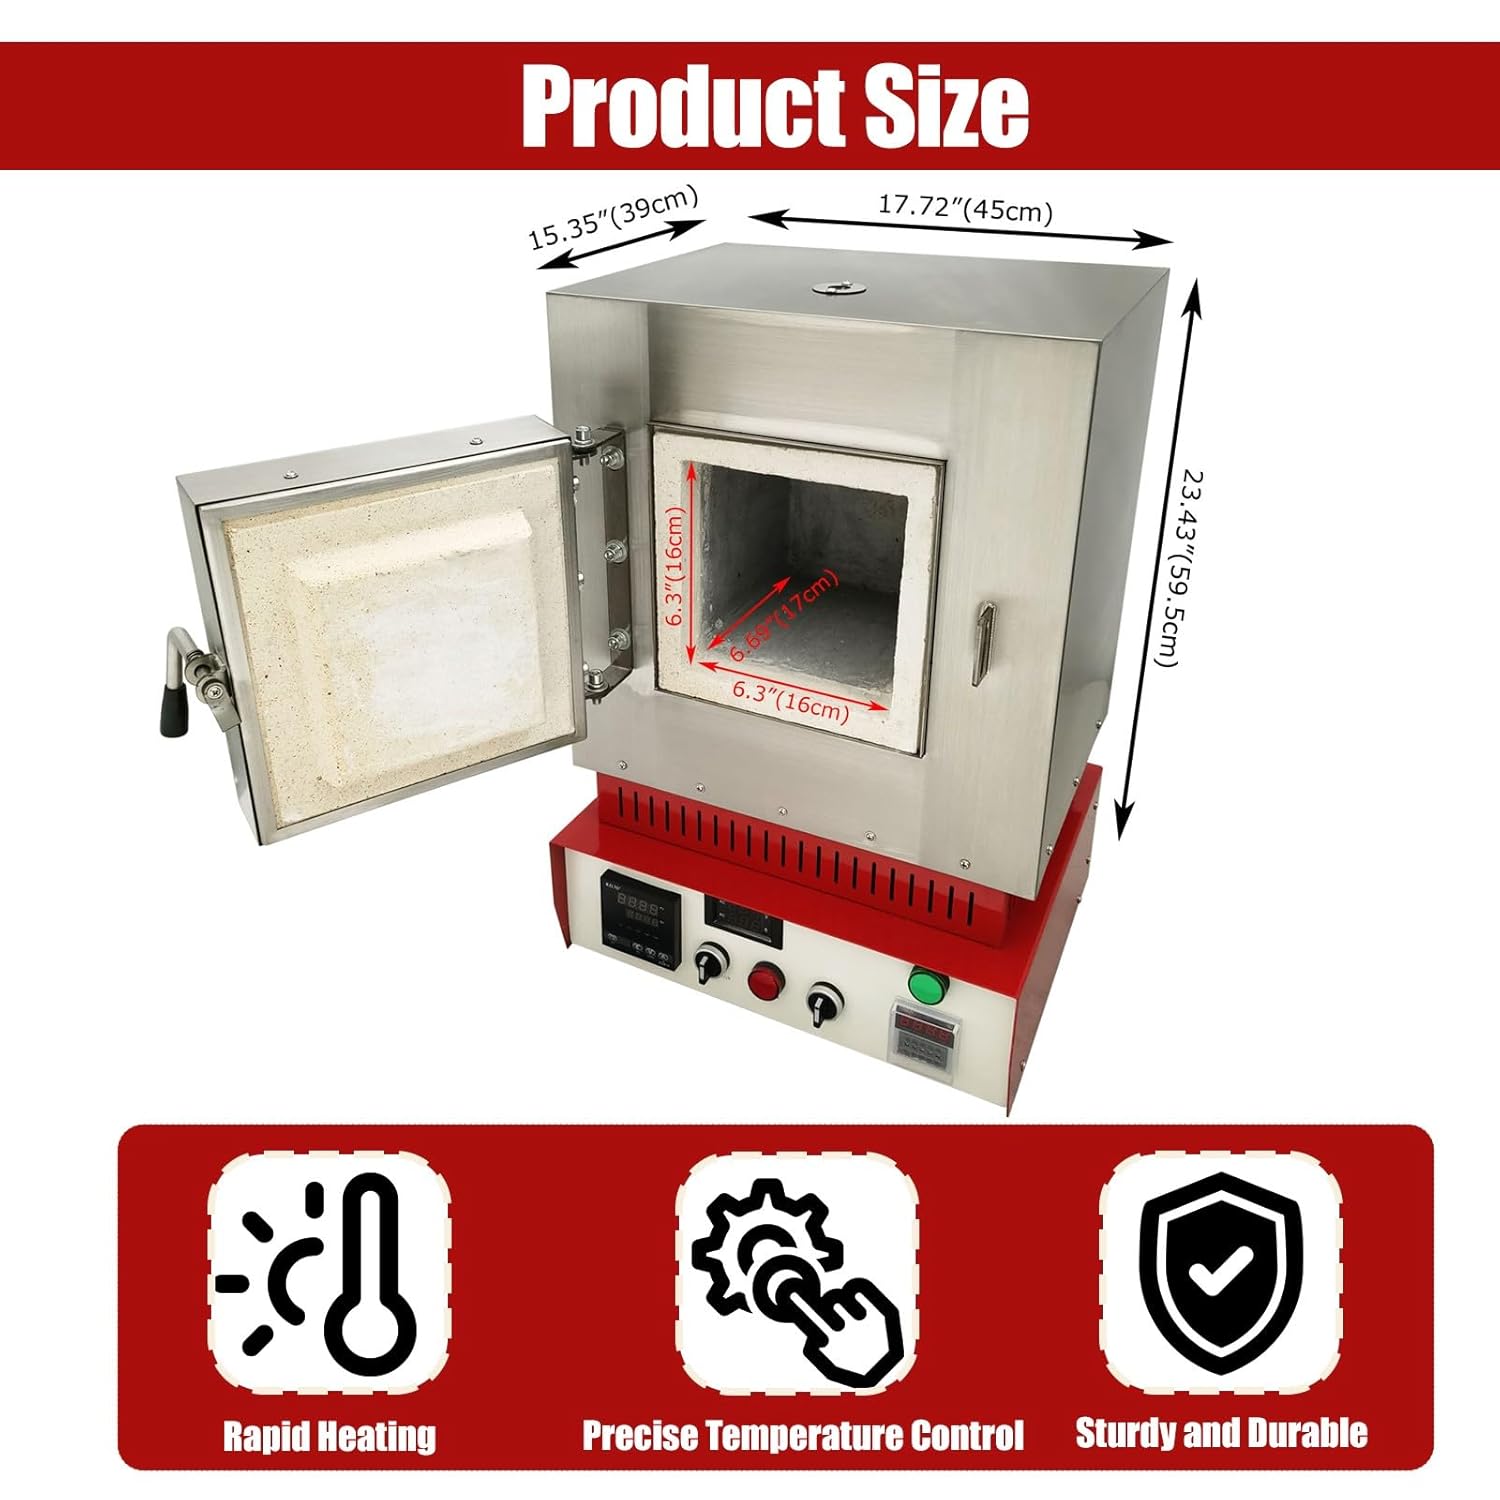
Figure 2.1: Product Dimensions and Key Features. This image displays the overall dimensions of the BEILOCKERY Laboratory Resistance Furnace, including its width, depth, and height. Key features such as rapid heating, precise temperature control, and durable construction are also indicated.

Figure 2.2: Product Parameters. This image provides a summary of the furnace's technical specifications, including its operating voltage (110V), rated power (3000W), maximum temperature (1100°C / 2012°F), rated current (≤28A), internal furnace size, package dimensions, and net/gross weights.
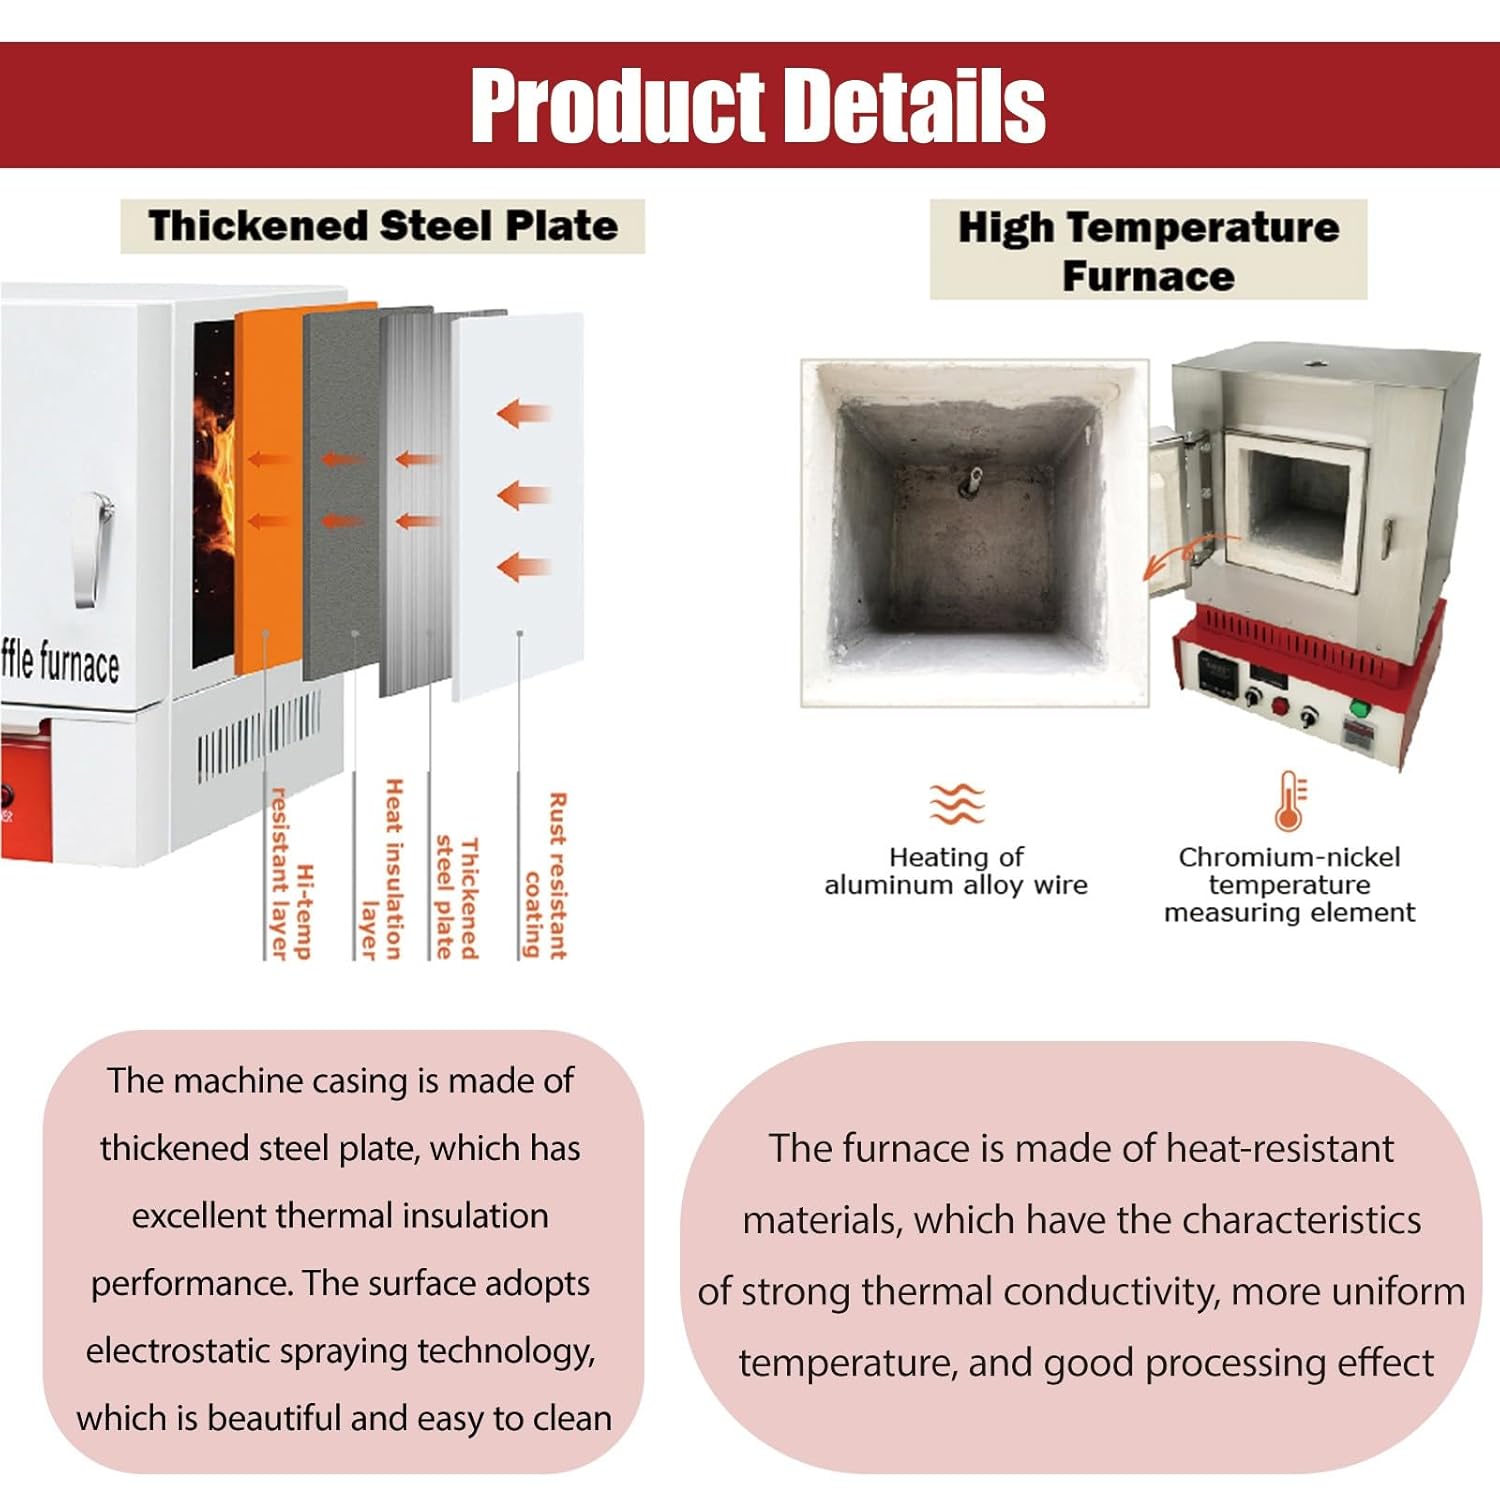
Figure 2.3: Internal Construction. This image illustrates the internal construction of the furnace. It highlights the multi-layered casing made of thickened steel plate with heat insulation, and the high-temperature furnace chamber featuring aluminum alloy wire heating elements and a chromium-nickel temperature measuring element for uniform heating.

Figure 2.4: Control Panel and Radiator System. This image focuses on the intelligent control panel, which includes digital displays for precise temperature and time control. It also shows the radiator system with multiple vents on the sides, designed to dissipate excess heat and protect the machine.

Figure 2.5: Air Switch and Smoke Vent. This image shows the air switch, indicating its wiring for safe electrical connection, and the smoke vent located on the top of the furnace, designed for discharging combustion gases to maintain a clean working environment.

Figure 2.6: Side View. A side view of the furnace, highlighting the robust door and its handle, designed for secure closure during high-temperature operations.

Figure 2.7: Top View. An overhead view of the furnace, providing a perspective of its top casing and the integrated smoke vent.

Figure 2.8: Rear View. The rear view of the furnace, illustrating the power input connection and additional ventilation grilles for heat dissipation.
3. Specifications
The following table details the technical specifications of the BEILOCKERY 1100°C Laboratory Resistance Furnace:
| Parameter | Value |
|---|---|
| Voltage | 110V |
| Rated Power | 3000W |
| Maximum Temperature | 1100°C (2012°F) |
| Rated Current | ≤28A |
| Furnace Internal Size (L*W*H) | 16cm * 16cm * 17cm (6.30" * 6.30" * 6.69") |
| Product Dimensions (L*W*H) | 45cm * 39cm * 59.5cm (17.72" * 15.35" * 23.43") |
| Package Size (L*W*H) | 47cm * 45cm * 67cm (18.5" * 17.7" * 26.4") |
| Net Weight | 36.3KG (80.03LB) |
| Gross Weight | 39.6KG (87.30LB) |
| Manufacturer | BEILOCKERY |
| ASIN | B0G188WJNW |
4. Setup
Careful setup is crucial for the safe and effective operation of your furnace.
4.1 Unpacking and Inspection
- Carefully remove the furnace from its packaging.
- Inspect the unit for any signs of shipping damage. If damage is found, contact your supplier immediately.
- Ensure all components listed in the packing list are present. The item included is 1 Hi-Temp Burnout Oven (056399).
4.2 Placement
- Place the furnace on a stable, level, and heat-resistant surface.
- Ensure there is adequate clearance around the furnace (at least 15 cm or 6 inches) for proper ventilation and heat dissipation.
- Locate the furnace in a well-ventilated area, away from flammable materials, liquids, and gases.
4.3 Electrical Connection
- Verify that the power supply matches the furnace's requirements: 110V, 60Hz, with a dedicated circuit capable of handling 3000W (approximately 28A).
- Connect the furnace's power cord to a properly grounded electrical outlet. The air switch wiring (Live Wire, Earth Wire, Neutral Wire) must be correctly connected for safety.
- Do not use extension cords or adapters unless they are rated for the furnace's power requirements and are properly grounded.
4.4 Smoke Exhaust
- Connect appropriate exhaust piping to the smoke vent located on the top of the furnace.
- Ensure the exhaust system effectively vents fumes and gases generated during operation to a safe outdoor location.
5. Operating Instructions
Follow these steps for safe and effective operation of the furnace.
5.1 Powering On
- Ensure the furnace door is securely closed.
- Turn on the main power switch, usually located on the front panel. The digital control panel should illuminate.
5.2 Setting Temperature
- Use the intelligent digital control panel to set the desired temperature. Refer to the specific instructions for the control panel model for detailed programming steps.
- The furnace can reach a maximum temperature of 1100°C (2012°F).
5.3 Loading Materials
- Only load materials suitable for high-temperature processing in a muffle furnace.
- Use appropriate crucibles or containers that can withstand the set temperature.
- Carefully place the materials inside the furnace chamber using long-handled tongs or other suitable tools. Avoid contact with the heating elements.
- Close the furnace door securely.
5.4 Heating Process
- Once the temperature is set, the furnace will begin to heat. The digital display will show the current temperature.
- The furnace features optimized fast heating technology, reaching the required working temperature efficiently.
- During heating, the smoke exhaust outlet will facilitate the discharge of any generated fumes. Ensure the exhaust system is functioning correctly.
5.5 Unloading Materials and Powering Off
- Once the heating cycle is complete, allow the furnace to cool down to a safe temperature before opening the door.
- Using heat-resistant gloves and appropriate tools, carefully remove the processed materials from the furnace.
- Turn off the main power switch and disconnect the furnace from the power supply if it will not be used for an extended period.
6. Maintenance
Regular maintenance ensures the longevity and optimal performance of your furnace. Always ensure the furnace is completely cool and disconnected from power before performing any maintenance.
6.1 Cleaning
- Exterior: Wipe the exterior casing with a soft, damp cloth. Avoid abrasive cleaners or solvents. The surface adopts electrostatic spraying technology, which is easy to clean.
- Furnace Chamber: After each use and once the furnace is cool, carefully remove any debris or residue from the furnace chamber using a brush or vacuum. Avoid damaging the heating elements or insulation.
6.2 Inspection
- Heating Elements: Periodically inspect the heating elements for signs of wear, damage, or breakage. Replace if necessary (consult a qualified technician).
- Insulation: Check the furnace insulation for cracks or deterioration. Proper insulation is critical for efficiency and safety.
- Wiring and Connections: Ensure all electrical connections are secure and free from corrosion. Inspect the power cord for any damage.
- Door Seal: Verify that the furnace door seals properly to maintain temperature uniformity and energy efficiency.
- Ventilation: Ensure the radiator system vents are clear of obstructions to allow for proper heat dissipation.
The optimized control circuit design contributes to a low failure rate, and routine maintenance as described above is generally sufficient for long-term stable operation.
7. Troubleshooting
This section addresses common issues you might encounter with your furnace. For problems not listed here, or if solutions do not resolve the issue, contact customer support.
| Problem | Possible Cause | Solution |
|---|---|---|
| Furnace does not power on | No power supply; tripped circuit breaker; faulty power cord/switch. | Check power outlet and circuit breaker. Inspect power cord and main switch. Ensure air switch is correctly wired. |
| Furnace not heating or heating slowly | Incorrect temperature setting; damaged heating elements; faulty temperature sensor; door not fully closed. | Verify temperature setting on control panel. Inspect heating elements for visible damage. Ensure furnace door is securely closed. |
| Temperature display is inaccurate | Faulty temperature sensor (thermocouple); control panel malfunction. | Check thermocouple connection. If issue persists, contact support for control panel diagnosis. |
| Excessive smoke/fumes | Improper smoke exhaust connection; materials producing excessive fumes. | Ensure smoke vent is properly connected to an effective exhaust system. Review materials being processed for suitability. |
| Overheating or error codes | Control panel error; sensor malfunction; ventilation issues. | Note any error codes displayed. Ensure radiator vents are clear. Power cycle the unit. If error persists, contact support. |
8. Warranty and Support
For warranty information, technical support, or service inquiries, please refer to the documentation provided at the time of purchase or contact your seller directly. Keep your purchase receipt and product model information handy when contacting support.
The manufacturer, BEILOCKERY, is committed to providing reliable equipment. For any issues, please reach out to the point of purchase or the manufacturer's customer service channels.