1. Introduction
This manual provides essential information for the safe operation, assembly, and maintenance of your Hiboy Q2 Adult Electric Scooter. Please read this manual thoroughly before your first ride to ensure proper usage and to maximize the lifespan of your scooter. Retain this manual for future reference.

Image 1.1: The Hiboy Q2 Adult Electric Scooter, featuring a comfortable seat, phone holder, and a rear storage basket.
2. Safety Information
Your safety is paramount. Always wear a helmet and appropriate protective gear (knee pads, elbow pads) when riding. Adhere to all local traffic laws and regulations. Avoid riding in adverse weather conditions or on slippery surfaces. Do not perform stunts or ride with more than one person. Ensure the scooter is in good working order before each use.
Important: This electric scooter has passed stringent UL 2272 certifications.

Image 2.1: The scooter's charger and a traffic notice for New York State, advising adherence to local laws.
3. Package Contents
Verify that all items are present upon unboxing:
- Hiboy Q2 Electric Scooter (main unit)
- Seat assembly
- Rear storage basket
- Phone holder
- Power adapter/charger
- Tool kits
- User Manual (this document)
4. Assembly
Follow these steps to assemble your Hiboy Q2 scooter:
- Unfold the Scooter: Carefully lift the handlebar stem and secure it in the upright position using the quick-release latch. Ensure it clicks into place.
- Install the Seat: Attach the seat post to the designated slot on the scooter frame. Adjust the seat height for comfortable riding and tighten securely.
- Attach the Rear Basket: Secure the rear storage basket to the frame behind the seat using the provided hardware.
- Mount the Phone Holder: Attach the phone holder to the handlebar in a convenient and secure position.
- Check Connections: Ensure all cables and connections are secure and not pinched.
5. Setup
5.1 Initial Charging
Before first use, fully charge the scooter's battery. Connect the power adapter to the charging port on the scooter and then to a power outlet. The charging time is approximately 5.5 hours.

Image 5.1: Visual representation of the 36V 9Ah battery, indicating a 4.5-5 hour charging time and a 22-mile maximum range.
5.2 Tire Pressure
Ensure tires are inflated to the recommended pressure for optimal performance and safety. Refer to the tire sidewall for specific pressure recommendations.
6. Operating Instructions
6.1 Power On/Off
Press and hold the power button on the display to turn the scooter on or off.
6.2 Riding Modes
The Hiboy Q2 features three riding modes: E (Eco), D (Drive), and S (Sport). Cycle through modes by pressing the mode button on the display. Each mode offers different speed and power characteristics.

Image 6.1: The clear dashboard display showing current speed and selectable riding modes (E, D, S).
6.3 Acceleration
Use the thumb throttle located on the handlebar for smooth and responsive acceleration.

Image 6.2: Close-up of the thumb throttle on the handlebar, designed for intuitive acceleration control.
6.4 Braking
The scooter is equipped with front and rear drum brakes. Squeeze the brake levers on the handlebars to engage the brakes for controlled stopping.

Image 6.3: The high-performance mechanical drum brake lever for smooth and reliable stopping.
6.5 Lights
Activate the front headlight and rear brake light for enhanced visibility, especially during low-light conditions. The scooter also features neon underglow lights for added visibility and style.

Image 6.4: The scooter's neon underglow lights and flashing rear brake light for maximum visibility.
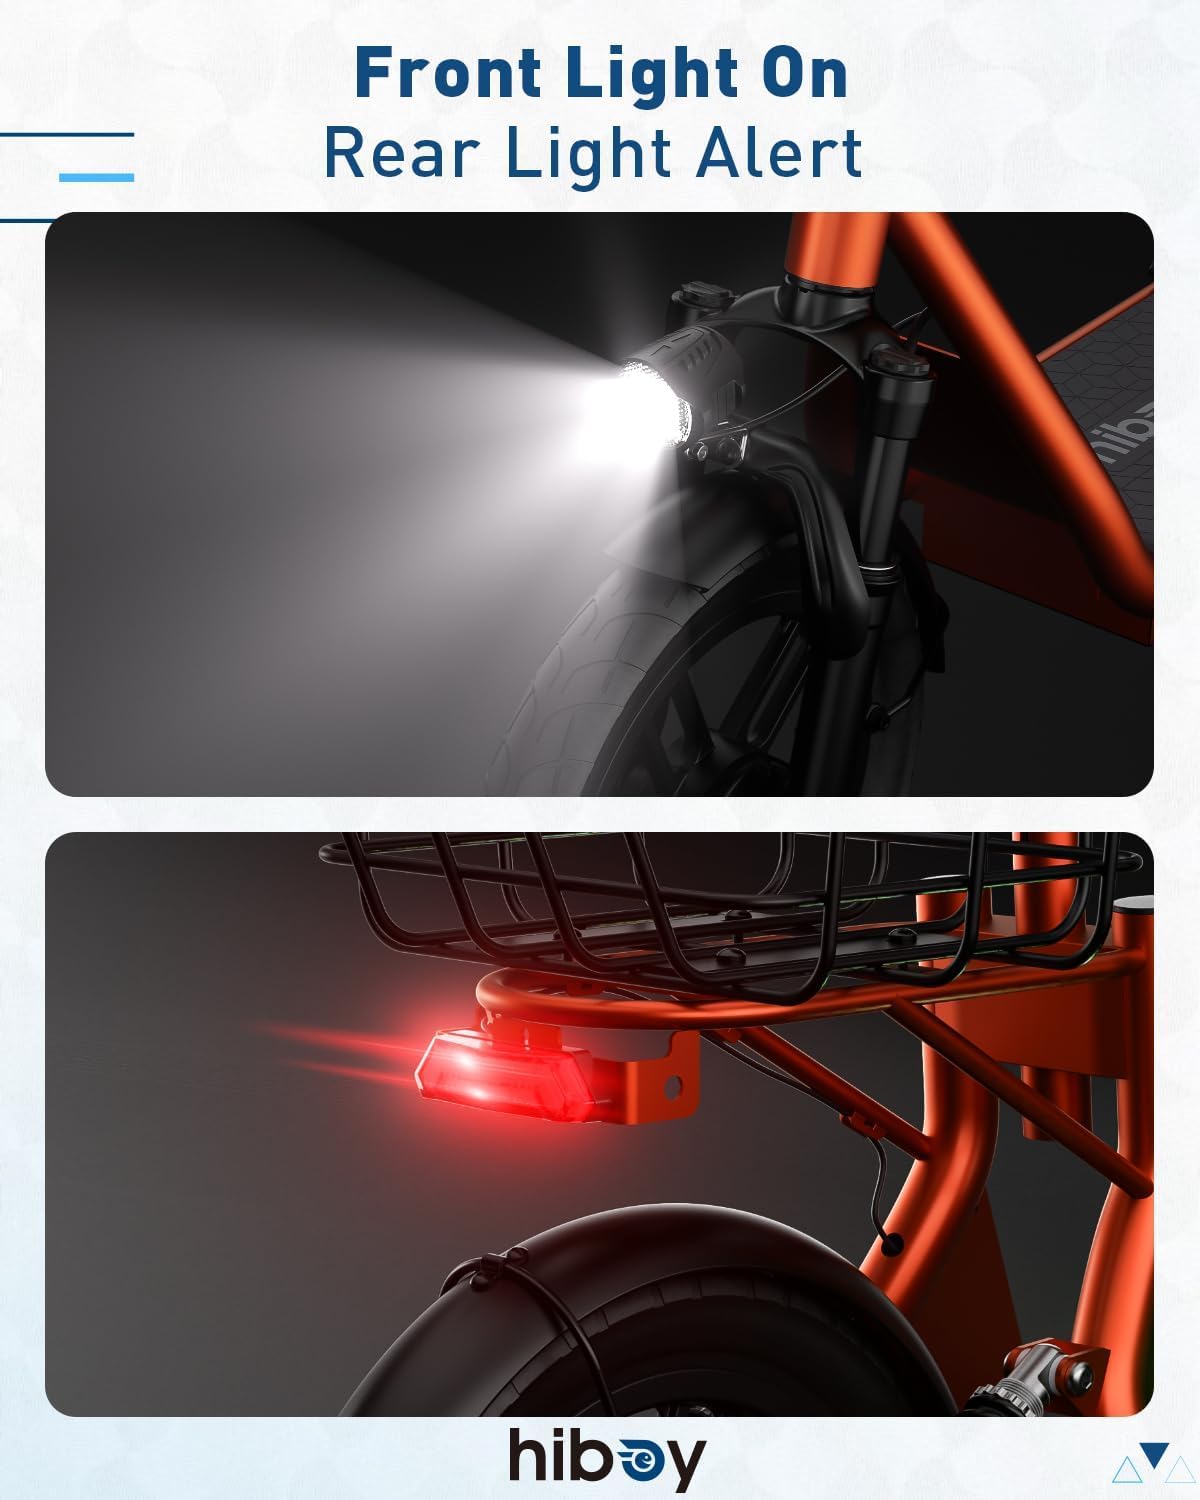
Image 6.5: The front headlight and rear brake light illuminated for safety.
7. Features Overview
- Powerful Motor: Equipped with a 500W peak motor for strong acceleration and a top speed of 20 MPH. It can handle inclines of up to 15%.

Image 7.1: Illustration of the 500W motor, highlighting its 20 mph max speed and 15% climb slope capability.
- Long-Range Battery: Features a reliable 36V 9Ah battery, providing an impressive range of up to 22 miles on a single charge. The Battery Management System (BMS) prevents overcharging and short circuits.
- Dual Suspension: Front and rear suspension systems ensure a comfortable and stable ride, even on uneven surfaces.

Image 7.2: Detailed view of the hydraulic damping up front and dual spring shocks in the rear, providing a smoother ride.
- 14-inch Pneumatic Tires: Large 14-inch rubber pneumatic tires provide a smooth and stable ride, engineered for everyday roads.

Image 7.3: Overview of scooter features, including the 14-inch pneumatic tires.
- Front & Rear Drum Brakes: Reliable braking system for quick and controlled stops.
- Foldable Design: Weighing 61.5 lbs, the scooter features a quick-fold mechanism for easy storage and portability.

Image 7.4: The scooter folded and stored in a car trunk, demonstrating its portability.
- Comfortable Seat: An integrated seat provides a comfortable riding experience for longer commutes.
- Rear Storage Basket: A convenient basket with an elastic strap is included for carrying personal items or groceries.

Image 7.5: The rear storage basket, shown with various items, highlighting its utility.
- Phone Holder: A phone holder is provided for easy navigation access.
- Ergonomic Grips: PVC grips with a seamless design and smooth edges for comfortable handling.

Image 7.6: Close-up of the ergonomic PVC grips and the integrated display on the handlebar.
8. Maintenance
Regular maintenance ensures the longevity and safe operation of your scooter.
- Cleaning: Wipe the scooter with a damp cloth. Avoid using high-pressure water jets or harsh chemicals.
- Tires: Regularly check tire pressure and inspect for wear or damage. Replace worn tires promptly.
- Brakes: Periodically check brake functionality and adjust if necessary. Ensure brake levers are responsive.
- Battery Care: Charge the battery regularly, even if not in use, to maintain its health. Avoid fully discharging the battery. Store in a cool, dry place.
- Fasteners: Check all screws and bolts periodically and tighten if loose.
9. Troubleshooting
Refer to this section for common issues and their solutions.
| Problem | Possible Cause | Solution |
|---|---|---|
| Scooter does not power on | Low battery; loose power connection | Charge the battery; check all power connections. |
| Reduced range or speed | Under-inflated tires; low battery charge; heavy load | Inflate tires to recommended pressure; fully charge battery; reduce load. |
| Brakes feel loose or ineffective | Brake cable needs adjustment; worn brake pads | Adjust brake cable tension; inspect and replace brake pads if necessary. |
| Unusual noises during operation | Loose components; debris in wheels/motor | Inspect and tighten all fasteners; clear any debris from moving parts. |
10. Specifications
| Feature | Specification |
|---|---|
| Brand | Hiboy |
| Model Name | Q2 |
| Motor Power | 500W Peak |
| Battery | 36V 9Ah |
| Max Speed | 20 MPH |
| Max Distance Range | 22 Miles |
| Charging Time | 5.5 Hours |
| Weight Limit | 220 Pounds |
| Item Weight | 61.48 Pounds |
| Product Dimensions (L x W x H) | 53.8" x 9.3" x 48.1" |
| Wheel Size | 14 Inches |
| Wheel Type | Pneumatic |
| Frame Material | Aluminum |
| Suspension Type | Front & Rear Suspension |
| Brake Style | Front Braking, Rear Braking (Drum Brakes) |
| Special Feature | Basket, Seat, Phone Holder, Neon Lights |
11. Warranty and Support
The Hiboy Q2 Electric Scooter comes with a warranty. Please refer to the following for details:
- Warranty Description: 12-Month or 6-Month Assurance for Different Parts.
For further assistance, technical support, or warranty claims, please contact Hiboy customer service through their official website or the retailer where the product was purchased.


