
1. Introduction
Thank you for purchasing the Keehusux 43" Tall Bathroom Storage Cabinet. This manual provides essential information for the safe assembly, operation, and maintenance of your new cabinet. Please read these instructions thoroughly before beginning assembly and retain this manual for future reference.

Figure 1: Keehusux 43" Tall Bathroom Storage Cabinet, Natural Oak
2. Safety Information
WARNING: To prevent serious injury, this cabinet must be securely anchored to the wall using the provided anti-tip device. Failure to do so can result in the cabinet tipping over, causing property damage or personal injury.
- Always assemble the cabinet on a soft, clean surface to prevent scratches.
- Ensure all parts are present and undamaged before assembly.
- Do not overtighten screws, as this may damage the material.
- Keep small parts away from children during assembly.
- Do not stand on or climb into the cabinet.
- Distribute weight evenly on shelves to maintain stability.
3. Package Contents
Please check the package to ensure all components are included:
- 1 x Rattan Storage Cabinet (unassembled components)
- 1 x Tools Bag (containing necessary hardware and an Allen wrench)
- 1 x User Manual (this document)
If any parts are missing or damaged, please contact customer support.
4. Assembly Instructions
Assembly typically requires two adults. Follow the detailed, step-by-step instructions provided in the separate assembly guide included in your package. All components are logically numbered for ease of identification.
4.1. Assembly Overview
- Unpack and Identify Parts: Lay out all components on a clean, soft surface. Refer to the parts list in your assembly guide to identify each piece.
- Assemble the Base: Attach the solid wood legs to the bottom panel of the cabinet.
- Construct the Frame: Connect the side panels, back panel, and top panel according to the diagrams.
- Install Shelves: Insert the fixed shelves and adjustable shelf supports into the pre-drilled holes.
- Attach Doors: Mount the doors using the provided hinges and attach the gold handles.
- Install Anti-Tip Device: Securely attach the anti-tip device to the top rear of the cabinet and then to a wall stud.

Figure 2: Key Components and Features
4.2. Product Dimensions
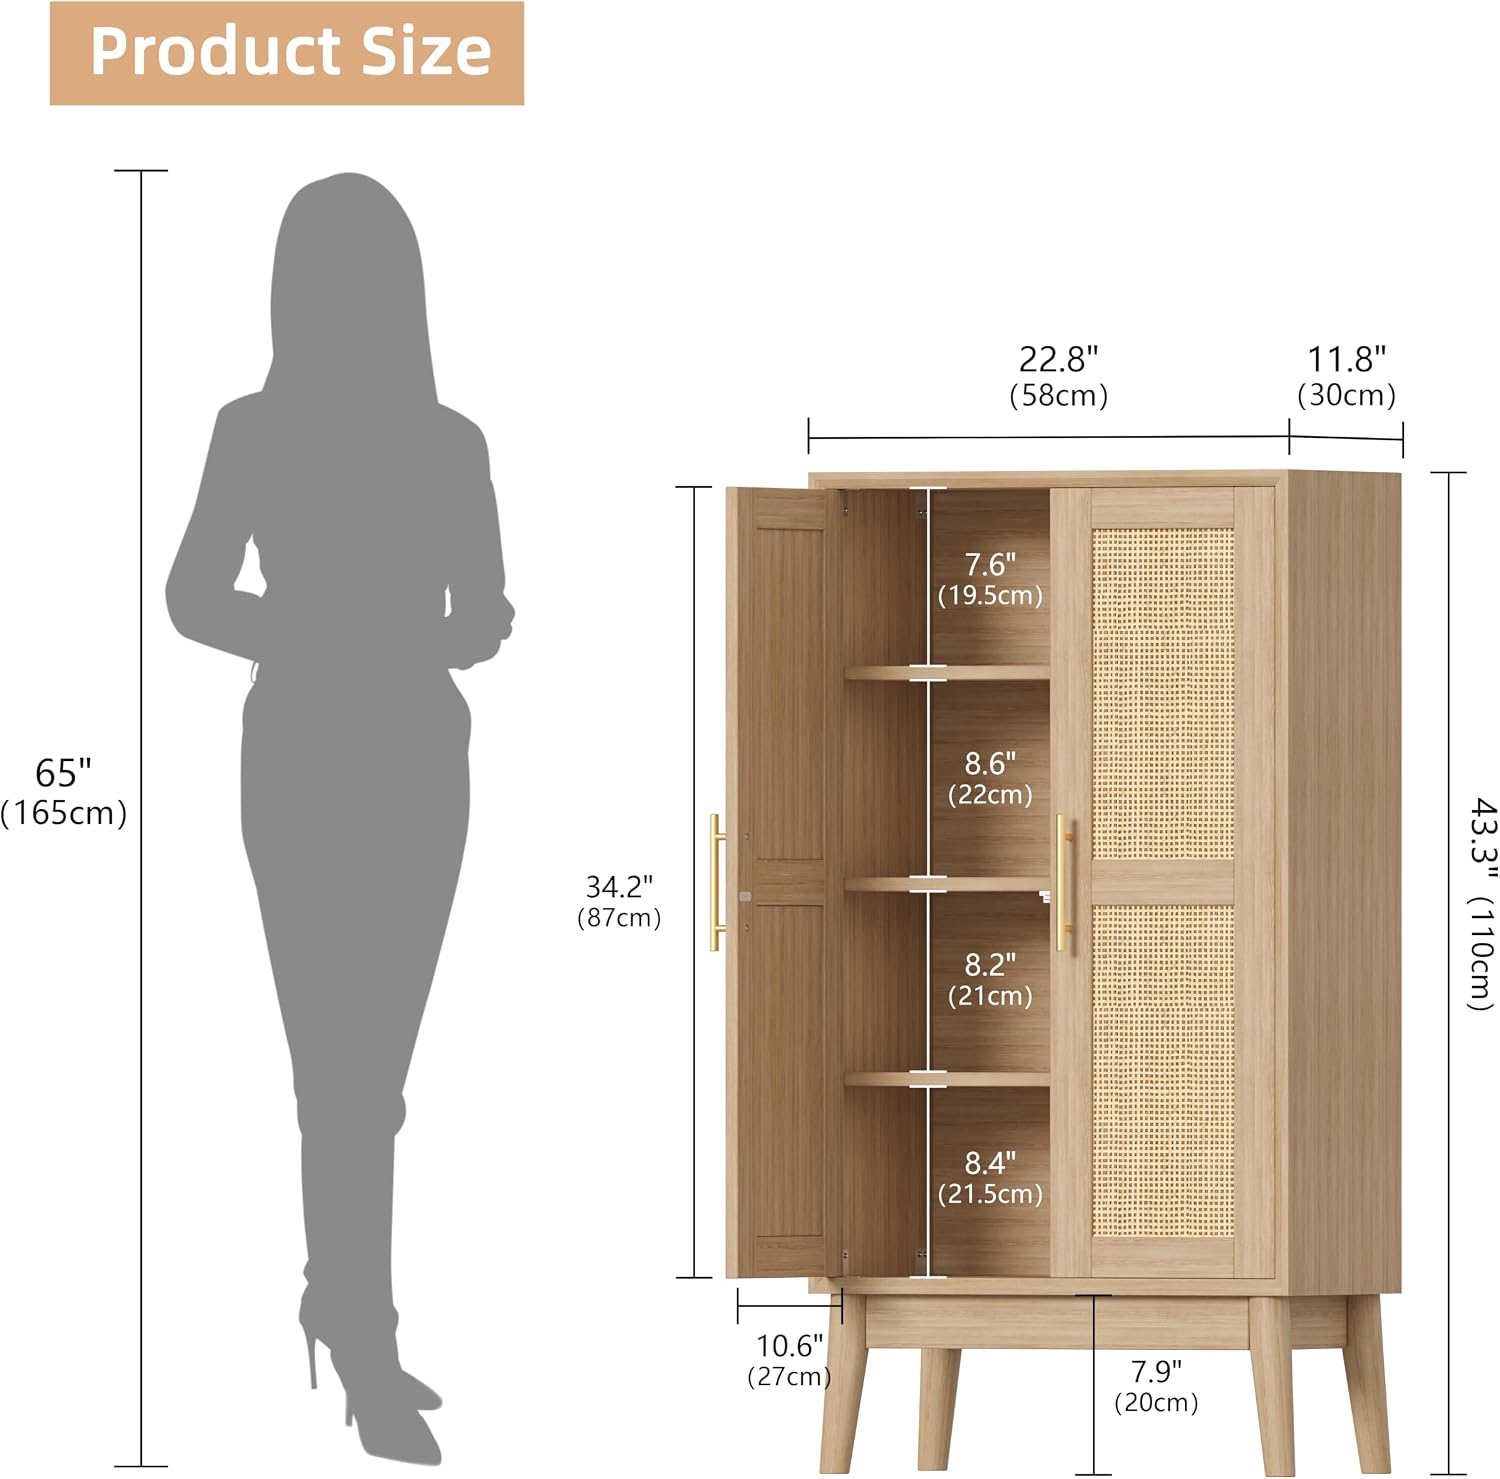
Figure 3: Product Dimensions
5. Operating Instructions
5.1. Adjusting Shelves
The cabinet features one adjustable shelf. To adjust its height:
- Empty the shelf of all contents.
- Carefully lift the shelf and remove the shelf pins from their current holes.
- Reinsert the shelf pins into the desired pre-drilled holes at the new height. Ensure all four pins are at the same level.
- Place the shelf back onto the pins, ensuring it is level and secure.

Figure 4: Adjustable Shelf Mechanism
5.2. Adjusting Cabinet Doors
If the cabinet doors are not perfectly aligned, you can adjust them using the hinge screws:
- Side-to-Side Adjustment: Tweak the screw on the hinge to make small left/right adjustments to the door.
- Up-and-Down Adjustment: Loosen the screws on the mounting plate to shift the door vertically (up or down).
- In-and-Out Adjustment: Loosen the screws on the hinge arm to move the door forward or backward.

Figure 5: Cabinet Door Adjustment Guide
5.3. Storage Capacity
The cabinet offers ample storage with two fixed shelves and one adjustable shelf, allowing you to organize various items such as towels, toiletries, books, or office supplies.

Figure 6: Example of Storage Capacity
6. Maintenance
- Cleaning: Wipe surfaces with a soft, damp cloth. Avoid using harsh chemicals, abrasive cleaners, or furniture polish that may damage the finish.
- Rattan Care: For the rattan panels, gently dust with a soft brush or vacuum with a brush attachment. Avoid excessive moisture.
- Spills: Wipe up spills immediately to prevent staining or damage to the engineered wood.
- Hardware: Periodically check all screws and fasteners to ensure they are tight. Retighten if necessary, but do not overtighten.
- Sunlight: Avoid prolonged exposure to direct sunlight to prevent fading or discoloration.
7. Troubleshooting
7.1. Cabinet Feels Wobbly
- Ensure the cabinet is placed on a flat, level surface.
- Check that all assembly screws are securely tightened.
- Verify the anti-tip device is properly installed and anchored to the wall.
7.2. Doors Do Not Align Properly
- Refer to Section 5.2 (Adjusting Cabinet Doors) for detailed instructions on hinge adjustments.
- Ensure the cabinet frame is square and all screws are tight.
7.3. Difficulty Assembling
- Review the step-by-step assembly guide carefully.
- Ensure you are using the correct hardware for each step.
- Do not force parts together; if they don't fit, recheck the instructions.
8. Specifications
| Feature | Detail |
|---|---|
| Brand | Keehusux |
| Model Number | KESCWG028M |
| Color | Natural Oak |
| Material | Engineered Wood (EPA-grade Particleboard), Rattan |
| Product Dimensions (D x W x H) | 11.8"D x 22.8"W x 43.3"H (30cm x 58cm x 110cm) |
| Item Weight | 35.9 pounds (16.3 kg) |
| Number of Shelves | 3 (2 fixed, 1 adjustable) |
| Number of Doors | 2 |
| Mounting Type | Floor Mount (Freestanding) |
| Special Features | Adjustable Shelf, Anti-Tipping Device, Solid Wood Legs |
9. Warranty and Support
9.1. Warranty Information
Please refer to your purchase documentation or contact your retailer for specific warranty details regarding this product. Keep your proof of purchase for any warranty claims.
9.2. Customer Support
For any questions, missing parts, or assistance with assembly or operation, please contact Keehusux customer service. We aim to reply to all inquiries within 24 hours.
For support, please visit the Keehusux Store on Amazon or refer to the contact information provided with your purchase.