
1. Product Overview
This manual provides detailed instructions for the Rimoody 8 Core 6G+128G Android Car Radio, designed specifically for Fiat Punto Evo models from 2012 to 2015. This 7-inch IPS screen car stereo offers advanced features including wireless CarPlay, Android Auto, Mirror Link, Bluetooth, FM/RDS radio, EQ, WiFi, GPS navigation, and rear camera support.
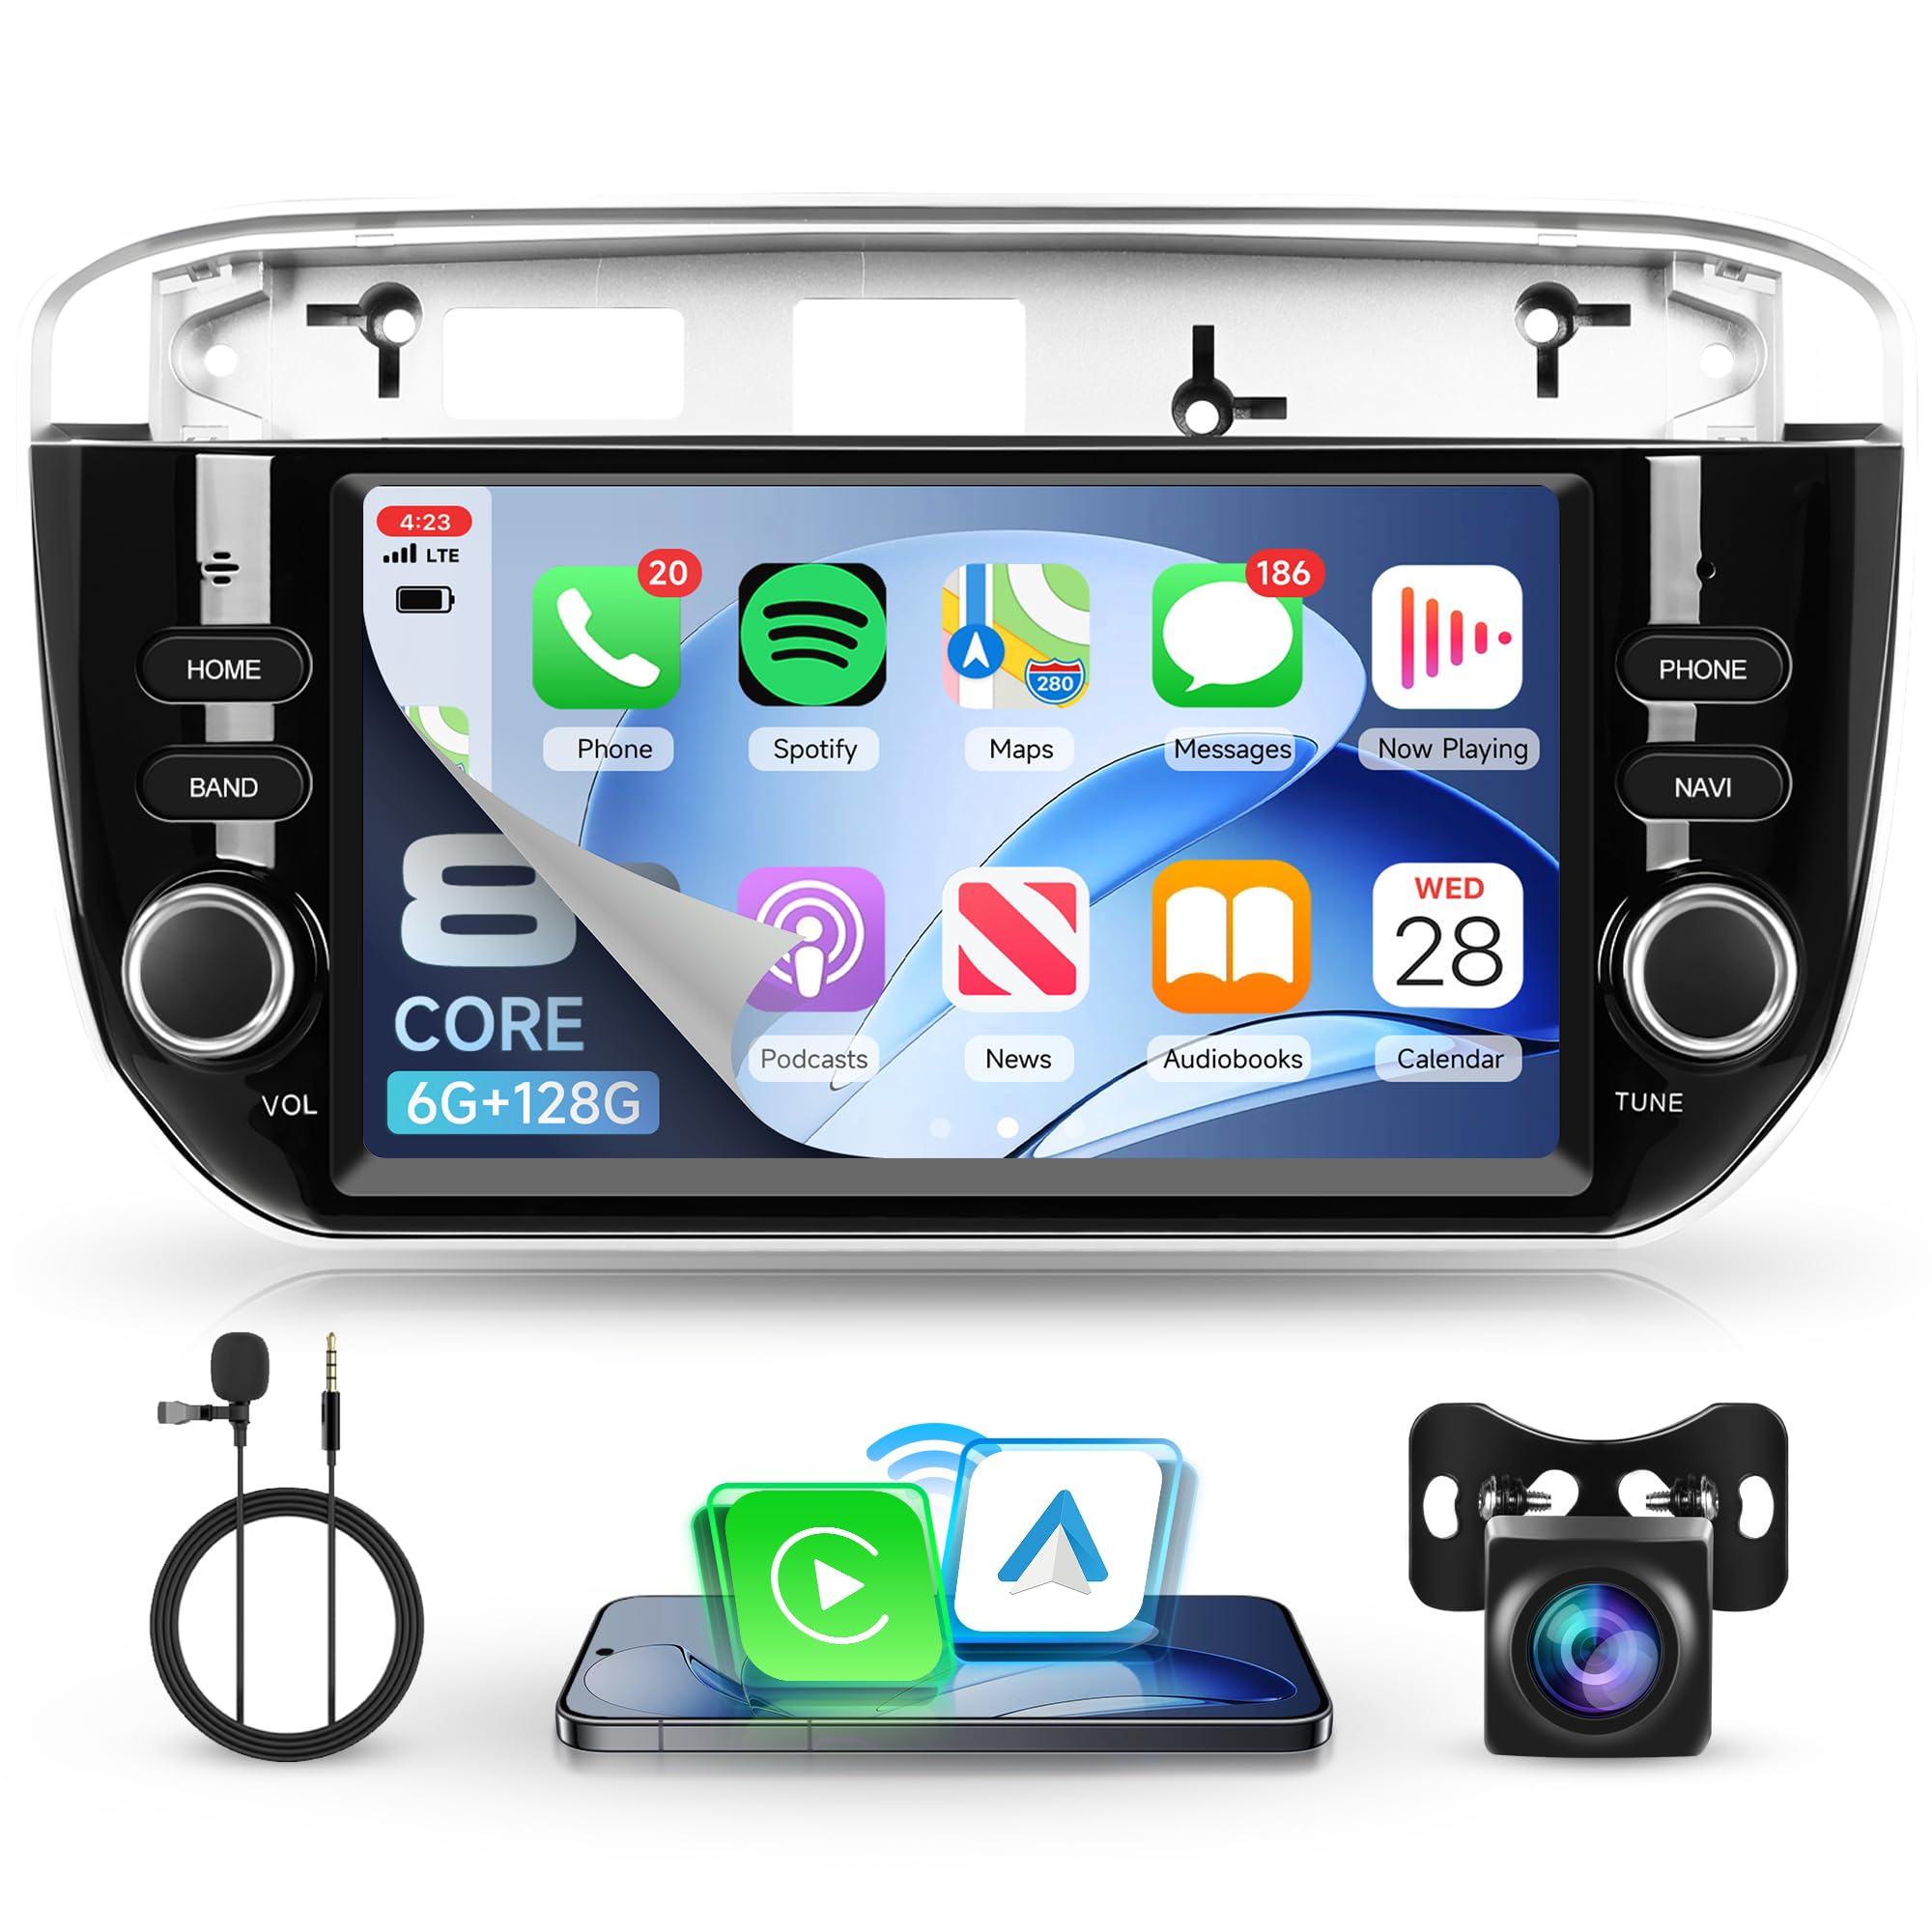
Image 1.1: The Rimoody Android Car Radio seamlessly integrated into a Fiat Punto Evo dashboard.
Key Features:
- Compatibility: Specifically designed for Fiat Punto Evo 2012-2015 models.
- Display: 7-inch IPS screen with 1024*600 resolution, full-capacitive touch screen.
- Performance: 8 Core processor with 6GB RAM and 128GB ROM for smooth operation.
- Smartphone Integration: Wireless CarPlay, Wireless Android Auto, and Mirror Link for seamless phone connectivity.
- Audio: FM/RDS radio, Bluetooth for music streaming and hands-free calls, 32-band EQ with DSP technology for optimized sound quality.
- Navigation & Connectivity: Built-in GPS for offline maps, WiFi for online apps (YouTube, Spotify, TikTok, etc.).
- Safety & Convenience: Rear camera input with automatic display, steering wheel control compatibility.
- User Interface: Split-screen functionality, intelligent voice control (optional activation), 59 UI themes, and 19 wallpapers.
- Optional Features: Internet Radio and Global Weather display (require additional activation).
2. What's in the Box
Verify that all the following components are included in your package:
- Rimoody Android Car Radio Unit
- GPS Antenna
- RCA Cable Set
- USB Cable
- Reverse Line Cable
- Rear View Camera
- Power Cable
- Antenna Adapter
- Canbus Decoder
- User Manual
- Microphone (Mic)
- Installation Tool

Image 2.1: Visual representation of the package contents, including the main unit, cables, antenna, and camera.
3. Setup & Installation
Professional installation is recommended. Ensure the vehicle's battery is disconnected before starting installation to prevent electrical damage.
3.1 Pre-Installation Check
- Confirm vehicle compatibility: Fiat Punto Evo 2012-2015.
- Unpack all components and verify against the "What's in the Box" list.
- Disconnect the negative terminal of the car battery.
3.2 Removing the Old Unit
Carefully remove the existing car stereo unit and any associated trim panels using the provided installation tool or appropriate automotive tools. Refer to your vehicle's specific service manual for detailed removal instructions.

Image 3.1: Comparison of the car dashboard before and after the Rimoody car radio installation.
3.3 Wiring Connections
Connect the provided wiring harnesses to the car radio and the vehicle's existing wiring. Ensure all connections are secure. Pay attention to:
- Power Cable: Connect to the vehicle's power supply.
- Canbus Decoder: Essential for integrating with the vehicle's electronics, including steering wheel controls and dashboard data.
- GPS Antenna: Mount in a location with a clear view of the sky, typically on the dashboard or under the windshield.
- USB Cables: Route to an accessible location for connecting external devices.
- RCA Cables: For external amplifiers, subwoofers, or auxiliary video inputs/outputs.
- Reverse Line & Rear Camera: Connect the rear camera and its trigger wire to the reverse light circuit for automatic activation.
- Microphone: Connect the external microphone for improved call quality.
3.4 Installing the New Unit
Carefully slide the Rimoody car radio into the dashboard opening. Secure it using the vehicle's mounting brackets or the provided hardware. Reinstall any trim panels removed earlier.
3.5 Post-Installation
- Reconnect the car battery.
- Turn on the vehicle ignition and power on the car radio.
- Perform initial setup and configuration as prompted on the screen.
4. Operating Instructions
4.1 Basic Operation
- Power On/Off: Press and hold the power button (usually a physical knob or on-screen icon).
- Volume Control: Use the physical volume knob or on-screen controls.
- Touch Screen: Navigate the interface by tapping, swiping, and pinching on the capacitive touch screen.
4.2 Wireless CarPlay & Android Auto
Connect your iPhone or Android smartphone wirelessly to access navigation, music, calls, messages, and other apps directly on the car radio display.
- Ensure Bluetooth and Wi-Fi are enabled on your smartphone.
- On the car radio, select the CarPlay or Android Auto application.
- Follow the on-screen prompts to pair your device.

Image 4.1: Display showing wireless connectivity options: CarPlay, Android Auto, and Mirror Link.
4.3 Mirror Link
Project your smartphone's screen onto the car radio display. This allows you to view any content from your phone, including maps, videos, and apps.
- Connect your phone via USB or Wi-Fi as prompted by the Mirror Link app on the car radio.
- Follow the instructions to establish the connection.
4.4 Radio (FM/RDS)
Access the FM radio tuner for local broadcasts. The RDS (Radio Data System) feature displays station information where available.
- Automatic Tuning: Use the auto-scan function to find and save available stations.
- Manual Tuning: Adjust the frequency manually.
- Presets: Save your favorite stations for quick access.

Image 4.2: Interfaces for Bluetooth music, hands-free calls, FM/RDS radio, and equalizer settings, demonstrating lossless sound quality.
4.5 Bluetooth Connectivity
Pair your smartphone via Bluetooth for hands-free calling and audio streaming.
- Pairing: Enable Bluetooth on your phone and search for the car radio (e.g., "Rimoody Car Stereo"). Enter the PIN if prompted (usually "0000" or "1234").
- Hands-free Calls: Make and receive calls directly through the car radio. Access your phone's contacts and call history.
- Bluetooth Music: Stream audio from your phone to the car radio speakers.
4.6 GPS Navigation & WiFi
The unit features built-in GPS for navigation and WiFi for internet access.
- Offline Maps: Download maps for your region to use navigation without an internet connection.
- Online Navigation: Connect to a WiFi hotspot (e.g., from your phone) to use online mapping applications.
- App Store: Use WiFi to access the app store and download various applications like YouTube, TikTok, Spotify, etc.

Image 4.3: GPS navigation interface with options for online and offline maps, and WiFi connectivity for app access.
4.7 Rear Camera Functionality
When the vehicle is shifted into reverse, the car radio automatically displays the rear camera feed, enhancing safety during parking and maneuvering.

Image 4.4: Rear camera display with parking lines and an illustration of steering wheel control functions.
4.8 Steering Wheel Controls
The unit is compatible with your vehicle's existing steering wheel controls, allowing you to manage audio, calls, and other functions without taking your hands off the wheel.
- Access the "Steering Wheel Control" settings in the car radio's menu.
- Follow the on-screen instructions to program each button on your steering wheel to the desired function.
4.9 Split Screen & Voice Control
- Split Screen: Display up to three applications simultaneously on the screen (e.g., navigation, music player, and contacts). You can also customize desktop shortcuts for frequently used apps.
- Intelligent Voice Control: (Optional activation required) Use natural language commands to ask questions, get directions, check weather, play music, and more.
4.10 UI Themes & Wallpapers
Personalize your car radio's interface by choosing from 59 desktop UI themes and 19 wallpapers available in the settings menu.
4.11 Optional Features (Activation Required)
- Internet Radio: Access over 20 countries and regions of mainstream radio stations worldwide via an internet connection.
- Global Weather Display: Get real-time weather information for cities globally through the internet.
5. Maintenance
- Screen Cleaning: Use a soft, lint-free cloth to gently wipe the screen. For stubborn smudges, slightly dampen the cloth with water or a screen-safe cleaner. Avoid harsh chemicals or abrasive materials.
- Software Updates: Periodically check for software updates through the system settings or the manufacturer's website to ensure optimal performance and access to new features.
- General Care: Avoid exposing the unit to extreme temperatures, direct sunlight for prolonged periods, or excessive moisture.
6. Troubleshooting
6.1 Common Issues and Solutions
- No Power:
- Check all power connections and fuses.
- Ensure the car battery is properly connected and charged.
- No Sound:
- Verify volume settings are not muted or too low.
- Check speaker connections.
- Ensure the correct audio source is selected.
- Bluetooth Connection Issues:
- Ensure Bluetooth is enabled on both the car radio and your phone.
- Delete previous pairings and try pairing again.
- Restart both devices.
- GPS Signal Loss:
- Ensure the GPS antenna is mounted in a clear location with an unobstructed view of the sky.
- Check antenna connection.
6.2 Dashboard Flickering (Fiat Punto Evo 2012-2015 Specific)
If your vehicle's dashboard mileage display starts flickering after installation, this indicates a CANbus protocol mismatch. Follow these steps to resolve the issue:
- Step 1: Protocol Setting
On the car radio, navigate to the protocol settings. Select "Simple Fiat-Doble 2009-2015-All" or a similar option that matches your vehicle's year range. Confirm the selection.

Image 6.1: Screen displaying the CANbus protocol selection menu, highlighting the Fiat-Doble option.
- Step 2: Car Info Settings
Enter the "Car Info" APP, then navigate to "Setting" -> "Car setting" -> "Vehicle identification setting 0xCA". Select and execute the following procedure for the model selection:
- Model 1: Turn off the engine, exit the vehicle, close all doors, and wait for 20 minutes (mandatory).
- Model 2: Turn off the engine, exit the vehicle, close all doors, and wait for 10 minutes (mandatory).
- Model 3: Turn off the engine, exit the vehicle, close all doors, and wait for 10 minutes (mandatory).
If the problem persists, repeat Step 2 using different combinations of version/vehicle settings until resolved.

Image 6.2: Car Info settings interface, showing options for vehicle identification and model selection to address CANbus issues.
If the issue cannot be resolved, please contact customer service for assistance.
7. Specifications
| Feature | Specification |
|---|---|
| Brand | Rimoody |
| Model | 8 Core 6G+128G |
| Compatible Vehicles | Fiat Punto Evo 2012-2015 |
| Connectivity Technology | USB, Bluetooth, Wi-Fi |
| Control Type | Steering Wheel Controls, Touch |
| Special Features | GPS Navigation, Wireless CarPlay, Android Auto, Mirror Link, Rear Camera Support, FM/RDS Radio, EQ, Split Screen, Voice Control |
| Compatible Devices | Smartphones, Tablets |
| Audio Output Mode | Stereo |
| Output Power (RMS) | 45 Watts |
| Number of Channels | 4 |
| Max Output Power | 180 Watts |
| Supported Internet Services | Spotify (and others via App Store) |
| Manufacturer | Rimoody |
| Country of Origin | China |
8. Warranty & Support
8.1 Product Warranty
This Rimoody product comes with a 2-year manufacturer's warranty from the date of purchase. This warranty covers defects in materials and workmanship under normal use. It does not cover damage caused by improper installation, accident, misuse, abuse, neglect, or unauthorized modification.
Please retain your proof of purchase for warranty claims.
8.2 Customer Support
For technical assistance, troubleshooting not covered in this manual, or warranty claims, please contact Rimoody customer support. Refer to the contact information provided with your purchase or visit the official Rimoody website for support details.
When contacting support, please have your product model number (8 Core 6G+128G) and purchase date ready.


