
Introduction
Thank you for choosing the Evanshow Bio-dl001 Smart Fingerprint Door Knob. This keyless entry system offers advanced security and convenience with multiple unlocking methods, including fingerprint, password, NFC card, and emergency key. This manual provides detailed instructions for proper installation, operation, and maintenance to ensure optimal performance and longevity of your smart door knob.
Product Overview
Key Features
- Multiple Unlocking Methods: Supports fingerprint, password, NFC card, and emergency key.
- Biometric Fingerprint Recognition: Quick 0.5-second unlock with advanced biometric technology. Stores up to 100 fingerprints.
- User Capacity: Supports up to 300 users (100 fingerprints, 100 passwords).
- Auto-Lock Function: Automatically secures the door after a pre-set time.
- Waterproof Design: Suitable for various weather conditions.
- Local Data Storage: Fingerprints and passwords are stored locally for enhanced privacy and security.
- Emergency Key Override: Provides a traditional key backup for access.
Included Components
The package includes the following items:
- Smart Door Knob Assembly
- Battery Compartment
- 1 Emergency Key
- 2 NFC Cards
- Installation Manual (this document)
- Mounting Hardware
Unlocking Methods
The Evanshow Bio-dl001 offers multiple convenient ways to unlock your door:
- Fingerprint: Quick, one-touch access using registered fingerprints.
- Password: Enter a numerical code on the keypad.
- NFC Card: Use the provided NFC cards for proximity unlocking.
- Emergency Key: Traditional key access for backup or emergencies.
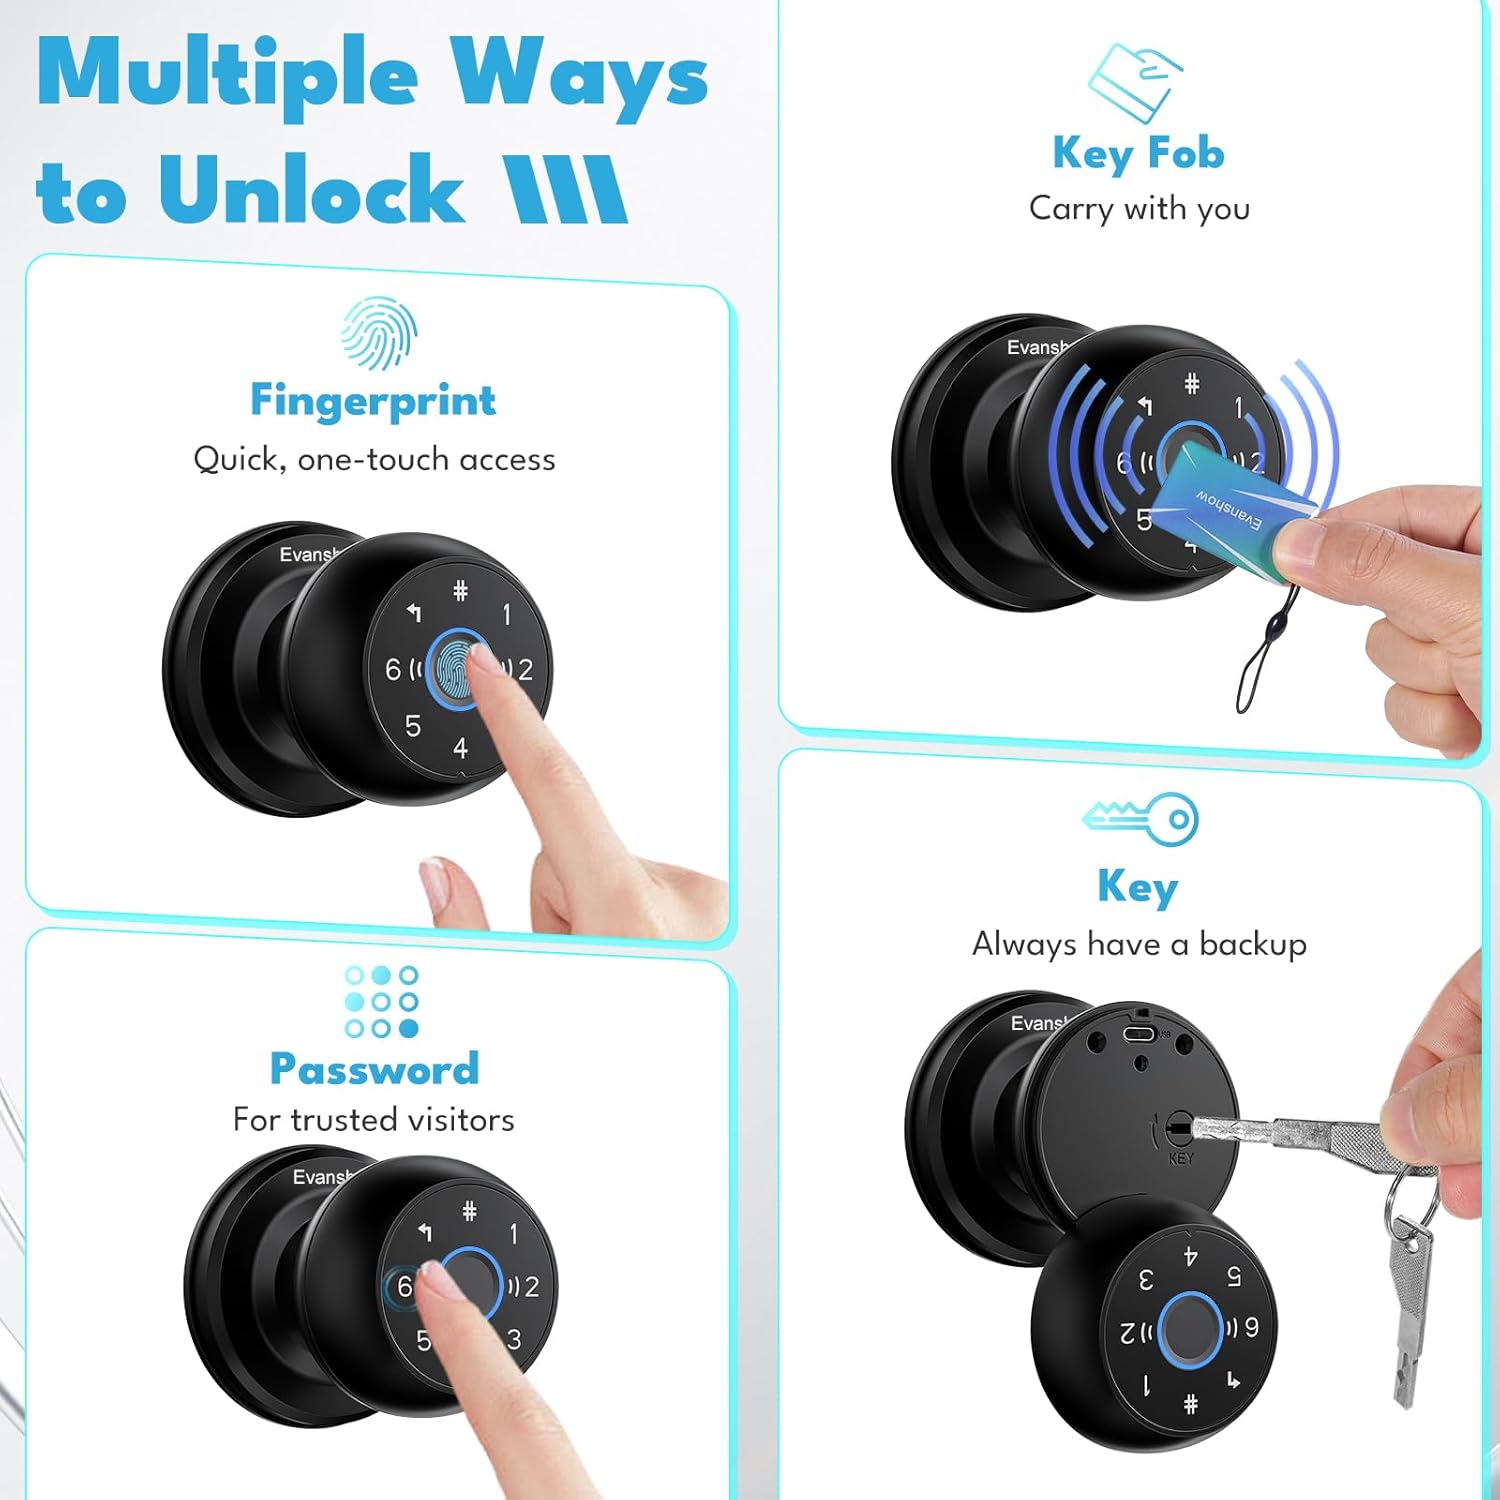
Figure 1: Multiple Unlocking Methods. This image illustrates the various ways to gain access: fingerprint, NFC card, password, and a traditional emergency key.
Installation Guide
The Evanshow Bio-dl001 smart door knob is designed for easy DIY installation without the need for drilling or complex wiring. Please follow these steps carefully.
Compatibility Check
Before beginning installation, ensure your door meets the following specifications:
- Door Thickness: 1.18 inches to 1.97 inches (30mm-50mm).
- Backset Distance: 2-3/8 inches or 2-3/4 inches (60mm or 70mm).
- Hole Diameter: 2-1/8 inches (54mm).
- Latch Hole: 1 inch (25mm).
- Hand Orientation: Reversible for both left and right-handed doors.
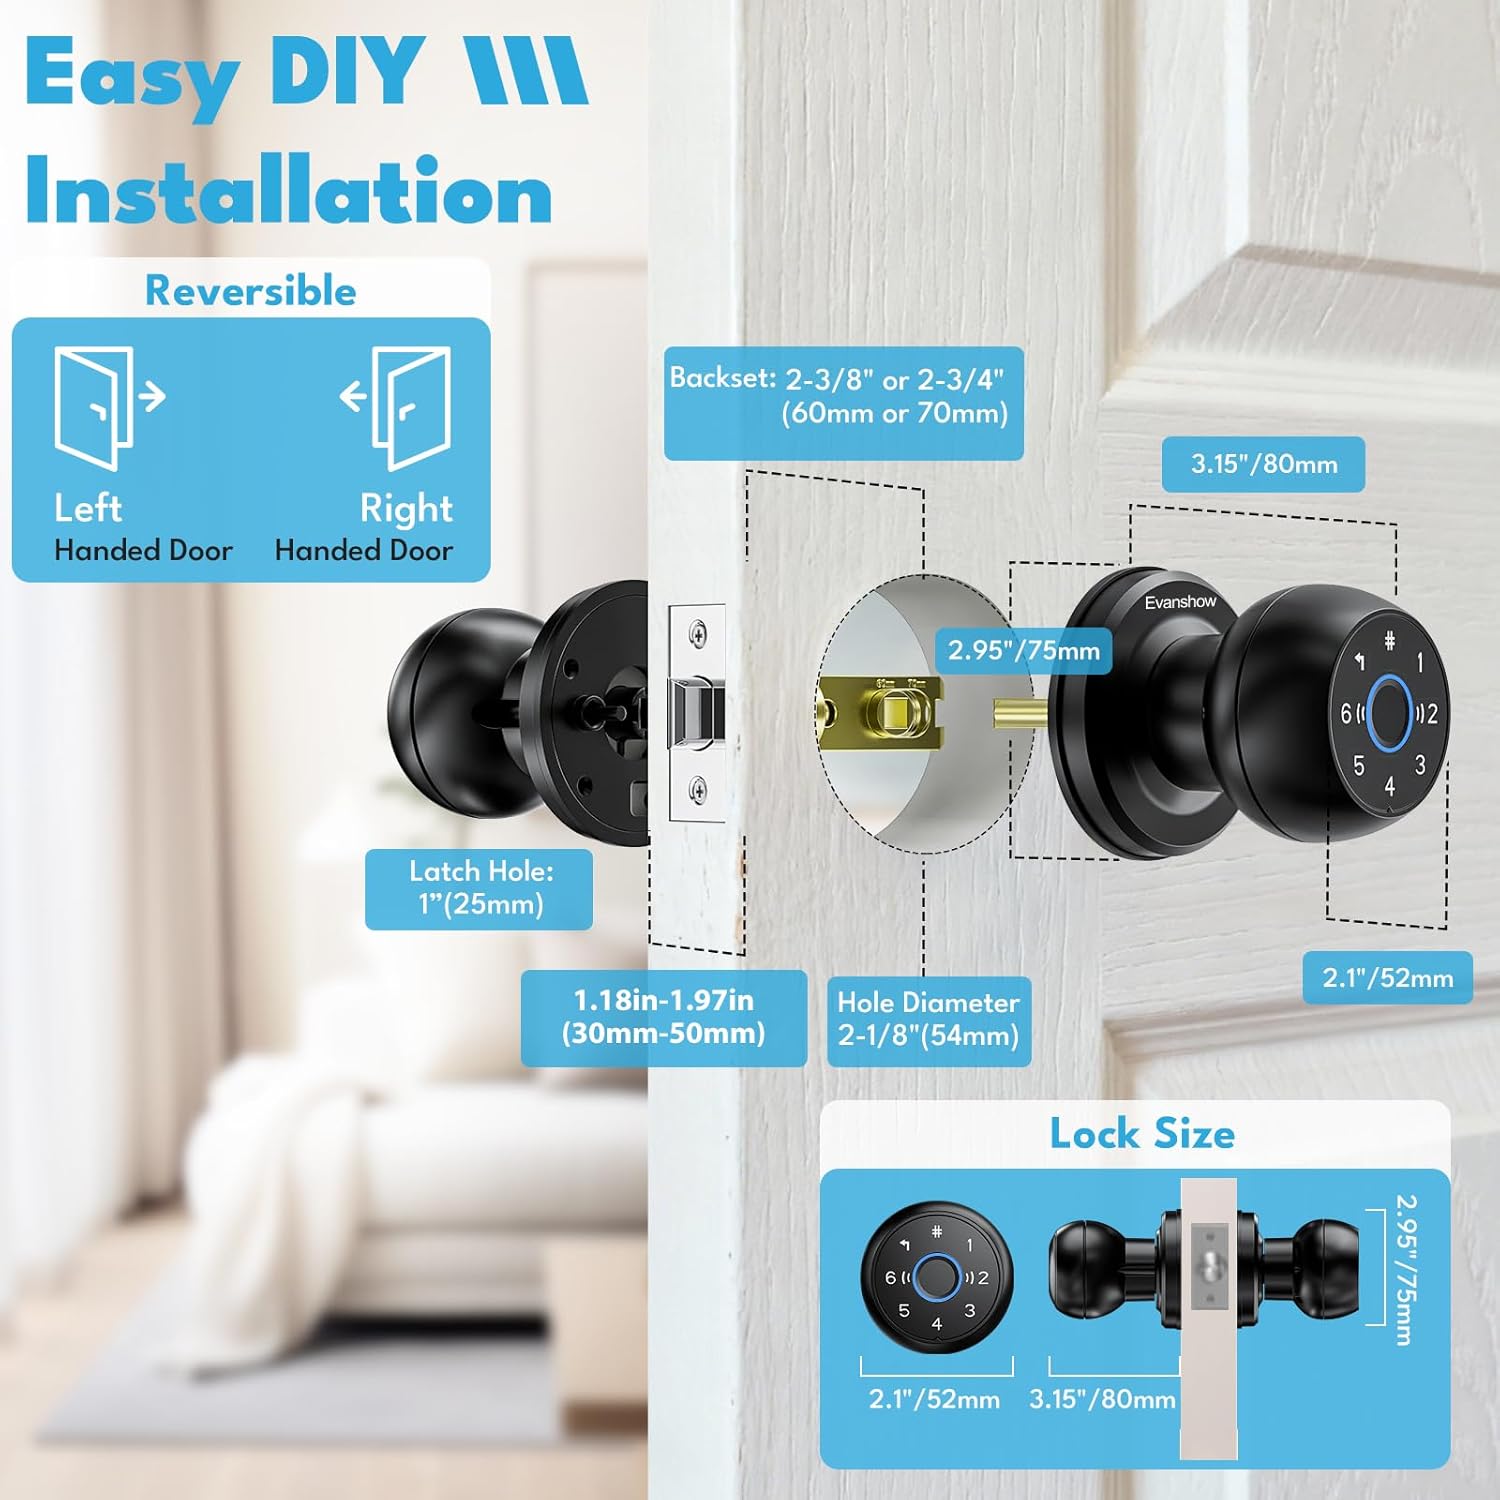
Figure 2: Door Compatibility and Dimensions. This diagram illustrates the required door thickness, backset, and hole diameters for proper installation.
Installation Steps
- Prepare the Door: Ensure the door is clean and the existing holes match the required dimensions.
- Install the Latch: Insert the latch into the door edge and secure it with screws. Ensure the latch bolt faces the correct direction for your door's swing.
- Install the Exterior Knob: Place the exterior knob assembly through the door, aligning the spindle with the latch mechanism.
- Install the Interior Knob: Connect the interior knob assembly to the exterior knob, ensuring all wires are properly routed and not pinched. Secure with mounting screws.
- Insert Batteries: Open the battery compartment on the interior knob and insert 4 AAA batteries (not included). Ensure correct polarity.
- Test Operation: After installation, test the mechanical operation of the knob and latch before proceeding to programming.
Operation and Programming
Before using the smart door knob, you must first add an administrator. Failure to do so will allow anyone to unlock the door with their fingerprint.
Initial Setup: Adding an Administrator
- Press 1 + # on the keypad.
- Follow the voice prompts to register your fingerprint multiple times until confirmed.
- The first registered fingerprint will automatically be set as the administrator.
Function Settings Overview
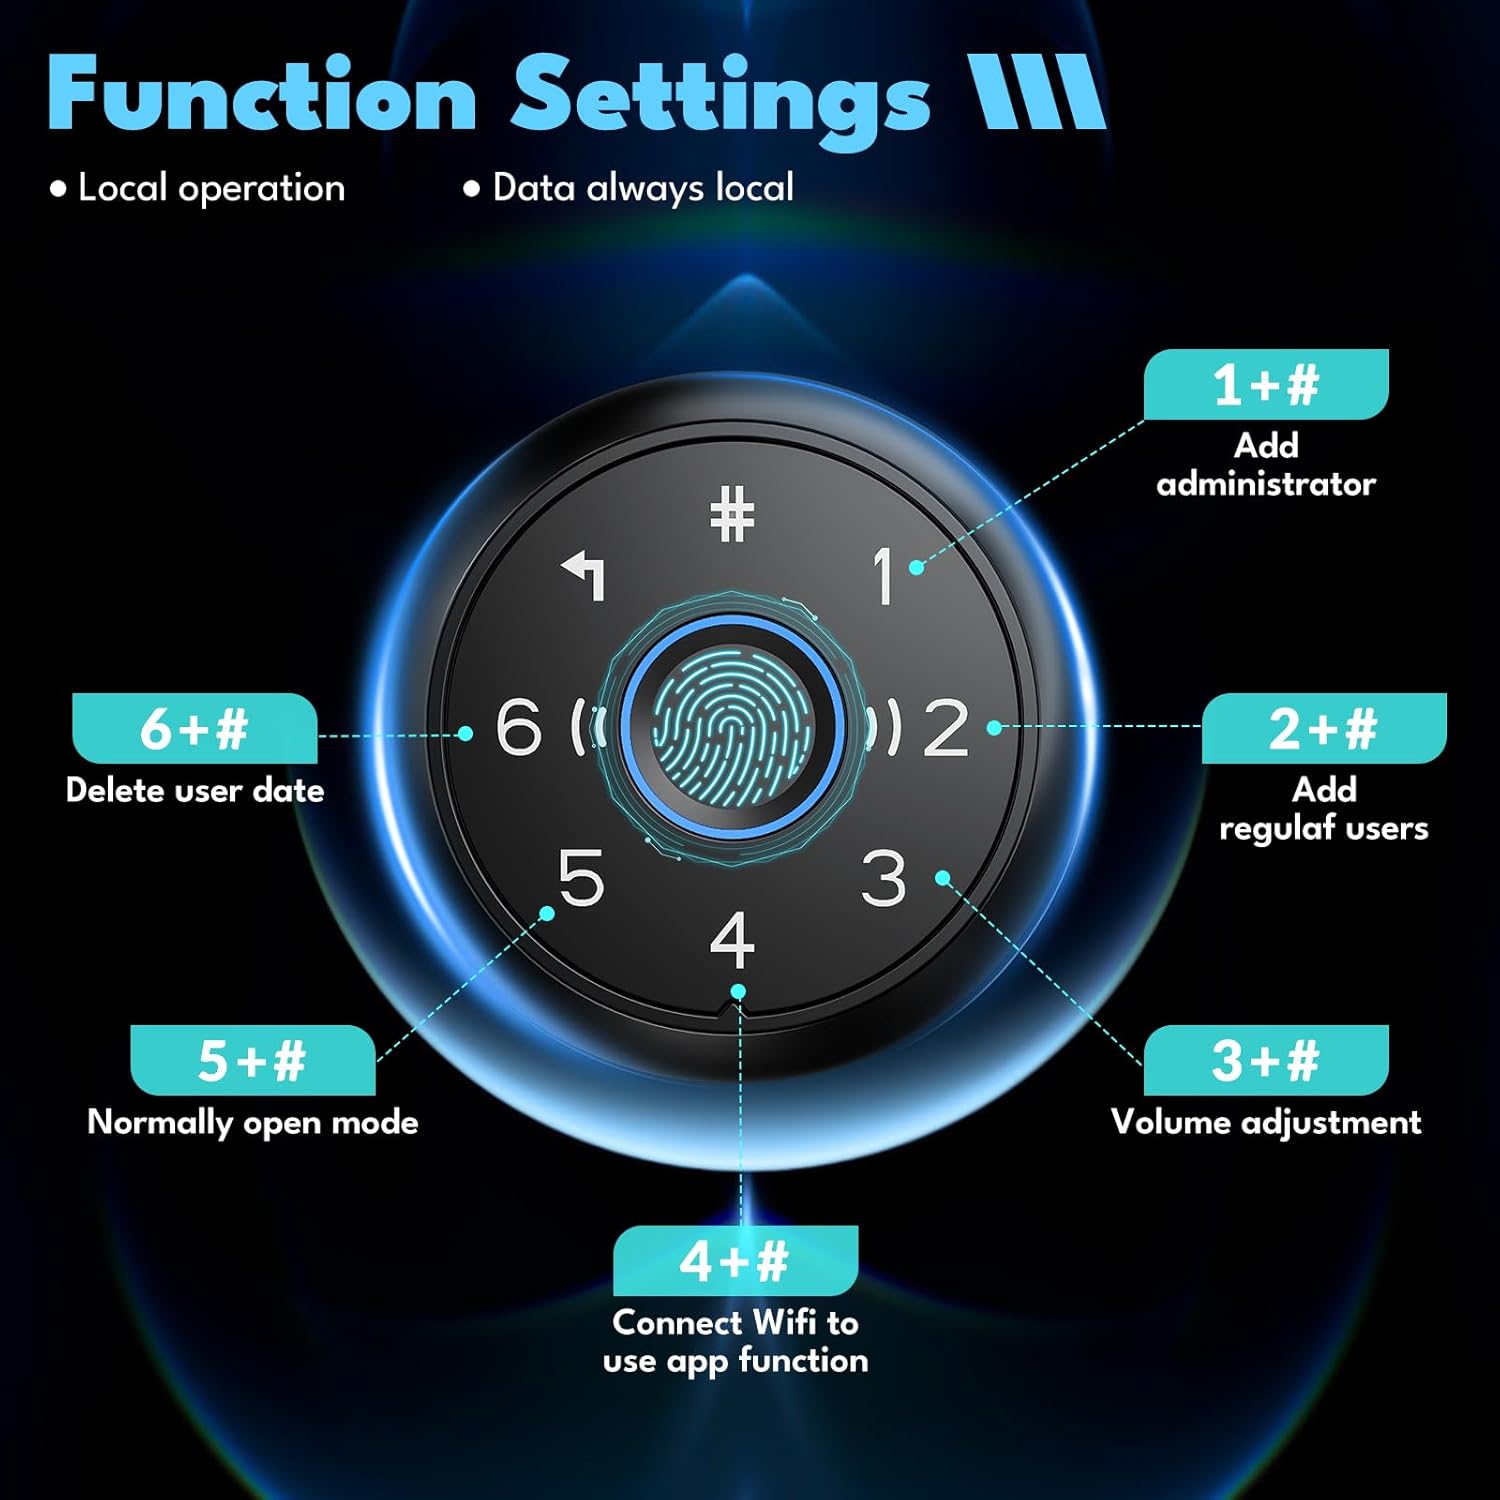
Figure 3: Function Settings. This image displays the keypad layout and the corresponding codes for various settings.
User Management
- Add Administrator: Press 1 + #. (Only the first registered user becomes administrator).
- Add Regular Users: Press 2 + #. Follow prompts to add fingerprints or passwords for regular users.
- Delete User Data: Press 6 + #. This will delete all user data.
Advanced Settings
- Volume Adjustment: Press 3 + # to cycle through volume levels.
- Normally Open Mode: Press 5 + # to activate or deactivate. In this mode, the door remains unlocked until manually locked or the mode is deactivated.
- Auto-Lock Function: The device automatically locks 5 seconds after unlocking. This feature is typically enabled by default.

Figure 4: Auto-Lock Mode. The smart door knob automatically locks after a short period, ensuring security.
Maintenance
Battery Replacement
The smart door knob requires 4 AAA batteries (not included). When the battery level is low, the lock will provide an audible warning. To replace batteries:
- Locate the battery compartment on the interior knob.
- Open the compartment cover.
- Remove the old batteries and insert new AAA batteries, ensuring correct polarity (+/-).
- Close the battery compartment cover securely.
Cleaning and Care
To maintain the appearance and functionality of your smart door knob:
- Wipe the surface with a soft, damp cloth. Avoid abrasive cleaners or solvents.
- Keep the fingerprint sensor clean and free of debris for optimal performance.
- The door knob is designed to be waterproof, making it suitable for various environments.

Figure 5: Waterproof Design. The smart door knob is built to withstand various weather conditions, ensuring durability.
Troubleshooting
| Problem | Possible Cause | Solution |
|---|---|---|
| Door does not lock/unlock with fingerprint. | Fingerprint not registered, sensor dirty, or incorrect placement. | Ensure fingerprint is registered as an administrator or regular user. Clean the sensor. Try different finger positions. |
| Door does not lock/unlock with password. | Incorrect password entered, or password not registered. | Verify the password. Ensure the password is correctly registered. |
| Lock is unresponsive. | Low batteries or dead batteries. | Replace all 4 AAA batteries with new ones. |
| Anyone can unlock the door with their fingerprint. | No administrator has been set up yet. | Immediately set up an administrator by pressing 1 + # and registering a fingerprint. This is a critical first step. |
| Auto-lock function not working. | Normally Open Mode is active. | Deactivate Normally Open Mode by pressing 5 + #. |
Specifications
| Feature | Detail |
|---|---|
| Model Number | Bio-dl001 |
| Brand | Evanshow |
| Material | ABS Plastic, Electronic Components, Zinc Alloy |
| Color | Matte Black (Q2-Upgraded Version without App) |
| Product Dimensions | 6"L x 3"W (15.24cm L x 7.62cm W) |
| Exterior Finish | Matte Black |
| Specific Uses | Apartment Doors, Bedroom Doors, Interior Doors, Office Doors |
| Special Features | Auto-locking, Digital Keypad, Electronic Touchscreen, Emergency Key Override, Fingerprint Recognition |
| Included Components | Smart Door Knob, Battery Compartment, 1 Emergency Key, 2 NFC Cards, Installation Manual, Mounting Hardware |
| Lock Type | Auto-lock, Biometric, Digital Code |
| Theme | Modern, Security, Smart Home |
| Center To Center Spacing | 2.75 Inches (69.85mm) |
| Metal Type | Zinc Alloy |
| Hand Orientation | Reversible |
| Projection Distance | 2.8 Inches (71.12mm) |
| Unit Count | 1.0 Count |
| Number of Items | 1 |
| Manufacturer | Smart Security Solutions |
| Item Depth | 3.5 Inches (88.9mm) |
| Indoor/Outdoor Usage | Indoor |
| Item Weight | 1.94 pounds (0.88 kg) |
| Batteries Required? | Yes (4 x AAA, not included) |
Note: While the product features waterproof characteristics, its primary intended use is for indoor applications such as bedrooms, apartments, and offices.
Warranty and Support
Warranty Information
Please refer to the product packaging or the official Evanshow website for specific warranty details. Typically, smart locks come with a limited manufacturer's warranty covering defects in materials and workmanship under normal use.
Customer Support
For technical assistance, troubleshooting, or any questions regarding your Evanshow Bio-dl001 Smart Fingerprint Door Knob, please contact Evanshow customer support. Contact details can usually be found on the product packaging, the manufacturer's website, or through your purchase platform.
When contacting support, please have your product model number (Bio-dl001) and purchase information readily available.


