1. Introduction
Thank you for choosing the Wenoker Magnetic Resistance Indoor Cycling Bike. This manual provides essential information for the safe assembly, operation, maintenance, and troubleshooting of your new exercise equipment. Please read this manual thoroughly before use and retain it for future reference.

Image 1.1: The Wenoker Magnetic Resistance Indoor Cycling Bike.
2. Safety Information
To ensure your safety and prolong the life of your exercise bike, please observe the following precautions:
- Consult a physician before starting any new exercise program.
- Keep children and pets away from the equipment during operation.
- Place the bike on a stable, level surface. Use a mat to protect flooring.
- Ensure all bolts and nuts are securely tightened before each use.
- Wear appropriate exercise attire and footwear.
- Do not exceed the maximum weight capacity of 350 pounds (158 kg).
- Use the emergency stop knob immediately if you feel unwell or experience discomfort.
3. Package Contents
Verify that all components are present before assembly:
- Main Frame (pre-assembled)
- Front Stabilizer
- Rear Stabilizer
- Left Pedal
- Right Pedal
- Seat Post
- Seat
- Handlebar Post
- Handlebars
- LCD Monitor
- Water Bottle Holder
- Hardware Kit (bolts, washers, nuts, wrench, Allen key)
- User Manual

Image 3.1: The Wenoker Exercise Bike is 80% pre-assembled, showing main components.
4. Assembly Instructions
The Wenoker Indoor Cycling Bike is 80% pre-assembled. Follow these steps for quick setup, typically within 30 minutes:
- Attach Stabilizers: Secure the front and rear stabilizers to the main frame using the provided bolts and washers. Ensure they are firmly tightened.
- Install Pedals: Identify the Left (L) and Right (R) pedals. Thread the left pedal counter-clockwise and the right pedal clockwise into their respective crank arms. Tighten with the wrench.
- Attach Water Bottle Holder: Mount the water bottle holder to the designated holes on the frame using the provided screws.
- Install Seat Post and Seat: Insert the seat post into the main frame. Adjust to your desired height and secure it with the adjustment knob. Attach the seat to the seat post, ensuring it is level and tightened.
- Install Handlebar Post and Handlebars: Insert the handlebar post into the main frame. Adjust to your preferred height and secure it. Attach the handlebars to the handlebar post using the provided bolts.
- Connect Monitor Cable and Attach Monitor: Connect the sensor cable from the main frame to the LCD monitor. Mount the LCD monitor onto the handlebar assembly.
5. Product Features
Your Wenoker Indoor Cycling Bike is designed with several features to enhance your workout experience:
- Magnetic Resistance System: Provides smooth, quiet, and consistent resistance. Features 8 levels of adjustable resistance and an emergency push-to-stop function.
- Silent Belt Drive: Engineered for ultra-quiet performance (under 25dB), allowing for workouts without disturbing others.
- LCD Monitor: Tracks essential workout data including time, distance, speed, calories burned, and heart rate.
- App Connectivity: Bluetooth enabled for pairing with fitness apps like Zwift and Kinomap, and syncing data with Apple Health or Google Health.
- Adjustable Comfort: Fully adjustable seat (height, forward/backward) and handlebars (height) to accommodate various user heights and preferences.
- Secure Pedals: Features anti-slip pedals with adjustable foot straps for secure foot placement during intense workouts.
- Integrated Device Holder: A convenient tray on the handlebars to hold your smartphone or tablet.
- Water Bottle Holder: Keeps hydration within reach during your workout.
- Transport Wheels: Located at the front stabilizer for easy relocation and storage.
- Sturdy Construction: Reinforced alloy steel triangle frame supports up to 350 pounds (158 kg).
Detailed Feature Overview

Image 5.1: Illustrates the silent and smooth belt-driven system.

Image 5.2: Shows compatibility with popular fitness apps like Zwift and Kinomap.
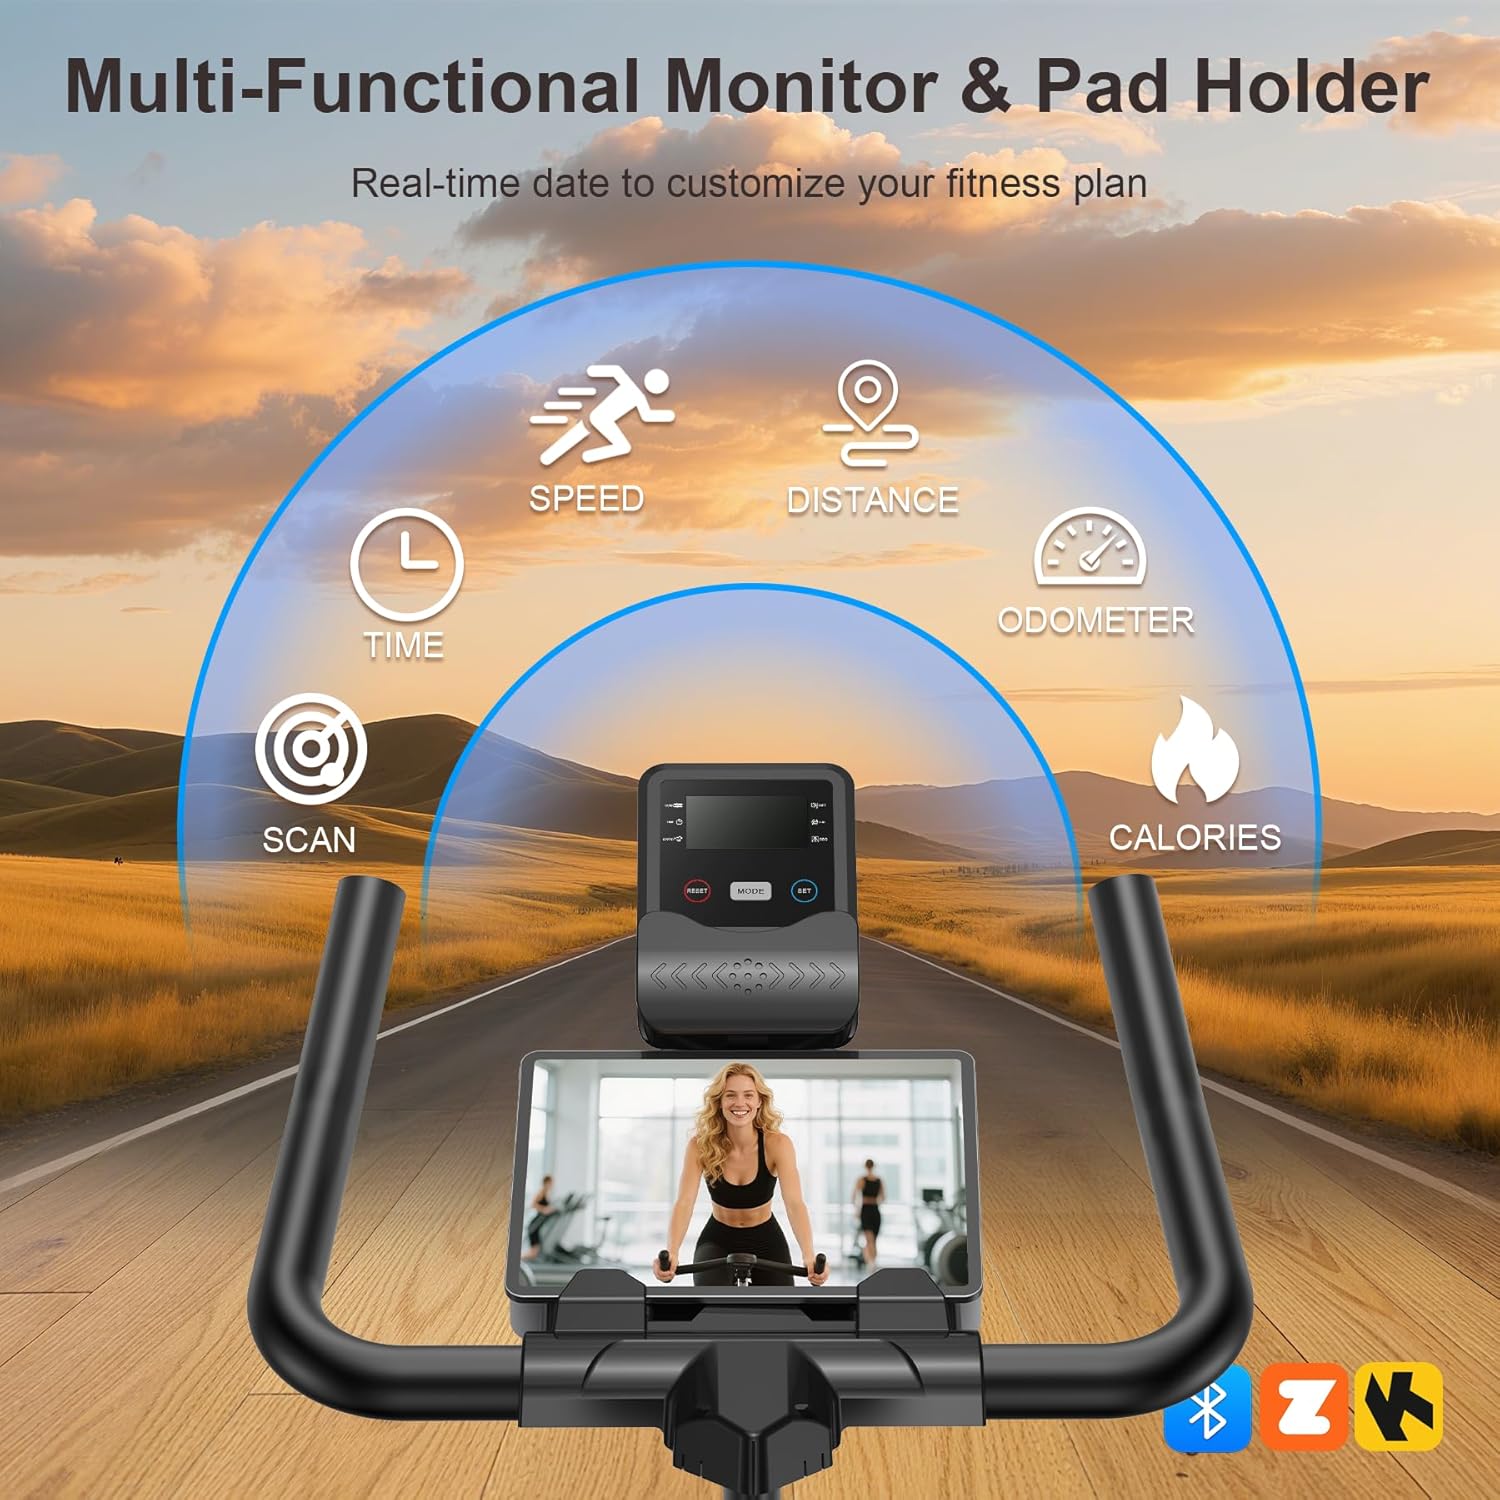
Image 5.3: Close-up of the multi-functional LCD monitor and integrated device holder.
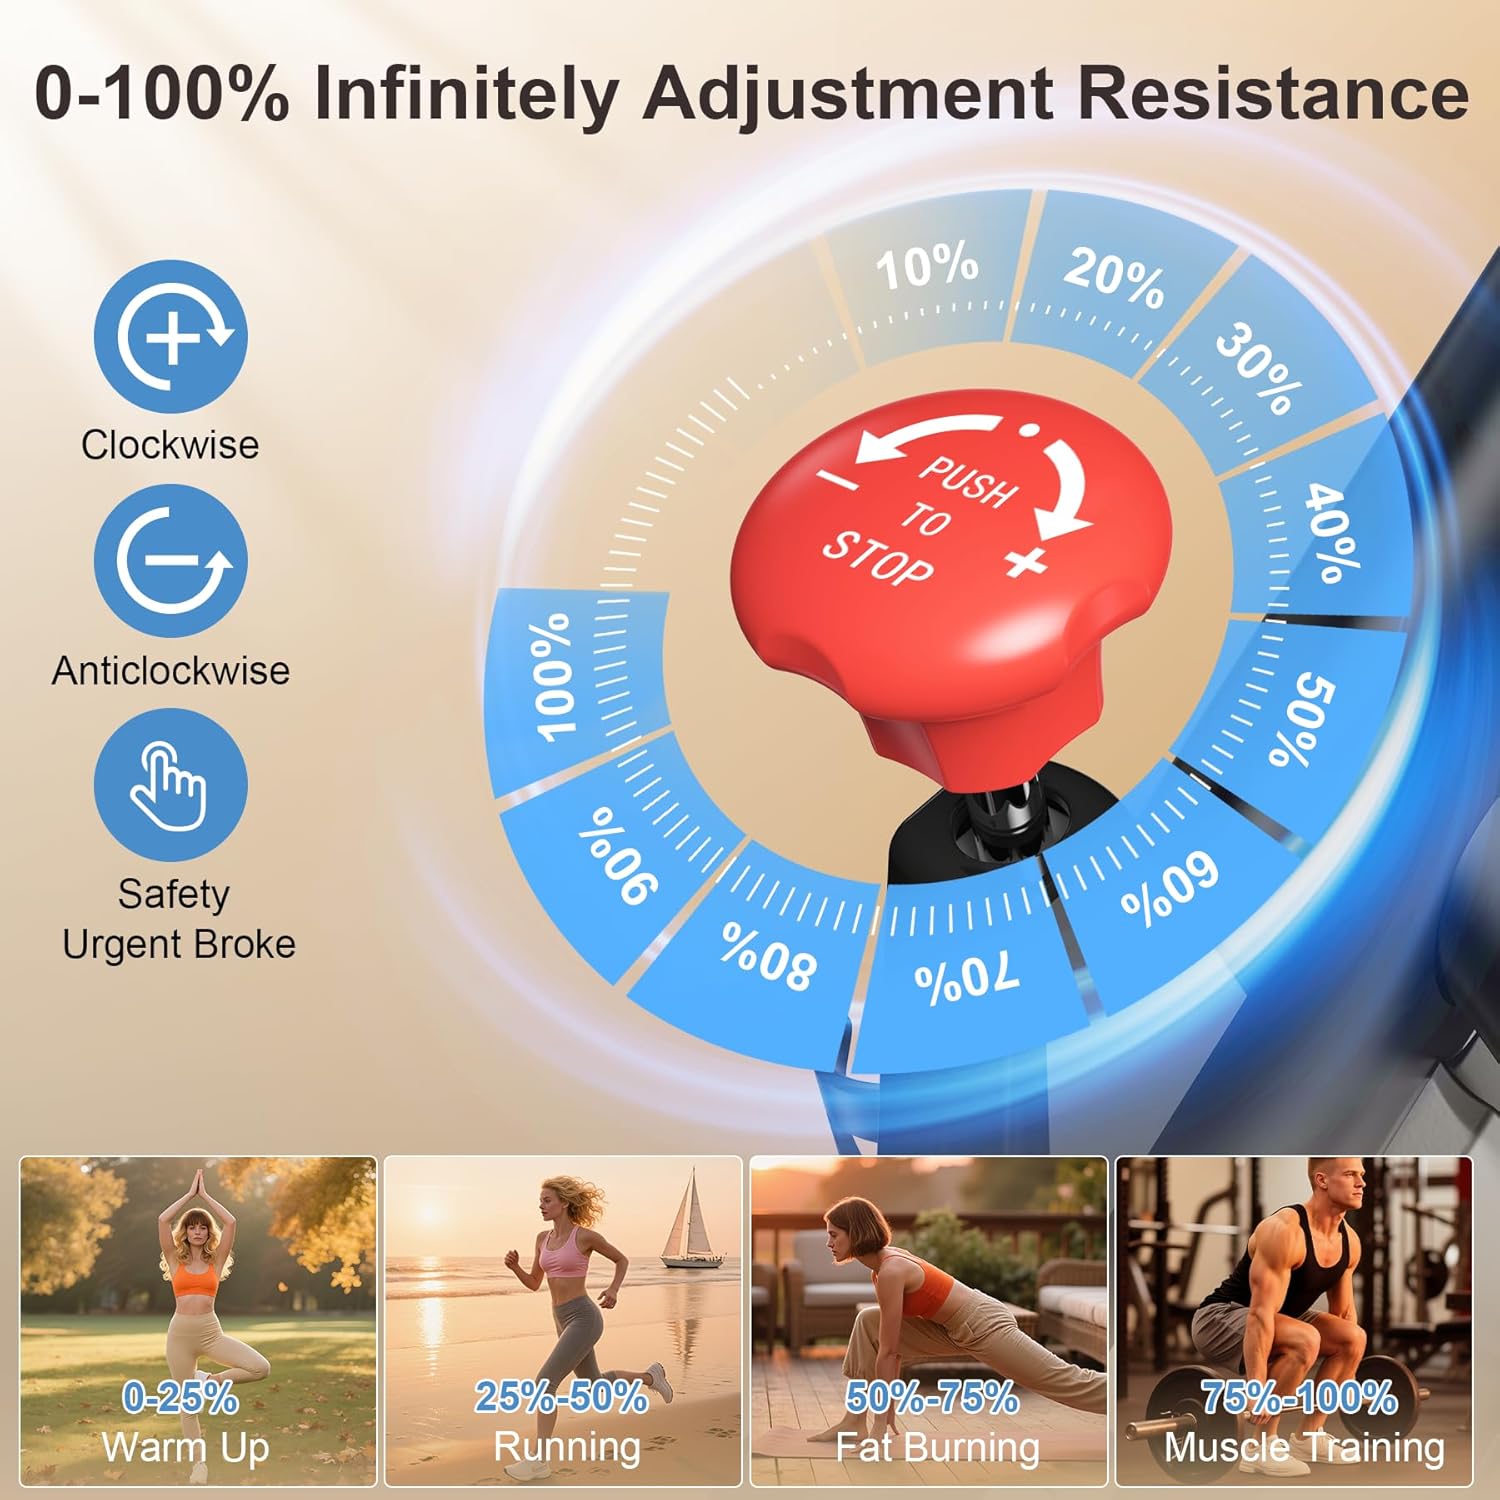
Image 5.4: Diagram illustrating the 0-100% infinitely adjustable magnetic resistance.

Image 5.5: Demonstrates the adjustable handlebar and seat post for personalized comfort.

Image 5.6: Shows the transport wheels for convenient relocation.
6. Operating Instructions
6.1 Starting a Workout
- Ensure the bike is on a stable surface.
- Adjust the seat and handlebars to your comfortable riding position (refer to Section 7).
- Place your feet securely in the pedals and fasten the straps.
- The LCD monitor will activate automatically when you begin pedaling or by pressing the 'MODE' button.
6.2 Adjusting Resistance
The bike features a magnetic resistance system with a red knob located on the main frame:
- Turn the knob clockwise to increase resistance.
- Turn the knob counter-clockwise to decrease resistance.
- Press the red knob down firmly to engage the emergency stop function, which will quickly halt the flywheel.
6.3 Using the LCD Monitor
The LCD monitor displays your workout data:
- MODE Button: Press to cycle through different display modes (Time, Speed, Distance, Calories, Heart Rate, Odometer, Scan).
- SCAN Mode: Automatically cycles through all functions every few seconds.
- RESET Button: Press and hold to clear all current workout data.
- SET Button: Used for setting target values for time, distance, or calories (refer to monitor instructions for detailed setup).
6.4 App Connection (Bluetooth)
To connect your bike to compatible fitness applications:
- Download a compatible fitness app (e.g., Zwift, Kinomap) to your smartphone or tablet.
- Ensure Bluetooth is enabled on your device.
- Open the fitness app and follow its instructions to search for and pair with your Wenoker exercise bike.
- Your workout data will sync in real-time with the app and can be integrated with Apple Health or Google Health.
7. Adjustments
Customize your bike for optimal comfort and performance:
7.1 Seat Adjustment
- Height: Loosen the adjustment knob on the vertical seat post. Raise or lower the seat to your desired height, ensuring your leg has a slight bend at the knee when the pedal is at its lowest point. Tighten the knob securely.
- Forward/Backward: Loosen the adjustment knob beneath the seat. Slide the seat forward or backward to achieve a comfortable position relative to the handlebars. Tighten the knob securely.
7.2 Handlebar Adjustment
- Height: Loosen the adjustment knob on the handlebar post. Raise or lower the handlebars to a comfortable height that allows for a relaxed upper body posture. Tighten the knob securely.
7.3 Pedal Straps
- Adjust the straps on the pedals to securely hold your feet in place, preventing slippage during your workout.
8. Maintenance
Regular maintenance ensures the longevity and safe operation of your exercise bike:
- Cleaning: Wipe down the bike with a damp cloth after each use to remove sweat and dust. Avoid abrasive cleaners.
- Check Fasteners: Periodically inspect all bolts, nuts, and screws to ensure they are tight. Re-tighten as necessary.
- Pedal Inspection: Check pedals for any signs of wear or damage. Ensure straps are intact and functional.
- Belt Drive: The belt drive system is low maintenance and does not require lubrication. Keep the area around the belt clean and free of debris.
- Storage: Store the bike in a dry, cool place away from direct sunlight and extreme temperatures. Use the transport wheels to move it easily.
9. Troubleshooting
If you encounter any issues, refer to the following common solutions:
- Monitor Not Displaying Data: Check the sensor cable connection to the monitor. Ensure the monitor batteries (if applicable) are correctly installed and have sufficient charge.
- Unusual Noises: Inspect all moving parts for loose connections. Ensure the bike is on a level surface. If the noise persists, contact customer support.
- Resistance Issues: Ensure the resistance knob is functioning correctly. If resistance is too loose or too tight at its extremes, check for any obstructions or damage to the magnetic system.
- Bike Wobbles: Adjust the leveling feet on the stabilizers to ensure the bike is stable on uneven floors.
For issues not covered here, please contact Wenoker customer service.
10. Specifications
| Feature | Specification |
|---|---|
| Brand | Wenoker |
| Model Name | 51-VIP3-KFF6 |
| Resistance Mechanism | Magnetic |
| Number of Resistance Levels | 8 (Infinitely Adjustable) |
| Drive System | Belt |
| Maximum Weight Recommendation | 350 Pounds (158 kg) |
| Item Weight | 62 Pounds (28.12 kg) |
| Material | Alloy Steel |
| Product Dimensions (LxWxH) | 37.4"D x 7.48"W x 29.92"H (95cm x 19cm x 76cm) |
| Power Source | Battery Powered (for monitor) |
| Special Features | Adjustable Footstrap, Adjustable Seat, App Connectivity, Speed Monitor, Water Bottle Holder |
11. Warranty and Support
Wenoker offers a 1-year free parts replacement warranty. For any support needs, questions, or concerns regarding your exercise bike, please contact Wenoker customer service. Refer to the contact information provided with your purchase or on the official Wenoker website.


