
1. Introduction
This manual provides detailed instructions for the assembly, operation, and maintenance of your Merax 50.7" Kitchen Island. Please read this manual thoroughly before assembly and use to ensure proper function and longevity of your product. Keep this manual for future reference.

Image: The Merax 50.7" Kitchen Island shown in a kitchen environment with its various storage compartments open, including drawers, a pull-out organizer, and a tilt-out trash can cabinet.
2. Safety Information
- Always assemble the unit on a soft, clean surface to prevent scratches.
- Ensure all parts are present and undamaged before beginning assembly.
- Do not overtighten screws during assembly to avoid damaging the engineered wood.
- Keep small parts away from children during assembly.
- Do not exceed the maximum load capacities specified in the 'Specifications' section.
- Lock the wheels when the island is in a stationary position to prevent accidental movement.
3. Components and Parts List
Before assembly, verify that all components listed below are included in your package. If any parts are missing or damaged, please contact customer support.
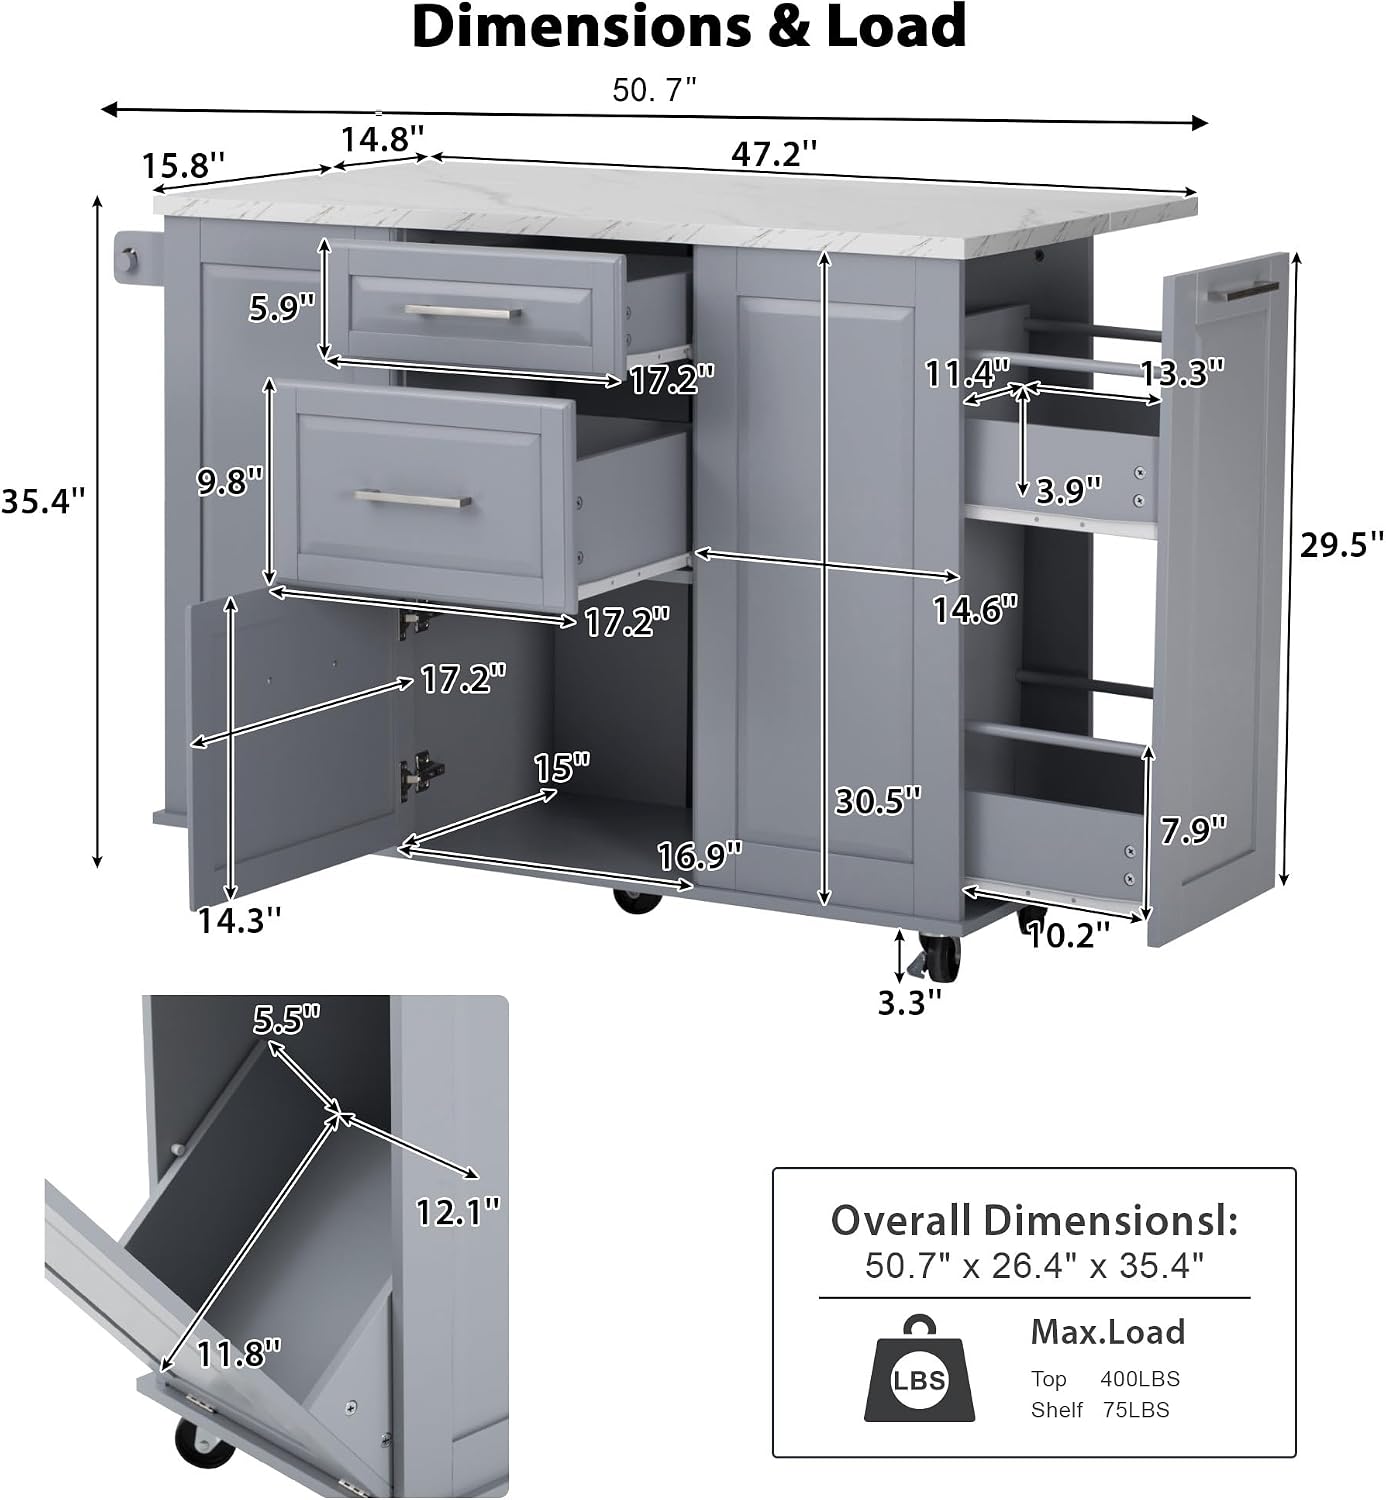
Image: Detailed diagram illustrating the dimensions of each section of the kitchen island, including drawers, cabinets, and the tilt-out trash can compartment, along with maximum load capacities for the top and shelves.
The product includes an installation kit and tools. Refer to the separate assembly instructions provided in your package for a detailed step-by-step guide.
4. Setup and Assembly
Your Merax Kitchen Island requires assembly. A detailed assembly instruction manual with diagrams is included in your product packaging. Please follow these instructions carefully.
4.1 Pre-Assembly Checklist
- Unpack all components and lay them out on a clean, soft surface to prevent damage.
- Verify all parts against the parts list in the assembly manual.
- Ensure you have the necessary tools (included in the kit).
4.2 Assembly Steps
Refer to the dedicated assembly manual for step-by-step instructions. General steps typically include:
- Assembling the main frame.
- Attaching the side panels and back panel.
- Installing drawers and drawer slides.
- Mounting cabinet doors and hinges.
- Assembling the tilt trash can mechanism.
- Attaching the pull-out cabinet organizer.
- Securing the tabletop and drop leaf.
- Installing the wheels and towel rack.


Images: Details of the towel rack and metal hinges, which are components installed during assembly.
5. Operating Instructions
5.1 Using the Drop Leaf Countertop
The kitchen island features a foldable drop leaf on one side, allowing for extended workspace or compact storage. To extend, gently lift the drop leaf until it is level with the main countertop. To fold, support the leaf and release the locking mechanism (if present) to lower it. Ensure the leaf is fully supported when extending or folding.

Image: An overhead view of the kitchen island, demonstrating the drop leaf in its extended position, providing additional counter space.
5.2 Tilt Trash Can Cabinet
The concealed tilt trash can cabinet is designed to hold a 9-gallon trash can (not included). To access, pull the cabinet door outwards from the top, allowing the inner bin holder to tilt forward. Insert or remove the trash can. Push the door back into place to conceal the trash can and help contain odors.

Image: The kitchen island with its tilt-out trash can cabinet open, revealing a trash bag inside and illustrating the mechanism for concealing waste.
5.3 Pull-Out Cabinet Organizer
The kitchen island includes a 2-tier pull-out cabinet organizer. To use, simply pull the cabinet door open and then slide the organizer shelves outwards. This allows for easy access to items stored at the back. Push the shelves back in and close the door when finished.

Image: A close-up view of the two-tier pull-out cabinet organizer, showing its functionality for storing various kitchen items.
5.4 Drawers and Storage Cabinet
The island features two drawers and an additional storage cabinet. The center drawer includes divider bars for flexible organization of kitchen items. Pull drawers and open cabinet doors gently. Avoid overloading to ensure smooth operation.

Image: A side view of the kitchen island with its drawers and cabinet doors open, showcasing the internal storage capacity.
5.5 Locking Wheels
The kitchen island is equipped with 5 wheels, two of which are lockable. To lock a wheel, press down on the lever located on the wheel. To unlock, lift the lever. Always lock the wheels when the island is in a desired stationary position to prevent accidental movement.

Image: A detailed view of the kitchen island's wheels, highlighting the locking mechanism on two of them for stability.
6. Care and Maintenance
6.1 Cleaning the Surface
- Engineered Wood Surfaces: Wipe with a soft, damp cloth. Avoid abrasive cleaners or harsh chemicals that can damage the finish. Dry immediately with a clean cloth.
- Faux Marble Top: Clean spills immediately. Use a mild soap and water solution with a soft cloth. Do not use acidic cleaners, as they can etch the surface.
6.2 Hardware Maintenance
- Periodically check all screws and fasteners to ensure they are tight. Retighten as necessary, but do not overtighten.
- Lubricate drawer slides and wheel mechanisms if they become stiff over time.
6.3 General Care
- Avoid placing hot items directly on the countertop without protection.
- Do not expose the island to excessive moisture or direct sunlight for prolonged periods.
7. Troubleshooting
| Problem | Possible Cause | Solution |
|---|---|---|
| Drawers stick or do not slide smoothly. | Overloaded drawer, misaligned slides, or debris in slides. | Reduce weight in the drawer. Check alignment of slides and clear any obstructions. Lubricate slides if necessary. |
| Wheels do not lock or roll freely. | Locking mechanism engaged incorrectly or debris in wheel. | Ensure the locking lever is fully engaged or disengaged. Clean any debris from the wheel and axle. |
| Drop leaf does not stay extended or fold properly. | Support mechanism not engaged or damaged. | Check that the support mechanism is fully extended and locked into place. Inspect for any damage to the hinges or supports. |
| Cabinet doors are misaligned. | Hinges are loose or improperly adjusted. | Tighten hinge screws. Adjust hinges as per assembly instructions to align doors. |
8. Specifications
| Feature | Detail |
|---|---|
| Brand | Merax |
| Model Number | JY00845 |
| Overall Dimensions (D x W x H) | 26.4" x 50.7" x 35.4" |
| Material | Engineered Wood |
| Top Material Type | Engineered Wood (Faux Marble Veined) |
| Color | Grey+Blue |
| Item Weight | 80 pounds |
| Number of Drawers | 2 |
| Number of Doors | 1 (for main cabinet) + 1 (for tilt trash can) |
| Number of Shelves | 2 (in pull-out organizer) |
| Tilt Trash Can Capacity | Accommodates 9-gallon trash can (not included) |
| Max Load Capacity (Top) | 400 LBS |
| Max Load Capacity (Shelf) | 75 LBS |
| Wheels | 5 wheels, 2 lockable |
| Additional Features | Drop Leaf Design, Pull-Out Cabinet Organizer, Towel Rack |
9. Warranty and Support
9.1 Return Policy
This product is subject to a 30-day return policy for refund or replacement. Please refer to your purchase documentation or retailer's website for specific terms and conditions regarding returns.
9.2 Product Protection Plans
Extended protection plans may be available for purchase separately. These plans typically cover repairs or replacements beyond the standard return period. Consult your retailer for details on available 2-Year or 3-Year protection plans.
9.3 Customer Support
For any questions regarding assembly, missing parts, or product issues not covered in this manual, please contact Merax customer support. Refer to your purchase receipt or the Merax official website for contact information.
10. Product Videos
No official product videos from the seller were found for this item.
