1. Introduction
This manual provides essential information for the safe and effective operation, assembly, and maintenance of your Garvee 60'' Tow Behind Lawn Dethatcher. Please read this manual thoroughly before attempting to assemble, operate, or maintain the equipment. Retain this manual for future reference.
Product Overview
The Garvee 60'' Tow Behind Lawn Dethatcher is designed to efficiently remove thatch, dead grass, leaves, and other debris from your lawn. It features 24 durable spring steel tines and a 60-inch working width, making it suitable for large areas. Its robust construction ensures stability and effective ground contact for a thorough clean.
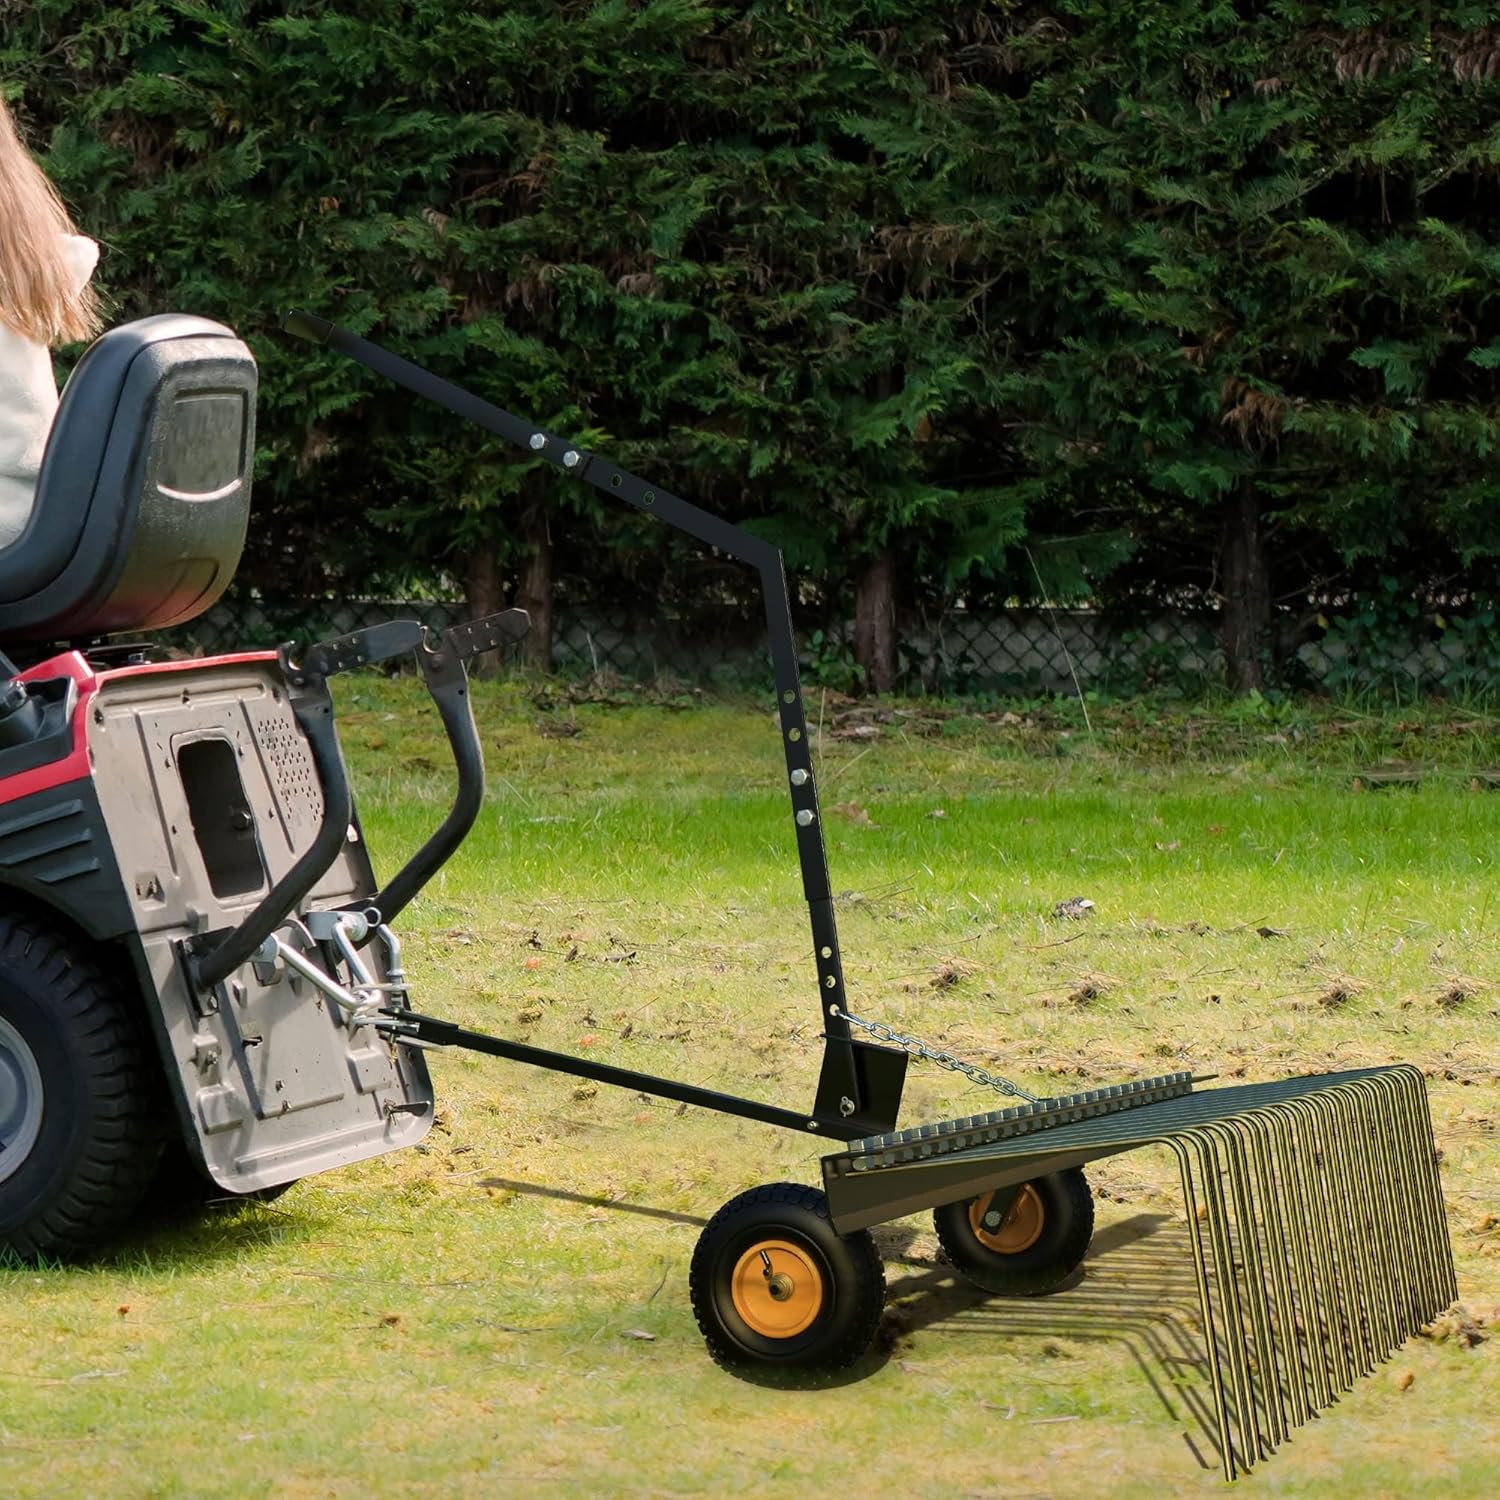
Figure 1.1: Garvee 60-inch dethatcher being towed by a riding lawn mower across a green lawn.
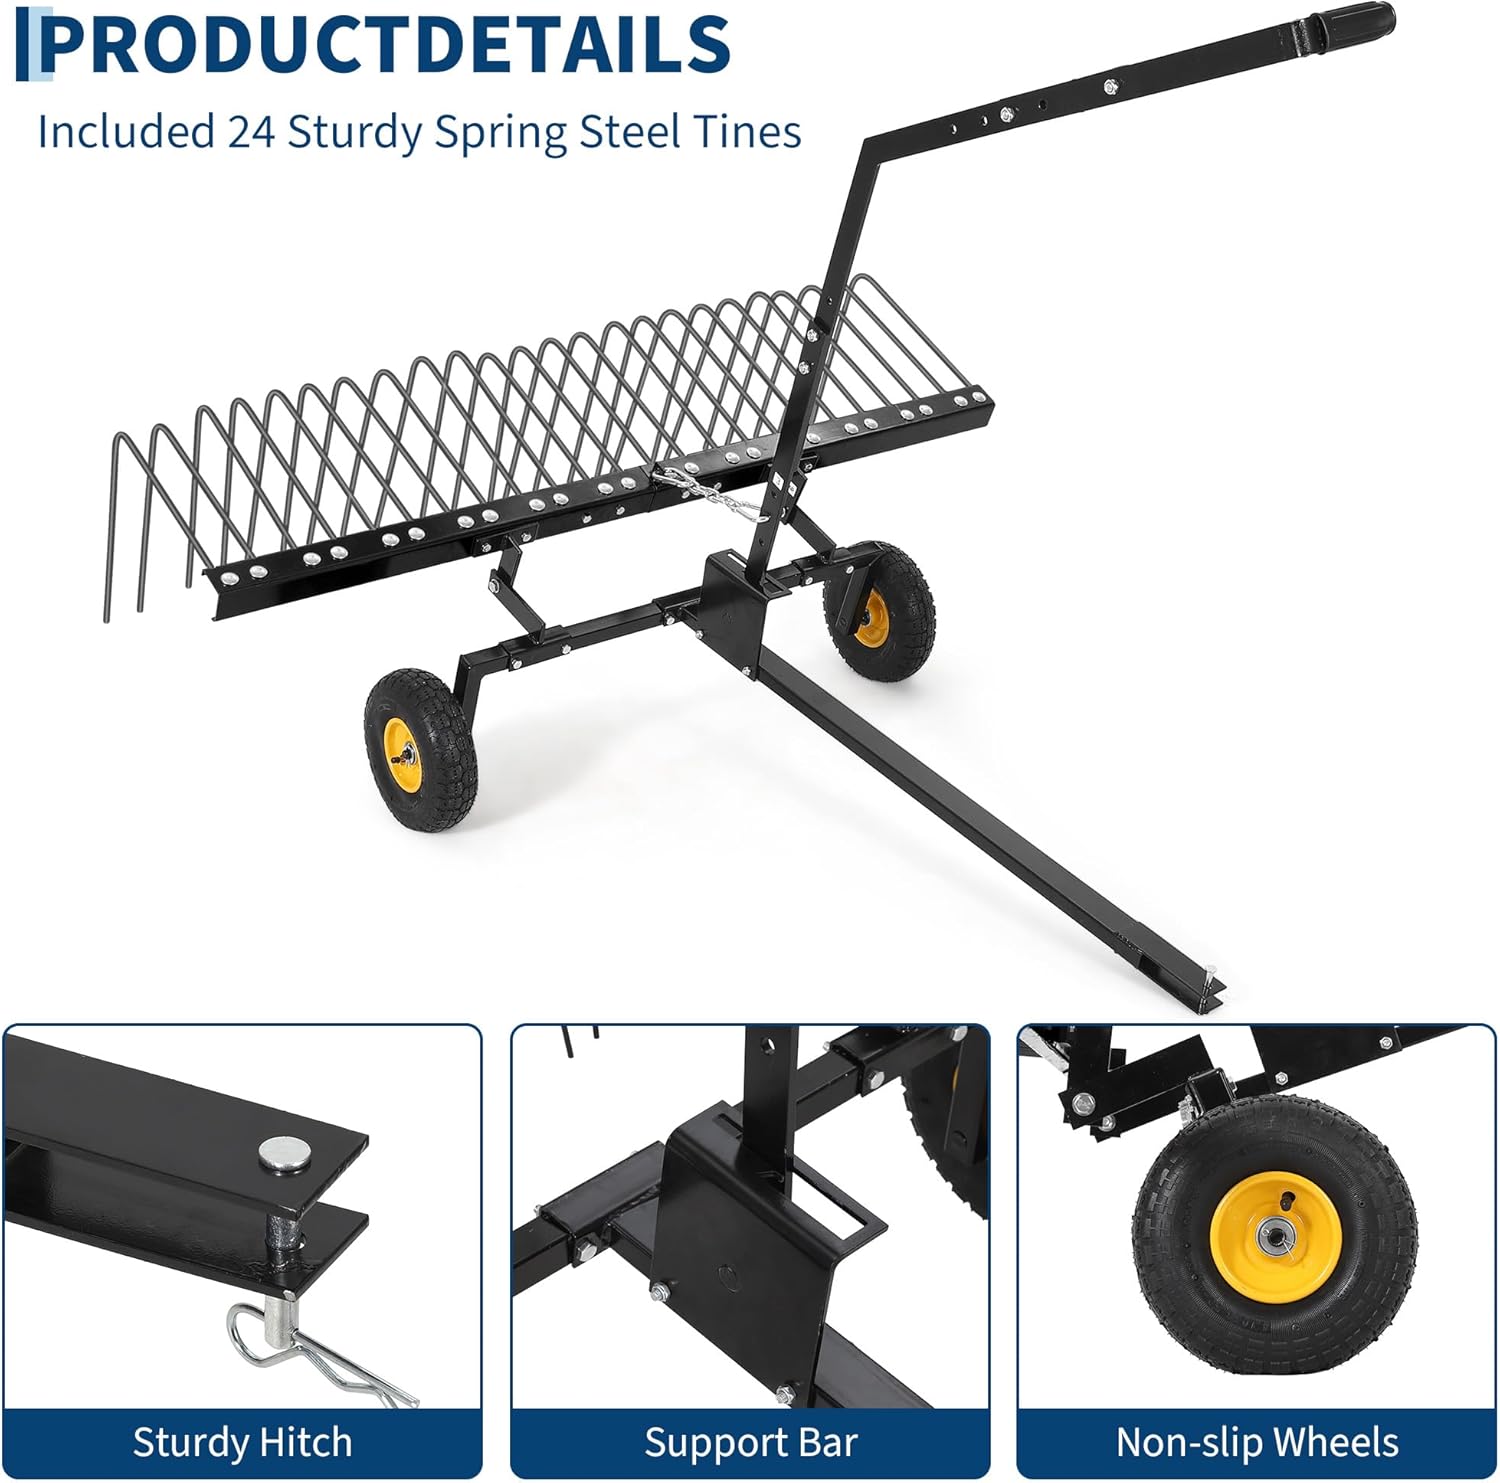
Figure 1.2: Detailed view of the Garvee dethatcher components, including the sturdy spring steel tines, hitch mechanism, support bar, and non-slip wheels.
2. Safety Information
Your safety and the safety of others are paramount. Always follow these safety guidelines to prevent injury and equipment damage.
General Safety Rules
- Read and understand all instructions in this manual before operating the dethatcher.
- Wear appropriate personal protective equipment (PPE), including safety glasses, gloves, and sturdy footwear.
- Keep children, pets, and bystanders away from the operating area.
- Inspect the dethatcher for any damaged or loose parts before each use. Do not operate if damage is found.
- Ensure all fasteners are tight before and during operation.
Operation Safety
- Operate the tow vehicle at a safe, slow speed, especially on uneven terrain or when turning.
- Avoid operating on excessively steep slopes where stability may be compromised.
- Ensure the dethatcher is securely hitched to the tow vehicle before starting.
- Be aware of underground obstacles (e.g., sprinkler heads, roots, rocks) that could damage the tines or equipment.
- Never leave the dethatcher unattended while the tow vehicle is running.
3. Assembly Instructions
Follow these steps carefully to assemble your Garvee 60'' Tow Behind Lawn Dethatcher.
Unpacking
Carefully remove all components from the packaging. Lay them out on a clean, flat surface and verify that all parts are present. Refer to the parts diagram (if available) to identify each component.
Required Tools
- Adjustable Wrench or Socket Set
- Pliers
- Safety Glasses
Assembly Steps
- Attach the Wheel Assemblies: Secure the wheels to the main frame using the provided axles, washers, and cotter pins. Ensure wheels spin freely.
- Assemble the Tine Bar: Attach the spring steel tines to the tine bar according to the pre-drilled holes. Ensure each tine is securely fastened.
- Connect the Main Frame and Tine Bar: Attach the tine bar assembly to the main frame using the specified bolts and nuts.
- Install the Hitch Arm: Secure the hitch arm to the front of the main frame. Ensure the high-strength pin hitch is properly aligned for connection to your tow vehicle.
- Attach the Lift Handle: Mount the lift handle to the designated position on the frame. This handle allows for easy adjustment of tine height.
- Secure the Adjustable Chain: Connect the adjustable fixed chain between the lift handle mechanism and the tine bar to control the dethatching depth.

Figure 3.1: Detailed components for assembly, including hitch, chain, and elastic device.
4. Operating Instructions
Proper operation ensures efficient dethatching and prolongs the life of your equipment.
Attaching to a Tow Vehicle
- Align the dethatcher's hitch with the hitch point on your lawn tractor, ATV, or garden tractor.
- Insert the hitch pin through both the dethatcher's hitch and the tow vehicle's hitch point.
- Secure the hitch pin with the cotter pin or R-clip to prevent accidental detachment.
- Ensure the connection is stable and there is no excessive play.
Adjusting Dethatching Depth
- The dethatcher features a user-friendly lift handle for easy height adjustment.
- For light dethatching or removing surface debris, raise the tines slightly so they just skim the top of the lawn.
- For heavier dethatching to remove compacted thatch, lower the tines to make more aggressive contact with the ground.
- Avoid setting the tines too low, as this can damage healthy grass, the tines themselves, or the underlying soil.
Dethatching Process
- Start the tow vehicle and engage the dethatcher.
- Operate the tow vehicle at a slow, consistent speed. Excessive speed can cause the dethatcher to bounce, reducing effectiveness and potentially damaging the equipment.
- Make overlapping passes to ensure complete coverage of the lawn. Overlap each pass by a few inches to avoid missed strips.
- Periodically check the dethatcher for accumulated debris and clear it as needed to maintain efficiency.
- The dethatcher is effective for removing leaves, weeds, dry branches, and pine straw.

Figure 4.1: Dethatcher in operation, pulled by a tractor.

Figure 4.2: Dethatcher clearing grass, straw, and leaves.

Figure 4.3: Dethatcher's 60-inch coverage and debris removal capabilities.

Figure 4.4: Dethatcher clearing dead branches, weeds, and straw.
5. Maintenance
Regular maintenance ensures optimal performance and extends the lifespan of your dethatcher.
After Each Use
- Clean the Tines: Remove any accumulated grass, leaves, or debris from the spring steel tines.
- Inspect for Damage: Check all tines for bends, breaks, or excessive wear. Inspect the frame and hitch for any signs of damage or loose fasteners.
- Storage: Store the dethatcher in a dry, covered area to protect it from weather elements and prevent rust.
Periodic Maintenance
- Tine Replacement: If individual tines become worn or damaged, they can be replaced using basic tools. Ensure replacement tines are compatible with the original specifications.
- Tire Pressure: Check the tire pressure periodically and inflate to the recommended PSI (if applicable) to ensure smooth operation and even ground contact.
- Lubrication: Apply a light lubricant to any pivot points or moving parts as needed to ensure smooth operation.
- Fastener Check: Regularly check and tighten all bolts, nuts, and pins to ensure the structural integrity of the dethatcher.
6. Troubleshooting
This section provides solutions to common issues you might encounter.
| Problem | Possible Cause | Solution |
|---|---|---|
| Ineffective dethatching or poor debris collection. | Tines not making sufficient contact with the ground. | Adjust the lift handle to lower the tines and increase ground contact. Ensure the adjustable chain is set correctly. |
| Dethatcher bouncing excessively during operation. | Tow vehicle speed is too high or terrain is very uneven. | Reduce the operating speed of the tow vehicle. Ensure tire pressure is correct for stability. |
| Tines bending or breaking frequently. | Tines set too low, hitting hard obstacles (rocks, roots), or excessive force. | Inspect the lawn for hidden obstacles. Adjust tine depth to prevent excessive digging. Replace damaged tines promptly. |
| Dethatcher detaches from tow vehicle. | Hitch pin not secured or damaged. | Always ensure the hitch pin is fully inserted and secured with its cotter pin or R-clip before operation. Inspect hitch components for wear. |
7. Specifications
Key technical specifications for the Garvee 60'' Tow Behind Lawn Dethatcher.
| Feature | Specification |
|---|---|
| Brand | Garvee |
| Model Number | RiOD4eFMD-uPYJRdC-KjCgd9d |
| Rake Type | Lawn Rake / Dethatcher |
| Head Size / Working Width | 60 inches |
| Number of Tines | 24 |
| Head Material | Alloy Steel (Spring Steel Tines) |
| Product Dimensions (L x W x H) | 44.88 x 14.57 x 7.28 inches (packaged) |
| Item Weight | 72.8 pounds |

Figure 7.1: Product dimensions diagram.
8. Warranty and Support
Garvee is committed to providing quality products and customer satisfaction. For specific warranty information, please refer to the documentation included with your purchase or visit the official Garvee website. If you require technical assistance, replacement parts, or have any questions regarding your Garvee 60'' Tow Behind Lawn Dethatcher, please contact Garvee customer service through the contact information provided in your purchase details or on the brand's official channels.


