
1. Product Overview
The KAMRUI AM21 Mini PC is a compact desktop computer designed for various applications, from daily computing to demanding tasks. It features an AMD Ryzen 7 8745HS processor, AMD Radeon 780M graphics, 32GB DDR5 RAM, and a 1TB NVMe PCIe 4.0 SSD.

Image 1.1: Front and side view of the KAMRUI AM21 Mini PC, highlighting its compact design and various connectivity ports.
What's in the Box:
- 1 x KAMRUI AM21 8745HS Mini PC
- 1 x HDMI cable
- 1 x VESA Mount with Screws
- 1 x Power Adapter
- 1 x User Manual
2. Setup Guide
2.1 Initial Connection
- Connect to Power: Plug the power adapter into the DC port on the rear of the Mini PC, then connect it to a power outlet.
- Connect to Display: Use the provided HDMI cable to connect the Mini PC to your monitor or TV. The AM21 supports up to four displays via its two HDMI 2.1 ports, one USB4 Type-C port, and one USB 3.2 Gen2 Type-C port.
- Connect Peripherals: Connect your keyboard and mouse to the available USB ports. For wired network access, connect an Ethernet cable to one of the RJ45 ports.
- Power On: Press the power button located on the front of the Mini PC. The system will boot up.
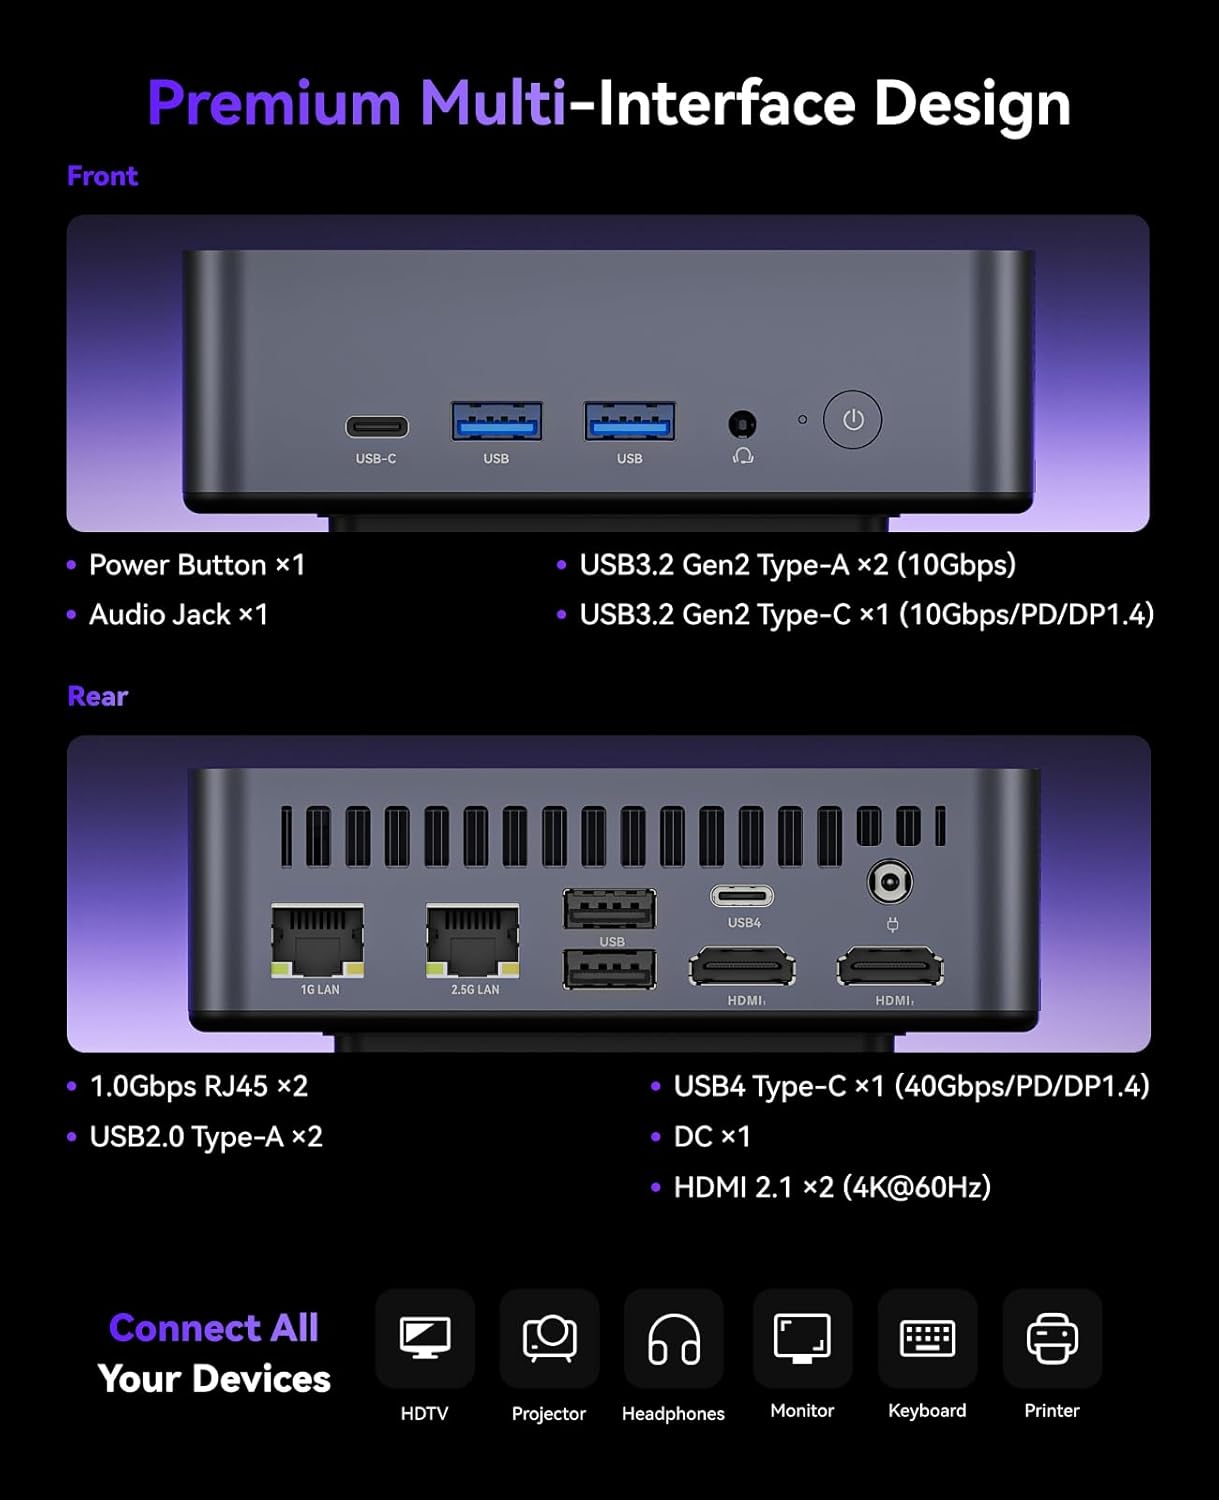
Image 2.1: Detailed view of the front and rear ports on the KAMRUI AM21 Mini PC, illustrating connectivity options.
2.2 VESA Mount Installation
The KAMRUI AM21 Mini PC can be mounted to the back of a compatible monitor using the included VESA mount. This allows for a clutter-free workspace.
- Attach the VESA bracket to the back of your monitor using the provided screws. Ensure the bracket is securely fastened.
- Slide the Mini PC onto the VESA bracket until it clicks into place.
- Connect all necessary cables (power, display, peripherals) to the Mini PC.

Image 2.2: The KAMRUI AM21 Mini PC shown mounted on the rear of a monitor, demonstrating its VESA mounting capability for space-saving.
3. Operating Instructions
3.1 Power On/Off
- Power On: Press the power button once.
- Shut Down: From the operating system, select 'Shut down'. Alternatively, press and hold the power button for 5 seconds to force a shutdown (use only when necessary).
3.2 Connecting to Network
- Wired Connection: Connect an Ethernet cable to one of the two 1Gbps RJ45 ports on the rear of the device.
- Wireless Connection (Wi-Fi 6): Navigate to the network settings in your operating system, select your Wi-Fi network, and enter the password.

Image 3.1: Illustration of the KAMRUI AM21 Mini PC's dual Gigabit Ethernet ports and Wi-Fi 6 capabilities for robust network connectivity.
3.3 Multi-Display Setup
The AM21 supports up to four displays simultaneously, offering enhanced productivity or immersive entertainment.
- Connect monitors to the two HDMI 2.1 ports.
- Utilize the USB4 Type-C port for an additional display (supports 8K video).
- The second USB 3.2 Gen2 Type-C port also supports DisplayPort 1.4 alternate mode for a fourth display.

Image 3.2: A visual representation of the KAMRUI AM21 Mini PC supporting a quad-display setup, demonstrating its multi-monitor capabilities.
4. Specifications
| Feature | Detail |
|---|---|
| Processor | AMD Ryzen 7 8745HS (8 Cores/16 Threads, up to 4.9 GHz, Zen 4 Architecture, 45W TDP, 16MB L3 Cache) |
| Graphics | AMD Radeon 780M (RDNA 3 Architecture, 12 Cores, 2600MHz) |
| RAM | 32GB DDR5 5600MHz (2x 16GB SO-DIMM, expandable up to 96GB) |
| Storage | 1TB M.2 2280 NVMe PCIe 4.0 x4 SSD (2x M.2 2280 slots, expandable up to 4TB; SATA SSD not supported) |
| Operating System | Windows 11 Pro |
| Wireless Connectivity | Wi-Fi 6, Bluetooth 5.2 |
| Ethernet | 2x 1Gbps RJ45 ports |
| Front Ports | 2x USB 3.2 Gen2 Type-A (10Gbps), 1x USB 3.2 Gen2 Type-C (10Gbps/PD/DP1.4), Power Button, 1x Audio Jack |
| Rear Ports | 2x 1Gbps RJ45, 2x USB 2.0 Type-A, 1x USB4 Type-C (40Gbps/PD/DP1.4), 1x DC-in, 2x HDMI 2.1 (4K@60Hz) |
| Display Output | Quad Display Support (2x HDMI 2.1, 1x USB4 Type-C, 1x USB 3.2 Gen2 Type-C with DP Alt Mode) |
| Dimensions | 119.2 x 119.2 x 36.9 mm |
| Weight | 2.59 pounds |
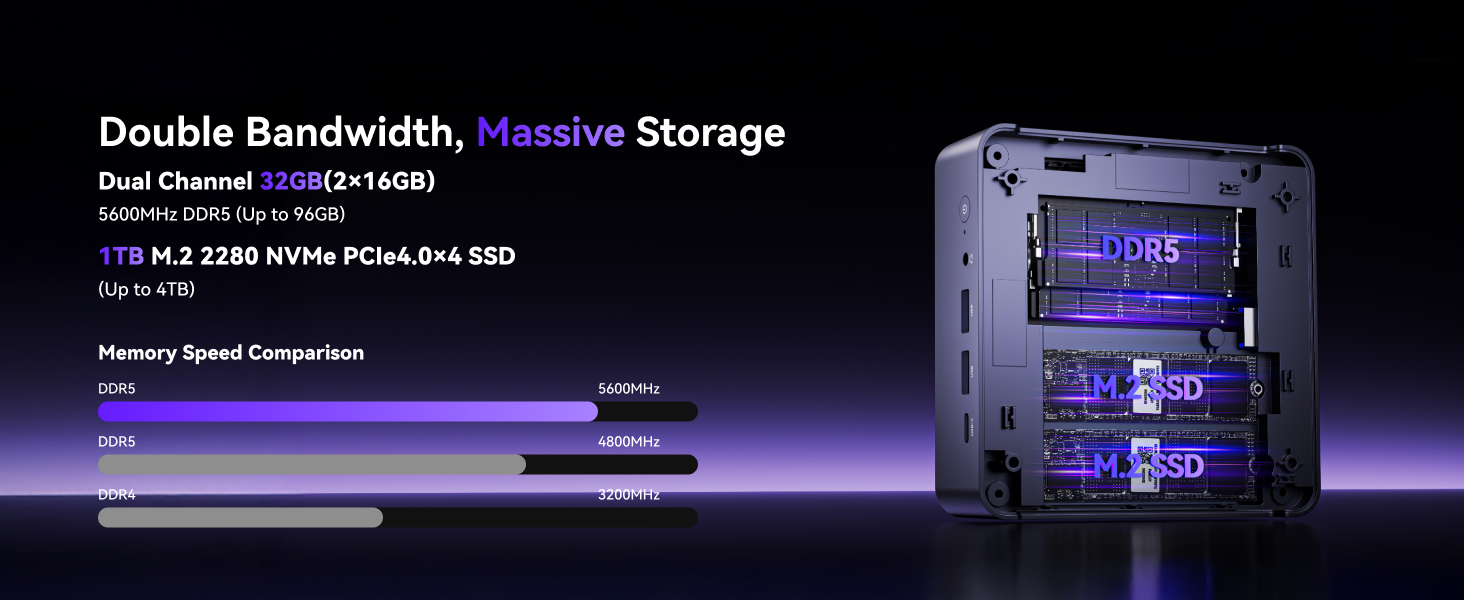
Image 4.1: Internal layout of the KAMRUI AM21 Mini PC, illustrating the dual DDR5 RAM slots and M.2 SSD expansion capabilities.
5. Maintenance
5.1 General Care
- Keep the Mini PC in a well-ventilated area to prevent overheating.
- Avoid exposing the device to direct sunlight, high temperatures, or excessive humidity.
- Do not place heavy objects on top of the Mini PC.
- Protect the device from dust and liquids.
5.2 Cleaning
- Use a soft, dry cloth to clean the exterior of the Mini PC.
- For stubborn marks, lightly dampen the cloth with water or a mild cleaning solution.
- Use compressed air to gently clear dust from ventilation grilles and ports. Ensure the device is powered off before cleaning.

Image 5.1: Diagram illustrating the efficient heat dissipation system of the KAMRUI AM21 Mini PC, emphasizing the importance of proper ventilation.
6. Troubleshooting
6.1 No Power
- Ensure the power adapter is securely connected to both the Mini PC and a working power outlet.
- Verify the power outlet is functional by testing it with another device.
- Check the power adapter for any visible damage.
6.2 No Display Output
- Confirm that the monitor is powered on and set to the correct input source (HDMI, USB-C).
- Ensure the HDMI or USB-C cable is securely connected to both the Mini PC and the monitor.
- Try a different display cable or monitor to rule out faulty equipment.
6.3 Network Connectivity Issues
- Wired: Check if the Ethernet cable is properly connected and if the network indicator lights on the RJ45 port are active.
- Wireless: Verify that Wi-Fi is enabled in the operating system settings. Restart your router/modem. Ensure you are within range of your Wi-Fi network.
6.4 System Performance Issues
- Close unnecessary applications running in the background.
- Ensure the operating system and drivers are up to date.
- Check for adequate ventilation to prevent thermal throttling.
7. Warranty and Support
KAMRUI provides comprehensive, round-the-clock dedicated technical support for its products.
7.1 Warranty Information
Please refer to the warranty card included with your product for specific warranty terms and conditions. Keep your proof of purchase for warranty claims.
7.2 Technical Support
For technical assistance or inquiries, please contact KAMRUI customer service via email:


