
Introduction
Thank you for choosing the Tefal IXEO Vision QT1811 Garment Steamer. This all-in-one solution combines powerful steaming and ironing capabilities to provide efficient garment care. This manual provides essential information for the safe and effective use, setup, operation, maintenance, and troubleshooting of your appliance. Please read these instructions carefully before first use and retain them for future reference.
Important Safety Instructions
When using electrical appliances, basic safety precautions should always be followed to reduce the risk of fire, electric shock, and injury to persons, including the following:
- Read all instructions before using the appliance.
- Use the appliance only for its intended use.
- To protect against a risk of electric shock, do not immerse the appliance in water or other liquids.
- Always turn the appliance off and unplug it from the electrical outlet when filling with water or emptying, and when not in use.
- Do not operate the appliance with a damaged cord or if the appliance has been dropped or damaged.
- Do not allow the cord to touch hot surfaces.
- Always ensure the water tank is securely in place before operating.
- Use caution when handling the hot iron head and steam to avoid burns. The iron head can become hot during use.
- Keep the appliance out of reach of children.
Product Overview
The Tefal IXEO Vision QT1811 is designed for versatile garment care, offering both vertical steaming and horizontal ironing. Key components include the main unit with a 1.2L water tank, a one-hand adjustable multi-position board, and a lightweight iron head with integrated LED technology.

Image: Full view of the Tefal IXEO Vision QT1811 Garment Steamer, illustrating its overall dimensions of 170 cm height, 55 cm length, and 44 cm width.
Setup
1. Unpacking
Carefully remove all components from the packaging. Ensure all parts are present and undamaged. Retain packaging for storage or future transport.
2. Assembly of the Multi-Position Board
Assemble the multi-position board according to the diagrams provided in the quick start guide. Ensure all locking mechanisms are engaged for stability. The board can be adjusted to various angles for both vertical steaming and horizontal ironing.

Image: Illustration showing the multi-position board being adjusted to different angles for versatile garment care.
3. Filling the Water Tank
- Remove the 1.2-liter water tank from the main unit.
- Open the tank cap and fill with clean tap water. Do not exceed the maximum fill line.
- Close the cap securely and place the water tank back into the main unit until it clicks into place.
4. Connecting Power
Plug the power cord into a suitable electrical outlet (220V). The appliance will begin to heat up.
Operating Instructions
1. Powering On and Heating Up
Once plugged in, the appliance will automatically begin heating. The IXEO Vision QT1811 is ready to use in approximately 70 seconds.

Image: Close-up of the iron head emitting steam, indicating the appliance is ready for use in 70 seconds.
2. Adjusting the Board
Use the one-hand adjustment mechanism to position the board vertically for steaming or horizontally for ironing, depending on your garment care needs.
3. Steaming Garments
Hold the iron head close to the fabric. Press the steam trigger to release continuous steam at 80g/min. For stubborn creases, use the steam boost function, which provides up to 200g/min of steam. Move the iron head slowly over the garment from top to bottom.

Image: A split image showing the garment steamer being used for vertical steaming on a shirt and horizontal ironing on a pair of jeans, demonstrating its all-in-one functionality.
4. Ironing Garments
Lay the garment flat on the multi-position board. Use the lightweight iron head to press out creases. The integrated LED technology illuminates the ironing path for precision. The twin-boiler technology ensures powerful, double-heated steam for effective crease removal.
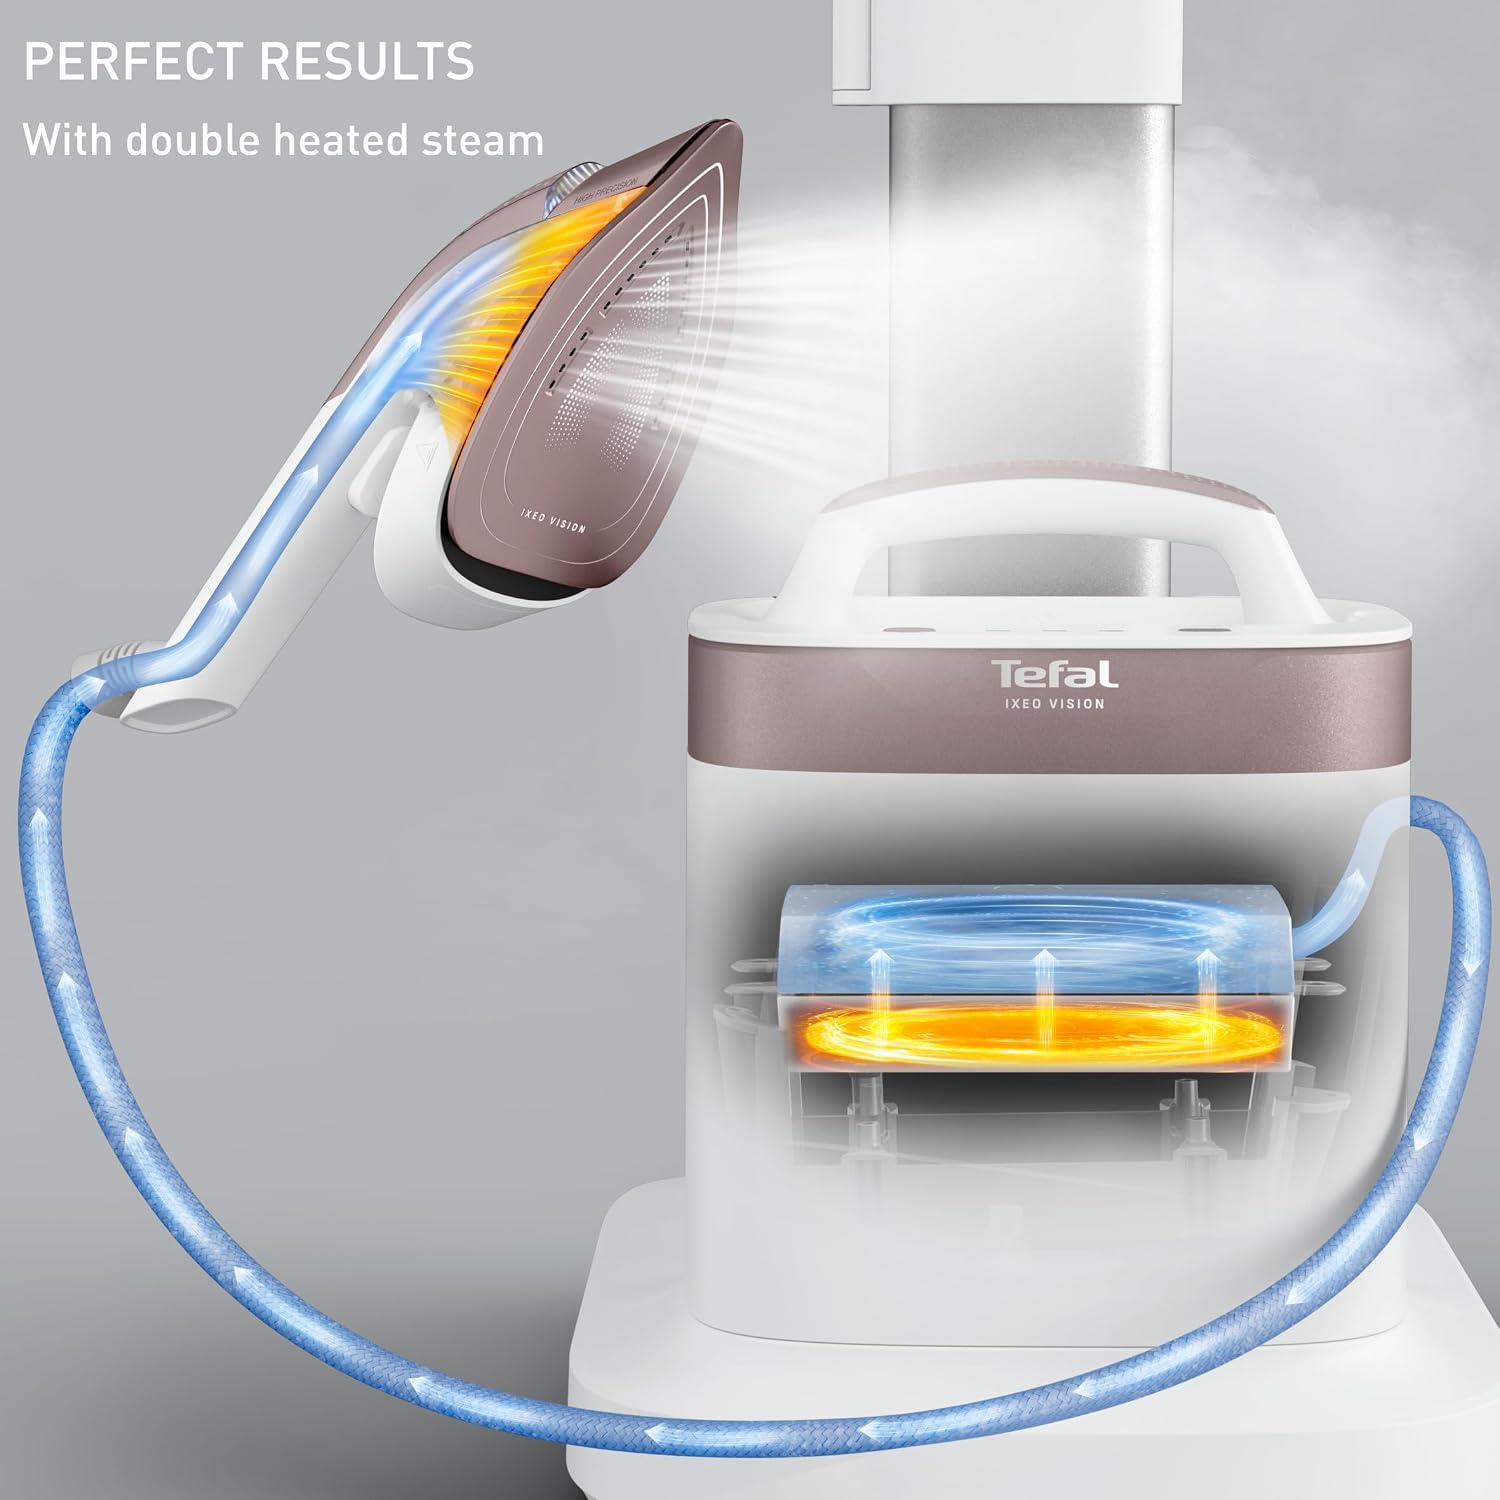
Image: An illustration demonstrating the double heated steam technology within the appliance, showing steam being heated twice for powerful output.

Image: Close-up of the lightweight iron head, highlighting the integrated LED technology that illuminates the fabric for precise ironing.
5. Sanitizing with the Removable Base
The removable base allows for sanitization of various surfaces. Detach the iron head from the main unit. Direct the steam towards fabrics like curtains, upholstery, or mattresses to kill 99.9% of viruses and bacteria. Ensure to follow proper safety guidelines and avoid direct contact with skin.

Image: A person using the detachable iron head to sanitize a sofa, demonstrating the versatility of the removable base for home sanitization.
6. Fabric Compatibility
The IXEO Vision QT1811 is safe for all ironable fabrics. No temperature setting is required, eliminating the risk of burning delicate materials.

Image: The iron head resting on multiple layers of different fabrics, illustrating that no temperature setting is needed and it is safe for all types of ironable fabrics.
Maintenance
1. Emptying the Water Tank
After each use, or before storing, unplug the appliance and allow it to cool completely. Remove the water tank and empty any remaining water. This prevents mineral buildup and prolongs the life of the appliance.
2. Cleaning the Iron Head
Wipe the soleplate of the iron head with a damp cloth. Do not use abrasive cleaners or scouring pads, as these can damage the surface.
3. Descaling
Depending on water hardness, descaling may be required periodically. Refer to the full instruction manual for detailed descaling procedures. Generally, this involves using a descaling solution or a mixture of water and white vinegar, followed by rinsing.
4. Storage
Ensure the appliance is cool and dry before storing. Store the garment steamer in an upright position in a safe, dry place, away from direct sunlight and extreme temperatures. The compact base with small wheels allows for easy movement and storage.
Troubleshooting
| Problem | Possible Cause | Solution |
|---|---|---|
| No steam is being produced. | Water tank is empty or not properly inserted. Appliance not heated sufficiently. | Fill the water tank and ensure it is correctly seated. Wait for 70 seconds for the appliance to heat up. |
| Water leakage from the iron head. | Appliance not hot enough. Overfilling the water tank. | Allow the appliance to fully heat up before use. Do not overfill the water tank. |
| Iron not heating up. | Appliance not plugged in. Power outlet malfunction. | Check if the power cord is securely plugged into a working outlet. Test the outlet with another appliance. |
| Wrinkles are not removed effectively. | Insufficient steam. Moving the iron too quickly. | Ensure continuous steam is active. Use the steam boost for stubborn wrinkles. Move the iron head slower over the fabric. |
| Handle gets hot during use. | Normal operation for extended periods. | Use with caution. Take short breaks if the handle becomes uncomfortably hot. This is a known characteristic of the product during prolonged use. |
Specifications

Image: A graphic summarizing key product specifications including power, steam output, and water tank capacity.
| Feature | Detail |
|---|---|
| Model Number | QT1811 |
| Power | 2200 Watts |
| Voltage | 220 Volts |
| Continuous Steam Output | 80 g/min |
| Steam Boost | 200 g/min |
| Steam Pressure | 6 Bar |
| Water Tank Capacity | 1.2 Liters |
| Heat-up Time | 70 Seconds |
| Product Dimensions (L x W x H) | 55L x 44W x 170H centimetres |
| Cord Length | 3 Meters |
| Auto-Off | 8 minutes |
| Product Benefits | Fabric Refreshing, Wrinkle Removal, Sanitizing, Sterilizing |
Warranty and Support
This product comes with a manufacturer's warranty. For specific warranty details, please refer to the warranty card included with your purchase or visit the official Tefal website. For technical support, spare parts, or service inquiries, please contact Tefal customer service through their official channels.