
Introduction
This manual provides detailed instructions for the assembly, operation, and maintenance of your Gorilley K99 Spot Welder DIY Kit. Please read this manual thoroughly before use to ensure safe and efficient operation.
Product Components
The Gorilley K99 Spot Welder DIY Kit includes the following items:
- Control board x 1
- Input line x 2 (red and black)
- Spot welding pen x 2 (red and black)
- Heat shrinkable sleeve x 2
- Screw x 6
- Nickel sheet x 1
Specifications
- Material: PCB
- Compatibility: Applicable to 14650, 17490, 18650, 21700, 26650, 32650 cylindrical lithium batteries, and nickel-hydrogen batteries.
- Welding Thickness: Supports spot welding of 0.1-0.3mm nickel sheets.
- MOS Tubes: Features 5 MOS tubes, with a total peak current reaching approximately 1700A.
- Display: Digital tube display for settings and status.
- Adjustable Gears: 99 adjustable power gears.
- Spot Welding Pen: 8 square spot welding pen with 10AWG wire and aluminum oxide copper spot welding needle for improved efficiency and over-current capability.
Setup Instructions
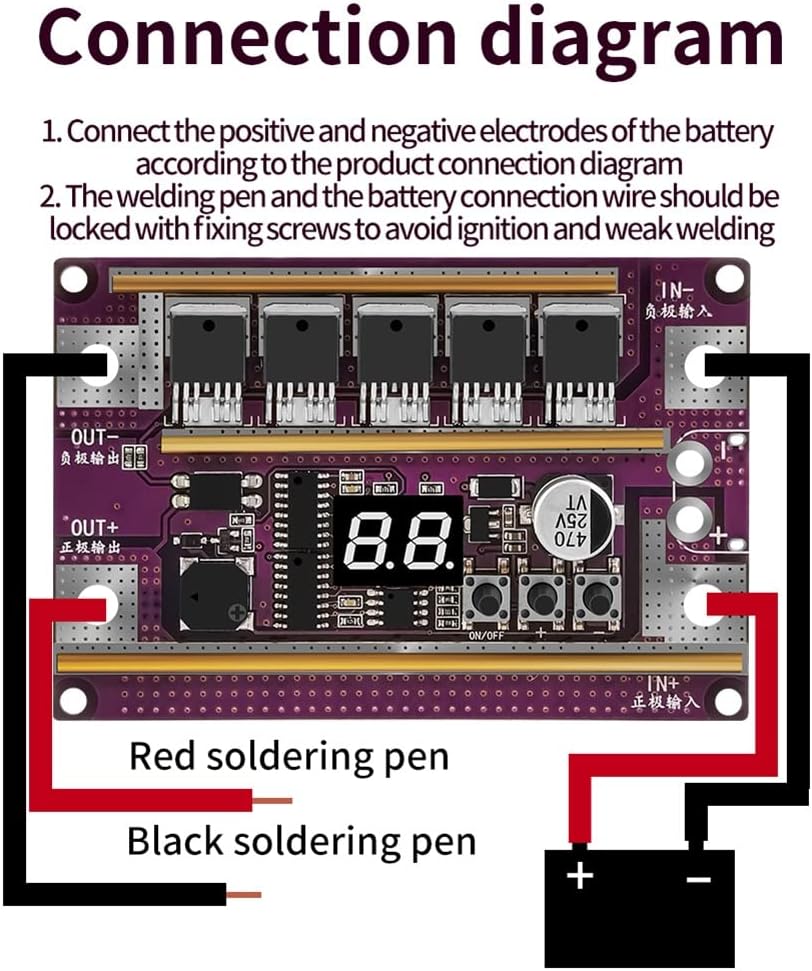
- Connect Battery: Connect the positive and negative electrodes of your power supply battery to the "IN+" and "IN-" terminals on the control board, respectively. Ensure correct polarity.
- Connect Welding Pens: Connect the red welding pen to the "OUT+" terminal and the black welding pen to the "OUT-" terminal.
- Secure Connections: The welding pens and battery connection wires should be securely fastened with the provided fixing screws to prevent loose connections, which can lead to ignition or weak welding.

Operating Instructions
The K99 Spot Welder features a digital tube display and control buttons for adjusting welding parameters.

- Power On/Off: Use the ON/OFF button to power the device on or off.
- Digital Tube Display: The Digital tube display shows the current welding gear setting.
- Adjusting Welding Gears:
- Use the Add file+ button to increase the welding gear (power level).
- Use the Downshift - button to decrease the welding gear (power level).
- The device offers 99 adjustable gears to fine-tune welding strength for different materials and thicknesses.
- Welding Process:
- Select an appropriate welding gear based on the nickel sheet thickness (0.1-0.3mm) and battery type.
- Place the nickel sheet onto the battery terminal.
- Firmly press both welding pens onto the nickel sheet, ensuring good contact.
- The device will automatically initiate the spot weld.
- Inspect the weld for strength and consistency. Adjust the gear as needed.
Welding Applications
The K99 Spot Welder is designed for various battery types and nickel sheet thicknesses, ensuring strong and reliable welds.

It is suitable for:
- Cylindrical lithium batteries such as 14650, 17490, 18650, 21700, 26650, and 32650.
- Nickel-hydrogen batteries.
- Spot welding nickel sheets with a thickness of 0.1mm to 0.3mm.
Proper technique ensures a firm and complete solder joint, crucial for battery pack assembly.
Maintenance
- Cleaning: Keep the control board and welding pens clean and free from debris, especially metal dust. Use a dry, soft cloth for cleaning.
- Storage: Store the kit in a dry, cool place away from direct sunlight and moisture when not in use.
- Welding Pen Tips: Periodically inspect the tips of the welding pens for wear or oxidation. Clean or replace them if necessary to maintain optimal welding performance.
- Connections: Regularly check all electrical connections for tightness to prevent arcing or poor performance.
Troubleshooting
| Problem | Possible Cause | Solution |
|---|---|---|
| Weak or inconsistent welds |
|
|
| No welding action |
|
|
| Overheating |
|
|
Warranty and Support
For warranty information or technical support, please refer to the retailer or manufacturer's official website. Keep your purchase receipt as proof of purchase.
For further assistance, please contact Gorilley customer service through their official channels.