
1. Important Safety Information
Read all instructions carefully before operating the pressure washer. Failure to follow these instructions may result in serious injury or property damage. Keep this manual for future reference.
- Always wear appropriate personal protective equipment, including safety glasses, gloves, and hearing protection.
- Ensure the power cord and water hose are free from damage before each use.
- Never point the spray gun at people, pets, or electrical outlets.
- Do not operate the pressure washer in an explosive atmosphere or near flammable liquids.
- Always disconnect the power supply and water supply before performing any maintenance or cleaning.
2. Product Overview
The DGIVOVO Pressure Washer G1510-BL is designed for efficient and powerful cleaning of various outdoor surfaces. It features a robust motor, a foam cannon, and multiple quick-connect nozzles to tackle different cleaning tasks.

Image: The DGIVOVO Pressure Washer G1510-BL, a compact and powerful cleaning machine.
Key Features:
- Powerful Performance: Max pressure of 4800 PSI and 3.0 GPM flow rate for effective cleaning.
- Foam Cannon: Sprays a thick layer of cleaning foam for enhanced cleaning power.
- Organized Storage: Built-in hose reel and accessory holders for tidy storage.
- Extended Reach: 35 FT power cable and 20 FT high-pressure hose for wide coverage.
- Versatile Nozzles: Includes 4 quick-connect nozzles for various cleaning applications.
3. Included Components
The following components are included with your DGIVOVO Pressure Washer G1510-BL:

Image: Overview of the pressure washer components, including the main unit, spray gun, foam cannon, and nozzles.
- Pressure Washer Unit
- High-Pressure Spray Gun
- 20 FT High-Pressure Hose
- 35 FT Power Cord
- Foam Cannon (450 ML Soap Bottle)
- 4 Quick-Connect Nozzles (0°, 15°, 25°, 40°)
- Nozzle Holder
- Gun Holder
4. Setup Instructions
Follow these steps to assemble and prepare your pressure washer for use:
4.1. Assembly
- Attach the handle to the main unit. Ensure it clicks securely into place.
- Connect the high-pressure hose to the spray gun and the pressure washer outlet. Tighten connections firmly.
- Insert the desired quick-connect nozzle into the spray gun wand.
- Connect the water supply hose (garden hose, not included) to the water inlet on the pressure washer.

Image: Visual guide showing the steps for assembling the pressure washer, including attaching the handle and connecting hoses.
4.2. Water and Power Connection
- Connect your garden hose to a water source and turn on the water.
- Squeeze the trigger on the spray gun to purge air from the system until a steady stream of water emerges. This prevents air pockets from damaging the pump.
- Plug the 35 FT power cord into a grounded electrical outlet.
5. Operating Instructions
5.1. Nozzle Selection
The pressure washer includes four quick-connect nozzles, each designed for specific cleaning tasks:
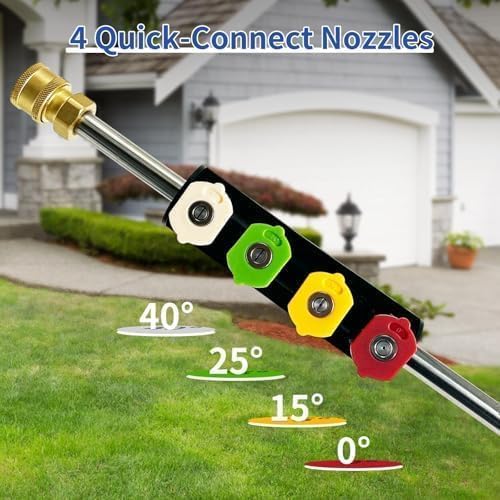
Image: The four quick-connect nozzles (0°, 15°, 25°, 40°) and their corresponding colors.
- Red (0°): Delivers a concentrated, high-pressure stream for stubborn stains and tough dirt on durable surfaces like concrete.
- Yellow (15°): Provides a powerful, fan-shaped spray for intense cleaning of hard surfaces, removing paint, grease, and grime.
- Green (25°): Offers a versatile, medium-pressure spray suitable for general cleaning of patios, driveways, and vehicles.
- White (40°): Produces a wide, gentle spray for cleaning delicate surfaces such as car exteriors, windows, and siding.

Image: Demonstrates the use of 0° (red) nozzle for stubborn stains and 15° (yellow) nozzle for mud and sand stains on outdoor surfaces.

Image: Illustrates the 25° (green) nozzle for versatile cleaning in courtyards and the 40° (white) nozzle for sensitive materials like vehicle washing and house siding.
5.2. Using the Foam Cannon
The foam cannon allows for the application of cleaning detergents, creating a thick foam that adheres to surfaces for deeper cleaning.
- Fill the foam cannon bottle with your preferred pressure washer-safe detergent.
- Attach the foam cannon to the spray gun wand.
- Turn on the pressure washer and spray the foam onto the desired surface.
- Allow the foam to dwell for a few minutes to loosen dirt, then rinse with a suitable nozzle.
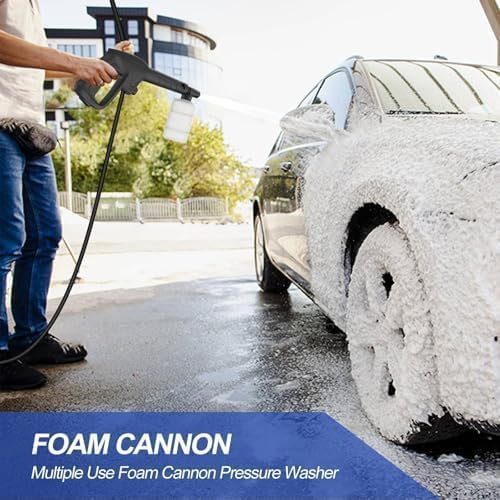
Image: A person using the foam cannon to apply cleaning foam to a car, demonstrating its effective coverage.

Image: Close-up of the foam cannon, highlighting its design for multiple uses with the pressure washer.
5.3. Starting and Stopping
- Ensure all connections are secure and the water supply is on.
- Turn the ON/OFF switch to the 'ON' position.
- Squeeze the spray gun trigger to begin spraying. Release the trigger to stop the flow.
- To turn off the unit, release the trigger, then turn the ON/OFF switch to the 'OFF' position.
5.4. Cleaning Applications
The DGIVOVO Pressure Washer is suitable for a variety of cleaning tasks:
- Car Washing: Use the foam cannon with car wash soap and a 40° nozzle for rinsing.
- Patio and Driveway Cleaning: Use a 15° or 25° nozzle for general cleaning, or a 0° nozzle for tough spots.
- House Siding: Use a 40° nozzle to avoid damaging the surface.
Video: Demonstrates the effective use of the pressure washer for car cleaning, including foaming and rinsing with different nozzles.
Video: Shows the pressure washer in action for various outdoor surface cleaning tasks, highlighting its power and versatility.
6. Maintenance
Regular maintenance ensures optimal performance and extends the life of your pressure washer.
6.1. After Each Use
- Turn off the water supply and disconnect the power.
- Squeeze the spray gun trigger to release any remaining pressure in the system.
- Disconnect all hoses and accessories.
- Wipe down the unit with a damp cloth.
- Store the power cord and high-pressure hose neatly using the built-in storage features.

Image: Shows the organized storage features of the pressure washer, including the hose reel, gun holder, and bottle rack.
6.2. Nozzle Cleaning
If a nozzle becomes clogged, use the included nozzle cleaning tool to clear any debris. Always ensure the pressure washer is off and depressurized before cleaning nozzles.
6.3. Winterization (for cold climates)
To prevent damage from freezing temperatures, follow these steps:
- Disconnect all water hoses.
- Turn on the machine for a few seconds to expel any remaining water from the pump. Do not run for more than 5 seconds without water.
- Store the unit in a warm, dry, and frost-free location.
7. Troubleshooting
Refer to this section for common issues and their solutions:
| Problem | Possible Cause | Solution |
|---|---|---|
| Motor does not start | Power cord not plugged in; circuit breaker tripped; ON/OFF switch in 'OFF' position. | Ensure power cord is securely plugged in; reset circuit breaker; turn switch to 'ON'. |
| Low pressure | Insufficient water supply; clogged nozzle; air in pump. | Check water supply and hose for kinks; clean nozzle; purge air from system by squeezing trigger with water on. |
| Water leaks | Loose connections; damaged O-rings. | Tighten all connections; replace damaged O-rings. |
| Pulsating pressure | Air in pump; clogged nozzle; water inlet filter clogged. | Purge air from system; clean nozzle; clean water inlet filter. |
8. Specifications
Detailed technical specifications for the DGIVOVO Pressure Washer G1510-BL:
| Specification | Value |
|---|---|
| Brand | DGIVOVO |
| Model Number | G1510-BL |
| Power Source | AC |
| Maximum Pressure | 4800 MAX-PSI |
| Maximum Flow Rate | 3 Gallons Per Minute (GPM) |
| Hose Length | 20 Feet |
| Power Cord Length | 35 Feet |
| Product Dimensions | 8"L x 9"W x 7"H |
| Item Weight | 18.24 pounds |
| Color | Blue |
| UPC | 717373087650, 717373087742, 717373088121 |
9. Warranty and Support
For warranty information, product registration, or technical support, please visit the official DGIVOVO website or contact their customer service. Details regarding optional protection plans may be available from your retailer.