
1. Introduction
The Fender Mustang LTX100 is a 100-watt modeling combo amplifier designed for guitarists seeking versatile tone and performance. This amplifier features 25 amp models, 25 studio-quality effects, and 100 preset slots for extensive sound customization. It is equipped with a 12-inch Celestion G12FSD-100 speaker, an integrated color display with a chromatic tuner, Bluetooth audio streaming, and USB-C connectivity for recording and app control. This manual provides essential information for the proper setup, operation, and maintenance of your Mustang LTX100 amplifier.

Figure 1.1: Fender Mustang LTX100 Amplifier with included accessories.
2. Safety Information
Please read and understand all safety instructions before operating your Fender Mustang LTX100 amplifier. Retain this manual for future reference.
- WARNING: To reduce the risk of fire or electric shock, do not expose this appliance to rain or moisture. Do not remove the cover. Refer servicing to qualified personnel only.
- CAUTION: To prevent electric shock, do not use this (polarized) plug with an extension cord, receptacle, or other outlet unless the blades can be fully inserted to prevent blade exposure.
- WARNING: This product contains chemicals known to the State of California to cause cancer and birth defects or other reproductive harm.
- Ensure the amplifier is connected to a grounded power outlet.
- Do not block ventilation openings. Maintain adequate space around the amplifier for proper airflow.
- Avoid placing the amplifier near heat sources such as radiators, heat registers, stoves, or other apparatus (including amplifiers) that produce heat.
- Protect the power cord from being walked on or pinched, particularly at plugs, convenience receptacles, and the point where they exit from the apparatus.
- Unplug this apparatus during lightning storms or when unused for long periods of time.
3. Setup
3.1 Unpacking and Placement
Carefully remove the amplifier and all accessories from the packaging. Inspect the unit for any signs of damage. Place the amplifier on a stable, level surface, ensuring adequate space for ventilation.
3.2 Power Connection
- Ensure the amplifier's power switch is in the OFF position.
- Connect the provided power cord to the INPUT POWER receptacle on the rear panel of the amplifier.
- Plug the other end of the power cord into a suitable grounded AC power outlet.
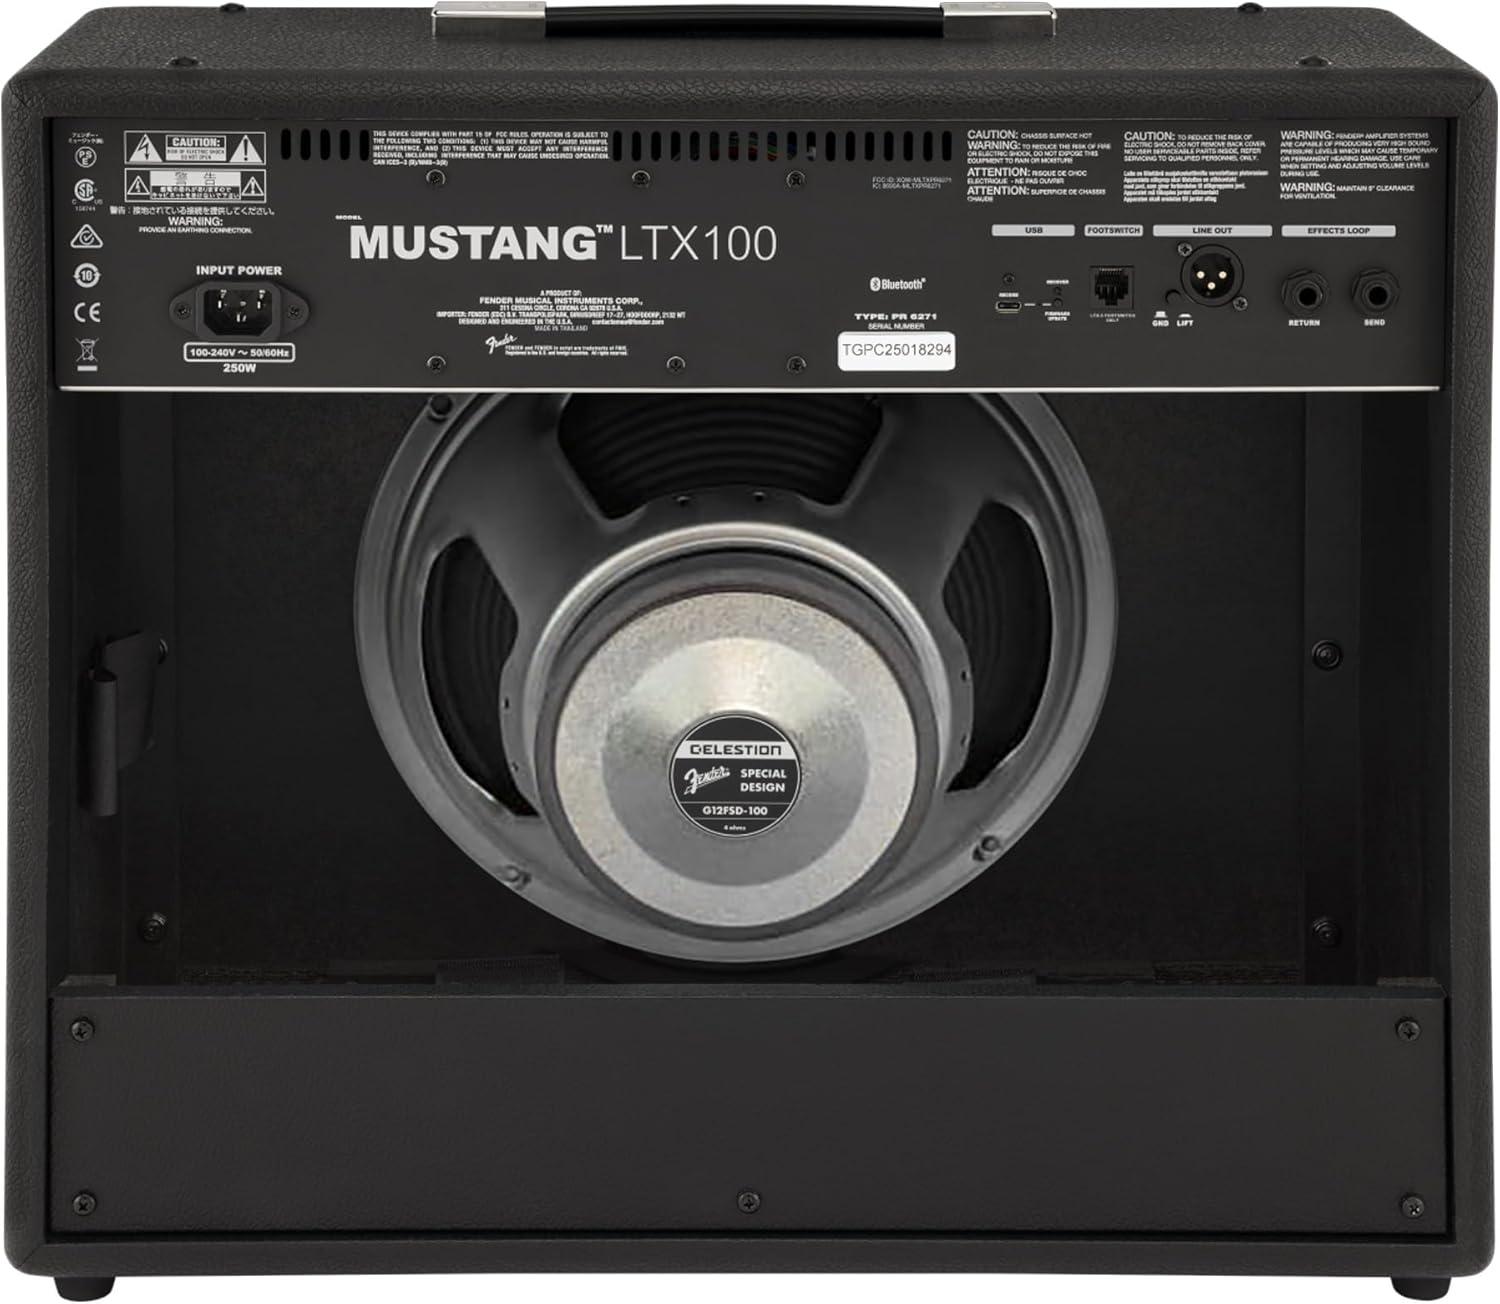
Figure 3.1: Rear Panel Connections
3.3 Instrument and Accessory Connections
- Instrument Input: Connect your guitar using a standard 1/4-inch instrument cable to the INPUT jack on the front panel.
- Auxiliary Input: For connecting external audio devices (e.g., MP3 player, phone), use a 3.5mm stereo cable to the AUX input on the front panel.
- Headphone Output: For silent practice, connect headphones to the HEADPHONE OUT jack on the rear panel.
- XLR Line Out: For connecting to a PA system or recording interface, use XLR cables to the LINE OUT jacks on the rear panel. A ground lift switch is provided to eliminate hum.
- Effects Loop: External effects pedals can be connected via the SEND and RETURN jacks on the rear panel.
- USB-C: Connect to a computer for recording, firmware updates, and Fender Tone 3.0 app control.
4. Operating Instructions
4.1 Front Panel Controls Overview

Figure 4.1: Front Panel Controls
- INPUT: 1/4-inch jack for connecting your guitar.
- AUX: 3.5mm stereo input for external audio devices.
- GAIN: Controls the input level and amount of overdrive/distortion for the selected amp model.
- VOLUME: Adjusts the output level of the selected amp model.
- TREBLE: Adjusts the high-frequency response.
- MIDDLE: Adjusts the mid-frequency response.
- BASS: Adjusts the low-frequency response.
- MASTER: Controls the overall output volume of the amplifier.
- DISPLAY: Color LCD screen for navigating menus, selecting amp models, effects, and viewing tuner.
- ENCODER KNOB: Used to scroll through menus and adjust parameters on the display. Press to select.
- BACK: Returns to the previous menu or screen.
- SAVE: Stores current settings as a preset.
- MENU: Accesses the main menu for system settings, global parameters, and more.
- TAP: Used for setting delay and modulation effect tempos. Hold to activate the chromatic tuner.
- ON/OFF: Power switch for the amplifier.
4.2 Powering On and Basic Operation
- Ensure all connections are secure and the MASTER volume is set to a low level.
- Press the ON/OFF switch to power on the amplifier. The display will illuminate.
- Select an amp model and effect using the encoder knob and display.
- Adjust the GAIN, VOLUME, TREBLE, MIDDLE, and BASS knobs to shape your desired tone.
- Gradually increase the MASTER volume to achieve the desired listening level.
4.3 Using Amp Models and Effects
The Mustang LTX100 offers 25 distinct amp models and 25 studio-quality effects. Use the encoder knob to browse through the available options on the display. Once an amp model or effect is selected, its parameters can be adjusted using the encoder knob or the dedicated tone knobs (Treble, Middle, Bass) if applicable.
4.4 Presets
The amplifier comes with 70 factory presets and allows for 100 user-defined presets. To save your custom settings:
- Dial in your desired amp model, effects, and tone settings.
- Press the SAVE button.
- Use the encoder knob to select a user preset slot.
- Press the encoder knob to confirm and save your preset.
4.5 Bluetooth Audio Streaming
To stream audio from a mobile device:
- Activate Bluetooth on your mobile device.
- On the amplifier, navigate to the Bluetooth menu via the display.
- Select "Pair New Device" and choose "Mustang LTX100" from your device's Bluetooth list.
- Once paired, you can play audio through the amplifier.
4.6 Fender Tone 3.0 App
The Fender Tone 3.0 app (available for iOS and Android) provides wireless control over your amplifier. It allows you to edit, save, and share presets, as well as access additional features. Connect your amplifier to your mobile device via Bluetooth to use the app.
5. Maintenance
5.1 Cleaning
- Always disconnect the amplifier from the power outlet before cleaning.
- Use a soft, dry cloth to clean the exterior surfaces.
- Do not use abrasive cleaners, solvents, or waxes, as these can damage the finish.
- Avoid spraying liquids directly onto the amplifier.
5.2 Storage
- Store the amplifier in a dry, cool environment, away from direct sunlight and extreme temperatures.
- If storing for an extended period, cover the amplifier to protect it from dust.
6. Troubleshooting
| Problem | Possible Cause | Solution |
|---|---|---|
| No power | Power cord not connected; Power outlet not active; Amplifier power switch off | Check power cord connection; Test outlet with another device; Ensure power switch is ON |
| No sound | Instrument cable faulty/disconnected; Guitar volume off; Amplifier volume/master low; Headphones connected | Check/replace instrument cable; Turn up guitar volume; Increase amplifier volume/master; Disconnect headphones |
| Distorted sound | Gain too high; Master volume too high; Faulty cable/instrument | Reduce GAIN; Reduce MASTER volume; Test with different cable/instrument |
| Bluetooth connection issues | Device not in pairing mode; Amplifier not discoverable; Interference | Ensure device is in pairing mode; Re-initiate pairing on amplifier; Move closer to amplifier; Restart both devices |
7. Specifications
| Feature | Detail |
|---|---|
| Model Name | Mustang LTX100 |
| Model Number | 2311800000 |
| Power Output | 100 Watts |
| Speaker | 1 x 12″ Celestion G12FSD-100 |
| Amp Models | 25 |
| Effects | 25 (distortion, overdrive, compression, modulation, delay, reverb, octave, etc.) |
| Presets | 70 factory presets + 100 user slots |
| Display | Color LCD with onboard chromatic tuner |
| Connectivity | Bluetooth audio, USB-C bidirectional audio |
| Outputs | XLR line out (with ground lift), headphone out |
| Inputs | 1/4″ instrument input, 3.5 mm aux input |
| App Support | Fender Tone 3.0 app (iOS/Android) |
| Construction | Combo amplifier, rugged build |
| Item Weight | 26.4 pounds |
| Product Dimensions | 22.3 x 19.9 x 12.3 inches |
| Material | Metal |
| Power Source | Corded Electric |
8. Warranty and Support
For detailed warranty information, product registration, and technical support, please visit the official Fender website. You can also find FAQs, software updates, and additional resources there.
Official Fender Store: Fender Store on Amazon


