
Introduction
This manual provides detailed instructions for the installation, operation, maintenance, and troubleshooting of your AKKON SMD LED Projector Headlights. These headlights are designed as a direct replacement for the original equipment on 2009-2014 Ford F-150 models.
Compatibility Notes:
- Compatible with 2009-2014 Ford F-150.
- Not compatible with 2013-2014 F-150 Limited, Platinum, or Tremor models.
- Not compatible with factory Xenon HID Headlights.
- Compatible with factory Halogen Headlights only.
Setup and Installation
The AKKON SMD LED Projector Headlights are designed for a plug-and-play installation, requiring no modifications to your vehicle's existing wiring. However, careful attention to detail during installation is crucial for proper function and longevity.
Required Tools (Not Included):
- Phillips head screwdriver
- Basic automotive hand tools
Installation Steps:
- Preparation: Ensure the vehicle is turned off and the battery is disconnected for safety. Park on a level surface.
- Remove Old Headlights: Carefully unclip and remove the spring clips securing the old headlight assemblies. This may require a fair amount of force. Disconnect all electrical connectors from the old headlights.
- Bulb Installation: The low beam and high beam bulbs (H7 type) are excluded and must be purchased separately and installed into the new headlight assemblies.
- DRL/Halo Wiring: Locate the green wires from the new headlights. These wires are used to power the halo and eyebrow LEDs (Daytime Running Lights). These wires must be plugged into the side light bulb socket from your stock headlights. Remove the original amber side light bulb and plug the green wire directly into the bulb socket. Do not plug it into the lamp connector. This will replace the amber side light with the new DRL/halo feature.
- Connect New Headlights: Connect all main electrical connectors from the vehicle's harness to the new AKKON headlight assemblies.
- Secure Headlights: Align the new headlight assemblies and firmly push them into place, ensuring the spring clips engage securely. It may require significant force to properly seat the clips.
- Test Functionality: Reconnect the battery. Turn on the vehicle and test all lighting functions: low beams, high beams, turn signals, and DRL/halo rings.
- Alignment: Adjust the headlight beam alignment. Vertical alignment can typically be adjusted using a Phillips head screwdriver. For optimal performance and to avoid blinding oncoming traffic, professional alignment is recommended.

Figure 1: Front view of the AKKON Projector Headlight installed on a Ford F-150.
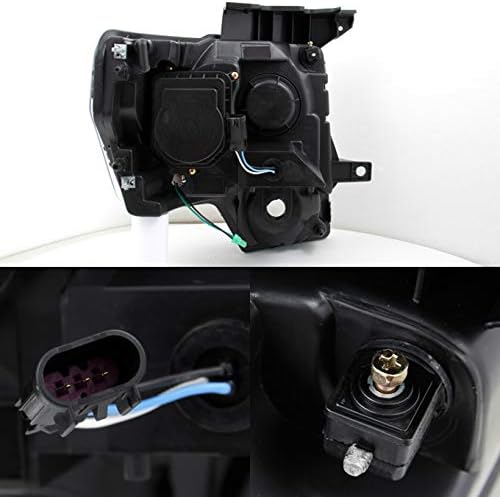
Figure 2: Rear view of the headlight assembly, illustrating the wiring harness and bulb sockets.
If you are unsure about any step of the installation process, it is recommended to seek assistance from a qualified automotive technician.
Operating Instructions
Your AKKON SMD LED Projector Headlights feature advanced lighting technology for improved visibility and aesthetics.
Key Features:
- Projector Lenses: Provide a focused and precise light beam pattern for both low and high beams, enhancing road illumination.
- Dual LED DRL Halo Rings: These rings illuminate as Daytime Running Lights (DRL), providing increased visibility during daylight hours and a distinct appearance.
- SMD LEDs: Integrated SMD LEDs provide additional accent lighting.

Figure 3: Close-up view of the projector lens and halo ring design.

Figure 4: Detailed view of the integrated SMD LED strip.
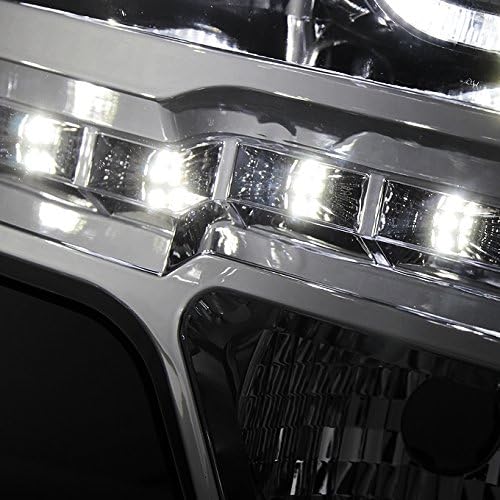
Figure 5: The SMD LED strip illuminated.

Figure 6: The dual halo rings illuminated.
The headlights are DOT (Department of Transportation) and SAE (Society of Automotive Engineers) approved, ensuring they meet regulatory standards for safety and performance.
Maintenance
Proper maintenance will help ensure the longevity and optimal performance of your AKKON headlights.
- Cleaning: Clean the headlight lenses regularly with a soft cloth and mild automotive-specific cleaning solution. Avoid abrasive cleaners or harsh chemicals that can damage the lens material.
- Inspection: Periodically inspect the headlight assemblies for any signs of damage, loose connections, or moisture accumulation.
- Bulb Replacement: If a low beam or high beam bulb (H7 type) burns out, replace it promptly. Ensure the replacement bulb is of the correct type and wattage. Refer to your vehicle's owner's manual for specific bulb replacement procedures, or consult a professional.
- Seals: While the headlights are designed to be waterproof, extreme conditions or impacts can compromise seals. If you notice persistent moisture inside the lens, inspect the seals and consider applying additional automotive-grade silicone sealant if necessary.
Troubleshooting
This section addresses common issues you might encounter with your AKKON headlights.
- Fogging/Condensation Inside Lens:
- Cause: Temperature fluctuations, high humidity, or compromised seals can lead to condensation.
- Solution: Small amounts of condensation often dissipate on their own. If fogging is persistent or excessive, inspect the rear caps and seals for proper seating. Ensure all wiring grommets are correctly installed. If a seal is damaged, it may require resealing with automotive-grade silicone.
- LED/DRL Not Illuminating:
- Cause: Loose wiring connection, incorrect wiring, or a faulty LED component.
- Solution: Verify that the green DRL/halo wires are securely plugged into the side light bulb socket. Check all other electrical connections. If the issue persists, contact customer support.
- Headlight Beam Misalignment:
- Cause: Improper installation or adjustment.
- Solution: Vertical alignment can be adjusted with a Phillips head screwdriver. If high beams are misaligned horizontally, this may require removing the headlamp and adjusting internal screws, which is best performed by a professional.
- FM Radio Interference:
- Cause: Some aftermarket LED components can generate electromagnetic interference.
- Solution: If you experience FM radio static, particularly at night when the LEDs are active, consult an automotive electrical specialist. They may be able to install filters or diagnose the source of the interference.
Specifications
| Feature | Specification |
|---|---|
| Brand | AKKON |
| Model Number | 9-P1F1509C |
| Compatibility | 2009-2014 Ford F-150 (Halogen models only) |
| Housing Color | Chrome |
| Lens Color | Clear |
| Bulb Type (Low Beam) | H7 (Excluded) |
| Bulb Type (High Beam) | H7 (Excluded) |
| Special Features | Waterproof, Dual LED DRL Halo Ring, Projector Lens |
| Wattage | 110 watts |
| Position | Front Left, Front Right |
| Item Weight | 23 pounds (pair) |
| Package Dimensions | 22 x 22 x 18 inches |
| Certifications | DOT & SAE Approved |
Warranty Information
Specific warranty details for AKKON products are typically provided at the point of purchase or directly by the manufacturer. Please retain your proof of purchase. For comprehensive warranty information, including coverage duration and terms, please contact the seller or AKKON directly.
Customer Support
If you have any questions, require technical assistance, or need to report an issue with your AKKON SMD LED Projector Headlights, please contact the seller from whom you purchased the product. They will be able to provide the most direct support and guidance.