1. Introduction
This manual provides detailed instructions for the safe and efficient operation, maintenance, and troubleshooting of your Preciva 902D V 2-in-1 Soldering and Hot Air Rework Station. Please read this manual thoroughly before using the device to ensure proper functionality and to prevent damage or injury.

Image: The Preciva 902D V main unit, featuring the hot air gun on the left and the soldering iron on the right, with dual digital temperature displays.
2. Safety Instructions
Always adhere to the following safety precautions to prevent electric shock, fire, or personal injury:
- Power Supply: Ensure the power supply matches the voltage requirements (110V-127V, 60Hz).
- Ventilation: Use the station in a well-ventilated area to avoid inhaling fumes from soldering.
- Hot Surfaces: The soldering iron tip and hot air gun nozzle reach high temperatures. Avoid direct contact. Allow components to cool before handling.
- Flammable Materials: Keep flammable liquids, gases, and materials away from the work area.
- Personal Protective Equipment: Wear safety glasses to protect against solder splashes and fumes.
- Children and Pets: Keep the device out of reach of children and pets.
- Unplug When Not in Use: Always unplug the station from the power outlet when not in use or before cleaning/maintenance.
- Proper Grounding: Ensure the station is properly grounded.
- Damage Inspection: Do not operate the station if the power cord, plug, or any part of the unit is damaged.
3. Package Contents
Verify that all items are present in the package:
- 1 x Preciva 902D V Main Unit (110V-127V, 60Hz, 750W)
- 1 x Soldering Iron
- 1 x Hot Air Gun
- 5 x Soldering Tips
- 4 x Hot Air Nozzles (5mm, 8mm, 10mm, 12mm)
- 1 x Soldering Iron Holder
- 1 x Hot Air Gun Holder
- 1 x Screwdriver
- 1 x 30g Solder Wire
- 1 x User Manual (this document)
4. Product Features
The Preciva 902D V is a versatile 2-in-1 soldering and hot air rework station designed for precision work. Key features include:
- Dual Functionality: Independent soldering iron and hot air gun with separate power switches.
- Precise Temperature Control: Advanced PID temperature control system for both tools, ensuring stable and accurate temperatures. Soldering iron temperature range: 200-480°C (392-896°F). Hot air gun temperature range: 100-480°C (212-896°F).
- Memory Presets: Three programmable memory channels (CH1, CH2, CH3) for both the soldering iron and hot air gun, allowing quick recall of frequently used temperature and airflow settings.
- Adjustable Airflow: Hot air gun features adjustable airflow up to 120 L/min, powered by a brushless blower for stable, low-noise operation.
- Dual LED Display: Clear digital LED displays show real-time temperatures for both the soldering iron and hot air gun.
- Temperature Unit Conversion: Easily switch between Celsius (°C) and Fahrenheit (°F) display modes.
- Smart Sleep Mode: The soldering iron enters sleep mode after 10 minutes of inactivity, cooling to 200°C (392°F) to prolong tip life. The hot air gun enters standby mode when placed in its holder, resuming operation when picked up.
- Temperature Calibration: Allows for precise calibration of temperature readings.
- SMT Double-Face Manufacturing: Internal design ensures signal stability and safety.

Image: The control panel highlighting the dual temperature display, Celsius/Fahrenheit conversion, sleep mode indicator, and temperature calibration function.
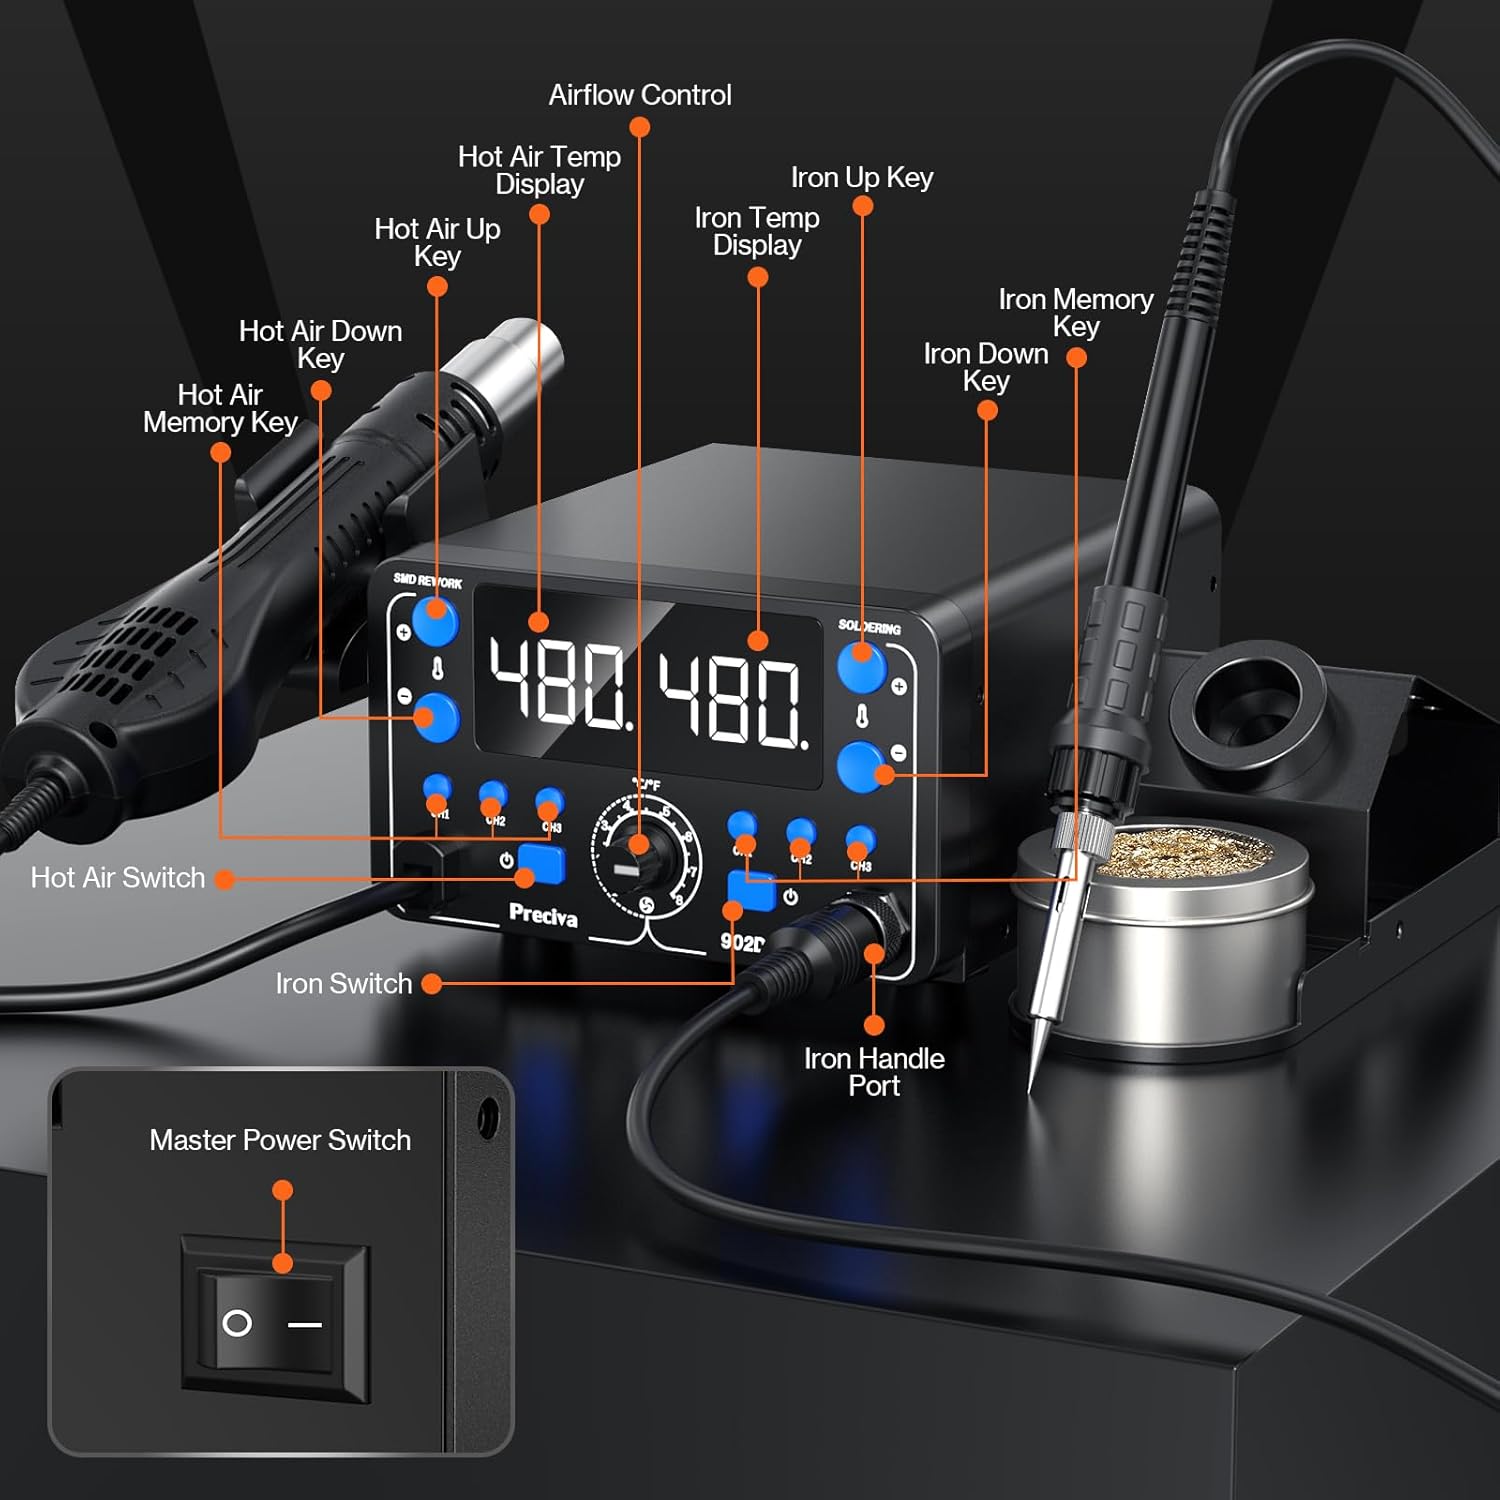
Image: Detailed diagram illustrating the control panel, including hot air and iron switches, temperature adjustment keys, memory keys, and the master power switch.
5. Setup Instructions
- Unpacking: Carefully remove all components from the packaging and inspect for any damage.
- Placement: Place the main unit on a stable, heat-resistant, and non-flammable surface. Ensure adequate space around the unit for ventilation.
- Connect Soldering Iron: Connect the soldering iron cable to the "SOLDERING" port on the front panel. Secure it by tightening the screw connector. Place the soldering iron in its holder.
- Connect Hot Air Gun: Connect the hot air gun cable to the "SMD REWORK" port on the front panel. Secure it by tightening the screw connector. Place the hot air gun in its holder.
- Install Nozzle: Select an appropriate hot air nozzle and attach it to the hot air gun.
- Power Connection: Connect the power cord to the main unit's power input and then plug it into a grounded electrical outlet.
6. Operating Instructions
6.1 General Operation
- Power On: Flip the master power switch located on the rear of the unit to the "ON" position. The LED displays will illuminate.
- Activate Tools: Press the individual power switches for the soldering iron and/or hot air gun on the front panel to activate them.
- Temperature Unit Conversion: Press the °C/°F button to toggle between Celsius and Fahrenheit display modes.
6.2 Soldering Iron Operation
- Set Temperature: Use the "Iron Up" and "Iron Down" keys to adjust the desired soldering temperature. The display will show the set temperature and then the actual temperature as it heats up.
- Using Memory Presets:
- To save a preset: Set the desired temperature, then press and hold one of the "CH1", "CH2", or "CH3" buttons until the display flashes, indicating the setting is saved.
- To recall a preset: Briefly press the corresponding "CH1", "CH2", or "CH3" button.
- Sleep Mode: The soldering iron will automatically enter sleep mode after 10 minutes of inactivity, reducing its temperature to 200°C (392°F). Picking up the iron will reactivate it to the last set temperature.

Image: The control panel displaying the three memory preset channels (CH1, CH2, CH3) for both the hot air station and soldering station.

Image: The soldering iron in its holder, illustrating the 10-minute auto sleep mode feature.
6.3 Hot Air Gun Operation
- Set Temperature: Use the "Hot Air Up" and "Hot Air Down" keys to adjust the desired hot air temperature.
- Adjust Airflow: Rotate the "Airflow Control" knob to adjust the air volume.
- Using Memory Presets:
- To save a preset: Set the desired temperature and airflow, then press and hold one of the "CH1", "CH2", or "CH3" buttons until the display flashes.
- To recall a preset: Briefly press the corresponding "CH1", "CH2", or "CH3" button.
- Standby Mode: When the hot air gun is placed in its holder, it will automatically enter standby mode, stopping the heating element and continuing airflow to cool down. Picking up the gun will reactivate it to the last set temperature and airflow.

Image: The hot air gun demonstrating its smart auto function, entering sleep mode when set down and reactivating when picked up.
7. Maintenance
Regular maintenance ensures optimal performance and extends the lifespan of your soldering station.
- Cleaning Soldering Tips:
- Always clean the soldering tip before and after use with a damp sponge or brass wool.
- Tin the tip with a small amount of solder after cleaning to prevent oxidation.
- Replace tips when they become excessively worn or corroded.
- Cleaning Hot Air Nozzles: Ensure nozzles are free from solder residue or debris. Clean gently with a soft brush if necessary, only when the unit is cool.
- Unit Cleaning: Wipe the main unit with a soft, damp cloth. Do not use abrasive cleaners or solvents. Ensure the unit is unplugged and cool before cleaning.
- Storage: Store the station in a dry, dust-free environment when not in use.
- Temperature Calibration: Periodically check and calibrate the temperature if you suspect inaccuracies. Refer to the specific calibration procedure in the full manual (if available) or contact customer support.
8. Troubleshooting
| Problem | Possible Cause | Solution |
|---|---|---|
| Station does not power on. | No power supply; Master switch off; Damaged power cord. | Check power connection; Ensure master switch is ON; Inspect power cord for damage. |
| Soldering iron not heating. | Iron switch OFF; Loose connection; Heating element failure; In sleep mode. | Turn iron switch ON; Check iron cable connection; Pick up iron from holder to exit sleep mode; Contact support if heating element is suspected. |
| Hot air gun not heating/no airflow. | Hot air switch OFF; Loose connection; Gun not picked up from holder; Heating element/blower failure. | Turn hot air switch ON; Check hot air gun cable connection; Pick up gun from holder; Contact support if heating element/blower is suspected. |
| Temperature display inaccurate. | Needs calibration; Sensor issue. | Perform temperature calibration (refer to advanced settings or contact support); Contact support if issue persists. |
| Poor solder joint quality. | Incorrect temperature; Oxidized tip; Dirty workpiece. | Adjust temperature; Clean and tin soldering tip; Clean workpiece thoroughly. |
9. Specifications
| Parameter | Value |
|---|---|
| Model | 902D V |
| Power Supply | 110V-127V AC, 60Hz |
| Total Power Consumption | 750W |
| Soldering Iron Temperature Range | 200-480°C (392-896°F) |
| Hot Air Gun Temperature Range | 100-480°C (212-896°F) |
| Hot Air Gun Airflow | Max 120 L/min (Brushless Blower) |
| Temperature Stability | ±1°C (Static) |
| Display Type | LED Digital |
| Item Weight | 3.7 pounds (approx. 1.68 kg) |
| Package Dimensions | 10.59 x 10.39 x 4.37 inches |
10. Warranty Information
Preciva products are manufactured to high-quality standards. For specific warranty terms and conditions applicable to your 902D V Soldering Station, please refer to the warranty card included with your product or contact Preciva customer support directly. Keep your proof of purchase for warranty claims.
11. Customer Support
Should you encounter any issues, have questions regarding product use, or require technical assistance, please do not hesitate to contact our dedicated customer support team. We are committed to providing prompt solutions and ensuring your satisfaction.
Contact Information: Please refer to the contact details provided on the Preciva official website or the product packaging.


