
Introduction
Thank you for choosing the STUDIOFINIX 8 Inch Bluetooth Ceiling Speaker System. This system is designed to provide high-quality audio with a discreet, flush-mount installation. This manual will guide you through the installation, operation, and maintenance of your new speaker system to ensure optimal performance and longevity. Please read these instructions carefully before installation and use.
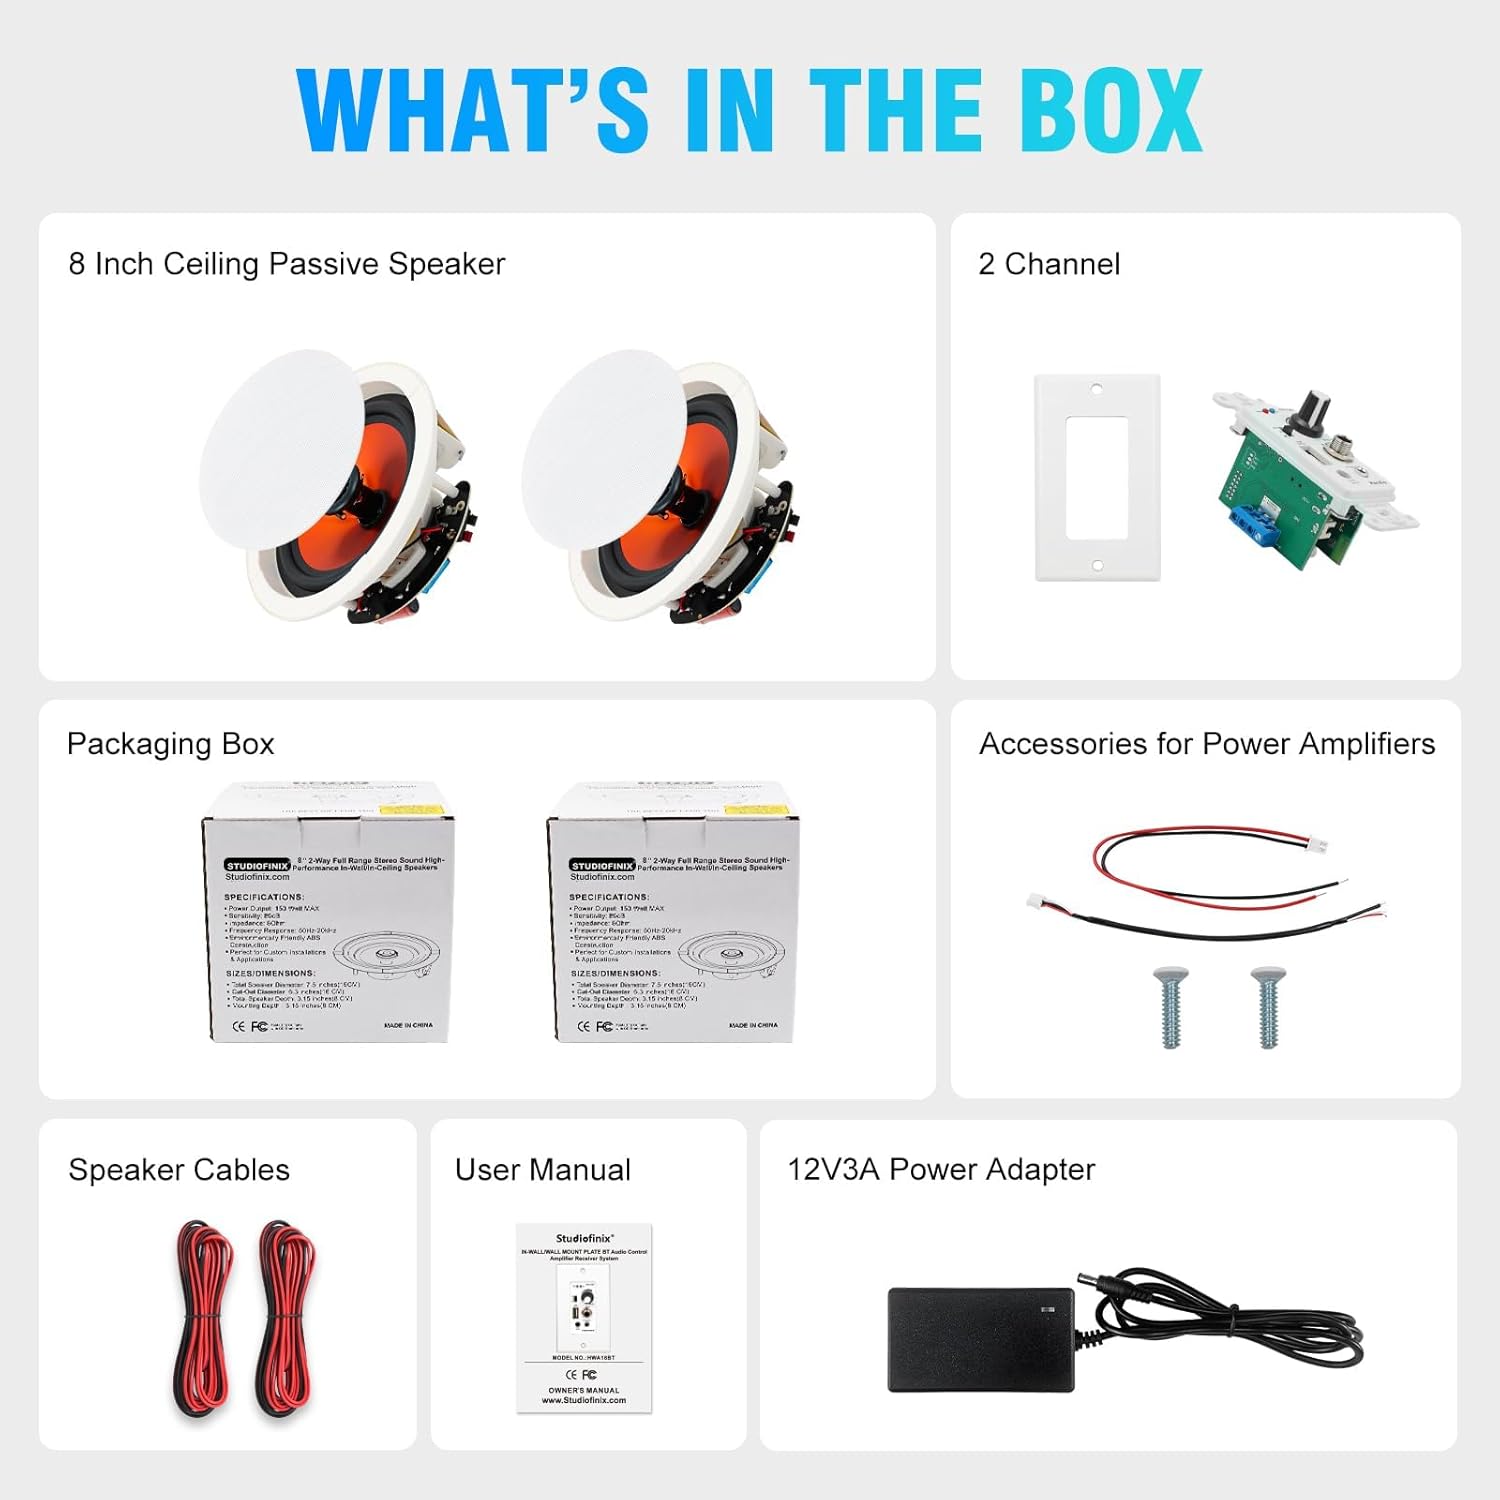
What's in the Box
Before beginning installation, please verify that all components are present:
- 2 x 8" Passive Ceiling Speakers
- 2 x Speaker Cables
- 1 x 2-Channel Wall Amplifier
- 1 x Power Adapter (12V3A)
- 1 x User Manual (this document)
- Mounting Hardware (screws, etc.)
- Installation Template
Setup and Installation
Careful planning is essential for a successful installation. This system requires routing speaker wires from the ceiling to the wall amplifier and connecting the amplifier to a power source. Professional installation is recommended if you are not comfortable with low-voltage wiring and drywall work.
1. Planning and Location Selection
Choose appropriate locations for your ceiling speakers and the wall amplifier. Ensure there are no obstructions like electrical wires, plumbing, or structural beams in the chosen areas. The wall amplifier should be installed in a standard single-gang electrical box and near a power outlet.

2. Speaker Installation
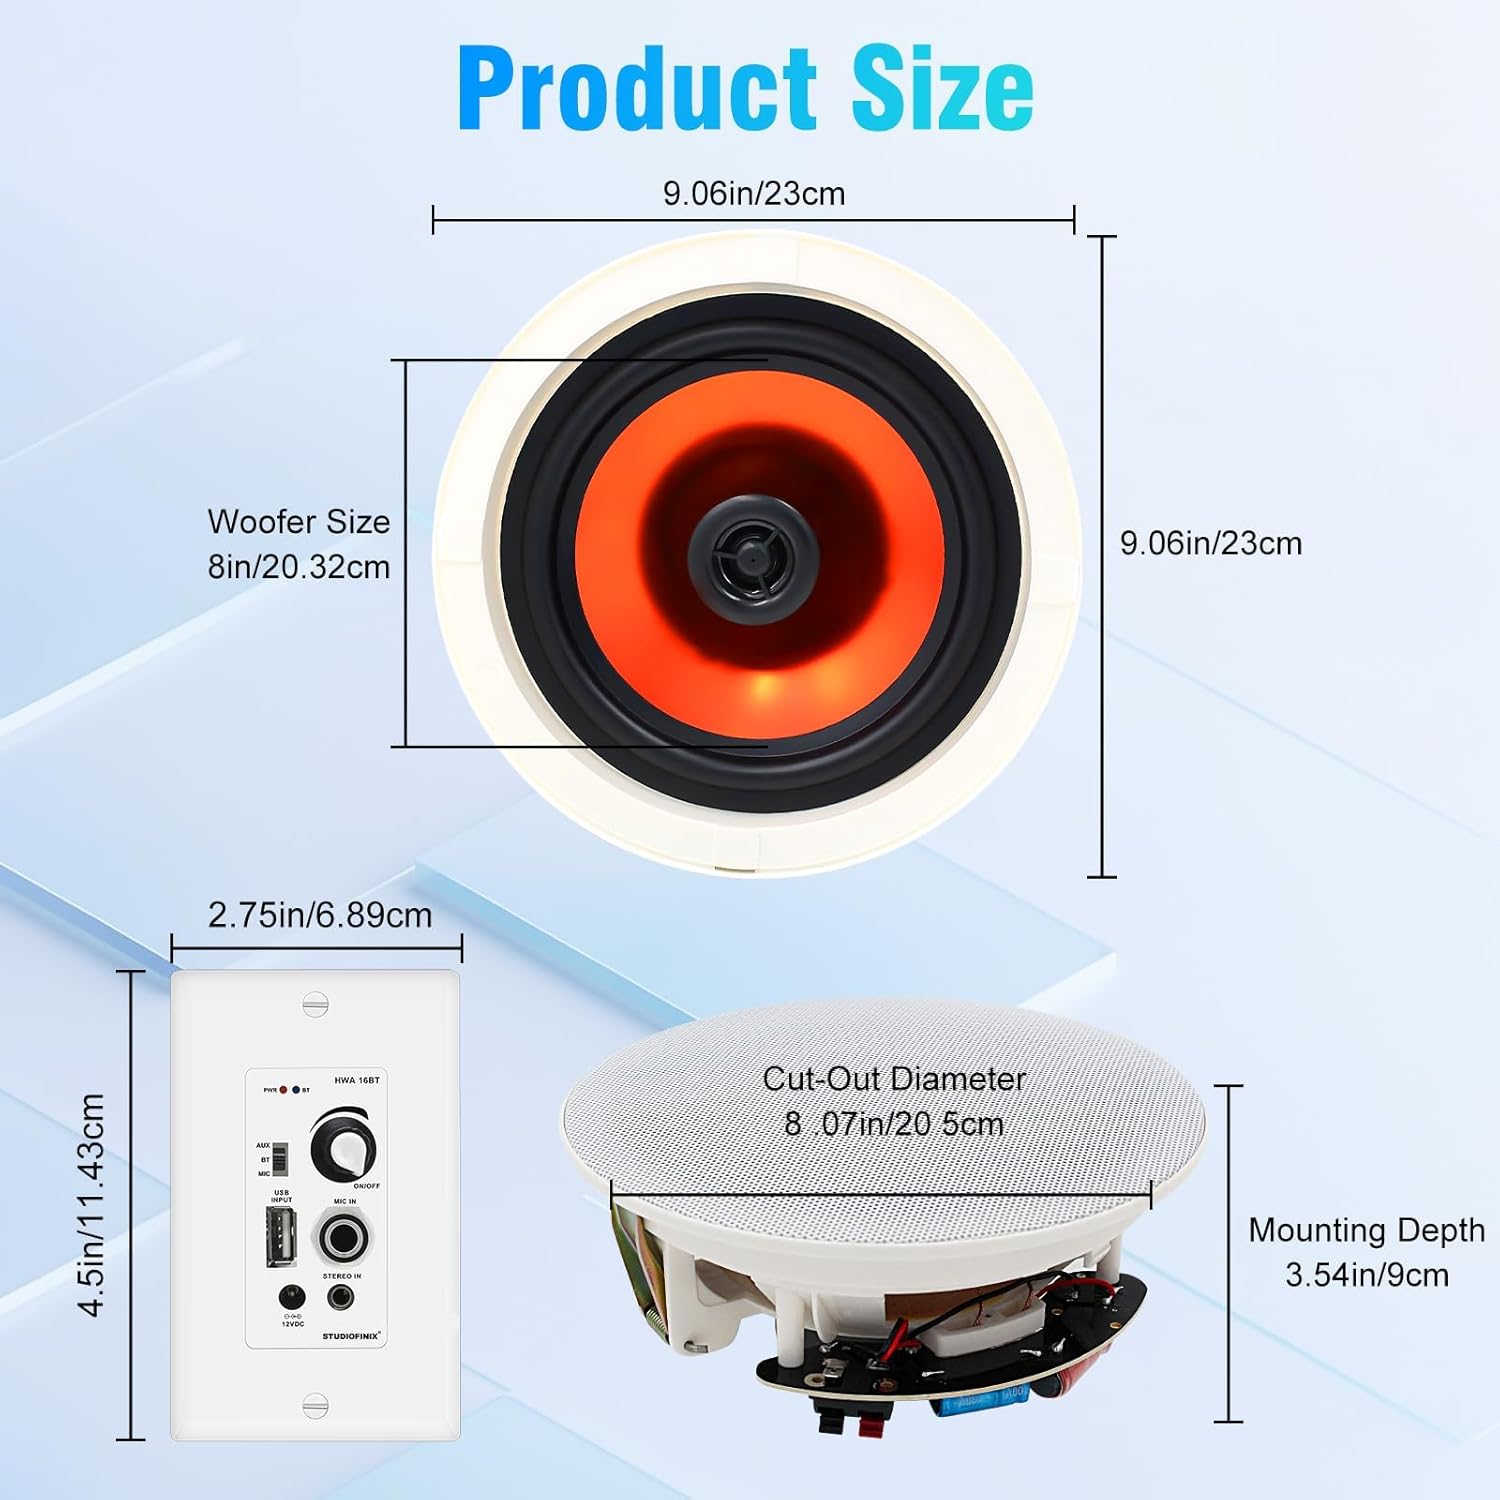
- Using the provided template, mark the cut-out diameter (approximately 8.07 inches / 20.5 cm) on the ceiling at your desired speaker locations.
- Carefully cut the holes in the ceiling.
- Run speaker wires from the cut-out holes to the location of the wall amplifier. Ensure proper polarity (+ and -) is maintained.
- Connect the speaker wires to the spring-loaded terminals on the back of each speaker. Press the depressible terminal, insert the stripped wire, and release.
- Insert the speaker into the ceiling hole. The integrated clamping anchors will secure the speaker in place.

3. Wall Amplifier Installation
- Install a standard single-gang electrical box at the chosen wall location.
- Route the speaker wires from the ceiling to this electrical box.
- Connect the speaker wires to the terminal block on the back of the 2-channel wall amplifier. Ensure correct polarity: Speaker Output L+ (Left Positive), Speaker Output L- (Left Negative), Speaker Output R+ (Right Positive), Speaker Output R- (Right Negative).
- Connect the 12V DC power supply wires to the amplifier's power input terminals (12V DC IN BLACK- and 12V DC IN RED+).
- Secure the wall amplifier module into the electrical box using screws. Attach the faceplate.
- Plug the power adapter into a wall outlet and connect it to the amplifier's DC 12V input.


Operating Instructions
Wall Amplifier Controls
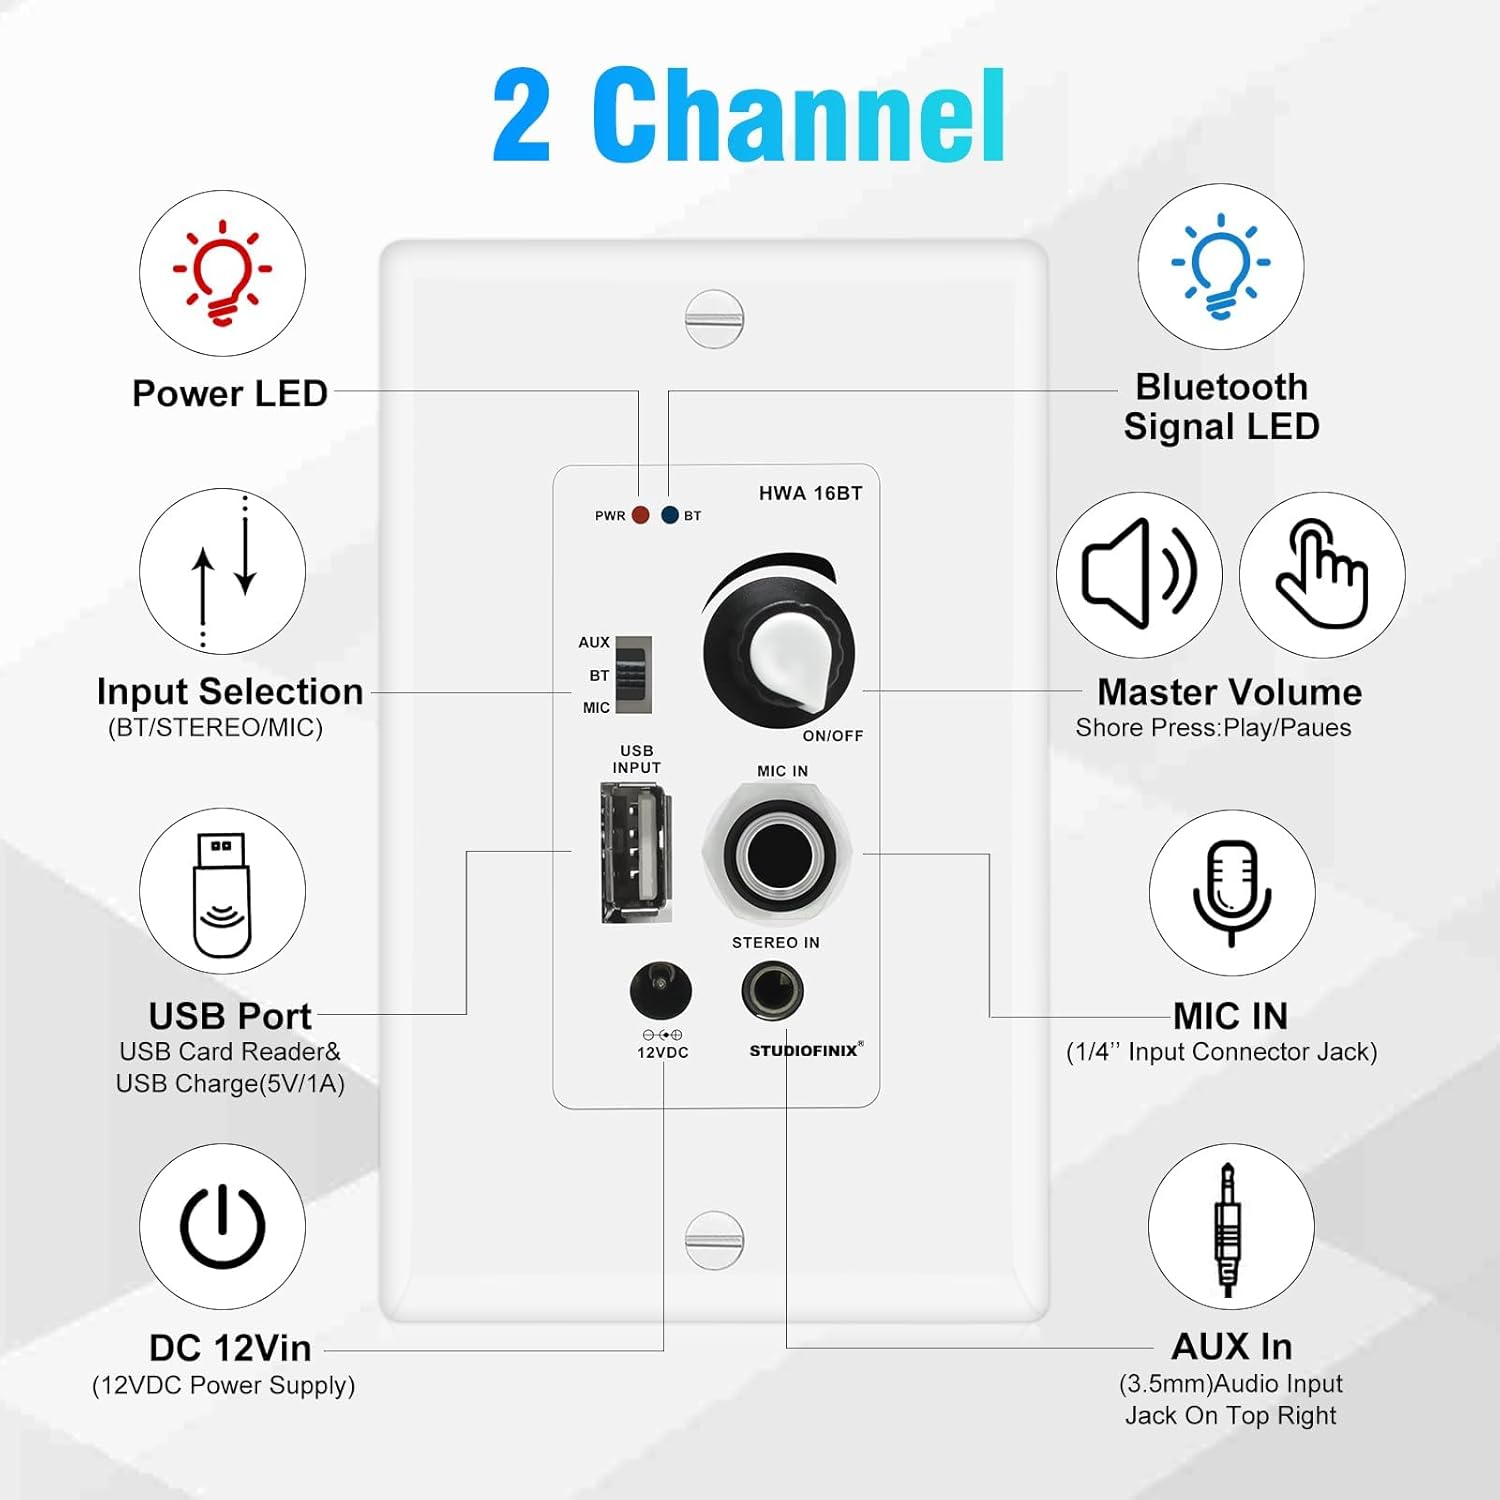
- Power LED: Indicates power status.
- Bluetooth Signal LED: Indicates Bluetooth connection status.
- Input Selection: Press to cycle between Bluetooth (BT), AUX, and Microphone (MIC) inputs.
- Master Volume: Rotate to adjust volume. Press to power ON/OFF or Play/Pause (in Bluetooth/USB mode).
- USB Port: For USB flash memory playback and 5V/1A device charging.
- MIC IN: 1/4" input jack for a microphone.
- AUX In: 3.5mm audio input jack for external devices.
Bluetooth Pairing
- Ensure the amplifier is powered on.
- Press the Input Selection button until the Bluetooth Signal LED starts blinking, indicating pairing mode.
- On your mobile device (smartphone, tablet, etc.), enable Bluetooth and search for available devices.
- Select "HCS828" (or similar model name) from the list to pair.
- Once connected, the Bluetooth Signal LED will become solid. You can now stream audio wirelessly.

AUX Input
Connect an external audio device (e.g., MP3 player, TV) to the 3.5mm AUX In jack on the wall amplifier using a 3.5mm audio cable. Select AUX input using the Input Selection button.
USB Playback
Insert a USB flash drive containing audio files into the USB Port. The amplifier will automatically detect and play compatible audio files. The USB port also provides 5V/1A charging for devices.
Microphone Use
Connect a 1/4" microphone to the MIC IN jack. Select MIC input using the Input Selection button. Adjust the master volume as needed.
Maintenance
- Cleaning: Use a soft, dry cloth to clean the speaker grilles and the wall amplifier faceplate. Do not use harsh chemicals or abrasive cleaners.
- Grille Removal: The speaker grilles are magnetic and can be carefully removed for cleaning or painting.
- Environmental Conditions: Avoid exposing the system to excessive moisture, extreme temperatures, or direct sunlight.
- Wiring Inspection: Periodically check all wiring connections to ensure they are secure and free from damage.
Troubleshooting
| Problem | Possible Cause | Solution |
|---|---|---|
| No sound from speakers | Power not connected; incorrect input selected; loose speaker wires; volume too low. | Check power adapter connection; ensure Power LED is on. Select correct input (BT/AUX/MIC). Verify speaker wire connections at both the amplifier and speakers. Increase volume. |
| Bluetooth not pairing | Amplifier not in pairing mode; device too far; interference; incorrect device selected. | Ensure Bluetooth input is selected and LED is blinking. Move device closer to amplifier. Turn off other Bluetooth devices. Select "HCS828" from your device's Bluetooth list. |
| Distorted audio | Volume too high; poor source audio quality; loose connections. | Reduce volume. Test with a different audio source. Check all wiring connections. |
| USB playback not working | Unsupported file format; USB drive not properly inserted; corrupted files. | Ensure audio files are in a supported format. Reinsert USB drive. Try a different USB drive or files. |
Specifications
Ceiling Speakers
- Speaker Size: 8 Inches
- Woofer Diameter: 8 Inches
- Tweeter: 1 Inch Silk Dome
- Rated Power: 50W
- Max Power Output: 200W (EACH)
- Sensitivity: 89dB
- Impedance: 8 Ohm
- Frequency Response: 50-20KHz
- Cut-Out Diameter: 8.07 Inch (20.5 CM)
- Mounting Depth: 3.54 Inches (9 CM)
- Material: ABS
Wall Amplifier
- Power Output: 100 Watt Peak, 40 Watt RMS x 2 Ch. @ 4 Ohm
- Bluetooth Version: 5.0
- Wireless Range: 30 Feet (10 Meters)
- Mic Input Type: Dynamic
- Power Amp Type: Stereo Class-D
- Minimum Load Resistance: 4 Ohm
- T.H.D.: 0.03% (8 Ohm, 1KHz)
- Power Draw: 12V 3Amps
- Power: DC 100-240V, 50/60Hz (12V DC Adapter)
- Connectivity: Bluetooth, AUX (3.5mm), USB, MIC (1/4")
Warranty Information
STUDIOFINIX products are designed and manufactured to the highest quality standards. This product is covered by a limited warranty against defects in materials and workmanship. Please refer to the warranty card included in your package or visit the official STUDIOFINIX website for detailed warranty terms and conditions. Keep your purchase receipt as proof of purchase.
Support
If you encounter any issues or have questions regarding your STUDIOFINIX 8 Inch Bluetooth Ceiling Speaker System, please contact our customer support team. You can find contact information on the STUDIOFINIX official website or through your retailer. Please have your model number (ST-HCS828-16BT2CH-US) and purchase details ready when contacting support.
For additional resources and FAQs, visit the STUDIOFINIX Store on Amazon.