1. Introduction
This manual provides detailed instructions for the assembly, operation, and maintenance of your VINGLI Queen Bed Frame. This bed frame features four large storage drawers, an adjustable headboard with a built-in charging station, and integrated RGB LED lighting. Please read this manual thoroughly before assembly and use to ensure proper setup and safe operation.
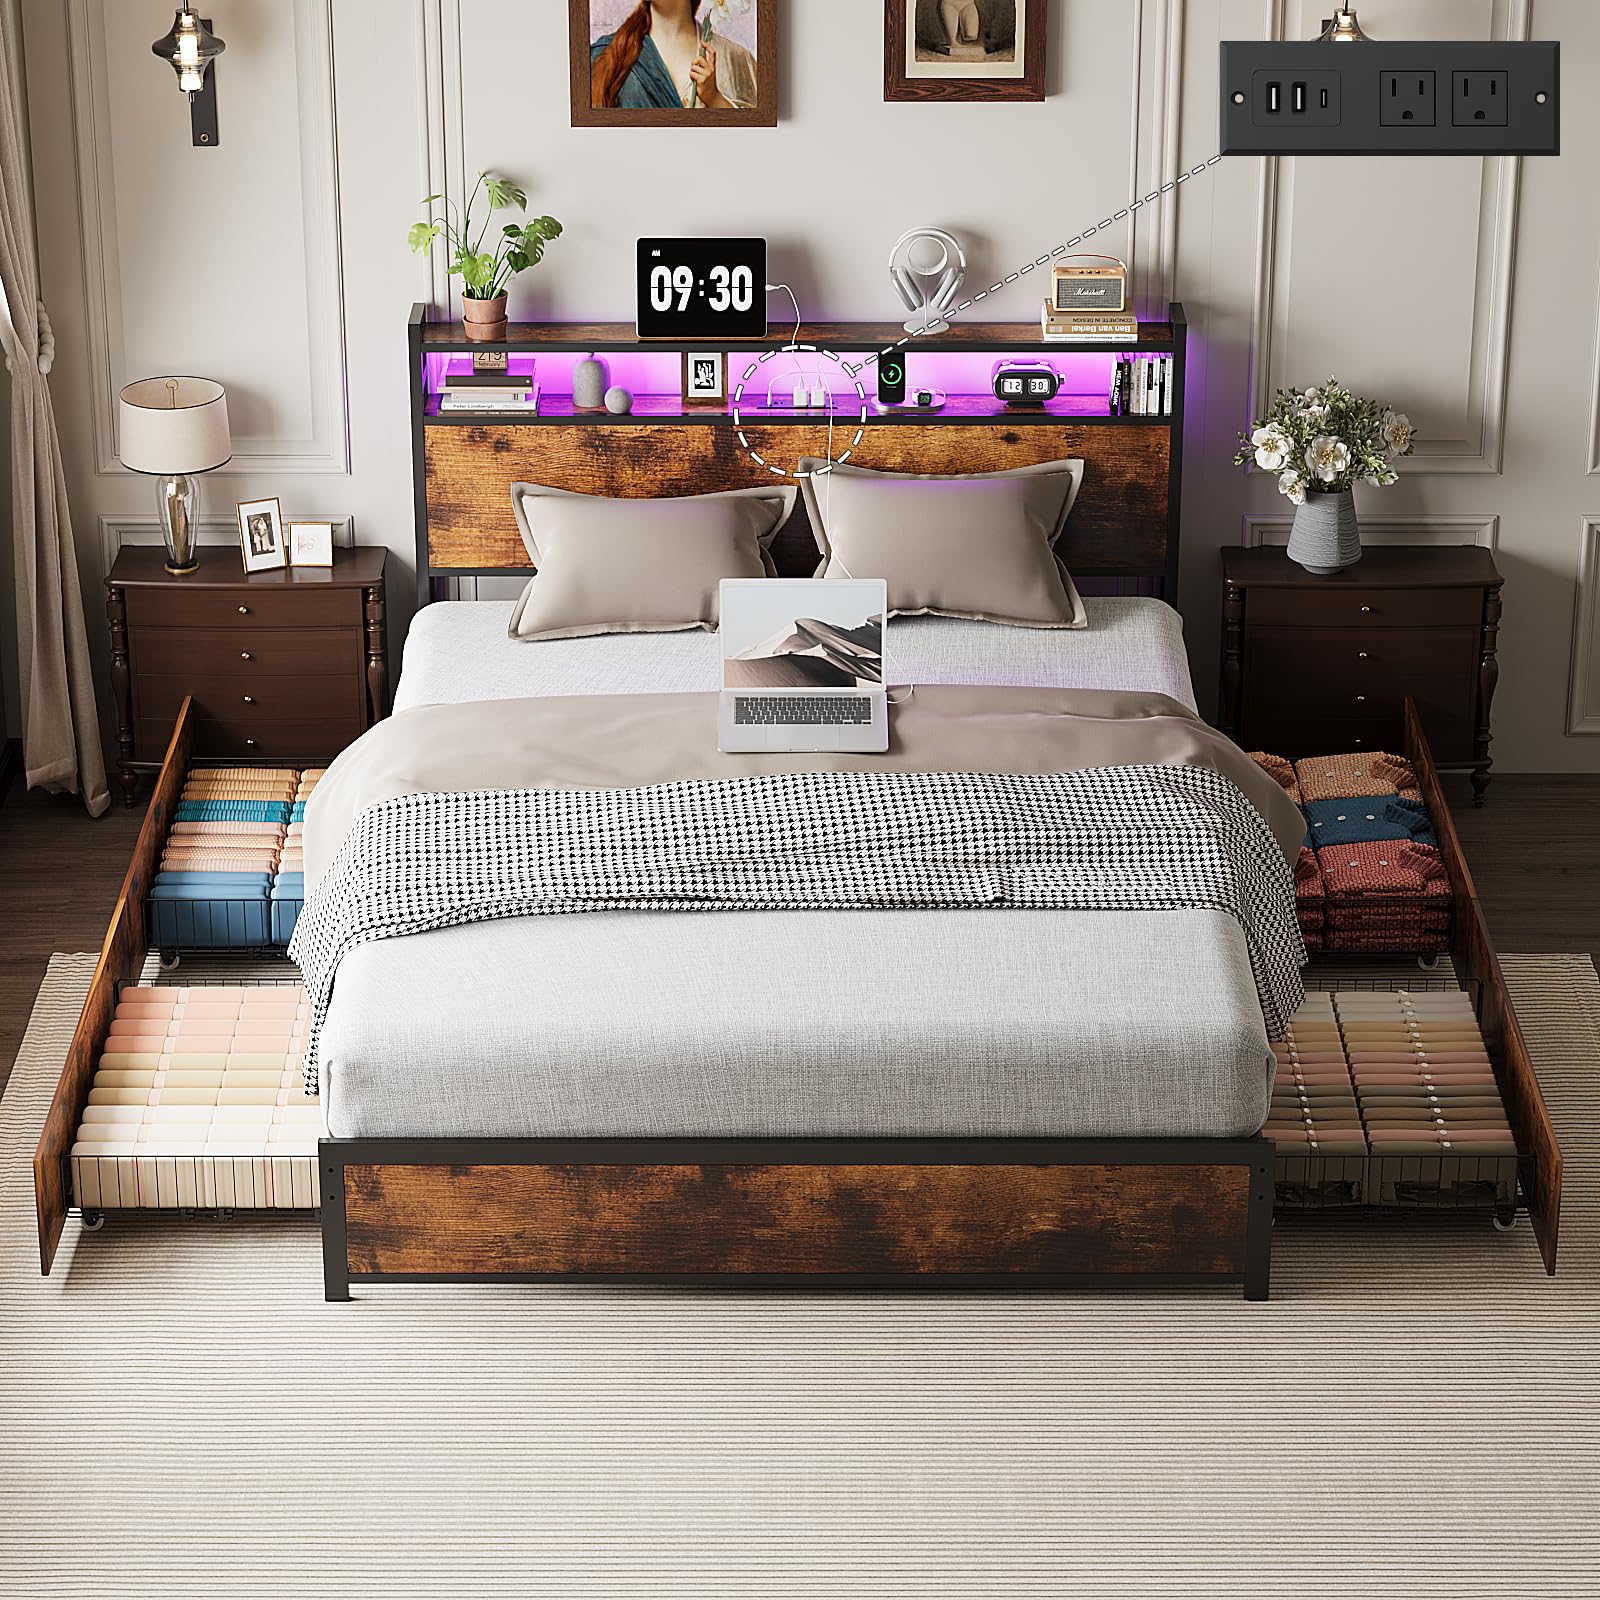
Overall view of the VINGLI Queen Bed Frame, showcasing its headboard, storage drawers, and integrated features.
2. Safety Information
- Ensure all parts are present and undamaged before assembly. Do not use if any parts are missing or broken.
- Assemble the bed frame on a soft, clean surface to prevent scratches.
- Tighten all screws firmly, but do not overtighten to avoid damaging the material.
- Keep small parts away from children during assembly to prevent choking hazards.
- Do not exceed the maximum weight capacity of 880 lbs for the bed frame and 55 lbs per storage drawer.
- Ensure the bed frame is placed on a level surface to prevent instability.
- Only use a mattress between 10-12 inches thick for optimal fit and safety.
- For electrical components (charging station, LED lights), ensure proper connection to a suitable power source. Do not overload outlets.
3. Package Contents
Before beginning assembly, verify that all components listed below are present in your package. Refer to the assembly video for visual identification of parts.
- Headboard components (metal frame, wooden panels, charging station)
- Side rails and footboard components (metal frame, wooden panels)
- Bed slats and support legs
- Four storage drawers (metal baskets, wooden fronts, wheels)
- RGB LED light strip and remote control
- Assembly hardware (screws, washers, Allen wrench)
- EVA mute strips
4. Assembly Instructions
Follow these steps carefully for proper assembly. It is recommended to have two people for assembly. An Allen wrench is included for most fasteners.
4.1 Headboard Assembly
- Attach the wooden panels (parts 4 and 5) to the headboard frame (parts 2 and 3) using the provided screws. Ensure the panel with the cutout (part 5) is positioned correctly for the charging station.
- Install the charging station (part H) into the cutout on the headboard panel (part 5) and secure it with screws (part I).
- Connect the headboard side frames (part 1) to the assembled headboard panels. Secure with screws (part C) and washers (part E).
- The headboard features an adjustable shelf. You can customize the board position as desired during assembly.

The headboard features an adjustable shelf for personalized storage and display.
4.2 Bed Frame Assembly
- Attach the side rails (parts 7) and footboard (parts 8 and 9) to the headboard assembly. Secure with screws (part C) and washers (part E).
- Install the central support beams (parts 10) and adjustable support legs (part D) to the bed frame. Ensure all connections are tight.
- Place the bed slats (parts 11 and 12) across the frame. Secure them using the provided fasteners (part C).
- Apply the EVA mute strips (part G) to the metal frame where the slats rest to reduce noise.
- Attach the mattress anti-slip brackets (part 15) to the corners of the bed frame.

Detail of the anti-slip mattress design to keep your mattress securely in place.
4.3 Storage Drawer Assembly
- Assemble the metal baskets for the drawers (parts 16 and 17) using the clips (part M). Repeat for all four drawers.
- Attach the wheels (part L) to the bottom of each assembled metal basket.
- Secure the wooden drawer fronts (part 14) to the metal baskets using screws (part A) and nuts (part N). Note: Tighten the screws only 10mm; over-tightening may cause cracking or bursting of the wood.
- Slide the assembled drawers under the bed frame. Align the screw (part B) on the drawer front with the holes on the bed frame to stop the drawer from sliding too far under.

The bed frame includes four large capacity drawers on wheels for convenient under-bed storage.
4.4 LED Light Installation
- Peel the EVA foam backing from the LED light strip (part K) and firmly stick it to the designated area on the headboard.
- Connect the LED strip plug to the charging socket on the headboard.
- The LED lights can be controlled via the included remote (part J), a mobile app, or a switch.

The headboard features integrated RGB LED lights with various color and mode options.
4.5 Assembly Video Guide
For a visual guide to the assembly process, please refer to the video below:
Official VINGLI assembly video for the bed frame, demonstrating step-by-step construction.
5. Operating Instructions
5.1 RGB LED Lights
The integrated RGB LED lights offer over 6000 colors, adjustable brightness levels, various scene modes, and music sync functionality. They can be controlled using three methods:
- Remote Control: Use the included remote to change colors, adjust brightness, select modes, and set timers.
- Mobile App: Download the dedicated mobile application (refer to the LED light manual for app details) to control the lights from your smartphone. This often provides more advanced customization options.
- Switch: A physical switch on the headboard allows for basic on/off control.
Ensure the LED strip is properly connected to the charging station for power.
5.2 Charging Station
The headboard features a convenient built-in charging station to power your electronic devices. It includes:
- 2 AC Outlets (120V/12A)
- 2 USB Ports (5V/2A)
- 1 Type-C Port (5V/2A)
Simply plug your devices into the appropriate ports. Ensure the bed frame is connected to a wall outlet for the charging station to function.

Close-up of the headboard's integrated charging station with AC, USB, and Type-C ports.
5.3 Storage Drawers
The four under-bed storage drawers are designed for easy access and organization. Each drawer is equipped with wheels and a keyhole slot design to ensure smooth gliding. To use:
- Gently pull the drawer out from under the bed.
- The keyhole slot on the drawer front aligns with a screw on the bed frame to prevent the drawer from being pulled out too far.
- Push the drawer back under the bed until it is fully closed.
6. Maintenance
- Cleaning: Wipe the metal and wooden surfaces with a soft, damp cloth. Avoid harsh chemicals or abrasive cleaners.
- Fasteners: Periodically check all screws and bolts to ensure they remain tight. Retighten as necessary to maintain stability and prevent noise.
- Drawers: Keep the drawer wheels free of debris to ensure smooth operation.
- Electrical Components: Ensure the charging station and LED light connections are secure. Unplug from the wall outlet before cleaning or performing any maintenance on electrical parts.
7. Troubleshooting
- Bed Frame is Wobbly/Noisy:
Check all screws and bolts. Tighten any loose fasteners. Ensure the bed frame is on a level surface. Verify that the EVA mute strips are properly installed on the slats.
- LED Lights Not Working:
Ensure the LED strip is securely plugged into the charging station. Check if the bed frame is plugged into a working wall outlet. Verify the remote control battery is functional. Try controlling with the mobile app or physical switch.
- Charging Station Not Functioning:
Confirm the bed frame's power cord is securely plugged into a working wall outlet. Test the outlet with another device. Ensure devices are properly connected to the charging ports.
- Drawers Not Sliding Smoothly:
Check for any obstructions under the bed or in the drawer tracks. Clean the wheels and ensure they are free of debris. Verify that the drawer fronts are not overtightened, which could cause warping.
8. Specifications
| Feature | Detail |
|---|---|
| Size | Queen |
| Material | Metal, Wood |
| Product Dimensions | 86.22"L x 60.34"W x 40.16"H |
| Style | Contemporary, Modern, Industrial, Rustic |
| Special Features | 4 Storage Drawers, Adjustable Headboard Shelf, Charging Station (2 AC, 2 USB, 1 Type-C), RGB LED Lighting, No Box Spring Needed |
| Weight Capacity (Bed Frame) | Up to 880 lbs |
| Weight Capacity (Each Drawer) | Up to 55 lbs |
| Recommended Mattress Thickness | 10-12 inches |
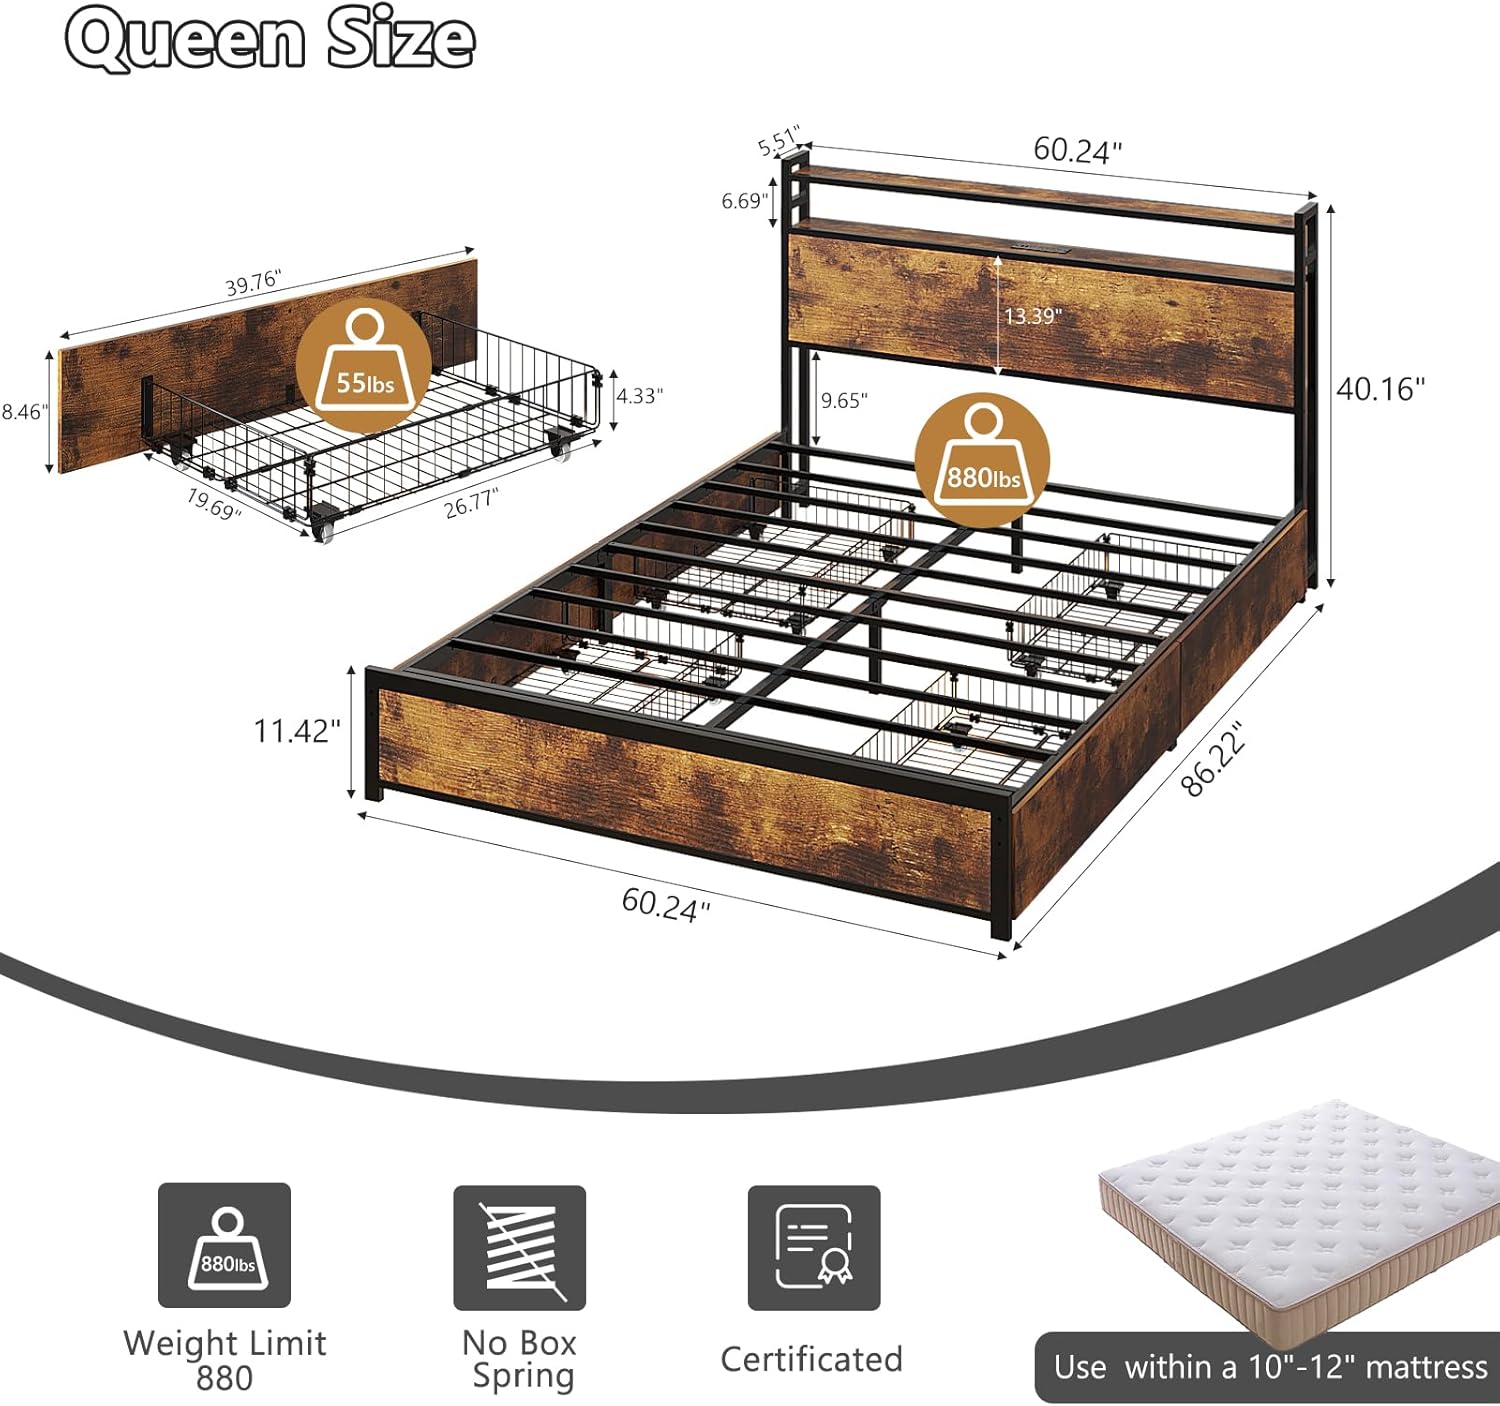
Detailed dimensions of the VINGLI Queen Bed Frame.
9. Warranty and Support
For warranty information, product support, or to order replacement parts, please contact VINGLI customer service. Refer to your purchase documentation or the VINGLI official website for contact details.
Website: VINGLI Store on Amazon


