
Introduction
Thank you for choosing the sbujuetc M-VAVE Pocket AMP Multi Effects Guitar Pedal. This compact and versatile processor is designed for electric guitar and bass, offering a wide range of features including advanced ANN Amp Modeling, 80 customizable presets, an IR loader, USB audio interface capabilities, OTG recording, and Bluetooth app control. This manual provides detailed instructions to help you set up, operate, and maintain your device.
The Pocket AMP is engineered for portability and high performance, allowing musicians to achieve studio-grade tones anywhere. Its lightweight design and long battery life make it ideal for practice, recording, and live performances.
Product Overview
Key Features
- ANN Amp Modeling: Recreates the dynamic response and rich harmonics of real tube amplifiers for authentic tone.
- 80 Presets: Includes 40 factory presets and 40 user-definable slots for custom tone creation.
- 6 Effect Modules: Flexible signal chain with FX, AMP, MOD, DELAY, REVERB, and IR CAB modules.
- IR Loader: Supports third-party Impulse Response files for cabinet simulation.
- USB Audio Interface & OTG Recording: Direct connection to PC or mobile devices for recording and live streaming.
- Bluetooth App Control: Wireless control and deep tone editing via a dedicated mobile application.
- Portable Design: Weighs only 120g, compact for easy transport.
Package Contents
Verify that all items listed below are included in your package:
- M-VAVE Pocket AMP Multi Effects Processor
- USB Cable
- Back Clip
- User Manual

Image: The M-VAVE Pocket AMP, its packaging box, a back clip, a USB cable, and the user manual are displayed as the package contents.
Device Layout and Controls
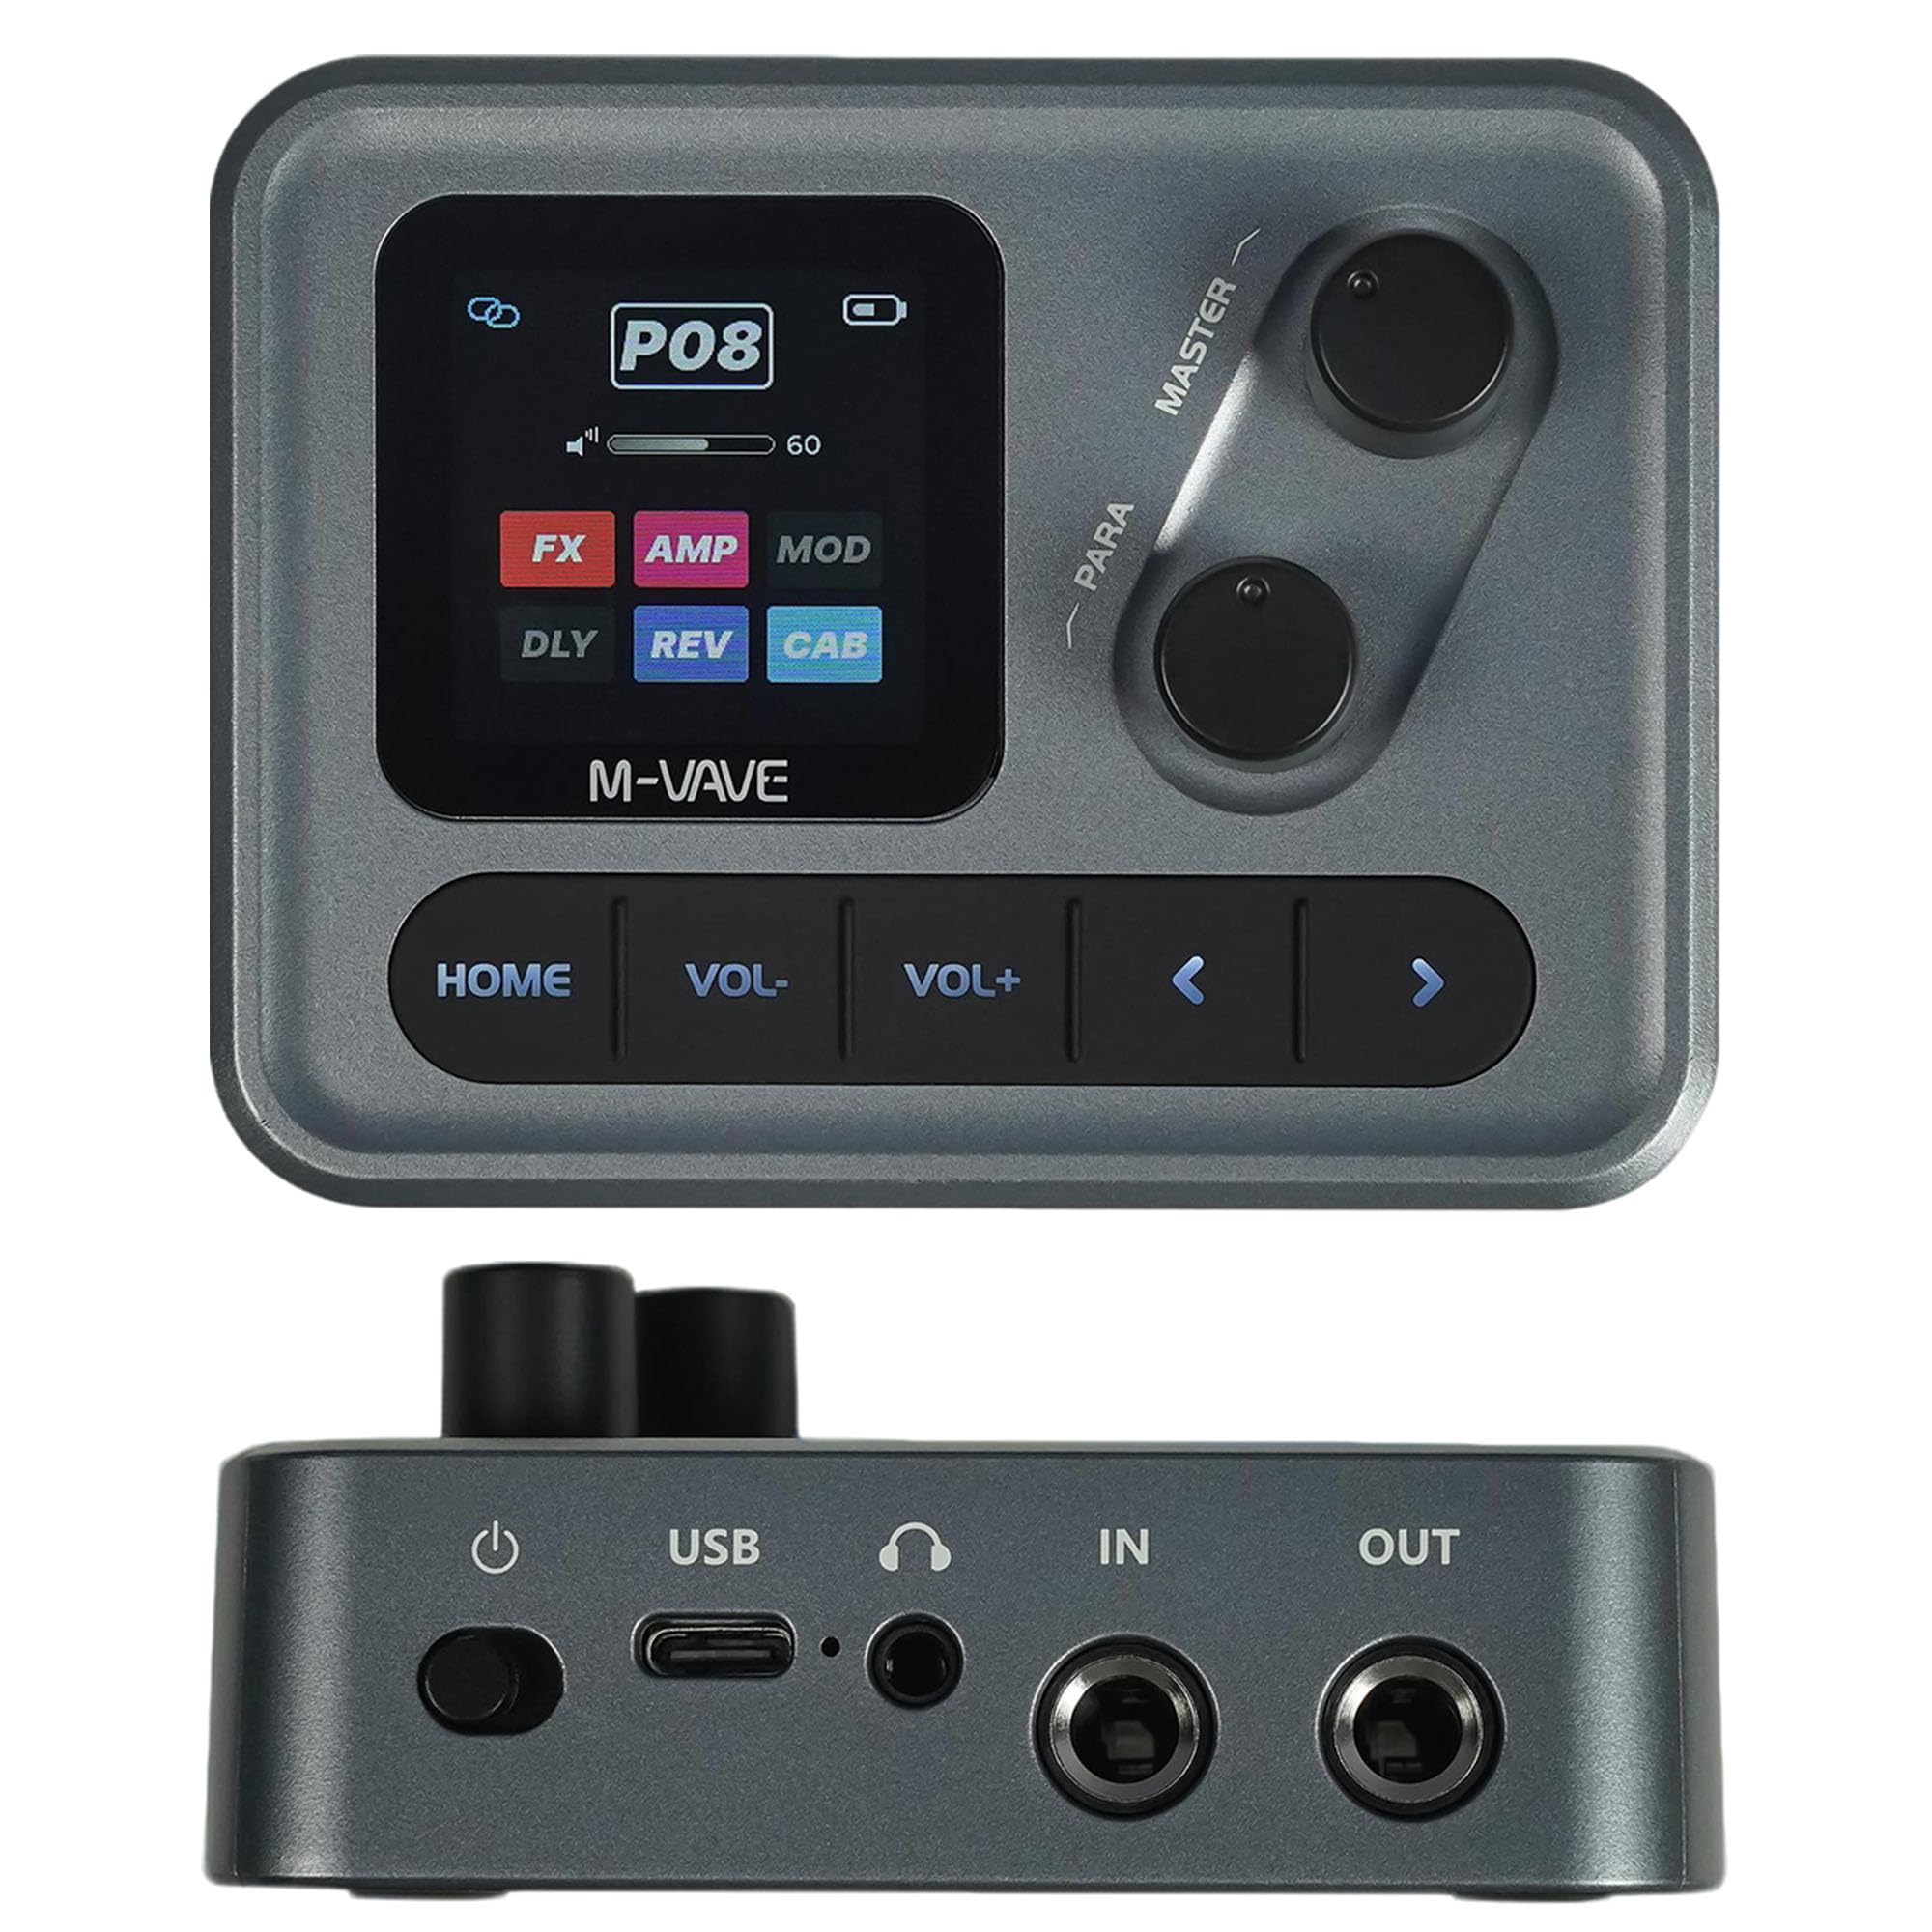
Image: Front view of the M-VAVE Pocket AMP showing the display screen, Master and Para knobs, and control buttons (Home, Vol-, Vol+, navigation arrows).
Front Panel
- Display Screen: Shows current preset, effect modules, and parameters.
- Master Knob: Controls overall output volume.
- Para Knob: Adjusts parameters within selected effect modules.
- Home Button: Returns to the main display.
- Vol- / Vol+ Buttons: Adjust volume or navigate menus.
- Navigation Arrows: Used for menu navigation and parameter selection.

Image: Side view of the M-VAVE Pocket AMP highlighting the USB-C port, headphone output, guitar input, and amp output.
Side Panel Connections
- Power Button: Turns the device on or off.
- USB-C Port: For charging the device and connecting to a computer for recording or data transfer.
- Headphone Out: 3.5mm stereo jack for silent practice and monitoring.
- Guitar Input (IN): 1/4" mono jack for connecting your electric guitar or bass.
- Amp Output (OUT): 1/4" mono jack for connecting to an amplifier or mixing console.
Setup
Charging the Device
Before first use, fully charge the Pocket AMP using the provided USB-C cable connected to a standard USB power adapter (not included) or a computer USB port. The battery indicator on the display will show charging status.
Basic Connections
- Connect your electric guitar or bass to the Guitar Input (IN) jack.
- For silent practice, connect headphones to the Headphone Out jack.
- To connect to an amplifier or mixing console, use a 1/4" cable from the Amp Output (OUT) jack.
- Press and hold the Power button to turn on the device.
Operating Instructions
Presets and Effect Modules
The Pocket AMP features 80 presets (40 factory, 40 user) and 6 customizable effect modules: FX, AMP, MOD, DELAY, REVERB, and IR CAB. You can reorder these modules to create your desired signal chain.
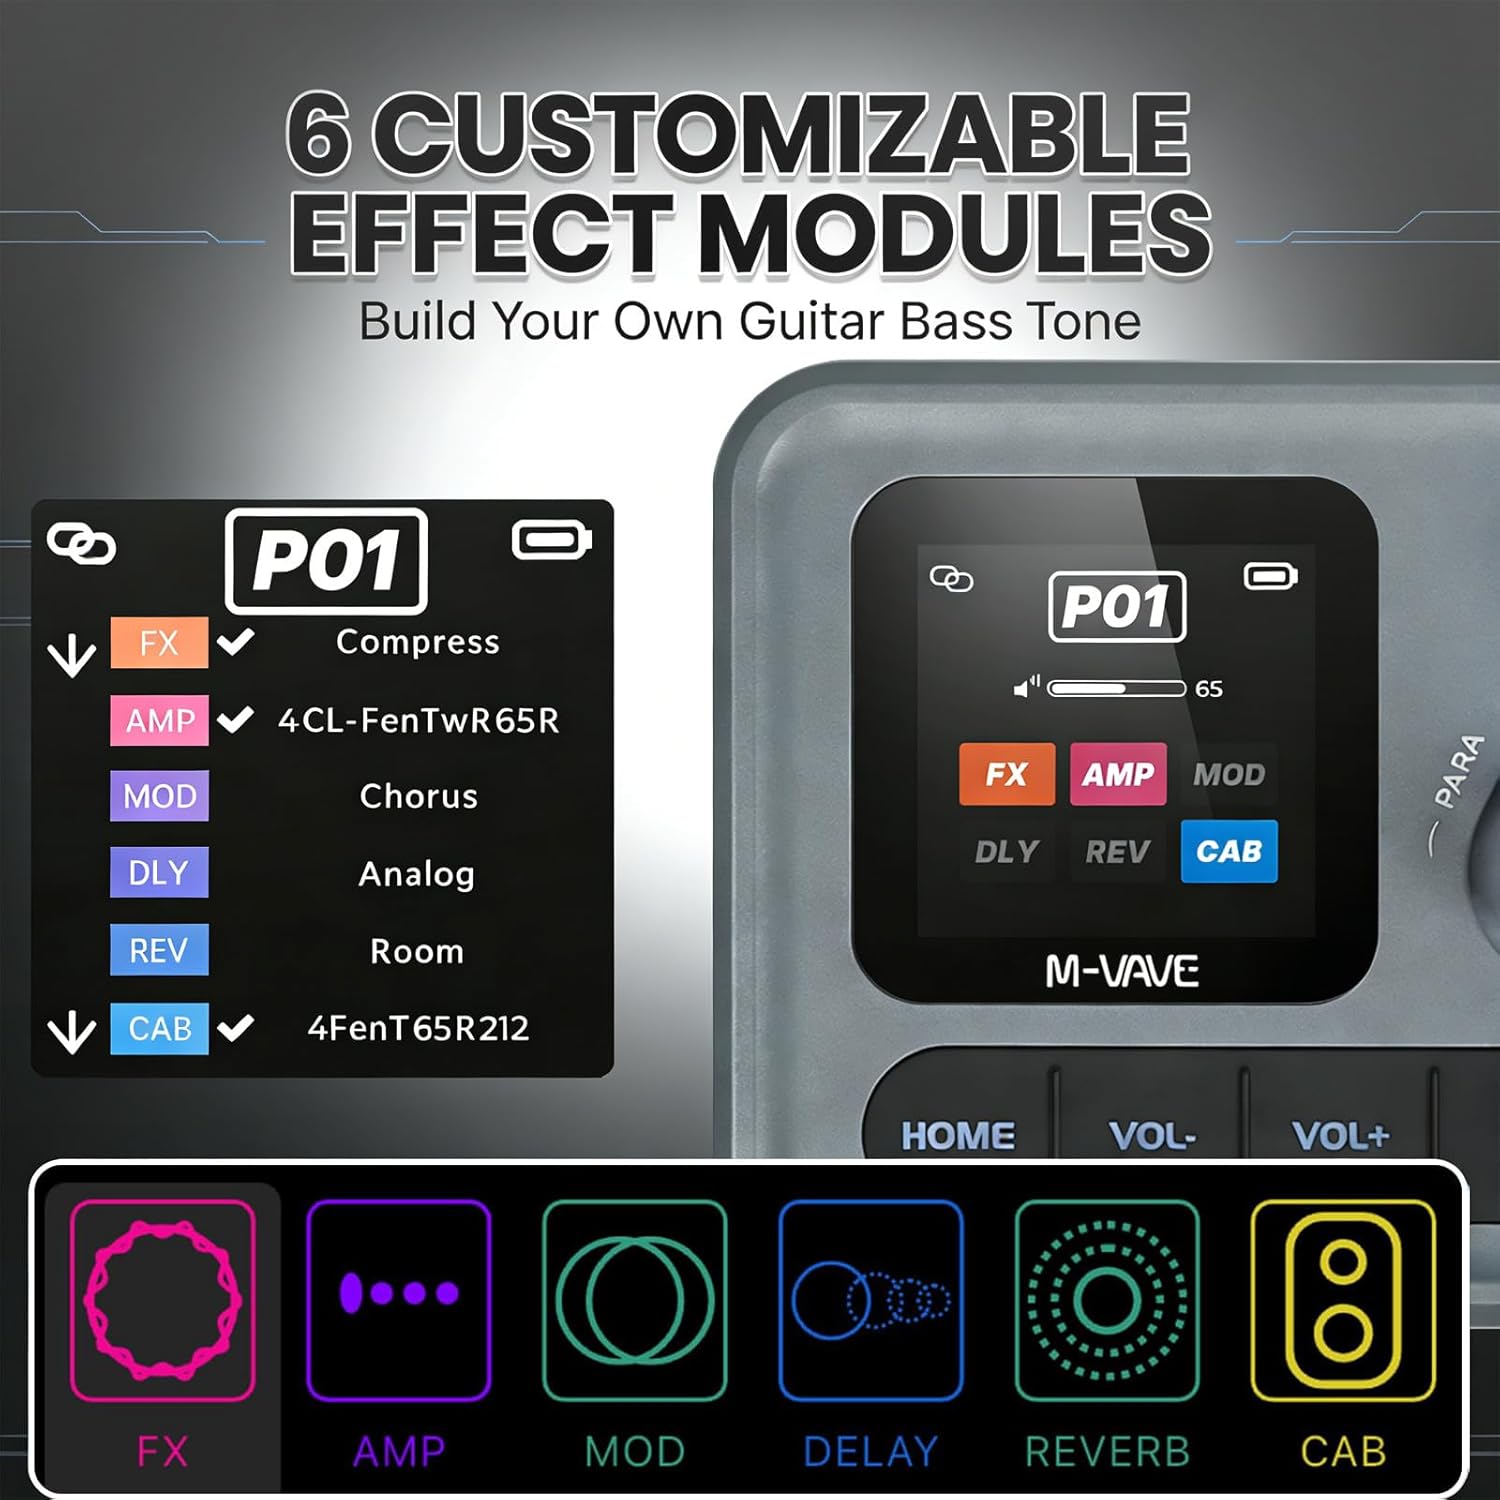
Image: A diagram illustrating the 6 customizable effect modules (FX, AMP, MOD, DLY, REV, CAB) and how they can be arranged in a signal chain on the Pocket AMP's display.
Use the navigation buttons to browse presets. Select a module on the display to adjust its parameters using the Para knob. The mobile app offers a more visual interface for editing and reordering modules.
MIDI Control
The Pocket AMP supports wired and wireless connection to MIDI pedal expansion footswitches (sold separately) for enhanced control over presets and effects during live performance.

Image: The M-VAVE Pocket AMP connected to an external MIDI pedal, demonstrating support for wired/wireless MIDI control.
Maintenance
Cleaning
Wipe the device with a soft, dry cloth. Do not use liquid cleaners or abrasive materials, as they may damage the finish or internal components.
Battery Care
To prolong battery life, avoid fully discharging the device frequently. If storing for an extended period, charge the battery to approximately 50% and recharge every few months.
Troubleshooting
- No Sound: Check all cable connections (guitar, headphones/amp). Ensure the Master volume is turned up on the device and any connected amplifier. Verify that the device is powered on and charged.
- Device Not Responding: Try restarting the device by holding the power button. If unresponsive, ensure it is charged.
- App Connection Issues: Ensure Bluetooth is enabled on your mobile device and the Pocket AMP is discoverable. Restart both the app and the Pocket AMP if connection fails.
- Recording Problems: Check USB/OTG cable connections. Ensure the correct audio input device is selected in your recording software or mobile app.
Technical Specifications
| Specification | Detail |
|---|---|
| Brand | sbujuetc |
| Model Name | Pocket Amp |
| Model Number | POCKET AMP |
| Item Weight | 120 Grams |
| Item Dimensions (LxWxH) | 3.66 x 1.58 x 2.82 inches |
| Connector Type | USB-C |
| Presets | 80 (40 Factory, 40 User) |
| Effect Modules | 6 (FX, AMP, MOD, DELAY, REVERB, IR CAB) |
Warranty and Support
For warranty information or technical support, please contact the manufacturer, sbujuetc, or the seller, TuneSmart, through their official channels. Retain your proof of purchase for any warranty claims.