
1. Introduction
This manual provides essential instructions for the safe assembly, operation, and maintenance of your Llamaviva 2-Burner Tabletop Gas Grill with Outdoor Table. This versatile cooking station is designed for outdoor use, offering a portable solution for grilling, food preparation, and storage. Please read this manual thoroughly before using the product and retain it for future reference.
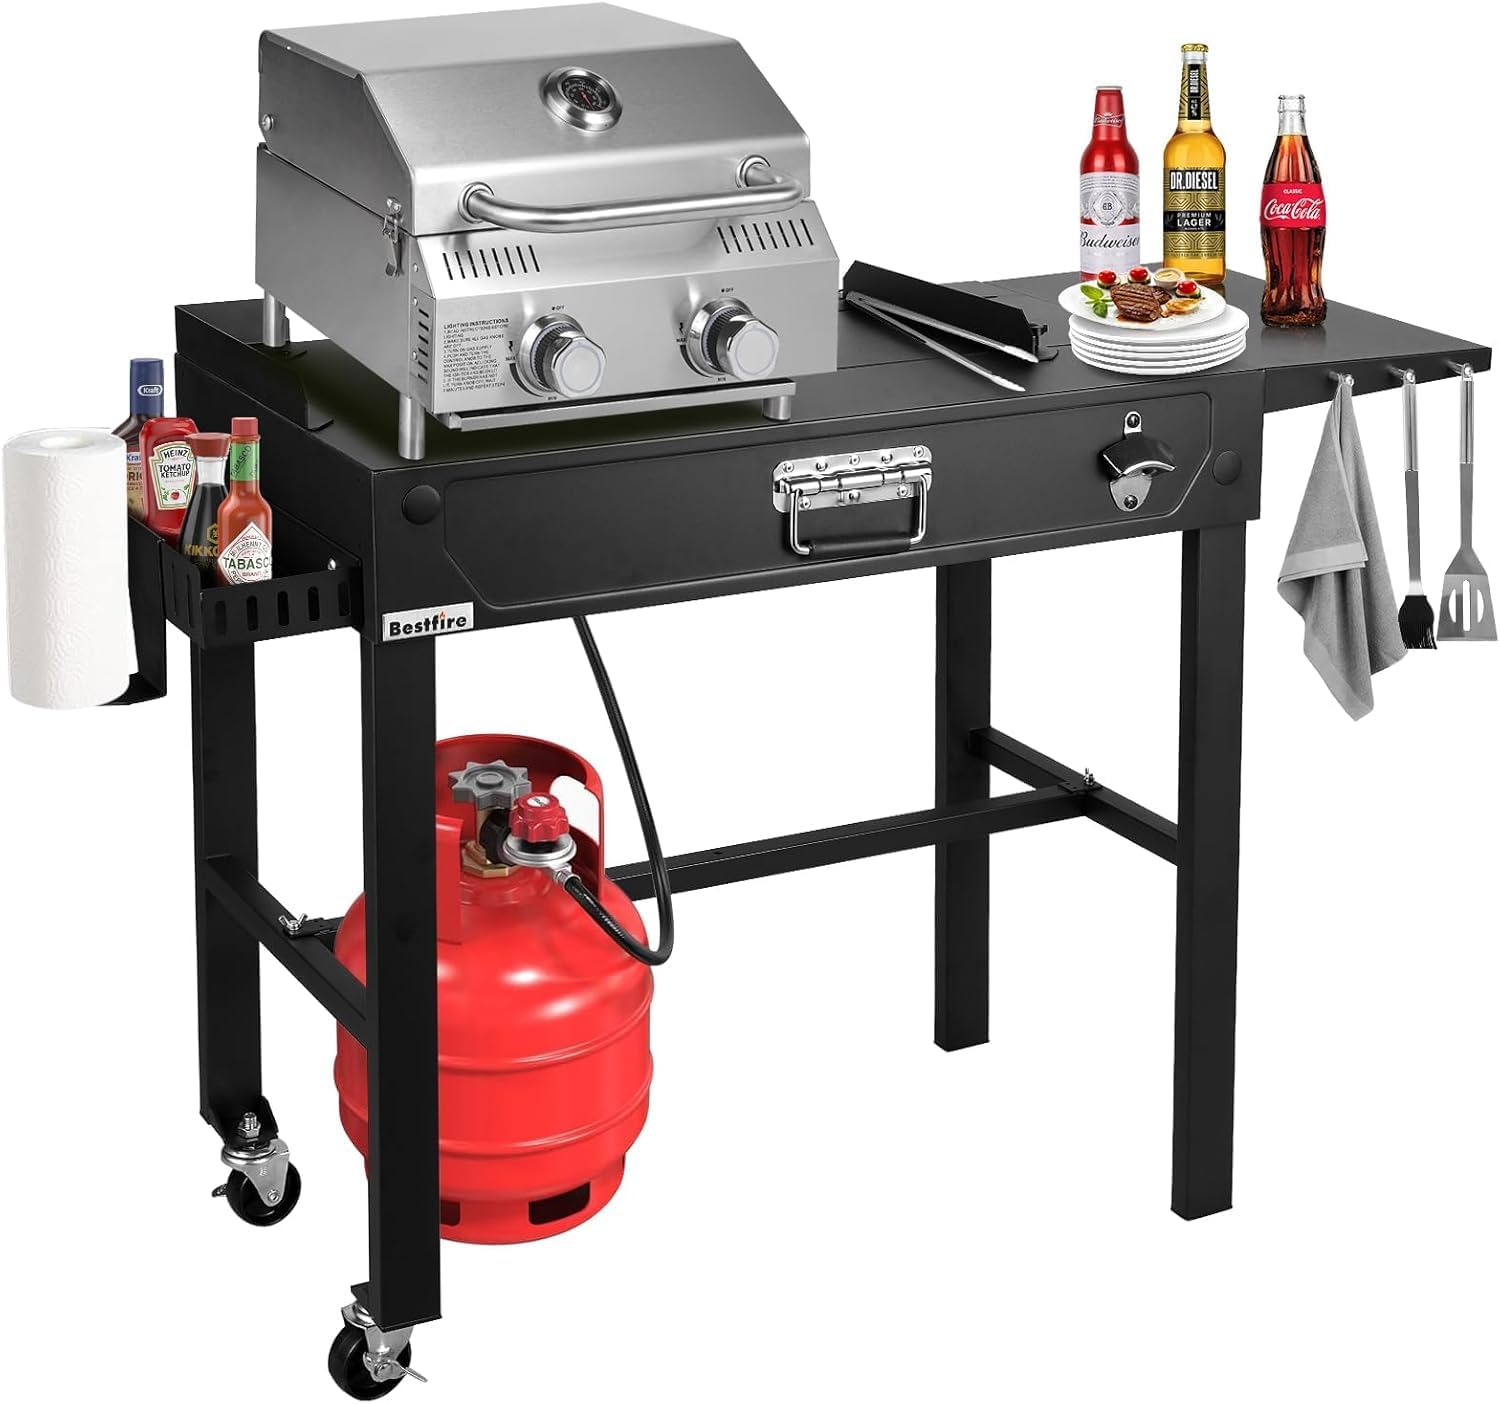
Figure 1.1: Llamaviva 2-Burner Tabletop Gas Grill with Outdoor Table, showcasing the grill unit, propane tank, condiment rack, and grilling tools.
2. Safety Information
WARNING: Failure to follow these instructions could result in fire, explosion, or burn hazard, which could cause property damage, personal injury, or death.
- For outdoor use only. Do not operate this appliance in an enclosed area such as a garage, shed, or any other enclosed area.
- Keep the grill area clear and free from combustible materials, gasoline, and other flammable vapors and liquids.
- Do not obstruct the flow of combustion and ventilation air.
- Keep children and pets away from the grill at all times.
- Always check for gas leaks before each use. Use a soapy water solution to check connections. Bubbles indicate a leak.
- Never store a spare LP gas cylinder under or near the appliance.
- Always use the grill on a level, stable surface.
- Do not move the appliance while in use or while hot.
- Wear protective gloves when handling hot components.
3. Package Contents
Verify that all components are present before beginning assembly. If any parts are missing or damaged, do not attempt to assemble or operate the grill. Contact customer support for assistance.
- Propane Grill Unit (1)
- Food Racks (2)
- Ignition Plates (2)
- Gas Hose with Regulator (1)
- Legs for Grill Unit (4)
- Outdoor Table Frame with Shelves and Accessories

Figure 3.1: Exploded view of the grill components, including food racks, ignition plates, gas hose, propane grill unit, and legs.
4. Assembly Instructions
Follow these steps for proper assembly. It is recommended to have two people for assembly.
4.1. Grill Table Assembly
- Open the Stand: Carefully unfold the main table stand and ensure it is securely locked into position.
- Tighten Side Plates: Attach and tighten any loose side plates or structural components using the provided hardware.
- Install Right Side Panel and Knobs: Secure the right side panel to the table frame. Then, screw on the control knobs for the grill unit.
- Install the Shelf: Place the lower shelf into its designated position on the table frame.
- Install the Basket: Attach the storage basket or condiment rack to the side of the table.

Figure 4.1: Visual guide for the simple and quick installation of the grill table components.
4.2. Grill Unit Placement
Place the 2-burner grill unit onto the designated area of the outdoor table. Ensure it sits securely and is level.
4.3. Connecting the Propane Tank
- Ensure the grill control knobs are in the 'OFF' position.
- Connect the gas hose regulator to the propane tank valve. Hand-tighten firmly. Do not use tools.
- Open the propane tank valve slowly to check for leaks. Apply a soapy water solution to all connections. If bubbles appear, tighten the connection or replace the hose/regulator if damaged.
- Position the propane tank securely on the lower shelf or designated hook.
5. Operating Instructions
5.1. Pre-Use Check
- Ensure all connections are tight and there are no gas leaks.
- Confirm the grill is on a stable, level surface, away from combustible materials.
- Open the propane tank valve fully.
5.2. Lighting the Grill
- Open the grill lid.
- Turn one burner control knob to the 'HIGH' position.
- Press and hold the igniter button (if present) or use a long lighter to ignite the burner.
- Once the first burner is lit, you can turn on other burners as needed.
- If ignition does not occur within 5 seconds, turn the burner control knob to 'OFF', wait 5 minutes, and repeat the lighting procedure.
5.3. Temperature Control
Adjust the burner control knobs to achieve the desired cooking temperature. The built-in thermometer on the grill lid provides an indication of the internal temperature.
5.4. Shutting Down the Grill
- Turn all burner control knobs to the 'OFF' position.
- Close the valve on the propane tank.
- Allow the grill to cool completely before covering or moving.
6. Maintenance and Cleaning
Regular cleaning and maintenance will ensure the longevity and safe operation of your grill.
6.1. General Cleaning
- Always ensure the grill is cool and the propane tank valve is closed before cleaning.
- Wipe exterior surfaces with a damp cloth and mild detergent. Avoid abrasive cleaners.
- The stainless steel cooking grates can be cleaned with a grill brush after each use. For deeper cleaning, remove and wash with warm soapy water.
6.2. Grease Tray
The removable grease tray should be emptied and cleaned regularly to prevent grease fires. Slide out the tray, dispose of accumulated grease, and wash with warm soapy water.

Figure 6.1: The grill unit with the grease collector tray extended for cleaning.
6.3. Storage
When not in use, store the grill in a dry, protected area. The outdoor table can be folded for compact storage:
- Remove the butterfly screws located on both sides of the crossbeam supporting the table.
- After folding the table, insert one end of the crossbeam into the side panel and secure it in the middle with a long butterfly screw to keep it compact.

Figure 6.2: Instructions for folding the grill table for compact storage.
7. Troubleshooting
If you encounter issues with your grill, refer to the following troubleshooting guide:
| Problem | Possible Cause | Solution |
|---|---|---|
| Burner fails to light | No gas flow; clogged burner ports; faulty igniter. | Check propane tank connection and gas level. Clean burner ports. Check igniter electrode for spark. |
| Low flame or uneven heat | Low gas pressure; clogged burner ports; regulator issue. | Ensure propane tank valve is fully open. Clean burner ports. Reset regulator by disconnecting and reconnecting. |
| Gas odor | Gas leak. | Immediately turn off gas at the tank. Perform a leak test with soapy water. Do not operate if a leak is detected. |
| Flare-ups | Excess grease buildup; high fat content in food. | Clean grease tray and cooking grates regularly. Trim excess fat from food. Adjust heat to lower setting. |
8. Specifications
Key specifications for the Llamaviva 2-Burner Tabletop Gas Grill with Outdoor Table:
| Feature | Detail |
|---|---|
| Brand | LLAMA VIVA |
| Model Name | L-BFEQT42-74 |
| Product Dimensions (Grill Unit) | 16.93"W x 15.75"D x 13.58"H (43cm W x 40cm D x 34.5cm H) |
| Product Dimensions (Table) | 45.9"W x 16.9"D x 30.5"H (approximate, with extensions) |
| Fuel Type | Gas (Propane) |
| Burners | 2 |
| BTU Output | 20,000 BTU (10,000 BTU per burner) |
| Material | Stainless Steel (grill), Powder-coated Steel (table frame) |
| Item Weight | 39.7 Pounds |
| Special Features | Heavy Duty, Rust Resistant, Removable Grease Tray, Locking Wheels |

Figure 8.1: Dimensions of the Llamaviva 2-Burner Tabletop Gas Grill unit.
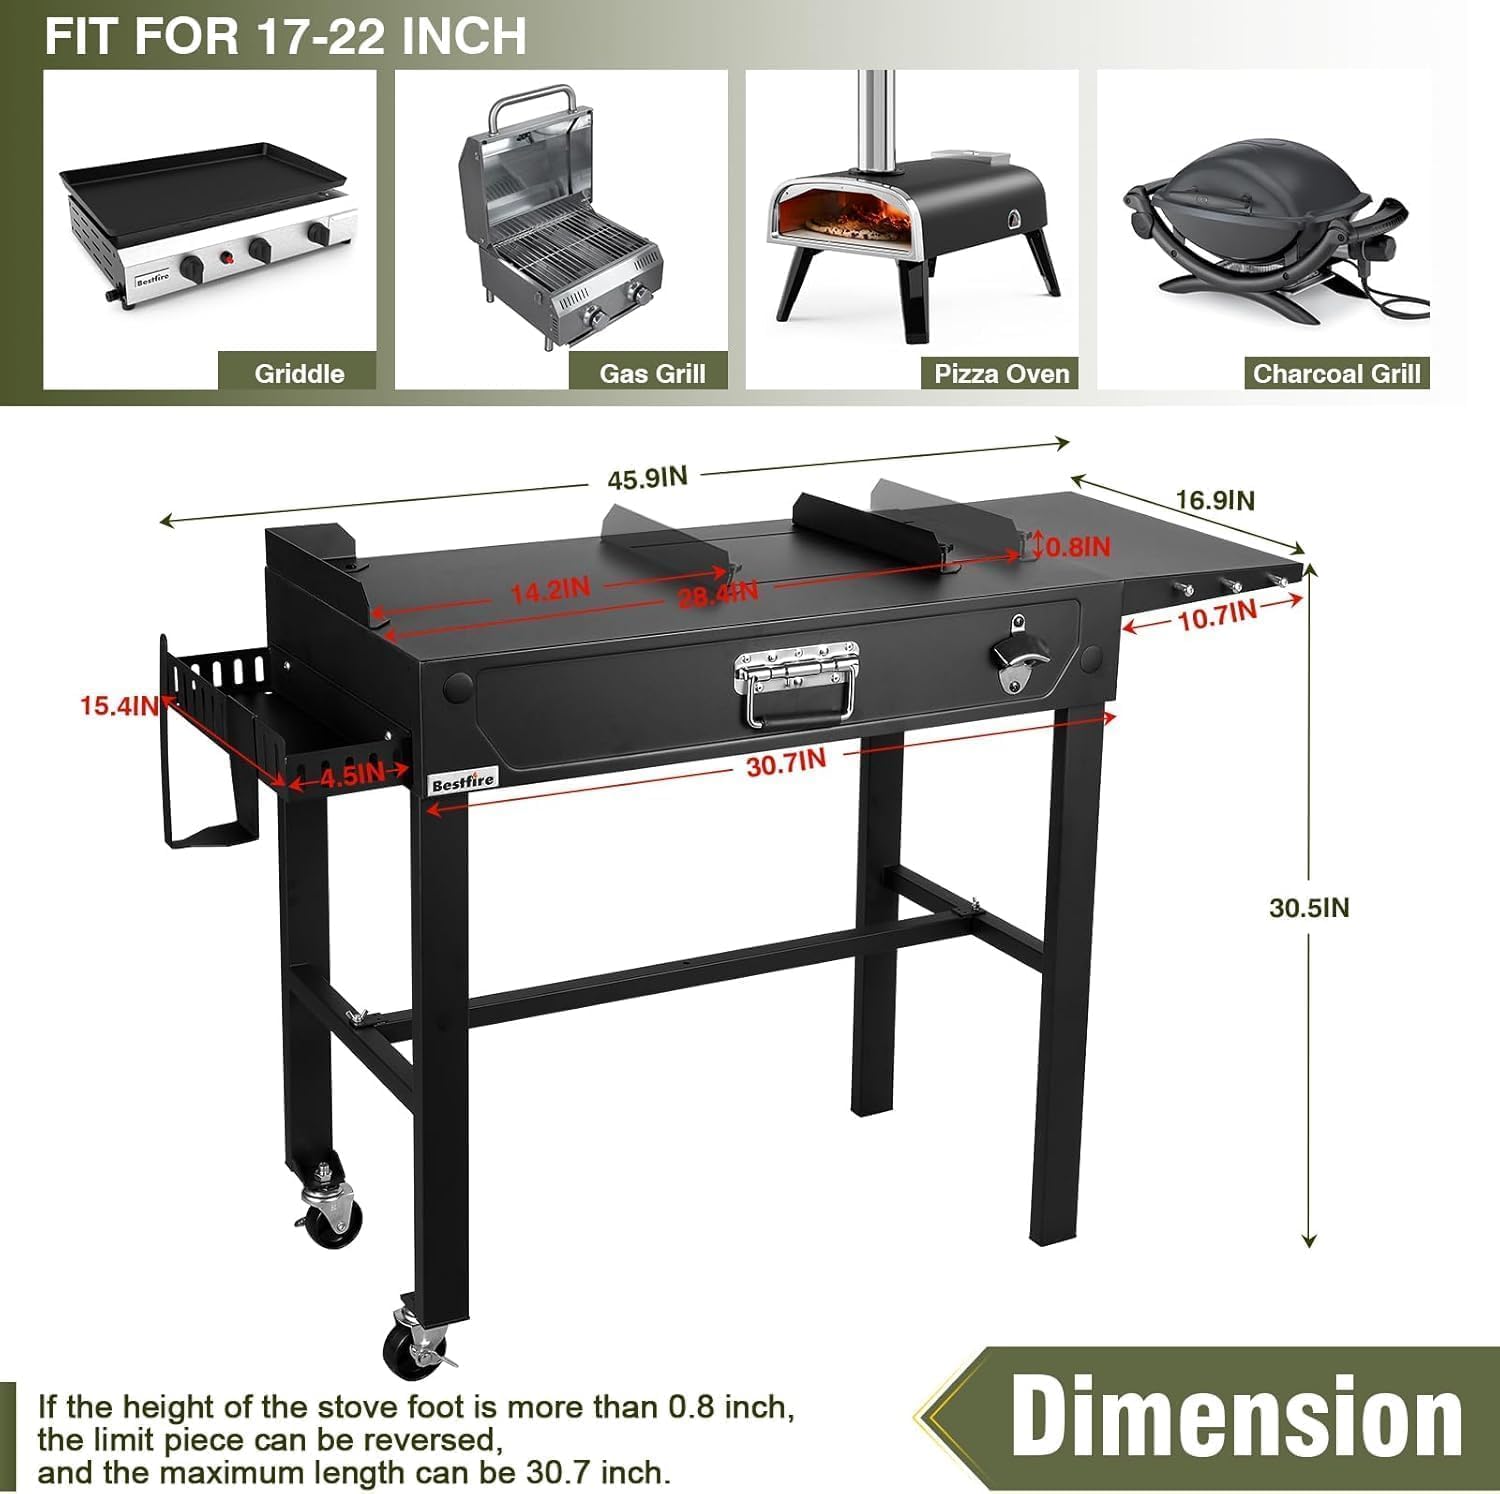
Figure 8.2: Dimensions of the Llamaviva Outdoor Table.
9. Warranty and Support
9.1. Warranty Information
Based on available product information, there is no explicit warranty description provided for this product.
9.2. Customer Support
For any questions, concerns, or assistance with your Llamaviva product, please contact the manufacturer or retailer where the product was purchased. Refer to your purchase documentation for specific contact details.