
MOUGOL X99
MOUGOL X99 Gaming Motherboard Kit User Manual
Model: X99 | Brand: MOUGOL
1. Introduction
This manual provides detailed instructions for the installation, operation, and maintenance of your MOUGOL X99 Gaming Motherboard Kit. This kit is designed for high-performance desktop PCs, featuring an Intel Xeon E5 2680 V4 processor and dual 16GB DDR4 ECC memory modules. Please read this manual thoroughly before proceeding with installation to ensure proper setup and optimal performance.
Key Features:
- High-performance MOUGOL X99 motherboard optimized for demanding applications and gaming.
- Includes a powerful Intel Xeon E5 2680 V4 processor for exceptional processing capabilities.
- Equipped with dual 16GB DDR4 ECC memory for stable performance and reliable multitasking.
- Supports advanced overclocking features for system performance optimization.
- Compatibility with a wide range of components for custom PC builds.
2. Package Contents
Verify that all items listed below are present and in good condition upon opening the package. If any items are missing or damaged, contact your retailer.
- MOUGOL X99 Motherboard
- Intel Xeon E5 2680 V4 Processor
- 2 x 16GB DDR4 ECC Memory Modules
- CPU Cooler Mounting Bracket
- SATA Data Cable
- I/O Shield
- Mounting Screws

Image 2.1: Contents of the MOUGOL X99 Motherboard Kit, including the motherboard, CPU cooler bracket, SATA cable, I/O shield, and screws.
3. Safety Information
- Always disconnect the power cord from the wall outlet before installing or removing any components.
- Wear an anti-static wrist strap or frequently touch a grounded metal object (e.g., the computer case) to discharge static electricity before handling components.
- Handle components by their edges to avoid touching sensitive circuits.
- Ensure proper ventilation within your computer case to prevent overheating.
- Keep all components away from moisture and extreme temperatures.
- Refer to the power supply unit (PSU) manual for specific power connection guidelines.
4. Setup Guide
4.1 Motherboard Layout and Component Identification
Familiarize yourself with the various components and connectors on the MOUGOL X99 motherboard before beginning installation.
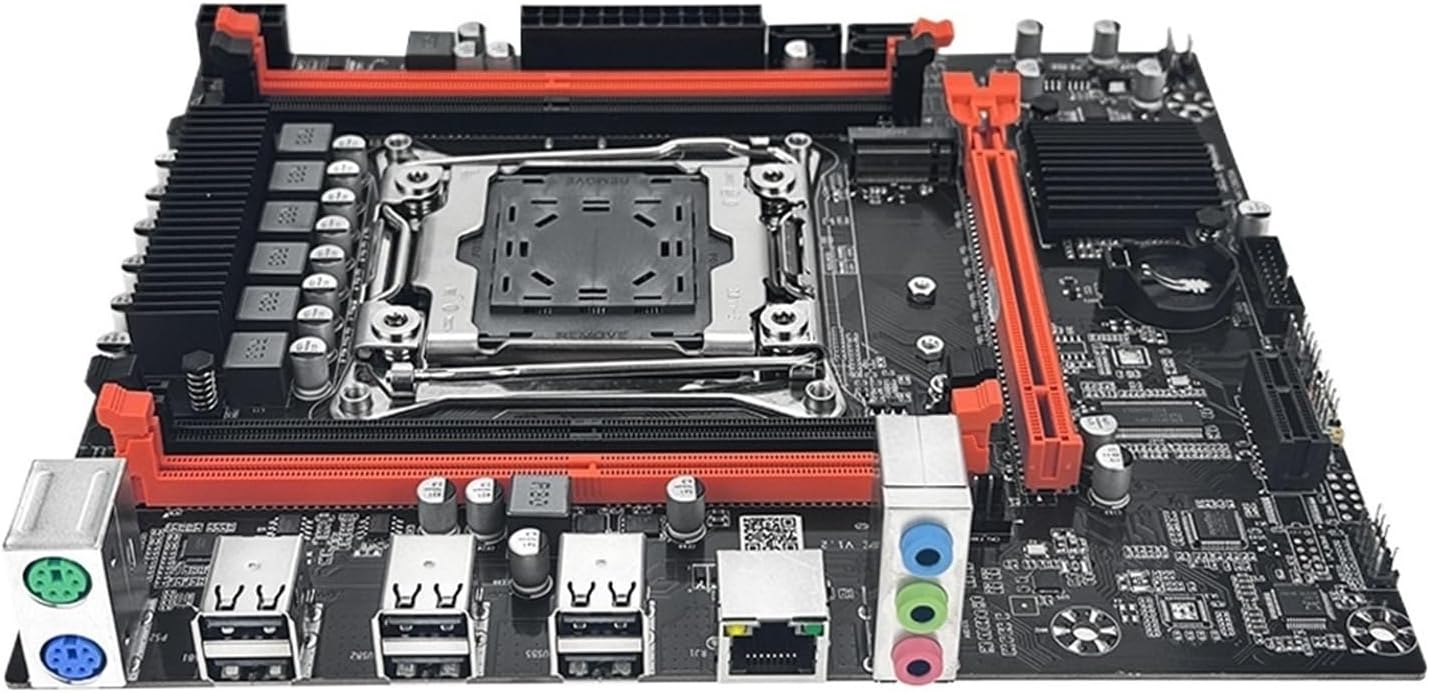
Image 4.1: Top-down view of the MOUGOL X99 motherboard, showing the CPU socket, RAM slots, PCIe slots, and I/O ports.
- CPU Socket (LGA 2011-3): Located centrally, designed for Intel Xeon E5 V3/V4 processors.
- DDR4 DIMM Slots: Multiple slots for DDR4 ECC memory modules, typically on either side of the CPU socket.
- PCIe x16 Slot: Primary slot for graphics cards.
- M.2 Slot: For high-speed NVMe or SATA M.2 SSDs.
- SATA Ports: Connect traditional SATA hard drives and SSDs.
- ATX Power Connectors: 24-pin main power and 8-pin CPU power.
- USB Headers: Various USB 2.0 and USB 3.0 headers for front panel connections.
- Front Panel Headers: Connectors for power button, reset button, HDD LED, power LED, and front audio.
- Rear I/O Panel: Ports for USB, Ethernet, audio, and PS/2.

Image 4.2: Close-up view of the LGA 2011-3 CPU socket and the M.2 slot on the MOUGOL X99 motherboard.
4.2 CPU Installation (Intel Xeon E5 2680 V4)
- Locate the LGA 2011-3 CPU socket on the motherboard.
- Gently push down the two metal retention levers on either side of the socket and swing them outwards to open the CPU socket cover.
- Carefully align the Intel Xeon E5 2680 V4 processor with the socket. Ensure the gold triangle on the CPU matches the triangle marking on the socket. Do not force the CPU into the socket.
- Once the CPU is seated correctly, close the socket cover and push the two retention levers back into their locked position.
- Apply a thin, even layer of thermal paste to the top of the CPU (if not pre-applied to your cooler).
- Install the CPU cooler according to its specific instructions, ensuring it is securely mounted and making good contact with the CPU. Connect the CPU fan cable to the designated CPU_FAN header on the motherboard.
4.3 Memory (DDR4 ECC) Installation
- Locate the DDR4 DIMM slots on the motherboard.
- Open the retention clips at both ends of the DIMM slot.
- Align the notch on the DDR4 ECC memory module with the key in the DIMM slot.
- Insert the memory module firmly into the slot until the retention clips snap into place, securing the module. Ensure both clips are fully closed.
- For optimal performance, install memory modules in the recommended dual-channel configuration (refer to motherboard silkscreen or specific manual for slot order).
4.4 Storage Device Installation
4.4.1 M.2 SSD Installation
- Locate the M.2 slot on the motherboard.
- Remove the M.2 standoff screw from the motherboard.
- Insert the M.2 SSD into the slot at a 30-degree angle, ensuring the gold contacts are fully seated.
- Gently push the M.2 SSD down and secure it with the standoff screw.
4.4.2 SATA Drive Installation
- Connect one end of the SATA data cable to a SATA port on the motherboard.
- Connect the other end of the SATA data cable to your SATA hard drive or SSD.
- Connect a SATA power cable from your power supply unit (PSU) to the SATA drive.
4.5 Graphics Card Installation
- Locate the PCIe x16 slot on the motherboard.
- If your PC case has a retention clip for the PCIe slot, open it.
- Align your graphics card with the PCIe x16 slot and press down firmly until it is fully seated and the retention clip (if present) locks into place.
- Secure the graphics card to the PC case with a screw.
- Connect any required PCIe power cables from your PSU to the graphics card.
4.6 Power Supply and Front Panel Connections
- Connect the 24-pin ATX main power connector from your PSU to the corresponding header on the motherboard.
- Connect the 8-pin (or 4+4 pin) CPU power connector from your PSU to the CPU power header near the CPU socket.
- Connect the front panel cables (Power SW, Reset SW, HDD LED, Power LED) to their respective headers on the motherboard. Refer to the motherboard's silkscreen for correct pin orientation.
- Connect any front panel USB (2.0 and 3.0) and audio headers to the motherboard.
4.7 Motherboard Mounting
- Install the I/O shield into the designated opening at the rear of your PC case.
- Ensure standoffs are correctly installed in your PC case, matching the screw holes on the MOUGOL X99 motherboard.
- Carefully place the motherboard into the case, aligning the screw holes with the standoffs and the rear I/O ports with the I/O shield.
- Secure the motherboard with the provided mounting screws. Do not overtighten.
5. Operating Instructions
5.1 Initial Boot-Up
- After all components are installed and connected, ensure the power supply switch is in the ON position.
- Press the power button on your PC case.
- The system should power on, and you should see a display output on your monitor.
- If no display appears, refer to the Troubleshooting section.
5.2 BIOS/UEFI Setup
To access the BIOS/UEFI setup utility, press the DEL or F2 key repeatedly during the initial boot-up sequence. Within the BIOS/UEFI, you can configure boot order, system time, fan speeds, and other advanced settings.
5.3 Driver Installation
After installing your operating system, install the necessary drivers for the motherboard chipset, network, audio, and any other integrated components. These drivers are typically available on the manufacturer's website or included on a driver CD/USB with the motherboard (if applicable).
6. Maintenance
6.1 Cleaning
- Regularly clean dust from inside your PC case using compressed air.
- Ensure fans (CPU, case, GPU) are free from dust buildup to maintain optimal cooling.
- Always power off and unplug the system before cleaning.
6.2 BIOS/UEFI Updates
Periodically check the MOUGOL support website for updated BIOS/UEFI versions. BIOS updates can improve system stability, compatibility, and performance. Follow the specific instructions provided by MOUGOL for updating the BIOS/UEFI to avoid potential issues.
7. Troubleshooting
- No Power:
- Check if the power supply unit (PSU) is switched on.
- Ensure all power cables (24-pin ATX, 8-pin CPU, PCIe for GPU) are securely connected.
- Verify the front panel power button cable is correctly connected to the motherboard header.
- No Display:
- Ensure your monitor is connected to the graphics card (not the motherboard I/O if a dedicated GPU is installed).
- Reseat the graphics card and memory modules.
- Check if the monitor is powered on and set to the correct input source.
- System Fails to Boot / Instability:
- Verify that the CPU and CPU cooler are correctly installed.
- Ensure memory modules are properly seated in the correct slots.
- Check all power and data cables for secure connections.
- If overclocking, reset BIOS settings to default.
- Try booting with only essential components (CPU, one RAM stick, GPU) to isolate the issue.
- Operating System Not Detected:
- Check SATA or M.2 drive connections.
- Verify boot order in BIOS/UEFI settings.
- Ensure the operating system is correctly installed on the drive.
8. Specifications
| Component | Detail |
|---|---|
| Motherboard Model | MOUGOL X99 |
| CPU Socket | LGA 2011-3 |
| Supported CPUs | Intel Xeon E5 V3/V4 Series (e.g., E5 2680 V4 included) |
| Memory Type | DDR4 ECC (2 x 16GB modules included) |
| Storage Interfaces | M.2 slot, SATA ports |
| Expansion Slots | PCIe x16 (for graphics card) |
| Package Dimensions | 0.39 x 0.39 x 0.39 inches |
| Item Weight | 14 ounces |
| Manufacturer | Yitun |
9. Warranty and Support
For warranty information and technical support, please refer to the documentation provided with your purchase or visit the official MOUGOL (Yitun) product support website. Keep your proof of purchase for warranty claims.
Related documentsX99


Ask a question about this manual
Ask about setup, troubleshooting, compatibility, parts, safety, or missing instructions. Manuals+ will review the question and use this page’s manual context to help answer it.