Important Safety Instructions
Please read all instructions carefully before using the Mayer MMAF450D Digital Air Fryer. Keep this manual for future reference.
- Always place the air fryer on a stable, heat-resistant surface.
- Do not immerse the appliance, cord, or plug in water or other liquids.
- Ensure the voltage indicated on the appliance corresponds to your local mains voltage.
- Supervise children closely when the appliance is in use.
- Do not block the air inlet or outlet vents during operation.
- Unplug the air fryer from the outlet when not in use and before cleaning.
- Do not operate the appliance if the cord or plug is damaged, or if the appliance malfunctions.
- Avoid using abrasive cleaning agents or sharp objects on the non-stick coating.
- The appliance is equipped with an automatic cut-off switch and overheating protection for safety.
Product Overview
Familiarize yourself with the components of your Mayer MMAF450D Digital Air Fryer.

Figure 1: Front view of the Mayer MMAF450D Digital Air Fryer, showcasing its sleek black design and digital control panel.
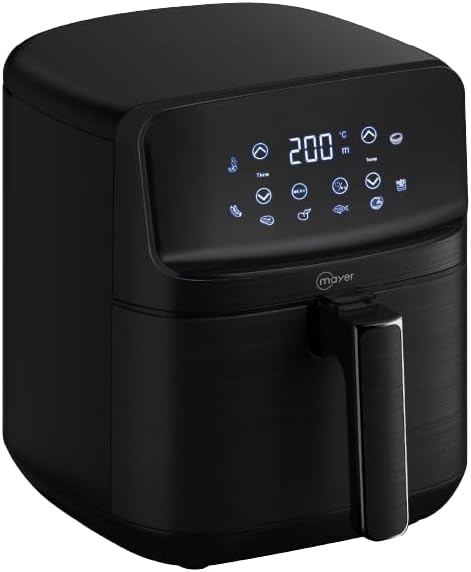
Figure 2: Side view of the air fryer, highlighting the integrated handle and the LED touch sensor control panel.
Main Components:
- Main Unit: Houses the heating element and fan.
- Control Panel: LED touch display for settings and presets.
- Frying Basket: 4.5L capacity with ceramic coating.
- Frying Tray: Ceramic coated, sits inside the basket.
- Handle: For safely pulling out the frying basket.
- Air Inlet/Outlet Vents: For proper air circulation.
Setup and First Use
Unpacking:
- Remove all packaging materials from the air fryer.
- Check for any damage during transit. Do not use if damaged.
- Remove any stickers or labels.
Before First Use:
- Clean the frying basket and tray thoroughly with hot water, dish soap, and a non-abrasive sponge. Rinse and dry completely.
- Wipe the inside and outside of the appliance with a damp cloth.
- Place the air fryer on a stable, level, and heat-resistant surface, ensuring adequate space (at least 10 cm) around the back and sides for proper ventilation.
- Plug the power cord into a grounded wall outlet.
Operating Instructions
Control Panel:

Figure 3: Detailed view of the LED touch sensor control panel, displaying temperature, time, and various preset icons.
The LED touch sensor control panel allows for easy selection of cooking settings.
- Power Button: Turns the appliance on/off.
- Temperature Control: Adjusts temperature from 80°C to 200°C.
- Timer Control: Sets cooking time up to 60 minutes.
- Preset Menus: 8 pre-programmed settings for common dishes.
- DIY Mode: Allows manual setting of temperature and time.
Basic Operation:
- Place the frying tray into the frying basket, then slide the basket into the main unit.
- Add your ingredients to the frying basket. Do not overfill.
- Plug in the air fryer. The power button will illuminate.
- Press the power button to turn on the display.
- Manual Mode: Use the temperature and timer controls to set your desired cooking parameters.
- Preset Mode: Select one of the 8 preset icons. The air fryer will automatically set the recommended temperature and time. You can adjust these manually if needed.
- Press the power button again to start cooking. The 5-second auto-start feature will begin.
- During cooking, you can pull out the basket to shake or check food. The air fryer will pause and resume automatically when the basket is reinserted.
- A bell sound will indicate when the cooking cycle is complete.
- Carefully pull out the basket and empty the cooked food. Use heat-resistant tongs.
- Unplug the appliance after use.
Memory Function: The air fryer remembers your last settings for quick recall.
Maintenance and Cleaning
Regular cleaning ensures optimal performance and extends the life of your air fryer.
Cleaning the Frying Basket and Tray:

Figure 4: The air fryer with its ceramic-coated frying basket and tray removed, ready for cleaning.
- Always unplug the air fryer and allow it to cool completely before cleaning.
- Remove the frying basket and tray.
- Wash the basket and tray with hot water, dish soap, and a non-abrasive sponge. The ceramic coating is non-stick, making cleaning easier.
- For stubborn food residue, soak the basket and tray in hot soapy water for about 10 minutes.
- Rinse thoroughly and dry completely before reassembling.
Cleaning the Main Unit:
- Wipe the exterior of the air fryer with a damp cloth. Do not use harsh chemicals or abrasive cleaners.
- Clean the interior with a damp cloth, ensuring no water enters the electrical components.
- Never immerse the main unit in water or any other liquid.
Troubleshooting
Refer to this section for common issues and their solutions.
| Problem | Possible Cause | Solution |
|---|---|---|
| Air fryer does not turn on. | Not plugged in; power outlet malfunction; appliance malfunction. | Ensure the power cord is securely plugged into a working outlet. Check the circuit breaker. If still not working, contact customer support. |
| Food is not cooked evenly. | Basket overloaded; food not shaken/turned. | Do not overload the basket. Shake or turn food halfway through cooking for even results. |
| White smoke coming from the appliance. | Grease residue from previous use; high-fat food. | Clean the basket and tray thoroughly after each use. For high-fat foods, drain excess fat during cooking. |
| Food is not crispy. | Too much moisture; insufficient cooking time/temperature. | Pat food dry before air frying. Increase cooking time or temperature slightly. A light coating of oil can also help. |
Specifications
| Feature | Detail |
|---|---|
| Model | MMAF450D |
| Capacity | 4.5 Liters |
| Voltage | 1300 Volts |
| Temperature Range | 80 – 200°C |
| Timer | Up to 60 minutes |
| Control Method | Touch (LED Touch Sensor Control Panel) |
| Basket/Tray Material | Ceramic Coating |
| Special Features | 8 Preset Menus, DIY Mode, 5-Second Auto Start, Memory Function, Automatic Cut-off Switch, Overheating Protection, Anti-slip Pad |
| Product Dimensions | 33D x 25W x 28.3H centimetres |
| Weight | 3.55 kg |
Warranty and Support
Mayer products are manufactured to high-quality standards. For warranty information or technical support, please refer to the warranty card included with your purchase or visit the official Mayer website.
For further assistance, please contact Mayer customer service.
Note: Warranty terms and conditions may vary by region.


