
1. Introduction
The ATTACK SHARK X11 is a high-performance gaming mouse designed for precision and comfort, ideal for FPS and MOBA games. It features versatile Tri-Mode connectivity, including low-latency 2.4 GHz wireless, Bluetooth, and USB-C wired options. The mouse is equipped with a rechargeable battery and, depending on the version, may include a convenient charging dock. Its ergonomic and lightweight design minimizes fatigue during extended use, while 100% PTFE feet ensure smooth gliding. Responsive switches provide consistent clicks, and customizable RGB lighting, adjustable DPI settings, and a high polling rate (up to 1000 Hz) enhance the gaming experience. On-board memory supports macros via manufacturer software. The X11 is compatible with Windows and macOS operating systems.
Key Features:
- Tri-Mode Connectivity: 2.4 GHz Wireless, Bluetooth, and USB-C Wired.
- Ergonomic Design: Lightweight for comfortable, extended gaming sessions.
- PTFE Feet: Ensures smooth and precise mouse movement.
- Customizable RGB Lighting: Dynamic lighting effects.
- Adjustable DPI: Step-by-step sensitivity adjustment.
- High Polling Rate: Up to 1000 Hz for immediate command response.
- Responsive Switches: Firm and consistent clicks.
- On-board Memory: For profiles and macros (via manufacturer software).
- Charging Dock: Available with some versions for convenient charging.
- Compatibility: Supports Windows and macOS.

A top-down view of the ATTACK SHARK X11 Tri-Mode Wireless Gaming Mouse in black, highlighting its ergonomic shape and button layout.
2. Setup
2.1 Package Contents
Before starting, ensure all items are present in the package:
- ATTACK SHARK X11 Gaming Mouse
- USB-C to USB-A Cable
- 2.4 GHz USB Receiver
- (Optional) Magnetic RGB Charging Dock
- User Manual
2.2 Connecting the Mouse
The ATTACK SHARK X11 offers three connectivity modes:
- 2.4 GHz Wireless Mode:
- Locate the 2.4 GHz USB receiver.
- Plug the receiver into an available USB-A port on your computer.
- Turn on the mouse using the switch on its underside. Select the '2.4G' mode.
- The mouse should automatically connect.
- Bluetooth Mode:
- Turn on the mouse and select the 'Bluetooth' mode using the switch on its underside.
- The mouse will enter pairing mode (indicator light may flash).
- On your computer, go to Bluetooth settings and search for new devices.
- Select "ATTACK SHARK X11" from the list to pair.
- USB-C Wired Mode:
- Connect the USB-C end of the cable to the mouse and the USB-A end to your computer.
- The mouse will function as a wired device and charge simultaneously.

An image illustrating the ATTACK SHARK X11 mouse connected via 2.4GHz wireless to a laptop, with icons for Bluetooth and USB-C wired connectivity, and the charging dock in the background.
2.3 Charging the Mouse
The ATTACK SHARK X11 mouse can be charged via the included USB-C cable or the optional magnetic RGB charging dock.
- Using USB-C Cable: Connect the USB-C cable to the mouse and a power source (e.g., computer USB port, USB wall adapter).
- Using Charging Dock: Place the mouse onto the magnetic charging dock. Ensure the metal contacts align. The dock's RGB lighting will indicate charging status.

The magnetic RGB charging dock for the ATTACK SHARK X11 mouse, demonstrating its convenient and easy-access charging capabilities with multiple switchable light effects.
2.4 Software Installation
For advanced customization, including button remapping, macro creation, DPI settings, and RGB lighting effects, download the official ATTACK SHARK software from the manufacturer's website. The software is typically compatible with Windows. For macOS users, basic functionality is plug-and-play, but advanced customization may require the software.
3. Operating the Mouse
3.1 Button Functions
The ATTACK SHARK X11 features 5 programmable buttons:
- Left Click: Primary action.
- Right Click: Secondary action/context menu.
- Scroll Wheel (Middle Click): Scrolling and middle-click function.
- Side Buttons (Forward/Backward): Default navigation, customizable via software.
- DPI Button: Cycles through preset DPI stages.
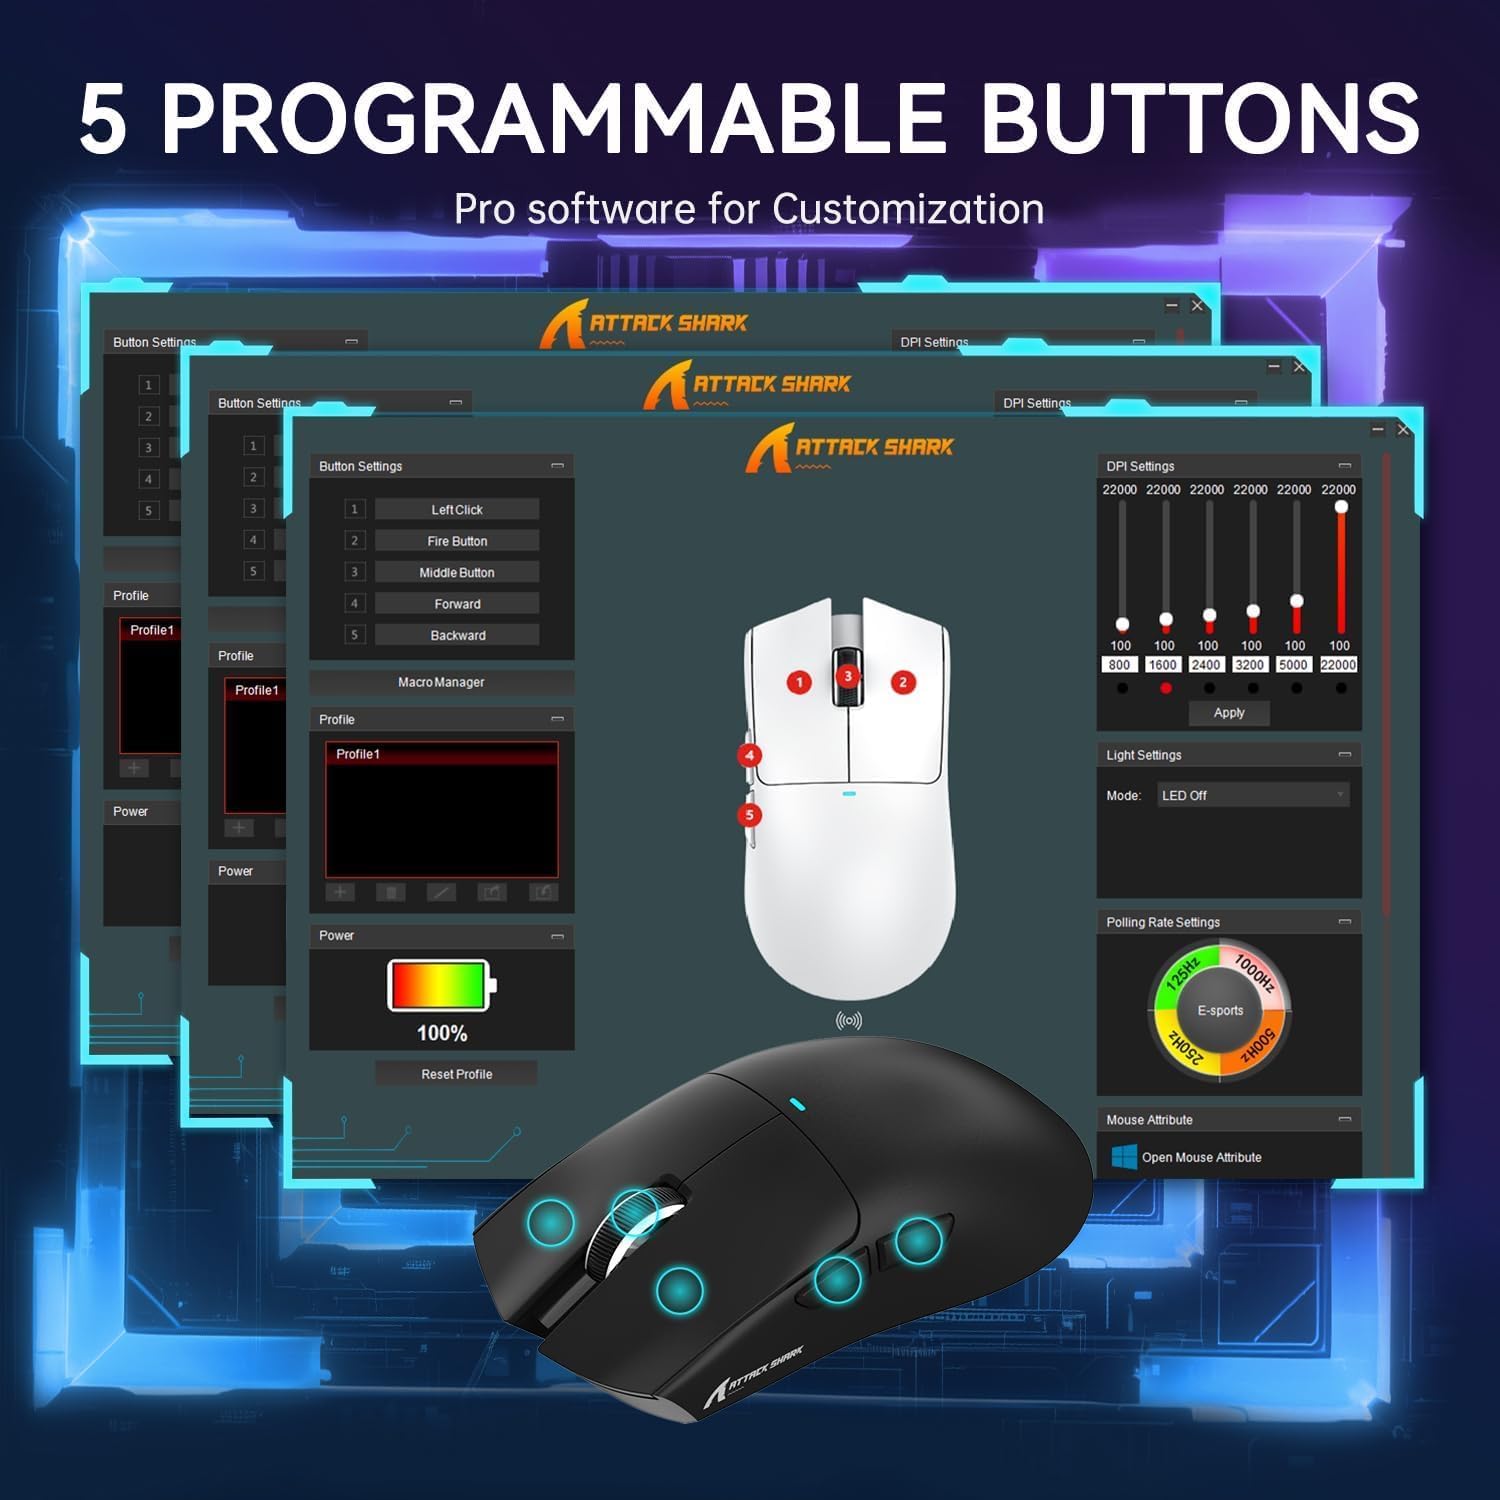
An illustration detailing the five programmable buttons on the ATTACK SHARK X11 mouse, along with a screenshot of the customization software interface.
3.2 DPI Adjustment
Press the dedicated DPI button (usually located behind the scroll wheel) to cycle through different sensitivity levels. The current DPI setting may be indicated by an LED color change or through the software interface.
3.3 Polling Rate Settings
The polling rate, which determines how often the mouse reports its position to the computer, can be adjusted via the manufacturer's software. Higher polling rates (e.g., 1000 Hz) provide more responsive tracking, which is beneficial for competitive gaming.
3.4 RGB Lighting Control
Customize the RGB lighting effects, colors, and brightness using the ATTACK SHARK software. You can choose from various presets or create your own lighting profiles.
3.5 On-board Memory
The mouse features on-board memory, allowing you to save your customized profiles (DPI settings, button assignments, RGB effects) directly to the mouse. This means your settings will be retained even when connecting the mouse to a different computer without the software installed.
4. Maintenance
4.1 Cleaning
- Use a soft, dry, lint-free cloth to wipe the mouse surface.
- For stubborn dirt, slightly dampen the cloth with water or a mild cleaning solution (avoid harsh chemicals).
- Use a cotton swab or compressed air to clean around buttons, scroll wheel, and the sensor area.
- Ensure no liquid enters the mouse's internal components.
4.2 Battery Care
- Avoid fully discharging the battery frequently.
- Charge the mouse regularly, especially if using the charging dock.
- Store the mouse in a cool, dry place if not used for extended periods.
4.3 PTFE Feet Care
The 100% PTFE feet provide smooth gliding. To maintain their performance:
- Keep your mouse pad clean and free of debris.
- Avoid scratching or damaging the PTFE feet.
- Replacement feet can be purchased if they wear out over time.
5. Troubleshooting
5.1 Connectivity Issues
- Mouse not connecting (2.4 GHz): Ensure the USB receiver is securely plugged in and the mouse is switched to 2.4G mode. Try a different USB port.
- Mouse not connecting (Bluetooth): Ensure Bluetooth is enabled on your computer and the mouse is in pairing mode. Remove previous pairings and try re-pairing.
- Intermittent connection: Check for interference from other wireless devices. Ensure the mouse is within range of the receiver/Bluetooth adapter.
5.2 Charging Issues
- Mouse not charging: Verify the USB-C cable is properly connected to both the mouse and the power source. If using the dock, ensure the mouse is correctly seated and the dock is powered. Try a different cable or USB port.
- Slow charging: Ensure the power source provides sufficient current.
5.3 Software Not Detecting Mouse
- Ensure the mouse is connected via USB-C or 2.4 GHz wireless (Bluetooth may not be supported by the software).
- Restart your computer and the software.
- Reinstall the software.
- For Linux users, the software may not have native support. Consider using a Windows virtual machine to configure settings if necessary, as settings are saved to the mouse's on-board memory.
5.4 Performance Issues (Lag, Stutter)
- Ensure the mouse battery is sufficiently charged.
- Check for physical obstructions or dirt on the sensor.
- Try a different mouse pad or surface.
- Reduce wireless interference by moving other wireless devices away.
6. Specifications
| Feature | Detail |
|---|---|
| Brand | ATTACK SHARK |
| Model | X11 |
| Color | Black |
| Connectivity Technology | 2.4 GHz Wireless, Bluetooth, USB-C Wired |
| Special Feature | Wireless |
| Motion Detection Technology | Laser (PAW3311 Sensor) |
| Number of Buttons | 5 |
| Orientation | Right-handed |
| Compatible Devices | PC, Tablet |
| Operating System | Windows, macOS |
| Power Source | Battery Powered (Rechargeable) |
| Item Weight | 62 Grams |

The ATTACK SHARK X11 mouse resting on a circuit board, highlighting its Pixart PAW3311 top-tier sensor with specifications like 22000 DPI, 300 IPS, and 35G acceleration.

An exploded diagram showcasing the internal components of the ATTACK SHARK X11 mouse, including the lightweight material case, engineering curved keys, lithium battery, PCB, TTC encoder, HUYU white spots, PAW3311 sensors, and mouse bottom case.

A cutaway view of the ATTACK SHARK X11 mouse, emphasizing the integrated Broadcom main control chip, responsible for faster and more power-efficient performance.
7. Warranty and Support
7.1 Warranty Information
The ATTACK SHARK X11 Tri-Mode Wireless Gaming Mouse comes with a 1-year limited warranty from the date of purchase. This warranty covers manufacturing defects and workmanship under normal use. It does not cover damage caused by misuse, accidents, unauthorized modifications, or normal wear and tear.
7.2 Customer Support
For technical assistance, warranty claims, or to download the latest software and drivers, please visit the official ATTACK SHARK website or contact their customer support. You can also visit the ATTACK SHARK Brand Store for more product information.


