
1. Introduction
This manual provides essential instructions for setting up, operating, and maintaining your Epson EcoTank ET-3958 wireless all-in-one printer. Please read this manual thoroughly before using the product to ensure correct and safe operation.
What's in the Box
- Epson EcoTank all-in-one printer
- User manual
- Power cord
- 1 bottle of 502 Black ink (127 mL)
- 1 bottle each of 502 Cyan, Magenta, Yellow ink (70 mL)
2. Setup
2.1 Unpacking the Printer
- Remove the printer from its packaging.
- Remove all protective tapes and materials from the exterior and interior of the printer.
2.2 Connecting Power
Connect the power cord to the printer and then to a power outlet. Press the power button to turn on the printer.
2.3 Filling the Ink Tanks
The EcoTank ET-3958 uses refillable ink tanks. Follow these steps to fill them:
- Open the ink tank unit cover on the side of the printer.
- Open the cap for the black ink tank.
- Uncap the black ink bottle and insert it into the black ink tank's filling port. The ink will automatically start to fill. Do not squeeze the bottle.
- Once the tank is full, remove the ink bottle and securely close the tank cap.
- Repeat the process for the cyan, magenta, and yellow ink tanks using the corresponding colored ink bottles.
- Close the ink tank unit cover.

Figure 2.3.1: Filling the black ink tank. Ensure the correct color ink bottle is used for each tank.
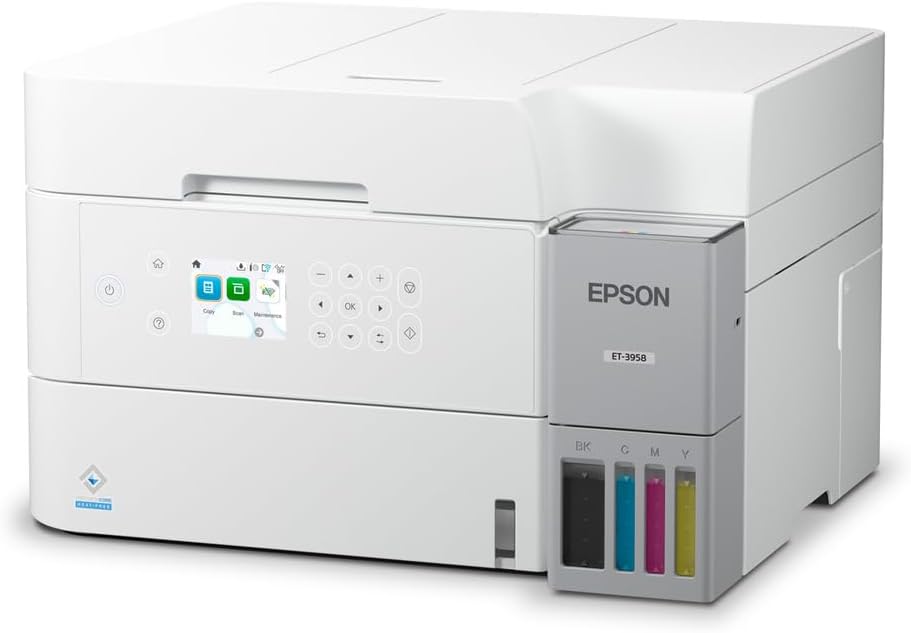
Figure 2.3.2: The printer's ink tank unit, displaying the four color tanks.
2.4 Initial Software Setup and Network Connection
Follow the on-screen instructions on the printer's control panel to complete the initial setup, including print head alignment and network connection. For detailed software installation, visit the official Epson support website.
3. Operating the Printer
3.1 Loading Paper
- Pull out the paper cassette from the front of the printer.
- Slide the edge guides to their widest position.
- Load paper print-side down. Ensure the paper stack does not exceed the maximum load line.
- Adjust the edge guides to the width of the paper.
- Insert the paper cassette back into the printer.

Figure 3.1.1: Paper loaded in the printer's input tray.
3.2 Basic Printing
- Ensure the printer is connected to your computer or network.
- Open the document or image you wish to print on your computer.
- Select the print option from your application.
- Choose the Epson ET-3958 as your printer and adjust print settings as needed.
- Click 'Print'.
3.3 Copying Documents
- Place your document face-down on the scanner glass or face-up in the Automatic Document Feeder (ADF).
- On the printer's control panel, select 'Copy'.
- Adjust settings such as number of copies, color/black & white, and paper size.
- Press the 'Start' button to begin copying.

Figure 3.3.1: The printer's control panel for selecting functions like copy, scan, and maintenance.
3.4 Scanning Documents
- Place your document on the scanner glass or in the ADF.
- On the printer's control panel, select 'Scan'.
- Choose your scan destination (e.g., computer, cloud service) and adjust scan settings.
- Press the 'Start' button to begin scanning.
4. Maintenance
4.1 Checking Ink Levels
Visually inspect the ink tanks on the front of the printer. The transparent tanks allow you to monitor ink levels. Refill ink when levels are low to prevent air from entering the system.
4.2 Performing Print Head Cleaning
If print quality declines (e.g., missing lines, faded colors), perform a print head cleaning:
- From the printer's control panel, navigate to 'Maintenance'.
- Select 'Print Head Cleaning' and follow the on-screen prompts.
- After cleaning, print a nozzle check pattern to verify improvement.
4.3 Replacing the Maintenance Box
The maintenance box collects waste ink. When the printer indicates it is full, it must be replaced.
- Turn off the printer.
- Locate the maintenance box cover on the side or back of the printer.
- Open the cover and carefully pull out the old maintenance box.
- Insert a new maintenance box until it clicks into place.
- Close the cover and turn on the printer.

Figure 4.3.1: Removing the maintenance box for replacement.
4.4 Cleaning the Printer Exterior and Scanner Glass
Wipe the exterior of the printer with a soft, damp cloth. For the scanner glass, use a lint-free cloth and a small amount of glass cleaner, ensuring no liquid seeps into the printer.
5. Troubleshooting
This section addresses common issues you might encounter. For more detailed troubleshooting, refer to the Epson support website.
5.1 Printer Not Responding
- Ensure the printer is powered on and connected securely to the computer or network.
- Check for any error messages on the printer's control panel.
- Restart both the printer and your computer.
- Verify that the correct printer driver is installed and selected.
5.2 Poor Print Quality
- Check ink levels and refill any low tanks.
- Perform a print head cleaning (refer to Section 4.2).
- Perform a print head alignment from the printer's maintenance menu.
- Ensure you are using appropriate paper for your print settings.
5.3 Network Connection Issues
- Verify your Wi-Fi router is working correctly.
- Restart your router and the printer.
- Re-establish the wireless connection from the printer's control panel.
- Ensure the printer is within range of your wireless router.
6. Specifications
| Feature | Detail |
|---|---|
| Product Dimensions (D x W x H) | 13.7" x 14.8" x 9.4" |
| Item Weight | 15.9 pounds |
| Maximum Media Size | 8.5 x 14 inches |
| Print Media Types | Paper (plain) |
| Supported Sheet Sizes | 3.5" x 5", 4" x 6", 5" x 7", 8" x 10", 8.5" x 11", 8.5" x 14" Inches |
| Connectivity Technology | Ethernet, USB, Wi-Fi |
| Printing Technology | Inkjet |
| Special Feature | Network-Ready |
| Color | White |
| Printer Output | Color |
| Maximum Print Speed (Color) | 9 ppm |
| Maximum Print Speed (Monochrome) | 18 ppm |
| UPC | 198390000943 |
7. Warranty and Support
7.1 Product Warranty
For detailed information regarding the warranty coverage for your Epson EcoTank ET-3958 printer, please refer to the warranty card included with your product or visit the official Epson website. Warranty terms and conditions may vary by region.
7.2 Customer Support
If you require further assistance, technical support, or wish to download the latest drivers and software, please visit the official Epson support website. You can find FAQs, troubleshooting guides, and contact information for customer service there.
Epson Support Website: www.epson.com/support


