
1. Introduction
This manual provides detailed instructions for the installation, operation, and maintenance of your SakerPlus 360° 4-Channel Full HD Dash Cam System. Please read this manual thoroughly before using the product to ensure proper functionality and safety.
Important Usage Notice: The Sakerplus dash cam does not support wireless connection, WiFi, or smartphone pairing. Video playback is only available via the SD card on a computer or compatible device. Please confirm this setup meets your needs before purchase.
2. What's in the Box
Verify that all items listed below are included in your package:
- SakerPlus 360° 4-Channel Dash Cam Unit (main unit with integrated front, left, and right cameras, and display)
- Rear Camera (external)
- Car Power Adapter (cigarette lighter plug)
- Mounting Bracket (suction cup or adhesive base)
- Adhesive Pads (for mounting)
- Cable Clips
- Pry Tool (for cable management)
- User Manual
- 64GB SD Card (pre-installed)
- GPS Module
- Electrostatic Film (for windshield mounting)

3. Setup and Installation
3.1 Preparing for Installation
- Clean Windshield: Ensure the area on your windshield where the dash cam will be mounted is clean and dry.
- Apply Electrostatic Film: Place the electrostatic film on the desired area of the windshield. This protects your windshield and allows for easier removal of the adhesive mount.
- Remove Protective Films: Carefully peel off any protective films from the camera lenses and the display screen.
- Insert SD Card: The 64GB SD card is typically pre-installed. If not, insert it into the designated slot on the main unit.

3.2 Mounting the Main Dash Cam Unit
- Attach Mount: Secure the mounting bracket (suction cup or adhesive base) to the electrostatic film on your windshield. Ensure it is firmly attached and does not obstruct your view.
- Attach Dash Cam: Slide the main dash cam unit onto the mounting bracket until it clicks securely into place.
- Adjust Angle: Adjust the main camera's angle to capture the desired forward view. The side cameras can be rotated independently to cover the left and right sides of the vehicle interior or exterior.

3.3 Connecting Power and Rear Camera
- Connect Power: Plug the car power adapter into your vehicle's 12V cigarette lighter socket. Connect the other end to the "POWER" port on the main dash cam unit.
- Route Power Cable: Use the provided pry tool and cable clips to neatly route the power cable along the windshield trim and dashboard to minimize clutter and ensure it does not interfere with driving.
- Install Rear Camera: Mount the external rear camera at the back of your vehicle, ensuring a clear view. Connect its cable to the "REAR" port on the main dash cam unit. Route this cable discreetly along the vehicle's interior.
- Connect GPS Module: Plug the GPS module into the "GPS" port on the main dash cam unit. Mount the GPS module on the windshield or dashboard in a location with a clear view of the sky for optimal signal reception.

3.4 Video Installation Guide
For a visual guide on the installation process, please refer to the following video:
4. Operating Instructions
4.1 Power On/Off
The dash cam will automatically power on and begin recording when connected to your vehicle's power supply and the ignition is turned on. It will power off automatically when the ignition is turned off.
4.2 Adjusting Camera Views
The main unit features a central front-facing camera and two adjustable side cameras. These side cameras can be rotated to capture interior cabin views or exterior side views. The external rear camera provides a dedicated rear view.

4.3 Key Features
- 1080P Four-Camera Coverage: Records from front, rear, left, and right angles with adjustable 1080P lenses, minimizing blind spots.
- Continuous Loop Recording: Ensures uninterrupted video storage by overwriting the oldest files when the SD card is full.
- Infrared Night Vision: Equipped with infrared sensors for clear cabin recordings in low-light conditions and sharp exterior footage at night.
- G-Sensor (Impact Detection): Automatically detects collisions or sudden impacts, locking and protecting important recordings from being overwritten.
- Parking Monitor: (If enabled in settings) Records events when the vehicle is parked and detects motion or impact.
- Reversing Aid: Automatically switches to a full-screen rear view when the vehicle is in reverse gear.
- HDR Function: Enhances image quality in varying light conditions, providing clearer recordings in both dark and bright environments.


4.4 Menu Navigation and Settings
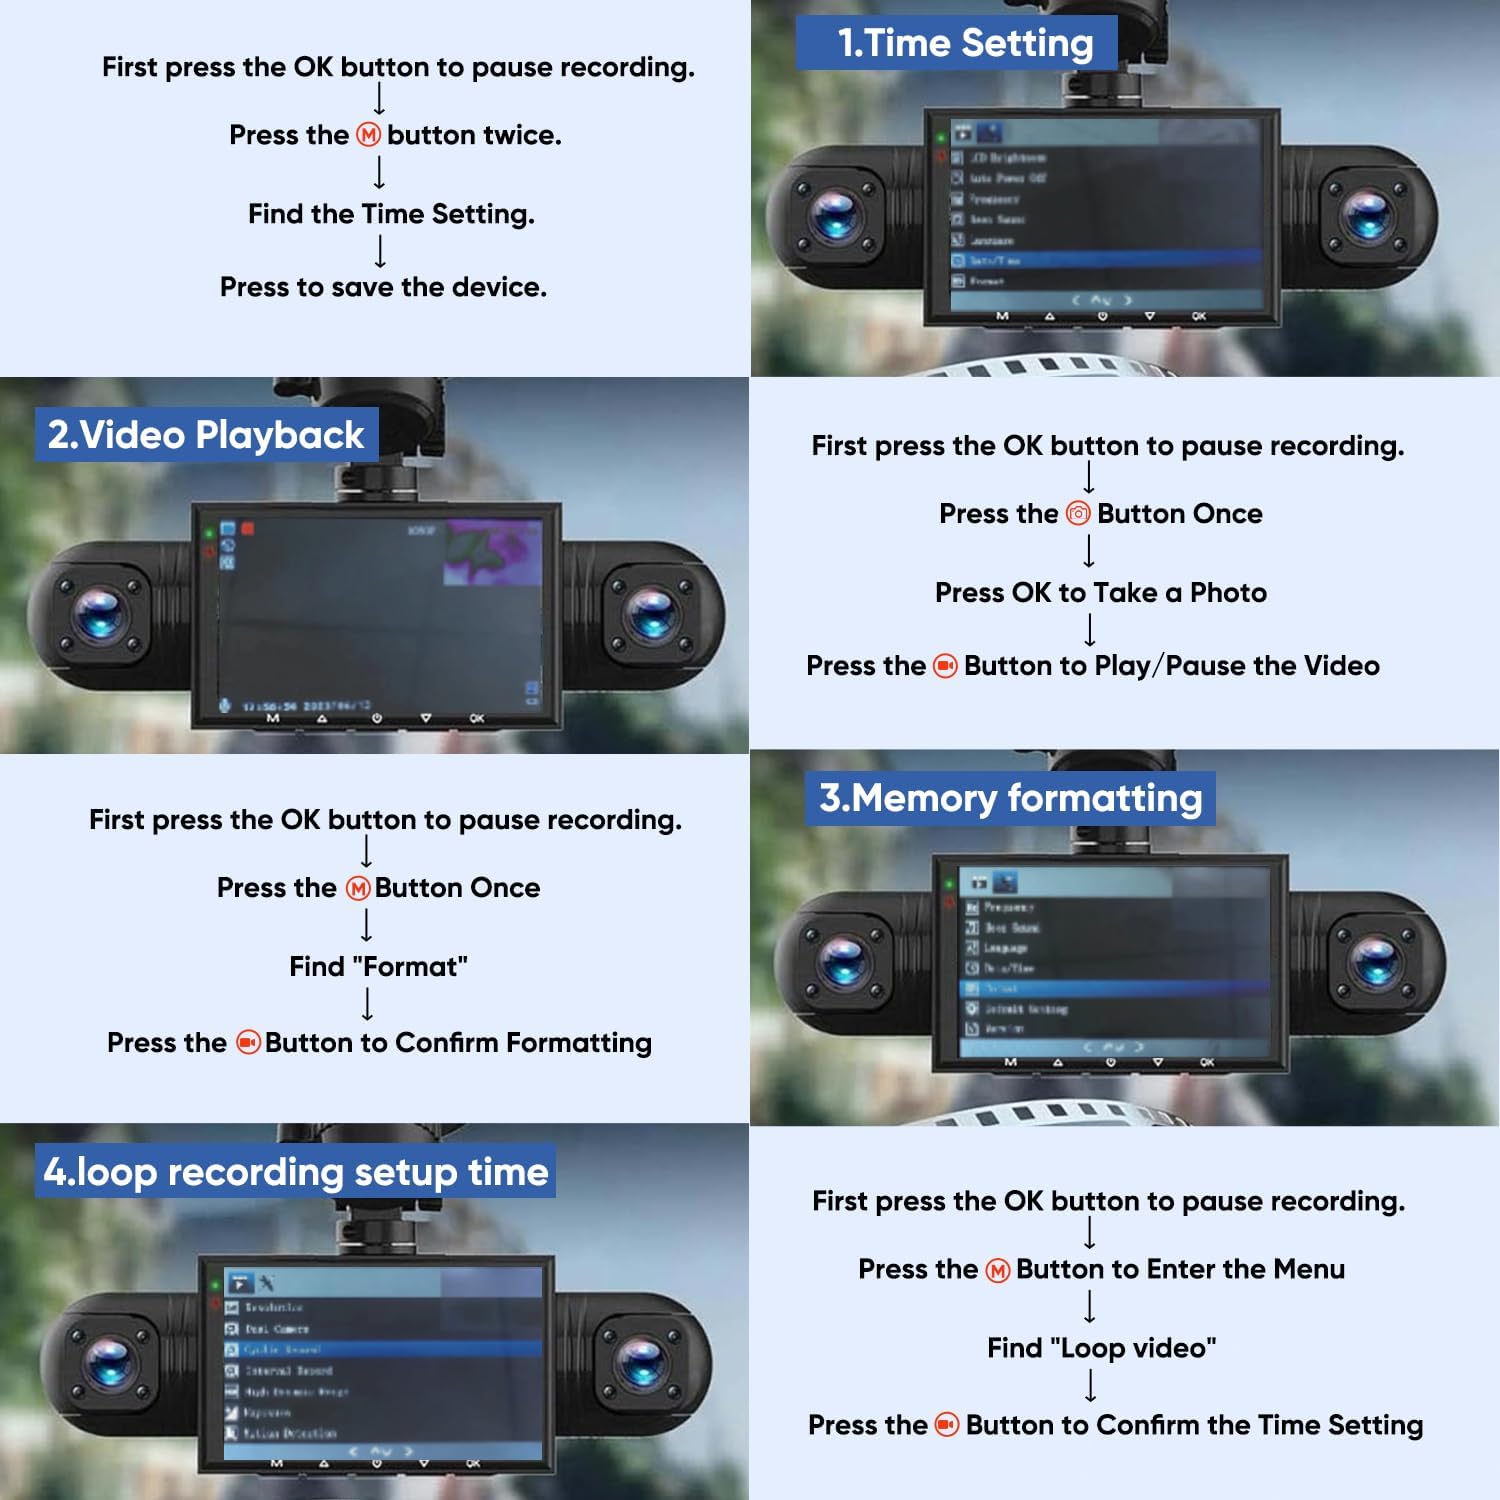
Use the buttons below the display screen to navigate through the menu options. Common settings include:
- Time Setting: Adjust date and time for accurate timestamps on recordings.
- Video Playback: Review recorded footage directly on the dash cam's screen.
- Memory Formatting: Format the SD card to clear all data and ensure optimal performance.
- Loop Recording Setup: Configure the duration of individual video segments (e.g., 1, 3, or 5 minutes).
- Motion Detection: Enable or disable motion-triggered recording.
- G-Sensor Sensitivity: Adjust the sensitivity of impact detection.
5. Maintenance
- SD Card Formatting: Regularly format the SD card (e.g., once a month) to prevent data corruption and ensure smooth recording. Back up any important files before formatting.
- Lens Cleaning: Keep camera lenses clean from dust, smudges, and debris using a soft, lint-free cloth to ensure clear video quality.
- Firmware Updates: Check the SakerPlus official website periodically for any available firmware updates to improve performance and add new features.
- Temperature Considerations: Avoid exposing the dash cam to extreme temperatures for prolonged periods, as this can affect battery life and component longevity.
6. Troubleshooting
- Dash Cam Not Powering On:
- Ensure the car power adapter is securely plugged into both the vehicle's cigarette lighter and the dash cam's power port.
- Check if the vehicle's 12V socket is receiving power (test with another device).
- Recording Issues (e.g., freezing, gaps):
- Format the SD card. If issues persist, try a new high-speed (Class 10 or U3) SD card.
- Ensure loop recording is enabled and configured correctly.
- Poor Video Quality:
- Clean the camera lenses.
- Ensure protective films have been removed from all lenses.
- Check settings for HDR or night vision modes if applicable.
- G-Sensor Too Sensitive/Not Sensitive Enough:
- Adjust the G-sensor sensitivity level in the dash cam's settings menu.
- GPS Signal Issues:
- Ensure the GPS module is mounted in a location with a clear view of the sky, away from obstructions.
- Verify the GPS module is securely connected to the dash cam.
7. Specifications
| Product Dimensions | 7.8 x 4.2 x 3.6 inches |
| Model Number | 128G |
| Video Capture Resolution | 1080p (for all 4 channels) |
| Field Of View | 170 Degrees (main camera) |
| Special Features | 360° Coverage, Infrared Night Vision, G-Sensor, Loop Recording, Parking Monitor, HDR |
| Connectivity Technology | HDMI (for display output) |
| Storage | 64GB SD Card (included) |
| Power Source | Plug-in Power (via car cigarette lighter) |

8. Warranty and Support
For warranty information and customer support, please refer to the contact details provided in your product packaging or visit the official SakerPlus website. Keep your purchase receipt for warranty claims.
Protection Plans: Additional protection plans are available for purchase:
- 2-Year Protection Plan: $5.99
- 3-Year Protection Plan: $7.99
- Complete Protect: $16.99/month (covers all eligible past and future purchases)