
1. Introduction
The Satisure WiFi Door Sensor Chime provides real-time alerts for doors and windows opening, enhancing home security and monitoring. This system integrates with the Tuya/Smart Life App, offering instant notifications and customizable settings. It is designed for easy, wire-free installation and is suitable for various applications, including child safety and general home monitoring.

Image 1.1: Main components of the Satisure WiFi Door Sensor Chime system, including the receiver and two sensors.
2. Product Overview
2.1 Package Contents
- 1 x Doorbell Receiver
- 3 x WiFi Alarm Sensors
- Adhesive mounting pads
- User Manual
2.2 Key Features
- Real-Time App Alerts: Receive instant push notifications on your smartphone via the Tuya/Smart Life App when a door or window opens.
- Adjustable Chime: Features 5 volume levels up to 110dB and 32 selectable melodies. Unique ringtones can be assigned to individual sensors.
- Wire-Free Installation: Simple plug-and-play setup with adhesive mounting.
- Expandable System: Supports up to 20 sensors for comprehensive coverage.
- Family Sharing: Share device access through the app for multiple users to receive alerts.
- Auto-Memory: Retains melody and volume settings after power outages.
- No Monthly Fees: Free app push notifications. Optional paid SMS/phone call alerts available.
2.3 Component Identification

Image 2.1: Diagram showing the receiver and sensor with their respective dimensions and button functions.
Receiver:
- Volume/Pair Network Button: Adjusts volume and initiates network pairing.
- Backward/Reset Button: Navigates through melodies and performs reset.
- Forward/Pair Transmitter Button: Navigates through melodies and initiates sensor pairing.
- LED Indicator: Provides visual feedback for status and alerts.
Sensor:
- Consists of two parts: a main sensor unit and a smaller magnetic unit.
- LED Indicator: Flashes when triggered.
3. Setup Instructions
3.1 App Download and Account Creation
- Download the "Smart Life" or "Tuya" App from your device's app store.
- For iPhone: Download "Smart Life-Smart Living" from the App Store.
- For Android: Download "Smart Life-Smart Living" from Google Play.
- Open the Smart Life App and log in. If you do not have an account, create one following the on-screen prompts.

Image 3.1: Visual guide for downloading the Smart Life App and logging in.
3.2 Adding the Gateway (Receiver) to the App
- Plug the receiver into a standard electrical outlet.
- In the Smart Life App, tap the "+" button or "Add Device".
- Hold the Volume/Pair Network button on the receiver for approximately 5 seconds until the LED indicator flashes rapidly. Release the button.
- The app should discover the nearby device. Tap "Add" to proceed.
- Enter your Wi-Fi network password. Note: Only 2.4GHz Wi-Fi networks are supported. Ensure your mobile device is connected to a 2.4GHz network during setup.
- Once successfully added, you can rename the gateway for easier identification (e.g., "Main Gateway").

Image 3.2: Step-by-step screenshots for adding the Satisure gateway to the Smart Life App.
3.3 Sensor Installation
- Identify the desired location for each sensor (door, window, cabinet, etc.).
- Ensure the surface is clean and dry.
- Attach the main sensor unit to the fixed frame of the door/window and the smaller magnetic unit to the moving part. The two parts must be aligned and within 1 cm (0.4 inches) of each other when the door/window is closed.
- Use the provided adhesive pads for mounting. For a more secure installation, screws can be used (not included).

Image 3.3: Examples of sensor placement on doors, windows, and other objects like safes and refrigerators.
3.4 Pairing Sensors with the Receiver
- Press the Forward/Pair Transmitter button on the receiver. The receiver's LED indicator will light up, indicating it's in pairing mode.
- Open and close the installed sensor (e.g., open a door where the sensor is placed). The sensor's LED will flash, and the receiver will chime, confirming successful pairing.
- Repeat for all additional sensors.
4. Operating Instructions
4.1 Basic Operation
- When a monitored door or window opens, the sensor will trigger.
- The receiver will emit a chime and its LED indicator will flash.
- An instant push notification will be sent to your smartphone via the Smart Life App.

Image 4.1: Example of real-time notifications received on a smartphone when a sensor is triggered.
4.2 App Functions
After adding the gateway and sensors to the Smart Life App, you can customize various settings:
- Rename Sensors: Assign unique names to each sensor (e.g., "Front Door," "Bedroom Window," "Refrigerator") to easily identify which one is triggered.
- Change Ringtone: Select from 32 available melodies for each sensor.
- Adjust Volume: Set the receiver's volume from 0-110dB.
- Light & Sound Modes: Choose between Ring + Light, Ring Only, or Light Only modes for the receiver.
- Notification Settings: Enable/disable app notifications.
- Do Not Disturb Schedule: Set specific times or days when you do not wish to receive alerts.
- Notification History: View a log of all triggered events.
- Family Sharing: Share access to the device with up to 20 family members or friends.

Image 4.2: Screenshot showing the custom settings interface within the Smart Life App, including ringtone, volume, and mode options.
5. Maintenance
5.1 Cleaning
Wipe the receiver and sensors with a soft, dry cloth. Do not use abrasive cleaners or solvents, as these can damage the device.
5.2 Battery Replacement
The sensors are battery-powered. When the sensor's LED indicator no longer flashes or the sensor fails to trigger, it may be time to replace the battery. Refer to the sensor's casing for the specific battery type (typically a CR2032 coin cell battery). Carefully open the sensor unit, replace the battery, and reassemble.
5.3 Adhesive Longevity
The included adhesive pads provide a convenient installation. If the sensors become loose over time, re-secure them with new strong adhesive tape or consider using small screws for a more permanent fixture.
6. Troubleshooting
- No App Notifications:
- Ensure the receiver is connected to a 2.4GHz Wi-Fi network. 5GHz networks are not supported.
- Check your phone's notification settings for the Smart Life App to ensure notifications are enabled.
- Verify that the "Do Not Disturb" schedule is not active in the app.
- Confirm your phone has a stable internet connection.
- Sensor Not Triggering:
- Check the alignment of the main sensor unit and the magnetic unit. They must be within 1 cm when closed.
- Replace the sensor battery if the LED does not flash when triggered.
- Ensure the sensor is properly paired with the receiver. If not, re-pair it following Section 3.4.
- Receiver Not Chime/Flashing:
- Ensure the receiver is plugged into a working power outlet.
- Check the volume setting in the app or by pressing the Volume button on the receiver.
- Verify the Light & Sound Mode setting in the app.
- Poor Range/Connectivity:
- The maximum range between the sensor and receiver is 500 feet in open areas.
- The receiver must be within 100 feet of your Wi-Fi router for optimal app connectivity.
- Obstacles like thick walls or metal objects can reduce signal range. Try repositioning the receiver or sensors.
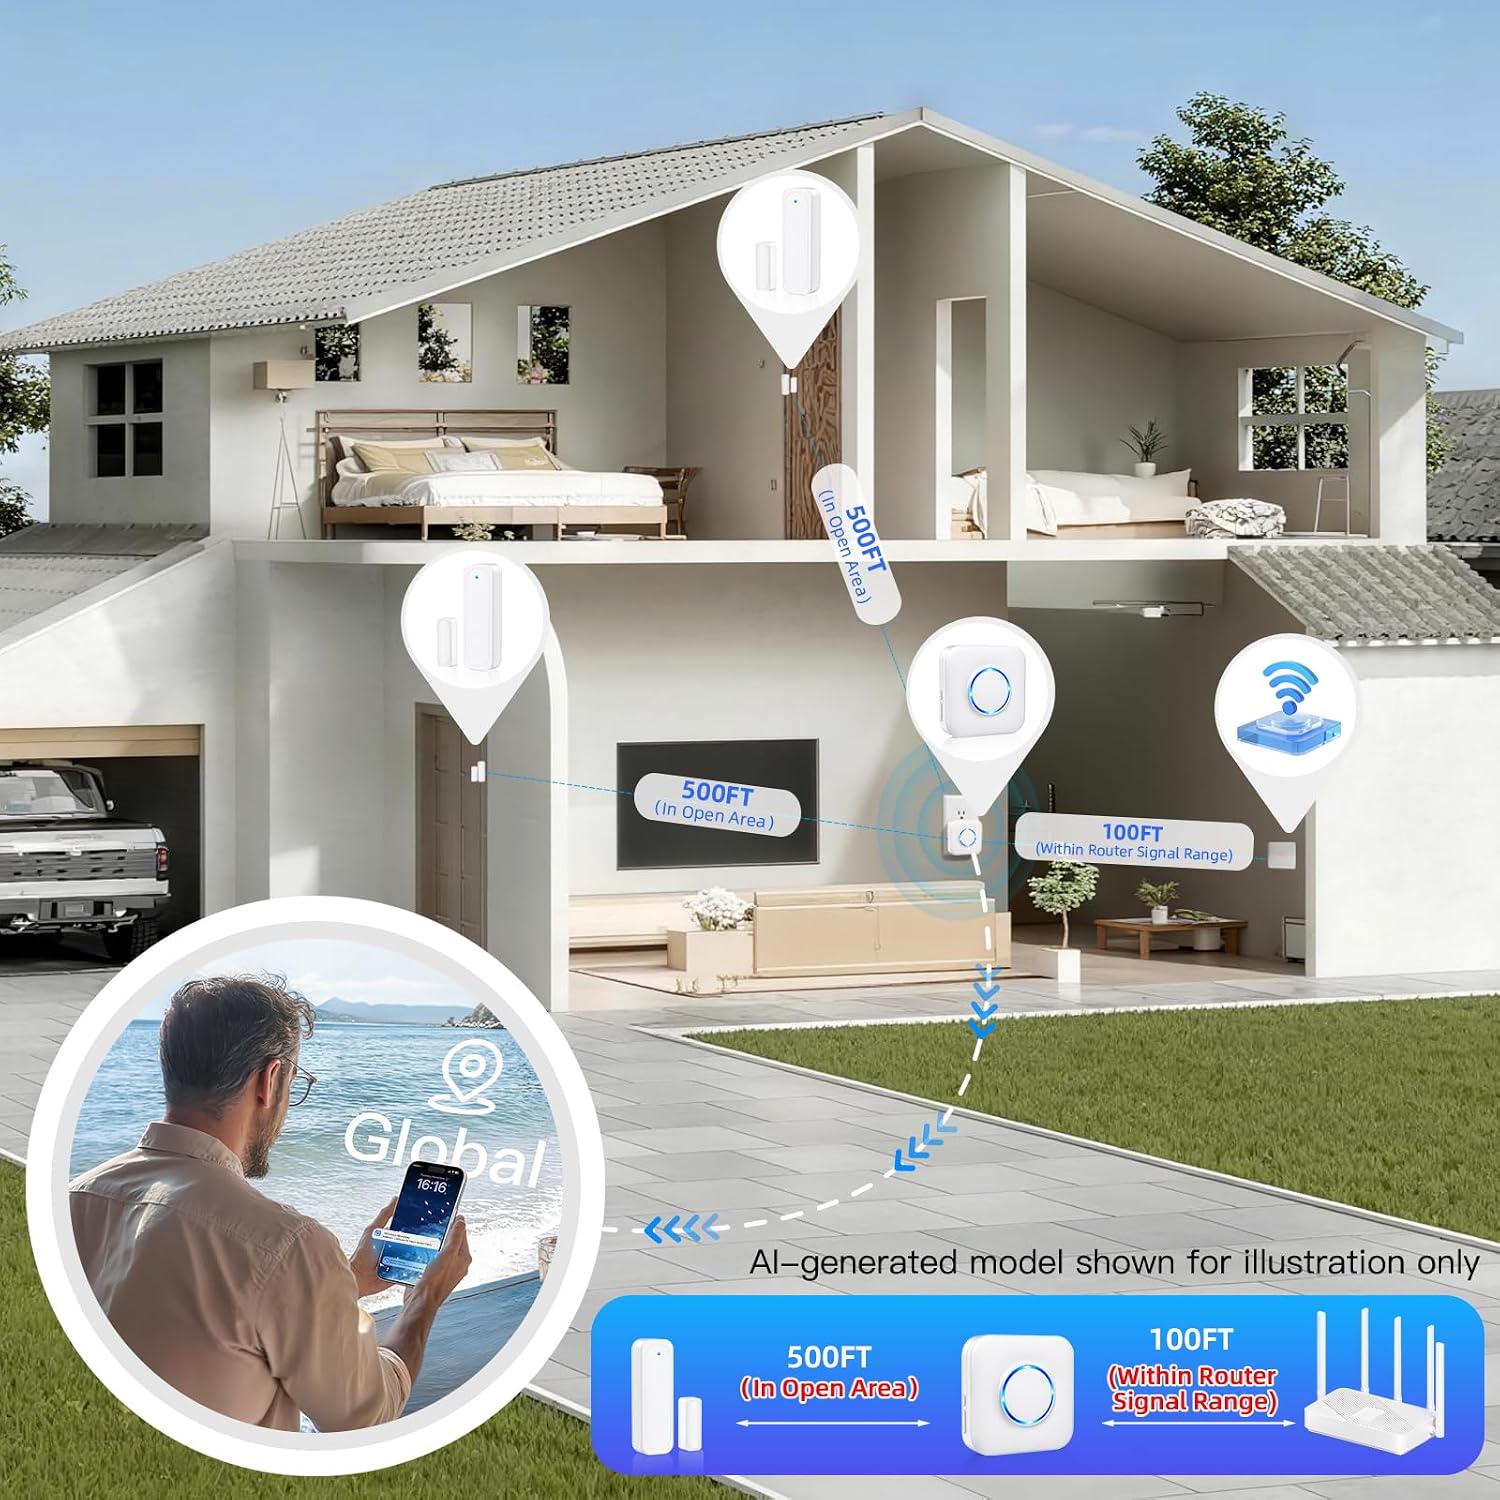
Image 6.1: Diagram illustrating the wireless range between sensors, receiver, and Wi-Fi router.
7. Specifications
| Brand | Satisure |
| Model Number | WIFI Sensor |
| Color | White |
| Power Source | Battery Powered (Sensors), AC Plug-in (Receiver) |
| Compatible Devices | Smartphone (via Tuya/Smart Life App) |
| Control Method | App |
| Audible Noise | Up to 110 dB |
| Mounting Type | Door Mount |
| Maximum Range (Sensor to Receiver) | 500 feet (in open area) |
| Wi-Fi Compatibility | 2.4GHz only |
| Number of Items | 3 Sensors + 1 WiFi Receiver |
8. Warranty and Support
For warranty information or technical support, please refer to the product packaging or contact Satisure customer service directly. Contact details can typically be found on the manufacturer's official website or through your purchase platform.