
1. Introduction
Thank you for choosing the Roizefar 55PSI Airbrush Kit with Compressor. This manual provides essential information for the safe and effective operation, setup, maintenance, and troubleshooting of your airbrush system. Please read these instructions thoroughly before first use and retain for future reference.
2. Package Contents
Verify that all items listed below are present in your package. If any components are missing or damaged, please contact customer support.
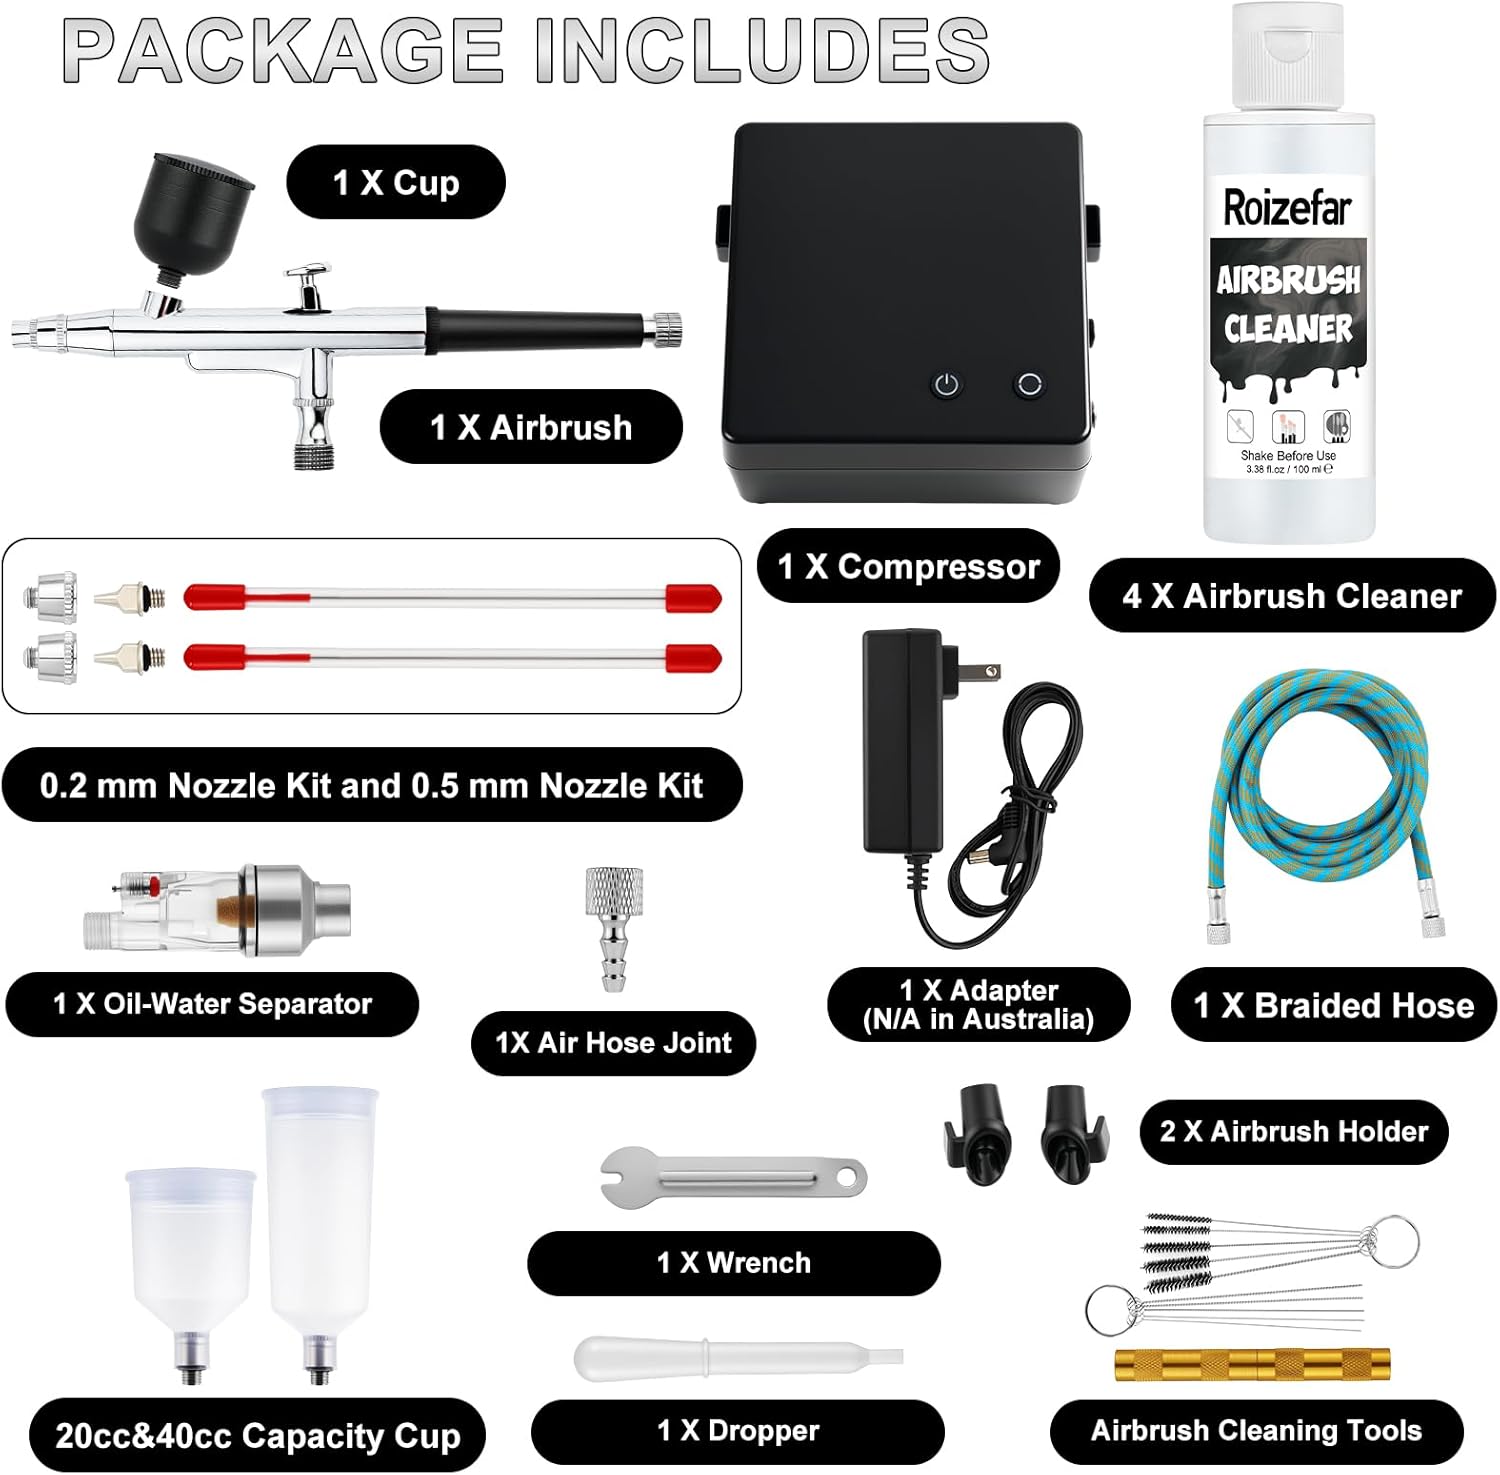
Image 2.1: Overview of all components included in the Roizefar Airbrush Kit.
- 1 x Airbrush
- 1 x Compressor
- 1 x Cup (pre-attached to airbrush)
- 1 x 0.2mm Nozzle Kit
- 1 x 0.5mm Nozzle Kit
- 4 x Airbrush Cleaner bottles
- 1 x Oil-Water Separator
- 1 x Air Hose Joint
- 1 x Adapter (Note: Not compatible with AU marketplace standards; replacement by user required for AU use)
- 1 x Braided Hose
- 1 x 20cc Capacity Cup
- 1 x 40cc Capacity Cup
- 1 x Wrench
- 1 x Dropper
- 2 x Airbrush Holders
- 1 x Set of Airbrush Cleaning Tools
3. Specifications
| Feature | Specification |
|---|---|
| Brand | Roizefar |
| Model Number | RAK-NA |
| Compressor Air Pressure | 55 PSI (Maximum) |
| Airflow | 14-20 L/min |
| Adjustable Airflow Settings | 3 gears: 14-16 L/min, 16-18 L/min, 18-20 L/min |
| Nozzle Sizes Included | 0.2mm, 0.3mm (pre-installed), 0.5mm |
| Airbrush Type | Dual-Action |
| Capacity Cups | 20cc, 40cc |
| Product Dimensions | 13 x 14 x 25 cm |
| Item Weight | 1.37 kg |
4. Setup
4.1 Airbrush Assembly
The airbrush comes with a 0.3mm needle and nozzle set pre-installed. You can change to the 0.2mm or 0.5mm nozzle kits as needed for different spraying tasks.

Image 4.1: Dual-action airbrush components and oil-water separator connection.
- Attach Oil-Water Separator: Screw the oil-water separator onto the airbrush hose connection. This helps prevent moisture from entering the airbrush.
- Connect Air Hose: Connect one end of the braided hose to the oil-water separator and the other end to the compressor's hose connector. Ensure all connections are secure to prevent air leaks.
- Nozzle Replacement (if needed): To change nozzles, gently loosen the front cap of the airbrush using the provided wrench. Carefully remove the existing needle and nozzle. Insert the desired nozzle and needle, then re-tighten the cap. Caution: Needles and nozzles are delicate. Handle with care to avoid bending or damage.

Image 4.2: Airbrush pen assembly guide, illustrating nozzle and needle replacement.
4.2 Compressor Connection
- Connect Power Adapter: Plug the power adapter into the compressor's power connector.
- Plug into Power Outlet: Plug the adapter into a suitable electrical outlet.

Image 4.3: Compressor overview with power switch, pressure regulator, and connection ports.
5. Operating Instructions
5.1 Initial Use
- Prepare Paint: Dilute your paint to the appropriate consistency for airbrushing. Use the dropper to transfer paint into the airbrush cup.
- Power On: Press the power switch on the compressor to turn it on.
- Adjust Airflow: Press the pressure regulator button on the compressor to cycle through the three airflow settings (Low, Middle, High). Select the desired pressure for your project. The default setting is Low.
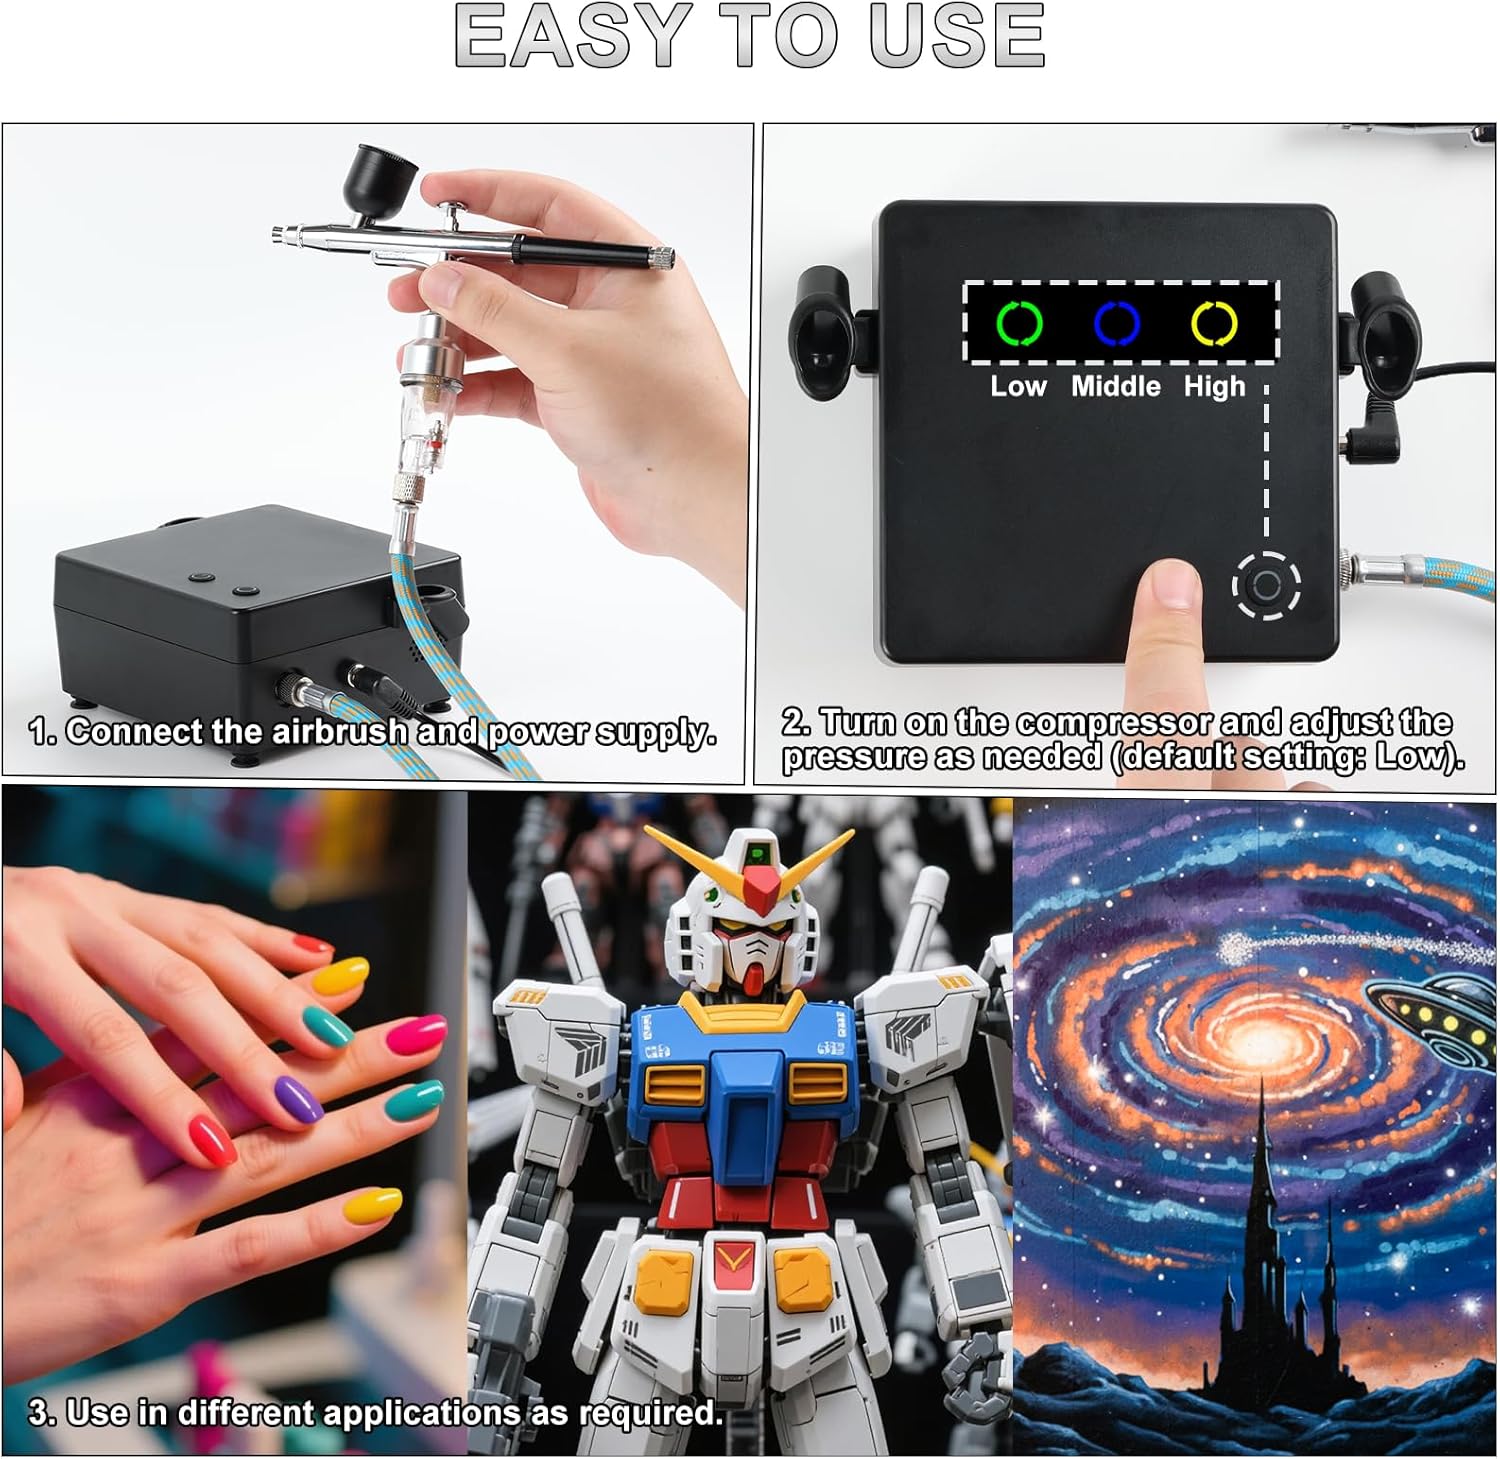
Image 5.1: Basic setup and operation steps, including airflow adjustment.
5.2 Dual-Action Control
Your airbrush features a dual-action trigger for precise control over both airflow and paint volume.

Image 5.2: Controlling airflow and paint with the dual-action trigger.
- Airflow Control: Press down on the main lever to release air.
- Paint Volume Control: While pressing down for air, pull the main lever back to release paint. The further back you pull, the more paint is released.
- Adjusting Paint Flow: Rotate the control knob at the rear of the airbrush to limit how far back the main lever can be pulled, allowing for consistent paint flow.
5.3 Nozzle Selection Guide
Choose the appropriate nozzle size based on your project requirements:

Image 5.3: Nozzle size recommendations for various applications.
- 0.2mm Nozzle: Ideal for fine lines, intricate details, and thin pigments.
- 0.3mm Nozzle: Suitable for small to medium-sized models and general-purpose spraying.
- 0.5mm Nozzle: Best for broader coverage, thicker pigments, and larger area spraying.
6. Maintenance and Cleaning
Proper cleaning after each use is crucial to prevent clogging and ensure the longevity of your airbrush kit.

Image 6.1: Step-by-step guide for cleaning the airbrush.
- Empty Remaining Paint: After use, empty any remaining paint from the cup.
- Rinse Cup: Add a small amount of airbrush cleaner or appropriate solvent to the cup and spray it through until clear.
- Disassemble Components: Carefully disassemble the airbrush, including the needle, nozzle, and cap.
- Soak Parts: Place disassembled components in a small container with airbrush cleaner to loosen dried paint.
- Clean with Brushes: Use the provided cleaning brushes and needles to thoroughly clean all internal and external parts, especially the nozzle and needle channel. Wipe the needle gently with a cloth.
- Dry and Reassemble: Ensure all parts are completely dry before reassembly. Reassemble the airbrush carefully.
Important: Always use cleaners compatible with your paint type (e.g., water-based cleaner for water-based paints). Never force parts during disassembly or reassembly.
7. Troubleshooting
If you encounter issues with your airbrush kit, refer to the common problems and solutions below:
| Problem | Possible Cause | Solution |
|---|---|---|
| No paint spraying | Clogged nozzle/needle, paint too thick, air cap loose, no air pressure | Clean nozzle/needle thoroughly. Thin paint. Tighten air cap. Check compressor connection and power. |
| Inconsistent spray pattern / Spitting | Partial clog, bent needle tip, damaged nozzle, paint consistency issues | Clean airbrush. Inspect needle and nozzle for damage; replace if necessary. Adjust paint thinning. |
| Air leaks | Loose connections, damaged O-rings | Tighten all hose and airbrush connections. Inspect O-rings for wear and replace if needed. |
| Compressor not turning on | No power, faulty adapter, internal issue | Check power outlet and adapter connection. Ensure power switch is on. If problem persists, contact support. |
8. Safety Information
- Always operate the airbrush in a well-ventilated area to avoid inhaling paint fumes.
- Wear appropriate personal protective equipment, including a respirator mask, safety glasses, and gloves.
- Keep the airbrush and compressor away from children and pets.
- Do not use flammable liquids or solvents near open flames or heat sources.
- Ensure the power adapter is compatible with your local voltage and outlet type. (Note: The provided adapter is not compatible with AU marketplace standards and must be replaced by the user for AU use).
- Unplug the compressor when not in use or during cleaning and maintenance.
- Never point the airbrush at yourself or others.
9. Applications
The Roizefar Airbrush Kit is versatile and suitable for a wide range of creative projects and precision work:

Image 9.1: Examples of airbrush applications.
- Art Painting
- Model Coloring (miniature models, model kits)
- Nail Art
- DIY Projects
- Fabric Painting
- Cake Decorating
- 3D Printing Finishing
10. Warranty and Support
For warranty information and customer support, please refer to the documentation included with your purchase or visit the official Roizefar website. If you have any questions or require assistance, please contact Roizefar customer service directly.
Manufacturer: Shenzhen Feng'ao Technology Co., Ltd.