Introduction
Thank you for choosing the INPHIC Wireless Rechargeable Mouse. This manual provides detailed instructions for setting up, operating, and maintaining your mouse to ensure optimal performance and longevity. This mouse features a visible battery indicator, silent buttons, an ergonomic design, and adjustable DPI settings for a comfortable and efficient user experience.
Setup
1. Package Contents
- INPHIC Wireless Rechargeable Mouse
- USB Receiver (stored in the mouse)
- USB-C Charging Cable
- User Manual
2. Initial Charging
Before first use, fully charge the mouse for approximately 1 hour. Connect the provided USB-C charging cable to the mouse's charging port and the other end to a USB power source (e.g., computer USB port, USB wall adapter). The visible battery indicator on the top of the mouse will show charging status and remaining battery level.

Image: The mouse connected via USB-C cable for charging, highlighting the charging port and the visible battery level indicator.
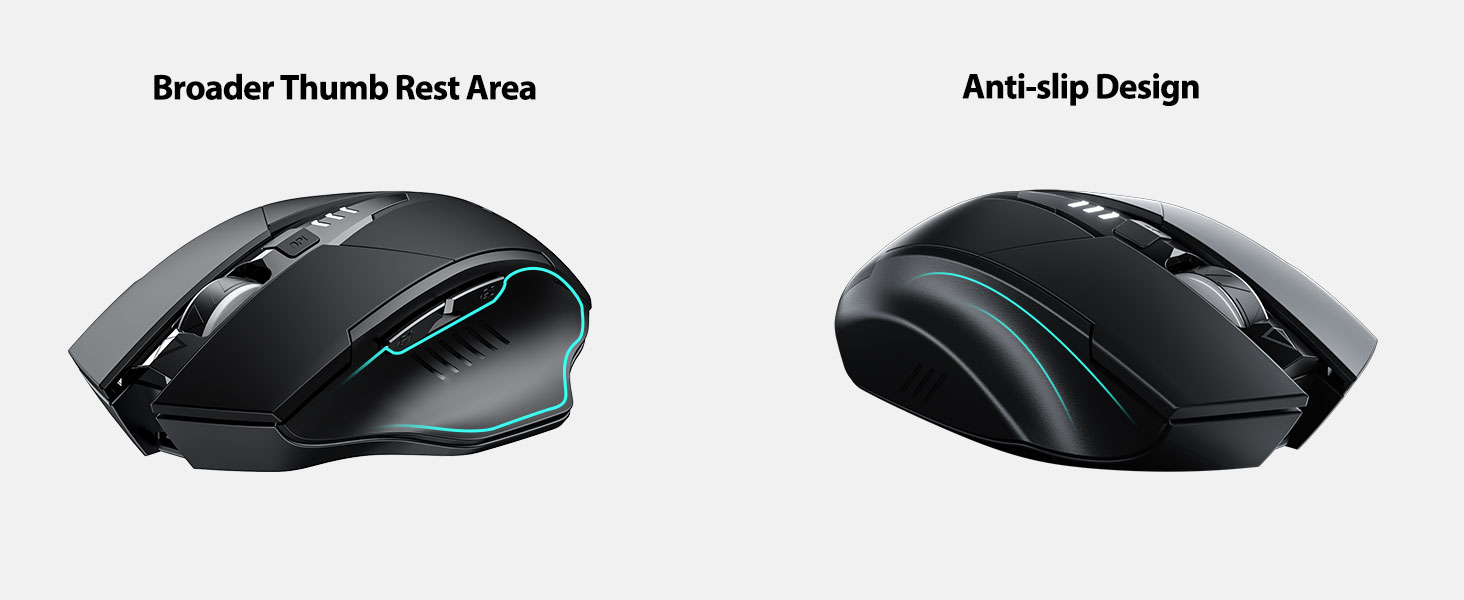
Image: A close-up of the mouse's top surface, showing the illuminated battery indicator displaying the current charge level.
3. Connecting the USB Receiver (2.4G Mode)
- Locate the USB receiver stored in the compartment on the bottom of the mouse.
- Remove the USB receiver.
- Insert the USB receiver into an available USB port on your computer or laptop.
- Turn on the mouse using the power switch located on the bottom.
- Your computer should automatically detect and install the necessary drivers. The mouse is ready for use.

Image: The underside of the mouse, illustrating the storage compartment for the USB receiver.

Image: The mouse in use on a desk, demonstrating its reliable 2.4G wireless connection with a laptop.
4. Compatibility
The 2.4G USB connected mode is compatible with any USB-enabled device and supports a wide range of operating systems, including:
- Windows 7/8/10/XP, Vista
- Mac OS System
- Android
- Chrome OS
- Linux kernel 2.6+

Image: The mouse positioned alongside icons representing Windows, Chrome OS, and Linux, illustrating its broad compatibility.
Operating Instructions
1. Power On/Off and Sleep Mode
Use the power switch on the bottom of the mouse to turn it on or off. To conserve battery, the mouse will automatically enter sleep mode after 5 minutes of inactivity. Click any button to wake it up.
2. DPI Adjustment
The mouse features 4 adjustable DPI levels: 800, 1200, 1600, and 2400. Press the DPI button located behind the scroll wheel to cycle through these settings. Each press will change the cursor speed, allowing you to select the sensitivity that best suits your task.
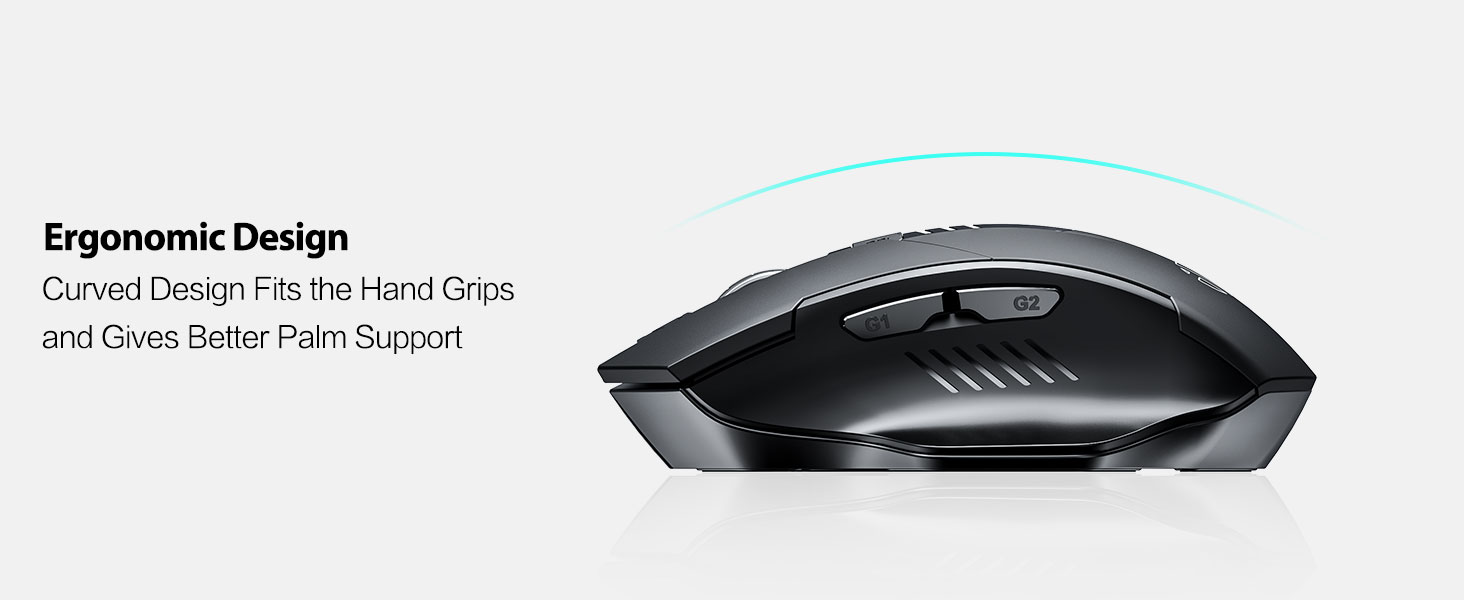
Image: An illustration showing the mouse and a graphic representing the adjustable DPI settings from 800 to 2400.

Image: A close-up view of the DPI controller button located on the top of the mouse.
3. Button Functions
The mouse is equipped with 6 efficient buttons:
- Left Click Button: Primary function, silent operation.
- Right Click Button: Secondary function, silent operation.
- Scroll Wheel: For vertical scrolling. Can also be pressed for middle-click functionality.
- DPI Button: Adjusts cursor sensitivity (800/1200/1600/2400 DPI).
- Side Buttons (G1, G2): Typically function as 'Forward' and 'Back' in web browsers and file explorers.

Image: The mouse on a desk, emphasizing its quiet left and right click buttons for reduced noise.

Image: A close-up view of the smooth scrolling wheel on the mouse.
4. Ergonomic Design
The mouse is designed for right-handed users with a curved shape and a broader thumb rest area to provide optimal support for the entire palm and fingers. This design aims to reduce pressure and tension during extended use.
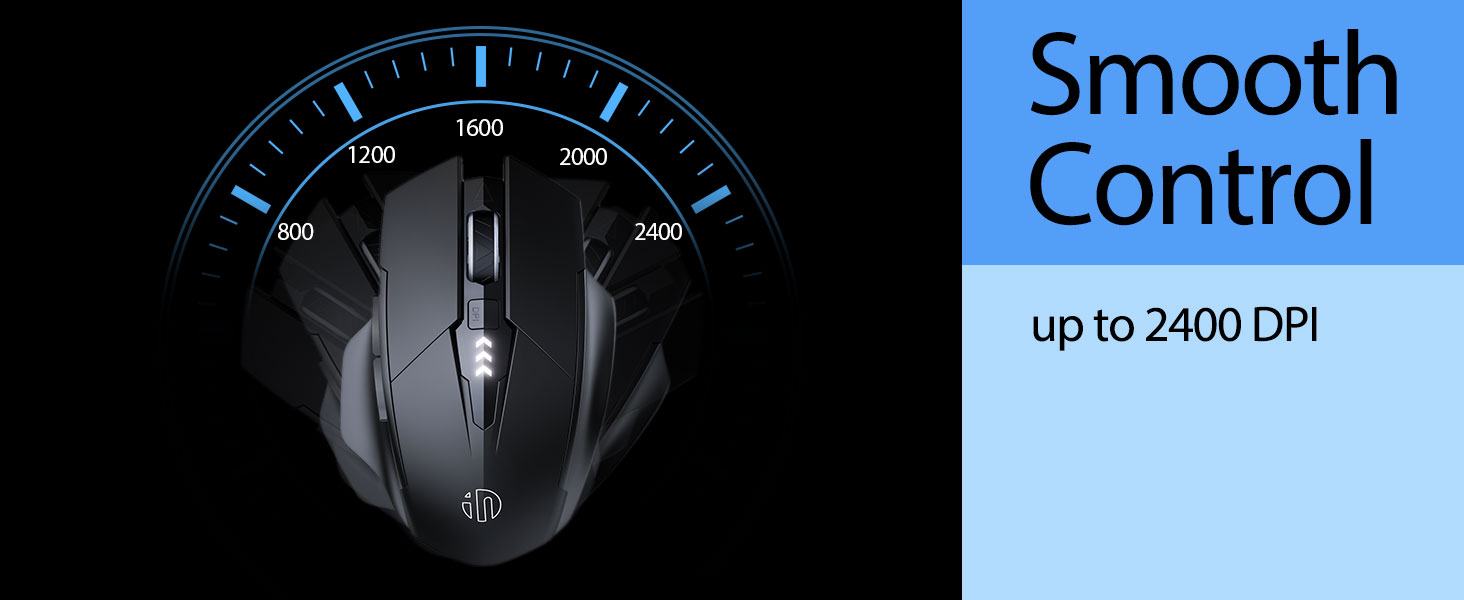
Image: An illustration demonstrating the ergonomic curve of the mouse, designed to fit the hand comfortably.

Image: Two views of the mouse, highlighting its broader thumb rest area and anti-slip design for improved grip and comfort.
Maintenance
1. Cleaning
To clean your mouse, gently wipe the surface with a soft, damp cloth. Avoid using harsh chemicals or abrasive materials, as these can damage the finish. Ensure no liquid enters the internal components.
2. Storage
When not in use for extended periods, store the mouse in a cool, dry place. It is recommended to turn off the mouse to preserve battery life. The USB receiver can be stored in its dedicated compartment on the mouse's underside.
3. Battery Care
The built-in 400mAh rechargeable battery is designed for long-lasting performance. For optimal battery health, avoid completely draining the battery frequently. Recharge the mouse when the visible indicator shows a low battery level. Do not expose the mouse to extreme temperatures.
Troubleshooting
| Problem | Possible Cause | Solution |
|---|---|---|
| Mouse not responding | Low battery; USB receiver disconnected; Mouse power off. | Charge the mouse; Re-insert USB receiver; Turn on the mouse. |
| Cursor movement is erratic or slow | Incorrect DPI setting; Dirty optical sensor; Unsuitable surface. | Adjust DPI using the DPI button; Clean the optical sensor; Use on a clean, non-reflective surface. |
| Mouse not charging | Faulty USB-C cable or power source. | Try a different USB-C cable or USB port/power adapter. |
| Side buttons (G1/G2) not working | Application does not support side button functions. | Ensure the application (e.g., web browser) is active and supports 'back'/'forward' commands. |
Specifications
- Model: B0FQCCP1VH
- Product Dimensions: 4.7 x 3.1 x 0.1 inches
- Item Weight: 4.2 ounces
- Battery: 1 Nonstandard Battery (400mAh, included)
- Connectivity Technology: 2.4G Wireless (USB Receiver)
- Movement Detection Technology: Optical
- DPI Levels: 800 / 1200 / 1600 / 2400 (Adjustable)
- Buttons: 6 (Left, Right, Scroll Wheel, DPI, G1, G2)
- Special Features: Ergonomic Design, LED Battery Level Display, Rechargeable, Silent Clicks (Left & Right Buttons)
Image: A diagram illustrating the physical dimensions of the INPHIC Wireless Mouse.
Product Video
Video: An overview of the INPHIC Wireless Rechargeable Mouse, demonstrating its features and ergonomic design.
Warranty and Support
For warranty information or technical support, please refer to the product packaging or contact the manufacturer directly. Keep your purchase receipt as proof of purchase.


