
1. Introduction
This manual provides detailed instructions for the safe and effective use of your POSEIDON Panda Design Wireless Tattoo Pen Machine Kit. Please read this manual thoroughly before operating the device and retain it for future reference.
2. Safety Information
Always prioritize safety when using tattoo equipment. Improper use can lead to injury or infection. This device is intended for professional use or supervised practice on synthetic skin. It is not intended for use by minors.
- Ensure all components are clean and sterilized before each use.
- Wear appropriate personal protective equipment, including gloves.
- Do not immerse the machine in liquids.
- Keep the device away from children and pets.
- Use only compatible and sterile needle cartridges.
- Disconnect power before cleaning or maintenance.
- Dispose of used needles and other contaminated materials according to local regulations.
3. Package Contents
Your POSEIDON Panda Design Wireless Tattoo Pen Machine Kit includes the following items:
- Panda Design Wireless Tattoo Pen Machine
- 1500mAh Battery (integrated)
- 20 Assorted Tattoo Needle Cartridges (5x1205RL, 5x1207RL, 5x1209RS, 5x1207CM)
- Grips
- Transfer Paper
- Marker Pen
- Ink Set (for practice use)
- Ink Cups
- Table Mats
- Practice Skin (3mm thickened)

Image: Overview of the POSEIDON Panda Design Wireless Tattoo Pen Machine Kit contents.
4. Product Overview
The POSEIDON Panda Design Wireless Tattoo Pen features a durable aluminum alloy construction and an advanced motor for consistent performance. It includes an LED display for monitoring voltage, working time, and battery status, along with intuitive paw-shaped buttons for control.
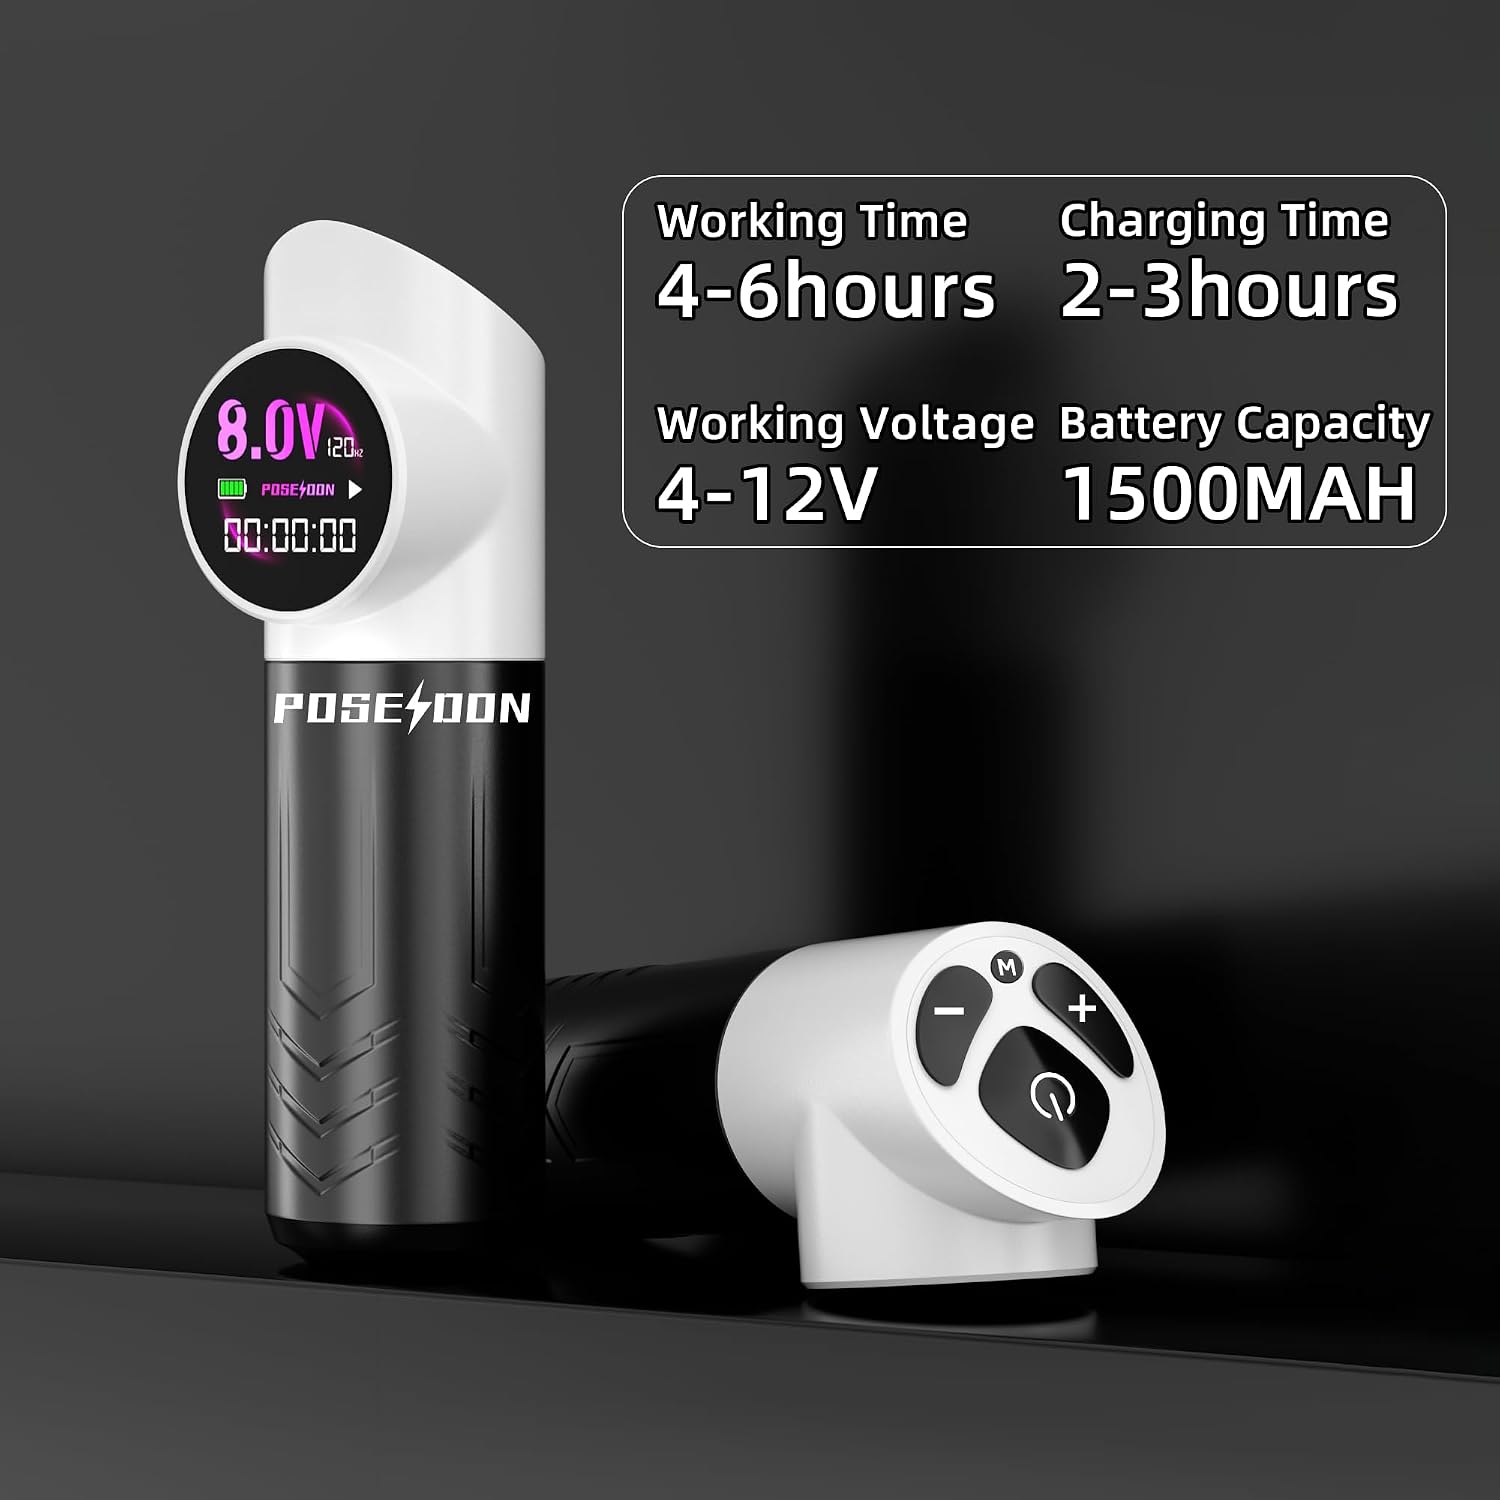
Image: Front view of the tattoo pen showing the LED display and key specifications like working time, charging time, working voltage, and battery capacity.

Image: Detailed view of the tattoo pen's internal motor, highlighting its construction and 8V 8000RPM performance.
5. Setup
5.1 Charging the Device
Before initial use, fully charge the tattoo pen. Connect the charging cable to the device and a suitable power source. The LED display will indicate charging status. A full charge typically takes 2-3 hours and provides 4-6 hours of working time.
5.2 Attaching Needle Cartridges
- Ensure the machine is turned off.
- Carefully insert a sterile needle cartridge into the front of the tattoo pen. Twist gently until it locks into place.
- The machine is compatible with most standard tattoo needle cartridges.

Image: The tattoo pen demonstrating its compatibility with a wide range of standard tattoo needles.
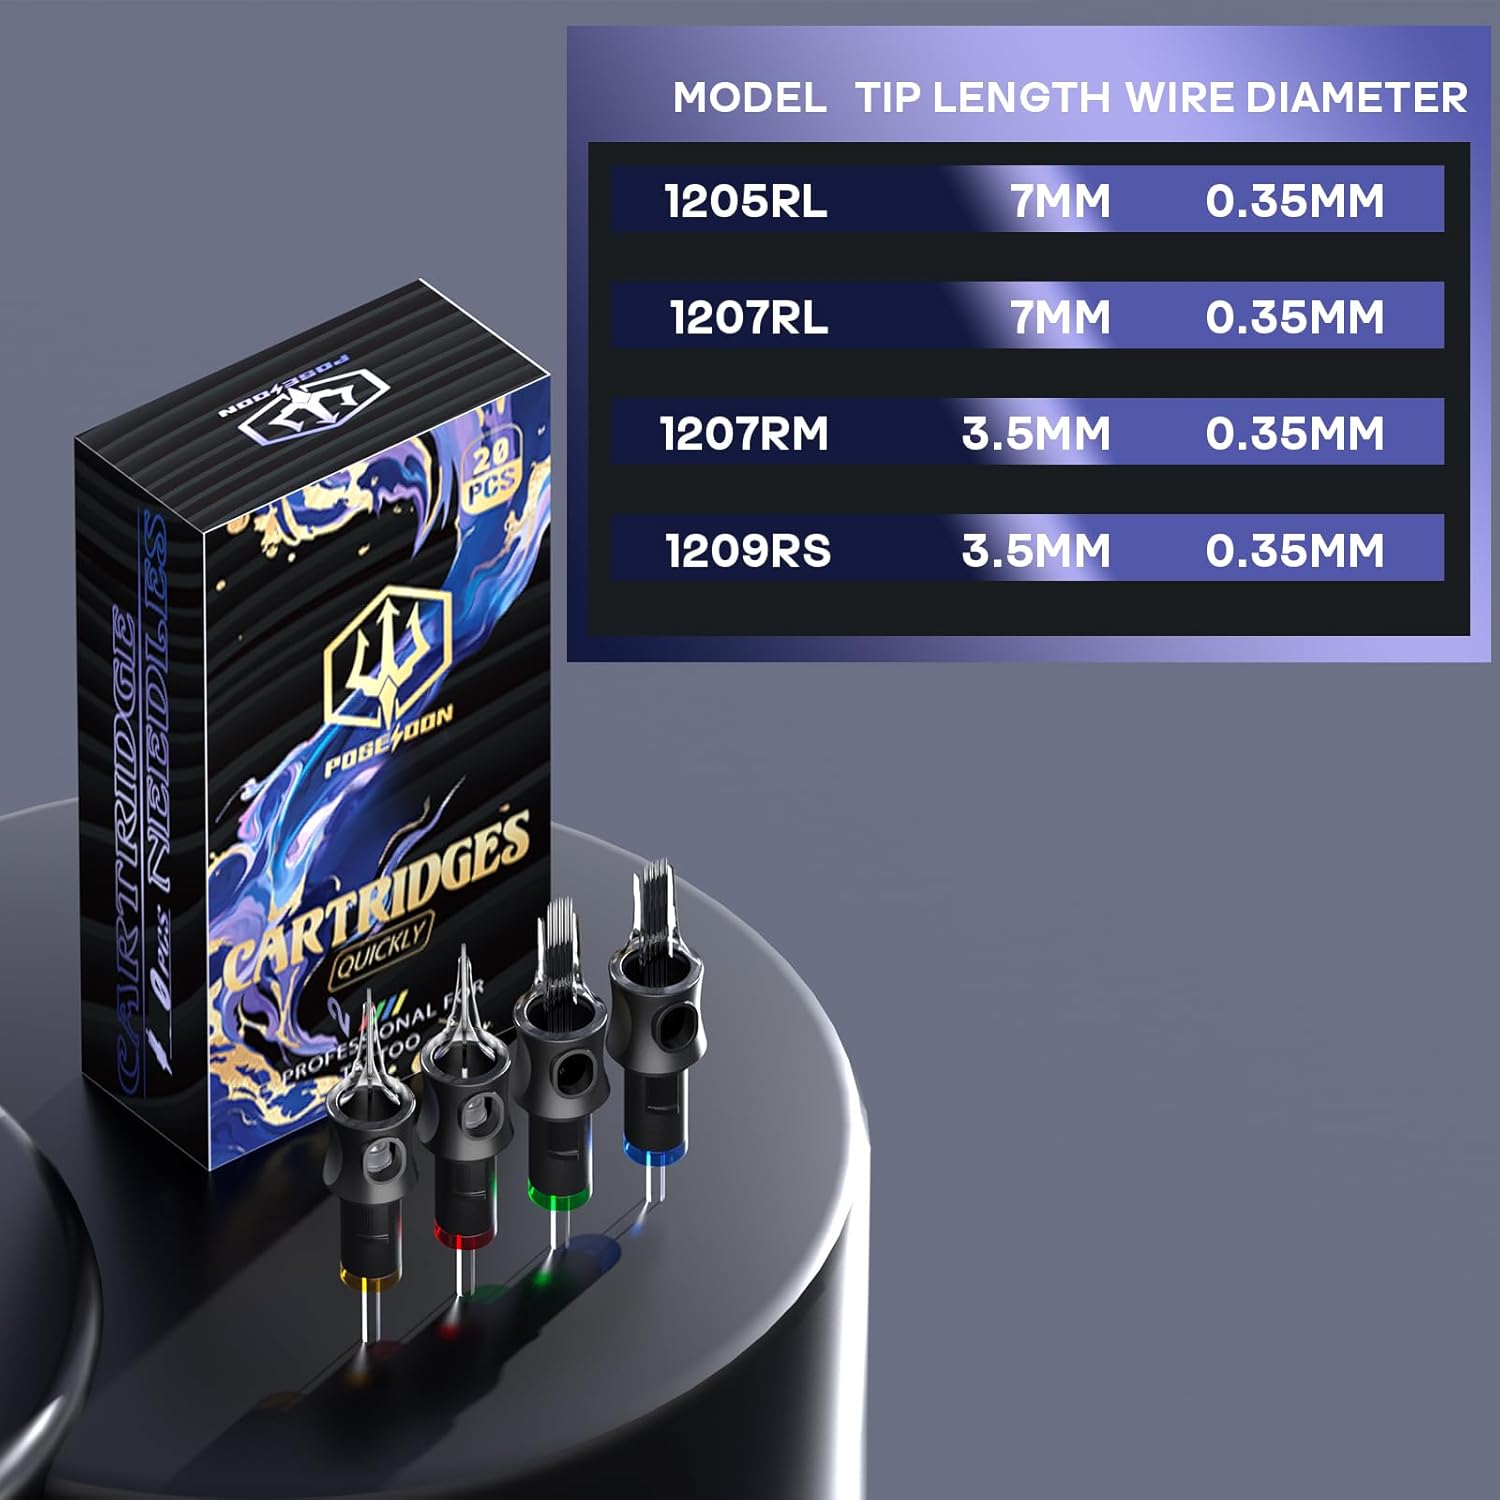
Image: A box containing 20 assorted tattoo cartridge needles, along with a chart detailing model, tip length, and wire diameter for various needle types (1205RL, 1207RL, 1207RM, 1209RS).
5.3 Adjusting Needle Depth
Twist the grip of the tattoo pen to adjust the needle depth to your desired setting. Ensure the needle is securely seated and moves smoothly.
6. Operating Instructions
6.1 Power On/Off
- To turn the device on or off, long-press the Power Key (center button) for 2 seconds.
- Tap the Power Key to start or pause operation.
6.2 Voltage Adjustment
- Tap the "+" or "-" keys to adjust the voltage in 0.1V increments.
- Long-press the "+" or "-" keys for rapid voltage adjustment.
- The voltage range is 4-12V.
6.3 Working Modes (Normal/Dot)
- Long-press the "M" key to enter Dot Mode for precise dotwork or stippling.
- Double-click the "M" key to switch between Force Start Mode and Normal Mode.
6.4 Session Timer
The integrated LED display includes a session timer to help track working duration. This can assist in managing client appointments and workflow.

Image: Close-up view of the tattoo pen's control buttons and LED display, detailing the operation guide for power, voltage, and mode selection.
Video: This video demonstrates the basic operation of the POSEIDON Panda Design Wireless Tattoo Pen, including powering on/off and adjusting voltage.

Image: Diagram illustrating the air hole design for smooth airflow within the tattoo cartridge, ensuring consistent ink output.
7. Maintenance
7.1 Cleaning the Machine
- After each use, disconnect the needle cartridge and wipe down the exterior of the machine with a disinfectant wipe or a cloth dampened with isopropyl alcohol.
- Do not allow liquids to enter the motor housing or charging port.
- Ensure the machine is completely dry before storage or next use.
7.2 Battery Care
- To prolong battery life, avoid fully discharging the battery frequently.
- Store the device in a cool, dry place when not in use.
- If storing for an extended period, charge the battery to approximately 50% capacity.
7.3 Storage
Store the tattoo pen and accessories in a clean, dry environment, away from direct sunlight and extreme temperatures.
8. Troubleshooting
| Problem | Possible Cause | Solution |
|---|---|---|
| Machine does not turn on | Low battery; Power button not pressed correctly | Charge the battery; Long-press the power button for 2 seconds |
| Inconsistent power/stalling | Low battery; Loose needle cartridge; Incorrect voltage setting | Recharge battery; Ensure needle cartridge is securely attached; Adjust voltage as needed |
| Needle not extending/retracting properly | Incorrect needle depth adjustment; Damaged needle cartridge | Adjust needle depth by twisting the grip; Replace with a new needle cartridge |
| LED display not working | Device malfunction | Contact customer support for assistance |
9. Specifications
| Feature | Detail |
|---|---|
| Model | Panda Design Tattoo Gun (B0FQBNZC2N) |
| Brand | POSEIDON |
| Material | Aluminum Alloy |
| Battery Capacity | 1500mAh Lithium Polymer |
| Working Voltage | 4-12V (adjustable in 0.1V increments) |
| Working Time | 4-6 hours per charge |
| Charging Time | 2-3 hours |
| Motor Speed | 8V 8000RPM |
| Modes | Normal Mode, Dot Mode, Force Start Mode |
| Display | LED Digital Display (Voltage, Timer, Battery) |
| Package Dimensions | 8.43 x 7.83 x 4.02 inches |
| Weight | 2.38 pounds |
| GTIN | 716597330047 |
10. Warranty and Support
For warranty information or technical support, please refer to the product packaging or contact POSEIDON customer service through the retailer where the product was purchased. Keep your purchase receipt as proof of purchase.