Product Overview
The ErGear Dual Monitor Arm is a full adjustable monitor mount designed for 13–32 inch flat or curved screens. It supports monitors weighing up to 19.8 lbs and is compatible with VESA mounting patterns of 75x75mm or 100x100mm. This stand aims to enhance your workspace ergonomics and organization.
Key Features:
- Wide Screen Compatibility: Fits most 13–32 inch flat or curved monitors, supporting up to 19.8 lbs, with VESA 75x75mm or 100x100mm patterns.
- Tool-Free VESA Mounting: Features an upgraded VESA plate for quick, three-step installation without tools.
- Dynamic Angle Adjustments: Offers precise height adjustments up to 17.5 inches, extension up to 18.1 inches, +80°/-50° tilt, ±90° swivel, and 360° rotation.
- Tidy Cable Management: Upgraded cable clips allow for easy organization, freeing up desk space.
- Built to Last: Engineered for long-term stability with an upgraded VESA head, 50% smaller gap, and tighter-fitting VESA panel. Tested for over 20,000 cycles.

Image: The ErGear Dual Monitor Arm supports monitors from 13 to 32 inches, with a maximum load of 19.8 lbs, and is compatible with 75x75mm or 100x100mm VESA patterns.
Package Contents
Before beginning installation, please ensure all parts are present and undamaged. Refer to the diagram below for a visual representation of the included components.
- Dual Monitor Arm Assembly (Upper and Lower Arms)
- Desk Mounting Base (C-Clamp and Grommet options)
- VESA Plates (x2)
- Hardware Kit (various screws, washers, Allen keys)
- Instruction Manual
Video: This video demonstrates the unboxing and shows all the components included in the ErGear Dual Monitor Arm package, including the arms, mounting options, and hardware.
Installation Guide
Step 1: Choose Your Mounting Option
The ErGear Dual Monitor Arm offers two installation methods: C-Clamp Mounting and Grommet Base Mounting. Select the option best suited for your desk.
C-Clamp Mounting:
This method is suitable for desks with a thickness between 0.39 inches and 2.56 inches. Secure the C-clamp to the edge of your desk, ensuring it is tight and stable.
Grommet Base Mounting:
This method is for desks with a pre-existing grommet hole or if you choose to drill one. It accommodates desk thicknesses between 0.39 inches and 2.95 inches. Insert the grommet bolt through the hole and secure it from underneath the desk.

Image: Two mounting options are available: C-Clamp for desk edges and Grommet Base for desks with a hole, each with specific thickness requirements.
Desk Compatibility Check:
Ensure your desk is compatible with the chosen mounting method. For C-clamp, verify sufficient contact surface width, height, and overall width. For both, a wooden desk is recommended, preferably without a crossbeam blocking the underside.

Image: Visual guide for checking desk compatibility, including required contact surface width, height, and overall width for secure mounting.
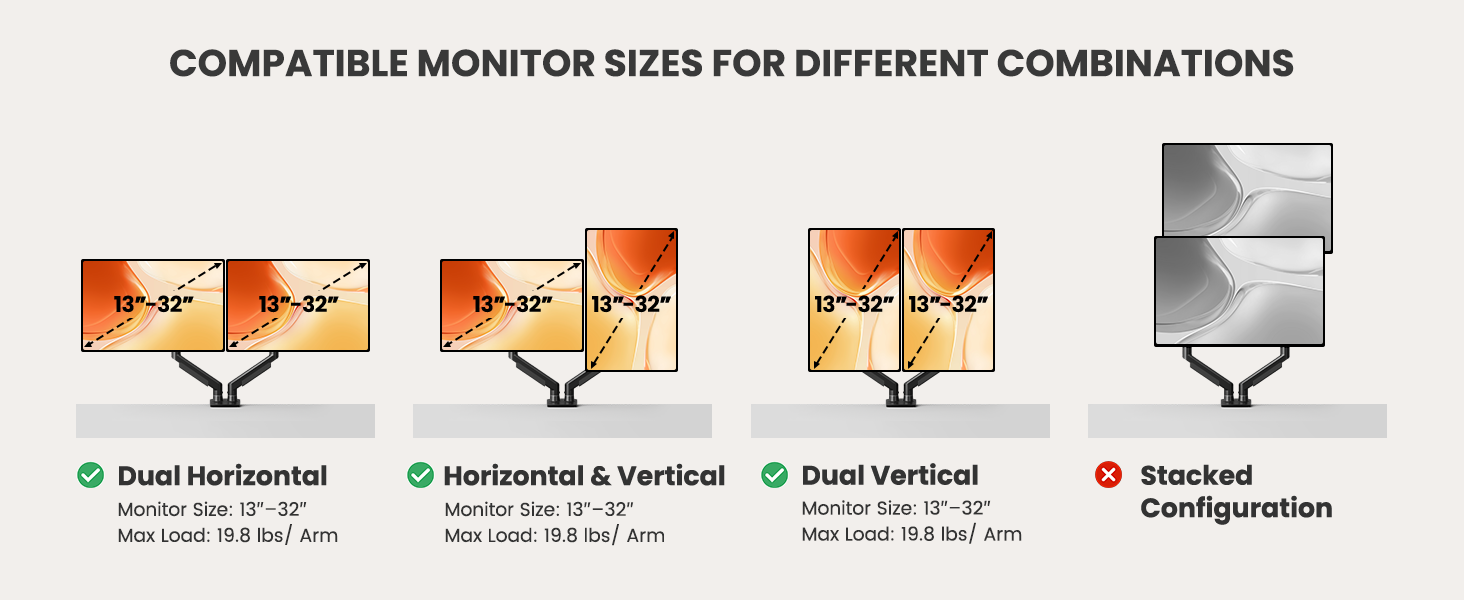
Image: This image shows that the monitor arm is compatible with wooden desks but not recommended for marble or glass surfaces.
Step 2: Assemble the Monitor Arm
Connect the upper and lower arm segments. Ensure they click securely into place. The arms are designed for easy assembly.
Step 3: Attach VESA Plate to Monitor
The VESA plate is compatible with 75x75mm or 100x100mm patterns. Align the plate with the screw holes on the back of your monitor. Use the provided screws and spacers as needed to secure the plate firmly. If your monitor has a pre-installed stand or cover, remove it first.
Image: This diagram illustrates how to locate VESA holes on a monitor, remove existing stands, and use VESA adapters if necessary.
Step 4: Mount Monitor to Arm
Once the VESA plate is attached to your monitor, carefully slide the monitor onto the arm's mounting head. The tool-free design allows for quick and secure attachment. Ensure the monitor is fully seated and stable.
Video: This video provides a step-by-step guide on how to install the monitor arm, including attaching the VESA plate and mounting the monitor.
Operating Instructions
Adjusting Your Monitor Arm
The ErGear Dual Monitor Arm offers extensive adjustability to achieve your desired viewing position. You can adjust height, tilt, swivel, and rotation.
- Height Adjustment: Raise or lower your monitors up to 17.5 inches.
- Extension: Extend your monitors up to 18.1 inches from the base.
- Tilt: Adjust the screen angle from +80° to -50°.
- Swivel: Rotate your monitors ±90° horizontally.
- Rotation: Rotate your monitors 360° for landscape or portrait orientation.

Image: This diagram shows the various adjustment capabilities of the monitor arm, including height, extension, tilt, swivel, and 360-degree rotation.
Video: This video demonstrates the smooth movement and adjustability of the monitor arm, allowing monitors to move up and down for an upgraded workspace setup.
Tension Adjustment
The monitor arm features a gas spring system that requires tension adjustment to match your monitor's weight. Use the provided Allen key to adjust the tension bolt located on the arm. Turn counterclockwise to increase tension (for heavier monitors) or clockwise to reduce tension (for lighter monitors).
Video: This video explains how to adjust the tension and tilt bolt on the monitor arm to ensure proper balance and prevent monitors from falling or rising unexpectedly.
Cable Management
Keep your workspace clean and organized with the integrated cable management system. The upgraded cable clips open easily without tools, allowing you to route your monitor and power cables neatly along the arm. This helps to reduce clutter and maintain a professional appearance.

Image: The upgraded cable clips on the monitor arm provide easy access and storage for cables, contributing to a tidy workspace.
Maintenance
Care and Maintenance
- Cleaning: Wipe the monitor arm with a soft, damp cloth. Avoid using abrasive cleaners or solvents that could damage the finish.
- Periodic Checks: Periodically check all screws and connections to ensure they remain tight and secure. Re-tighten if necessary.
- Gas Spring Adjustment: If your monitor's weight changes or if the arm's movement becomes too loose or stiff, re-adjust the gas spring tension as described in the Operating Instructions.
Troubleshooting
Common Issues and Solutions
- Monitor is falling down or rising up: This indicates incorrect gas spring tension. Refer to the
Related Documents - EGDMA70B-DS-UK

ErGear Desk Monitor Arm EGDMA69-SS: Installation Guide and Features
Comprehensive guide for installing and using the ErGear Desk Monitor Arm (EGDMA69-SS). Features include VESA compatibility, adjustable gas spring, swivel, tilt, and rotation for optimal monitor positioning. Includes safety information and step-by-step assembly instructions.
ErGear EGCM1/EGCM1W Dual Monitor Desk Mount - Instruction Manual
Comprehensive instruction manual for the ErGear EGCM1/EGCM1W dual monitor desk mount. Includes installation steps, safety guidelines, and compatibility checks for VESA patterns and weight.
ErGear Dual Desk Monitor Arm EODS15B/EODS15W Installation Manual
Comprehensive instruction manual for the ErGear Dual Desk Monitor Arm models EODS15B and EODS15W. Learn how to check compatibility, install the base using C-clamp or grommet mounting, attach monitor plates, hang monitors, adjust gas spring tension, and manage cables.
ErGear EGESD7 Electric Standing Desk - Installation Manual
Detailed installation guide for the ErGear EGESD7 electric standing desk, featuring height adjustment, memory settings, and a 63x28 inch surface. Includes specifications and setup instructions for creating an ergonomic workspace.
ErGear Electric Standing Desk Instruction Manual - Assembly and Operation Guide
Comprehensive instruction manual for the ErGear Electric Standing Desk (Models EGESD8B, EGESD8V). Learn how to assemble, operate, and troubleshoot your height-adjustable desk.
Ergear Electric Standing Desk MSESD202-80A User Manual and Assembly Guide
Comprehensive guide for the Ergear Electric Standing Desk (Model MSESD202-80A), including assembly instructions, safety information, operation of the controller, and troubleshooting.