
1. Introduction
This manual provides detailed instructions for the installation, configuration, and operation of the SOYO X99 BSF motherboard. It is designed to assist users in setting up their system correctly and efficiently. Please read this manual thoroughly before beginning the installation process.

Figure 1: SOYO X99 BSF Motherboard and included accessories, including the I/O shield, SATA cable, and CPU cooler mounting bracket.
2. Setup and Installation
Follow these steps for proper installation of your SOYO X99 BSF motherboard and its components.
2.1 Motherboard Layout

Figure 2: Detailed layout of the SOYO X99 BSF motherboard, highlighting key components and connectors such as the LGA2011-V3 CPU socket, DDR4 DIMM slots, M.2 NVMe slots, PCIe slots, and various headers.
2.2 CPU Installation
- Ensure the motherboard is placed on a non-conductive surface.
- Locate the LGA2011-V3 CPU socket. Open the CPU retention mechanism by releasing the two levers.
- Carefully align the CPU (Intel Xeon E5 LGA2011-V3 series) with the socket, ensuring the gold triangle on the CPU matches the triangle on the socket. Do not force the CPU into the socket.
- Close the retention mechanism by pressing down the levers until they lock into place.
- Apply thermal paste to the CPU and install the CPU cooler.
2.3 Memory (RAM) Installation
- Locate the four DDR4 DIMM slots.
- Open the clips at both ends of the DIMM slot.
- Align the memory module with the slot, ensuring the notch on the module matches the key in the slot.
- Press down firmly on both ends of the memory module until the clips snap into place. For optimal performance, install memory modules in the gray primary channels first.
2.4 Storage Device Installation
2.4.1 M.2 NVMe/SATA SSD Installation
- Locate the two M.2 slots on the motherboard. The upper slot supports NVMe (PCIe 3.0 x4) and SATA 3.0 protocols, while the lower slot supports NVMe (PCIe 3.0 x4) only.
- Insert the M.2 SSD into the slot at a 30-degree angle.
- Gently push down the SSD and secure it with the provided screw.
2.4.2 SATA 3.0 Device Installation
- Connect one end of the SATA data cable to one of the four SATA 3.0 interfaces on the motherboard.
- Connect the other end of the SATA data cable to your SATA hard drive or SSD.
- Connect a SATA power cable from your power supply unit (PSU) to the storage device.
2.5 Power Connections
- Connect the 24-pin ATX power connector from your PSU to the 24-pin ATX power socket on the motherboard.
- Connect the 8-pin EPS power connector from your PSU to the 8-pin EPS power socket near the CPU.
2.6 Front Panel and Internal Headers
Refer to Figure 2 for the location of these headers.
- FPANEL (Front Panel Header): Connect the power switch, reset switch, power LED, and HDD activity LED from your PC case.
- USB 2.0 Header: Connects to front panel USB 2.0 ports (expandable to 2 ports).
- USB 3.0 Header: Connects to front panel USB 3.0 ports (expandable to 2 ports).
- Front Audio Header: Connects to the front panel audio jacks.
- CPU Fan Header (4-pin): Connect your CPU cooler fan.
- System Fan Header (3-pin): Connect a case fan.
- JBAT (CMOS Clear): Used to clear CMOS settings.
- JLPC (LPC Debug): For debugging purposes.
- SPEAK (System Speaker): Connects to a system speaker for POST codes.
- TPM Header (14-pin): For connecting a compatible TPM 2.0 module.
2.7 Rear I/O Panel Connections
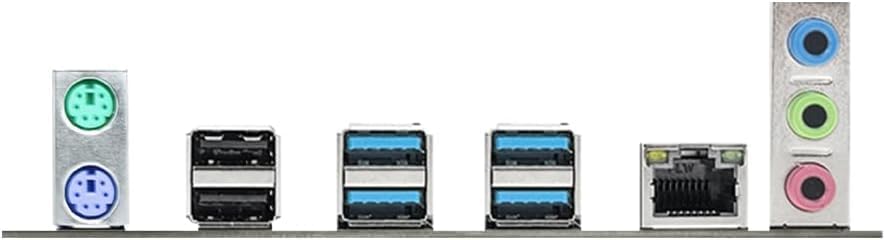
Figure 3: Close-up view of the rear input/output panel, showing PS/2 ports, USB 2.0 ports, USB 3.0 ports, RJ45 LAN port, and audio jacks.
- PS/2 Ports: 1 x PS/2 Keyboard port (green), 1 x PS/2 Mouse port (purple).
- USB 2.0 Ports: 2 x USB 2.0 ports (black).
- USB 3.0 Ports: 4 x USB 3.0 ports (blue).
- RJ45 LAN Port: 1 x Gigabit Ethernet port for network connection.
- Audio Jacks: 1 x Line Out (green), 1 x MIC In (pink), 1 x Line In (blue) for audio devices.
2.8 PCIe Card Installation
- Locate the PCIe x16 3.0 slot (PCIe1, from CPU) for graphics cards and the PCIe x1 2.0 slot (PCIe2, from PCH) for other expansion cards.
- Remove the corresponding slot cover from your PC case.
- Align the expansion card with the PCIe slot and press down firmly until it is seated correctly.
- Secure the card with a screw to the PC case.
3. Operating Instructions
3.1 Initial Boot-Up
- After all components are installed and connected, ensure the power supply is switched on.
- Press the power button on your PC case.
- The system should power on, and you should see the BIOS/UEFI splash screen.
3.2 BIOS/UEFI Setup
To enter the BIOS/UEFI setup utility, press the designated key (commonly DEL or F2) during the initial boot-up sequence. Here you can configure system settings, boot order, and monitor hardware status.
3.3 Driver Installation
After installing your operating system, install the necessary drivers for the motherboard components. These typically include chipset drivers, LAN drivers, and audio drivers. Drivers are usually provided on a support CD or can be downloaded from the SOYO official website.
4. Maintenance
- Keep Clean: Regularly clean dust from inside your PC case, especially around fans and heatsinks, to ensure optimal airflow and prevent overheating. Use compressed air for best results.
- BIOS Updates: Periodically check the SOYO website for BIOS/UEFI updates. Updates can improve system stability, compatibility, and performance. Follow the update instructions carefully to avoid system damage.
- Cable Management: Ensure cables are neatly routed to prevent obstruction of airflow and to facilitate future maintenance.
5. Troubleshooting
If you encounter issues, refer to the following common troubleshooting steps:
- No Power: Check all power connections (24-pin ATX, 8-pin EPS) from the PSU to the motherboard. Ensure the PSU is switched on.
- No Display: Verify that the graphics card is properly seated in the PCIe slot and that the monitor cable is securely connected to the graphics card. If using integrated graphics (not applicable for this motherboard as it requires a dedicated GPU), ensure the monitor is connected to the motherboard's video output.
- System Instability/Crashes: Check memory modules for proper seating. Test memory with diagnostic tools. Ensure CPU cooler is properly installed and making good contact. Check for overheating.
- Component Not Detected: Re-seat the component (e.g., RAM, M.2 SSD, SATA drive, PCIe card). Check power and data cables. Ensure drivers are installed.
- Clear CMOS: If the system fails to boot after making BIOS changes, clear the CMOS by shorting the JBAT header pins or removing the CMOS battery for a few minutes.
6. Specifications
| Feature | Specification |
|---|---|
| Manufacturer | SOYO |
| Model Number | X99 BSF |
| CPU Socket | LGA 2011-3 |
| Compatible Processors | Intel Xeon E5 LGA2011-V3 series (e.g., E5-2603V3, 2666V3, 2673V3, 2680V3, 2678V3, 2696V3, 2684V4, 2696V4) |
| Chipset Type | Intel X99 |
| Memory Technology | DDR4 |
| Memory Slots | 4 x DDR4 DIMM slots |
| Max Memory Capacity | Up to 128GB (32GB x 4) |
| Supported Memory Speed | 2133/2400MHz (Max) |
| Storage Interfaces | 2 x M.2 slots (Upper: NVMe PCIe 3.0 x4/SATA3.0; Lower: NVMe PCIe 3.0 x4) 4 x SATA3.0 interfaces |
| PCIe Slots | 1 x PCIe x16 3.0 slot (from CPU) 1 x PCIe x1 2.0 slot (from PCH) |
| Audio Chip | Realtek ALC897 HD Audio |
| LAN Chip | Realtek RTL8111H Gigabit Ethernet |
| Rear I/O Ports | 2 x USB 2.0, 4 x USB 3.0, 1 x RJ45, 1 x Line Out, 1 x MIC In, 1 x Line In, 1 x PS/2 Keyboard, 1 x PS/2 Mouse |
| Internal Headers | 1 x FPANEL, 1 x 4-pin CPU fan, 1 x 3-pin system fan, 1 x JBAT, 1 x JLPC, 1 x SPEAK, 1 x USB 2.0 (exp. 2 ports), 1 x USB 3.0 (exp. 2 ports), 1 x Front Audio, 1 x 14-pin TPM |
| Power Input | 24-pin ATX + 8-pin EPS connectors |
| Dimensions | 220 x 190mm (4-layer PCB) |
| Platform Compatibility | Windows 11 |
7. Warranty and Support
For warranty information, please refer to the documentation included with your purchase or contact your retailer. For technical support, driver downloads, and further assistance, please visit the official SOYO website or contact SOYO customer service.
You can find more information about SOYO products at their official store: SOYO Store on Amazon.