1. Introduction
This manual provides essential information for the safe operation, assembly, maintenance, and troubleshooting of your Varstrom VS10 Electric Scooter. Please read this manual thoroughly before first use to ensure proper function and to prevent injury or damage.
2. Safety Guidelines
Operating an electric scooter carries inherent risks. Adhere to the following safety guidelines:
- Always wear a helmet and appropriate protective gear (knee pads, elbow pads).
- Observe all local traffic laws and regulations.
- Do not ride in wet conditions, heavy rain, or on slippery surfaces.
- Avoid riding at night or in low visibility conditions. If unavoidable, ensure all lights are functional and wear reflective clothing.
- Maintain a safe speed and distance from other vehicles and pedestrians.
- Do not perform stunts or sudden maneuvers.
- Ensure the scooter is fully charged and all components are secure before each ride.
- Maximum load capacity is 120 kg. Do not exceed this limit.
- This scooter is intended for adult use only.
3. Package Contents
Verify that all items are present in the package:
- Varstrom VS10 Electric Scooter
- Charger
- User Manual (this document)
4. Product Overview
Familiarize yourself with the main components of your Varstrom VS10 Electric Scooter.

Image: Side view of the Varstrom VS10 Electric Scooter, showcasing its overall design and components.
Key Features:
- Motor: 500W Brushless DC Motor for efficient power delivery.
- Battery: 48V 15.6Ah Lithium-ion battery for extended range.
- Tires: 10-inch puncture-proof solid tires.
- Suspension: Front dual suspension and rear dual suspension for ride comfort.
- Lighting: Integrated headlight, bright rear brake light, and dual handlebar turn signals.
- Display: Intelligent LED screen showing speed, battery level, and riding mode.
- Control: App control via smartphone for various settings.
- Portability: Quick folding mechanism for easy storage and transport.
5. Assembly and Setup
5.1 Unfolding the Scooter
The scooter is shipped in a folded state. Follow these steps to unfold it:
- Place the scooter on a flat surface.
- Locate the folding mechanism latch near the base of the steering column.
- Release the latch and carefully lift the steering column until it locks into the upright position. Ensure the locking mechanism is fully engaged.
- Raise the handlebars and secure them if they are folded down.

Image: Illustration showing the folded and unfolded dimensions of the Varstrom VS10 Electric Scooter, demonstrating its compact storage capability.
5.2 Initial Charging
Before your first ride, fully charge the scooter's battery.
- Ensure the scooter is powered off.
- Locate the charging port, typically on the side of the deck.
- Connect the charger to the charging port, then plug the charger into a standard wall outlet.
- The charging indicator on the charger will typically show red during charging and turn green when fully charged.
- Charging time is approximately 6-7 hours. Do not overcharge.

Image: Detailed view of the scooter's battery compartment and charging specifications, highlighting the 48V 15.6Ah battery and 6-7 hour charging time.
6. Operation
6.1 Power On/Off
- To power on: Press and hold the power button on the LED display until the screen illuminates.
- To power off: Press and hold the power button until the screen turns off.
6.2 LED Display and Controls
The integrated LED display provides real-time information and control options.

Image: Close-up of the scooter's intelligent LED screen, displaying current speed, selected gear (riding mode), and battery level.
- Speed Display: Shows current riding speed.
- Battery Display: Indicates remaining battery charge.
- Gear Shift (Riding Modes): Press the 'Set/Switch' button to cycle through Eco, Drive, and Sport modes.
6.3 Riding Modes
- Eco Mode: Lowest speed, maximum range, suitable for beginners or crowded areas.
- Drive Mode: Medium speed, balanced performance for daily commuting.
- Sport Mode: Highest speed, maximum power, for experienced riders on open roads.
6.4 Cruise Control
To activate cruise control, maintain a consistent speed for a few seconds. The scooter will beep, and cruise control will engage. To disengage, press the brake lever or accelerate.
6.5 Lighting System
The scooter is equipped with a comprehensive lighting system for visibility and safety.
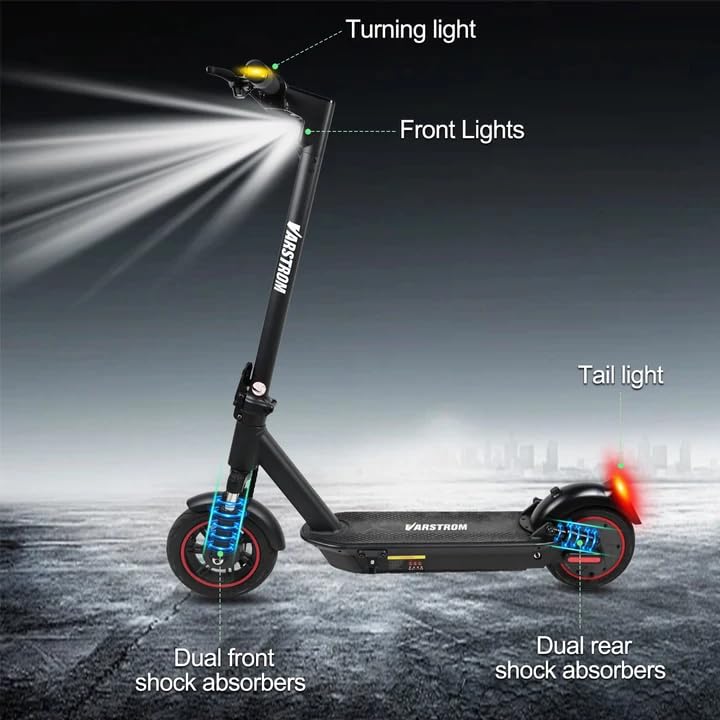
Image: Diagram illustrating the scooter's front lights, turning lights on the handlebars, tail light, and the dual front and rear shock absorbers.
- Headlight: Turn on/off via the app or dedicated button (if available).
- Tail Light/Brake Light: The rear light illuminates when the scooter is powered on and brightens when the brake is applied.
- Turn Signals: Activate turn signals using the controls on the handlebars to indicate your turning direction.
6.6 Braking
The scooter features front braking. Apply the brake lever gently to slow down. For emergency stops, apply firm and even pressure to the brake lever. Avoid sudden braking at high speeds.
6.7 Tuya Smart App Control
Enhance your riding experience by connecting your scooter to the Tuya Smart app.

Image: Screenshot of the Tuya Smart App interface, showing options to unlock the scooter, control cruise, turn on/off headlights, switch riding modes, and set speed limits.
- Download the 'Tuya Smart' app from your smartphone's app store.
- Ensure your scooter is powered on and Bluetooth is enabled on your phone.
- Open the app and follow the instructions to add a new device. You may need to hold the brake and power button simultaneously to activate Bluetooth pairing mode.
- Through the app, you can:
- Unlock/Lock the scooter remotely.
- Adjust lights.
- Switch riding modes.
- Set cruise control.
- Toggle units (km/mph).
- View real-time ride data.
- Enable/disable zero start (safety feature).
7. Maintenance
7.1 Battery Care
- Charge the battery regularly, even if not in use, to maintain its health.
- Avoid completely draining the battery.
- Store the scooter in a cool, dry place away from direct sunlight and extreme temperatures.
- Use only the provided charger.
7.2 Cleaning
Wipe the scooter with a damp cloth. Do not use high-pressure water jets or immerse the scooter in water, as this can damage electrical components.
7.3 Tire Inspection
Although the tires are puncture-proof solid tires, regularly inspect them for any signs of damage, cracks, or embedded debris.
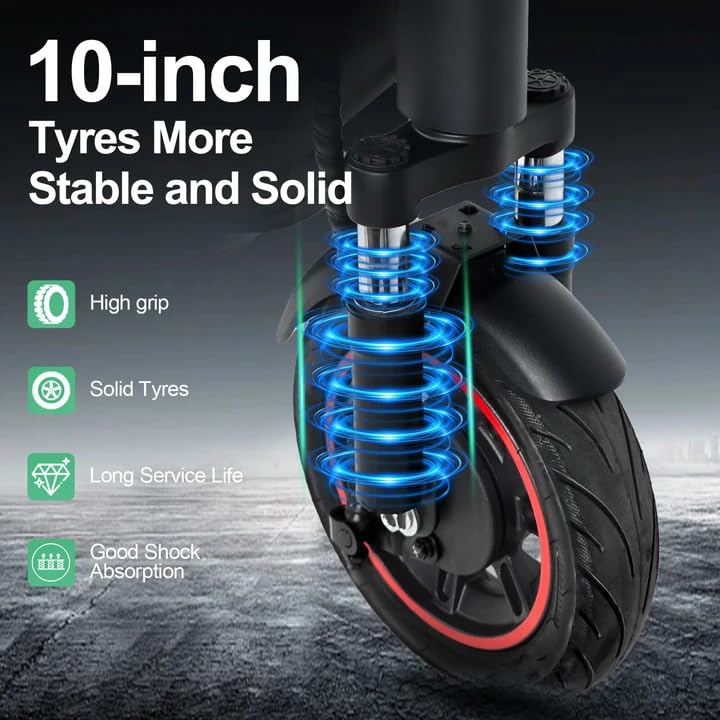
Image: Close-up of the scooter's 10-inch solid tires and dual suspension system, emphasizing stability and shock absorption.
8. Troubleshooting
| Problem | Possible Cause | Solution |
|---|---|---|
| Scooter does not power on | Low battery; Loose connections; Power button malfunction | Charge the battery; Check all visible connections; Contact support if issue persists. |
| Reduced range or power | Low battery; Overload; Cold weather; Tire damage | Fully charge battery; Ensure load is within limits; Battery performance decreases in cold; Inspect tires. |
| App not connecting | Bluetooth off; Scooter not in pairing mode; App issue | Ensure phone Bluetooth is on; Activate scooter's Bluetooth pairing mode (brake + power button); Restart app/phone. |
| Brakes not responsive | Brake cable loose or damaged | Inspect brake cable and lever; Seek professional service if necessary. |
9. Specifications
| Parameter | Value |
|---|---|
| Motor | 500W Brushless (50N·m torque) |
| Battery | 48V 15.6Ah Lithium |
| Max Range | Up to 60 km per charge |
| Max Speed | 25 km/h |
| Charging Time | 6-7 hours |
| Tires | 10-inch Puncture-Proof Solid Tires |
| Suspension | Front Dual Suspension + Rear Dual Suspension |
| Max Load | 120 kg |
| Climbing Angle | 15° |
| Unfolding Size (LWH) | 117 x 53 x 120 cm |
| Folding Size (LWH) | 117 x 53 x 56 cm |
| Weight | 19.6 kg |
| Special Features | Digital Display, Foldable, Rechargeable, App Control, Cruise Control, Turning Indicator Light |

Image: Cutaway view illustrating the 500W brushless DC motor, highlighting its power and efficiency, alongside key performance metrics.
10. Warranty and Support
For warranty information, technical support, or service inquiries, please refer to the purchase documentation or contact your retailer. Keep your proof of purchase for warranty claims.


