
Starway SW90TW
Starway SW90TW 9 kg Twin Tub Semi-Automatic Washing Machine User Manual
Model: SW90TW
1. Introduction
Thank you for choosing the Starway SW90TW 9 kg Twin Tub Semi-Automatic Washing Machine. This manual provides essential information for the safe and efficient use of your appliance. Please read these instructions carefully before operating the washing machine and retain them for future reference.
This appliance is designed for household use only. It features separate wash and spin tubs, offering flexibility and efficiency for your laundry needs.
2. Safety Instructions
To reduce the risk of fire, electric shock, or injury, observe the following basic precautions:
- Ensure the power supply voltage matches the rating label on the machine.
- Do not operate the machine with a damaged power cord or plug.
- Keep children away from the washing machine during operation.
- Do not immerse the appliance, power cord, or plug in water or other liquids.
- Unplug the machine from the power outlet when not in use or before cleaning.
- Do not wash or spin waterproof materials or clothes that float easily, as this may cause abnormal vibration.
- Do not open the spin tub lid until the spin cycle has completely stopped.
- Ensure the machine is placed on a stable, level surface.
3. Product Overview
3.1 Components
The Starway SW90TW washing machine consists of a wash tub and a spin tub, along with control knobs for various functions.

Image 3.1: Front view of the Starway SW90TW washing machine. This image displays the overall design, including the two top-loading lids for the wash and spin tubs, and the control panel located at the top rear of the machine.
3.2 Control Panel
The control panel features three main rotary knobs to manage washing and spinning operations.
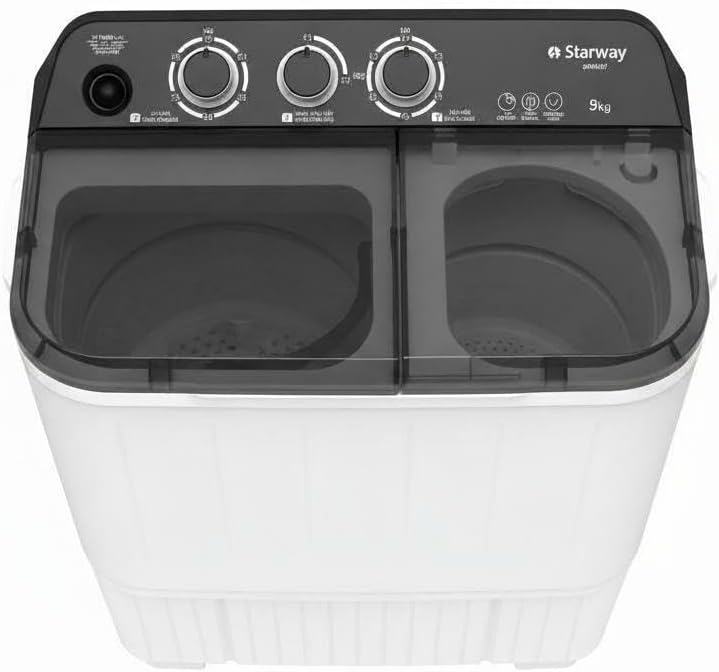
Image 3.2: Top view of the control panel. From left to right, the knobs are typically for Wash Timer, Wash Program (Gentle/Normal/Drain), and Spin Timer. Indicators for Wash, Rinse, and Spin cycles are also visible.
- Wash Timer Knob: Sets the washing duration.
- Wash Program Knob: Selects wash intensity (Gentle, Normal) or drains water.
- Spin Timer Knob: Sets the spinning duration for the spin tub.
4. Setup
4.1 Unpacking
Carefully remove the washing machine from its packaging. Inspect for any damage during transit. Retain packaging materials for potential future transport or service.
4.2 Placement
- Place the machine on a firm, level surface to minimize vibration and noise during operation.
- Ensure there is adequate space around the machine for ventilation and access.
- Avoid direct sunlight or placement near heat sources.
4.3 Water and Drain Connections
- Connect the water inlet hose to a cold water tap. Ensure a secure connection to prevent leaks.
- Position the drain hose to allow for proper water drainage. The drain hose should be placed lower than the bottom of the machine to ensure gravity drainage.
4.4 Power Connection
- Plug the power cord into a grounded electrical outlet. The machine operates on 220 Volts.
- Do not use extension cords or adapters.
5. Operating Instructions
5.1 Washing Cycle
- Sort laundry by fabric type and color.
- Open the wash tub lid and load clothes into the wash tub. Do not overload.
- Add appropriate amount of detergent directly into the wash tub.
- Fill the wash tub with water to the desired level.
- Close the wash tub lid.
- Turn the Wash Program Knob to select either "Gentle" for delicate items or "Normal" for regular laundry.
- Turn the Wash Timer Knob to set the desired washing time (e.g., 10-15 minutes). The machine will start washing.
- Once the wash cycle is complete, turn the Wash Program Knob to "Drain" to empty the water from the wash tub.
5.2 Rinsing Cycle
- After draining the wash water, refill the wash tub with clean water.
- Turn the Wash Program Knob to "Normal" or "Gentle" and set the Wash Timer Knob for 3-5 minutes to rinse the clothes.
- Drain the rinse water by turning the Wash Program Knob to "Drain". Repeat rinsing if necessary.
5.3 Spinning Cycle
- Carefully transfer the washed and rinsed clothes from the wash tub to the spin tub. Distribute clothes evenly to prevent imbalance.
- Close the spin tub lid securely.
- Turn the Spin Timer Knob to set the desired spinning time (e.g., 3-5 minutes). The machine will start spinning.
- Once the spin cycle is complete, wait for the spin tub to come to a complete stop before opening the lid and removing clothes.
6. Maintenance
Regular maintenance ensures the longevity and optimal performance of your washing machine.
6.1 Cleaning the Exterior
- Wipe the exterior of the machine with a soft, damp cloth.
- Do not use abrasive cleaners or solvents.
6.2 Cleaning the Lint Filter
The lint filter collects lint and debris during washing. Clean it regularly to maintain washing efficiency.

Image 6.1: Interior of the wash tub, highlighting the removable lint filter. The filter is typically located on the side wall of the wash tub and can be detached for cleaning.
- Locate the lint filter inside the wash tub.
- Gently pull out the filter.
- Remove any accumulated lint and debris.
- Rinse the filter under running water.
- Reinsert the clean filter back into its position.
6.3 Storage
- If storing the machine for an extended period, drain all water from the tubs and hoses.
- Wipe the interior and exterior dry.
- Store in a dry, well-ventilated area.
7. Troubleshooting
Refer to the table below for common issues and their solutions.
| Problem | Possible Cause | Solution |
|---|---|---|
| Machine does not start | No power supply; Lid not closed properly | Check power plug and outlet; Ensure lids are securely closed |
| Water does not drain | Drain hose blocked or improperly positioned; Drain knob not set to "Drain" | Clear drain hose; Ensure hose is lower than machine base; Turn Wash Program knob to "Drain" |
| Excessive vibration/noise during spin | Uneven load in spin tub; Machine not level | Redistribute clothes evenly; Adjust machine to be level |
| Poor washing performance | Overloading; Insufficient detergent; Dirty lint filter | Reduce load size; Use correct amount of detergent; Clean lint filter |
8. Specifications
| Feature | Detail |
|---|---|
| Brand | Starway |
| Model | SW90TW |
| Type | Twin Tub Semi-Automatic Washing Machine |
| Capacity | 9 Kilograms |
| Dimensions (D x W x H) | 50 x 82 x 97 cm |
| Item Weight | 25 Kilograms |
| Voltage | 220 Volts |
| Noise Level | 77 Decibels (Spin Cycle) |
| Material | Plastic |
| Special Features | High Efficiency |
| Included Components | Drain Hose, Power Cord |
9. Warranty and Support
For warranty information and customer support, please refer to the warranty card included with your purchase or contact your local Starway service center. Keep your purchase receipt as proof of purchase for warranty claims.
Note: The product is SASO Approved, ensuring compliance with Saudi Arabian Standards Organization regulations.
Ask a question about this manual
Ask about setup, troubleshooting, compatibility, parts, safety, or missing instructions. Manuals+ will review the question and use this page’s manual context to help answer it.