1. Introduction
This manual provides detailed instructions for the installation, operation, and maintenance of your PGST QEK-A107S-B Home Alarm System. This system offers comprehensive security for your home with WiFi and GSM connectivity, a 4.3-inch touch screen, and smart app integration. Please read this manual thoroughly before using the product to ensure proper function and safety.

Image: The PGST QEK-A107S-B alarm system main panel with a 4.3-inch touch screen display.
2. Safety Information
- Ensure the alarm host is installed in a dry, stable location, away from direct sunlight and extreme temperatures.
- Use only the provided power adapter.
- Do not attempt to disassemble or repair the device yourself. Contact customer support for assistance.
- Keep the device and accessories out of reach of children.
- Ensure proper ventilation around the alarm host.
3. Package Contents
Verify that all items are present in your package:
- 1 x Alarm Host (Main Panel)
- 2 x Door/Window Sensors (with battery)
- 2 x Wireless PIR Motion Detectors (with battery)
- 2 x Remote Controls (with battery)
- 2 x RFID Tags
- 1 x Wired Siren (120dB)
- 1 x User Manual
- 1 x Charger/Power Adapter
- Mounting Screws
4. Product Overview
The PGST QEK-A107S-B alarm system features a central host with a 4.3-inch TFT display, an SOS button, RFID card sensing area, and a speaker. The back panel includes mounting holes and an anti-prying switch for enhanced security.

Image: Front view of the alarm host showing the 4.3-inch TFT display and dimensions (160mm/6.3in width, 98mm/3.86in height, 19mm/0.748in depth).
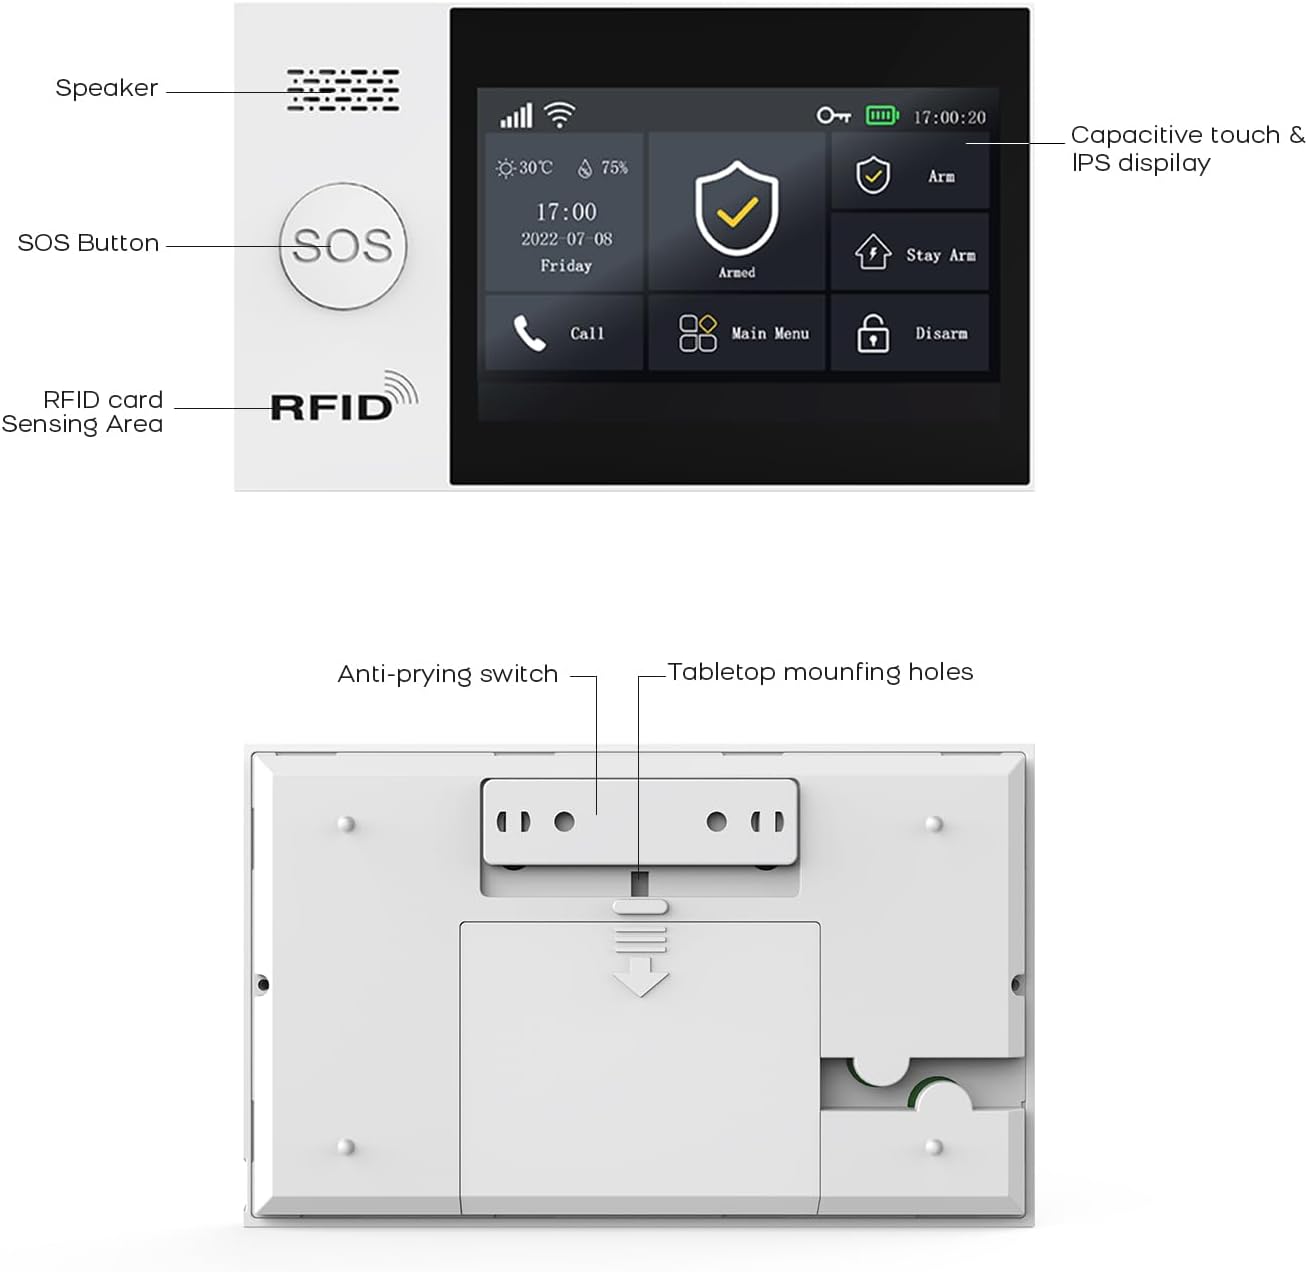
Image: Back view of the alarm host, highlighting the anti-prying switch and tabletop mounting holes.
5. Setup
5.1. Powering On
Connect the alarm host to the power source using the provided charger. The system includes a 1000 mAh backup lithium polymer battery, allowing it to operate even during power outages for approximately 5.5 hours.

Image: Alarm host display indicating low power consumption and battery status.
5.2. SIM Card Installation (GSM)
The system supports a GSM SIM card for remote notifications via SMS and calls, especially useful in areas without Wi-Fi coverage. Insert a 2G GSM SIM card into the designated slot on the alarm host. Ensure the SIM card is active and has credit if required for calls/SMS.
5.3. WiFi Configuration
The alarm host connects to your home Wi-Fi network (2.4 GHz only, 5G is not supported) via the 'Smart Life' or 'Tuya Smart' application.
- Step 1: Power on the alarm base. Open the package and insert the data cable. On the host, navigate to: Menu → Wi-Fi → Soft AP Configuration.
- Step 2: Download the 'Smart Life' or 'Tuya Smart' app from your phone's app store and enable Bluetooth.
- Step 3: Add the alarm base to the app. If the alarm model is not shown, you can add it from the top right corner of the app. On your phone, navigate to: Smart Life App → Add Devices → Sensors → Alarm → Wi-Fi Blinking.

Image: Visual guide for Wi-Fi setup using the Smart Life mobile application.
5.4. Pairing Sensors and Accessories
The system supports up to 100 wireless storage locations for accessories. Refer to the alarm host's manual section on 'Accessory Pairing' to add door sensors, PIR detectors, remote controls, and RFID tags.
5.5. Mounting the Alarm Host
The alarm host can be mounted on a wall using the provided screws or placed on a tabletop. Ensure it is securely fixed to prevent tampering. The anti-prying switch on the back will trigger an alarm if the unit is forcibly removed from its mounting.

Image: Example placement of alarm system components within a home, including the alarm host, door sensor, motion sensor, and IP camera.
6. Operating Instructions
6.1. Arming and Disarming
The system offers various arming modes:
- Full Arm: Activates all sensors.
- Stay Arm (Home Arm): Activates perimeter sensors (e.g., door/window sensors) while allowing movement inside.
- Disarm: Deactivates all sensors.
These modes can be controlled via the touch screen, remote control, or the Smart Life/Tuya app.
6.2. App Control (Smart Life/Tuya)
The 'Smart Life' or 'Tuya Smart' app allows remote control and parameter configuration. You can arm/disarm, monitor status, receive instant alerts, and manage all paired devices from anywhere.
6.3. Voice Control (Alexa, Google Assistant)
The system is compatible with Amazon Alexa and Google Assistant. You can use voice commands to arm or disarm your home security system.

Image: Demonstrates voice control integration with Alexa and Google Assistant for arming the system.
6.4. Two-Way Voice Intercom
The alarm host supports two-way voice communication, allowing you to make and receive calls, and send voice messages through the system, functioning like a fixed-line phone via the GSM SIM card.

Image: Depicts the two-way voice intercom feature, enabling communication through the alarm panel.
6.5. SOS Function
In case of an emergency, press the SOS button on the alarm host or remote control. The system will immediately send alerts and make calls to pre-programmed emergency numbers.
6.6. Timer Function
Program up to 4 sets of timing schedules for automatic arming and disarming of the system according to your daily routine.

Image: Illustrates the smart app remote control feature with programmable timing for arming and disarming.
6.7. Delay Function
Customize the entry and exit delay times for the alarm system through the app. This allows you time to enter or exit your property before the alarm is fully armed or triggered.
7. Maintenance
7.1. Battery Replacement for Sensors
The system will send notifications to your app when wireless sensor batteries are low. Replace batteries promptly to ensure continuous protection.
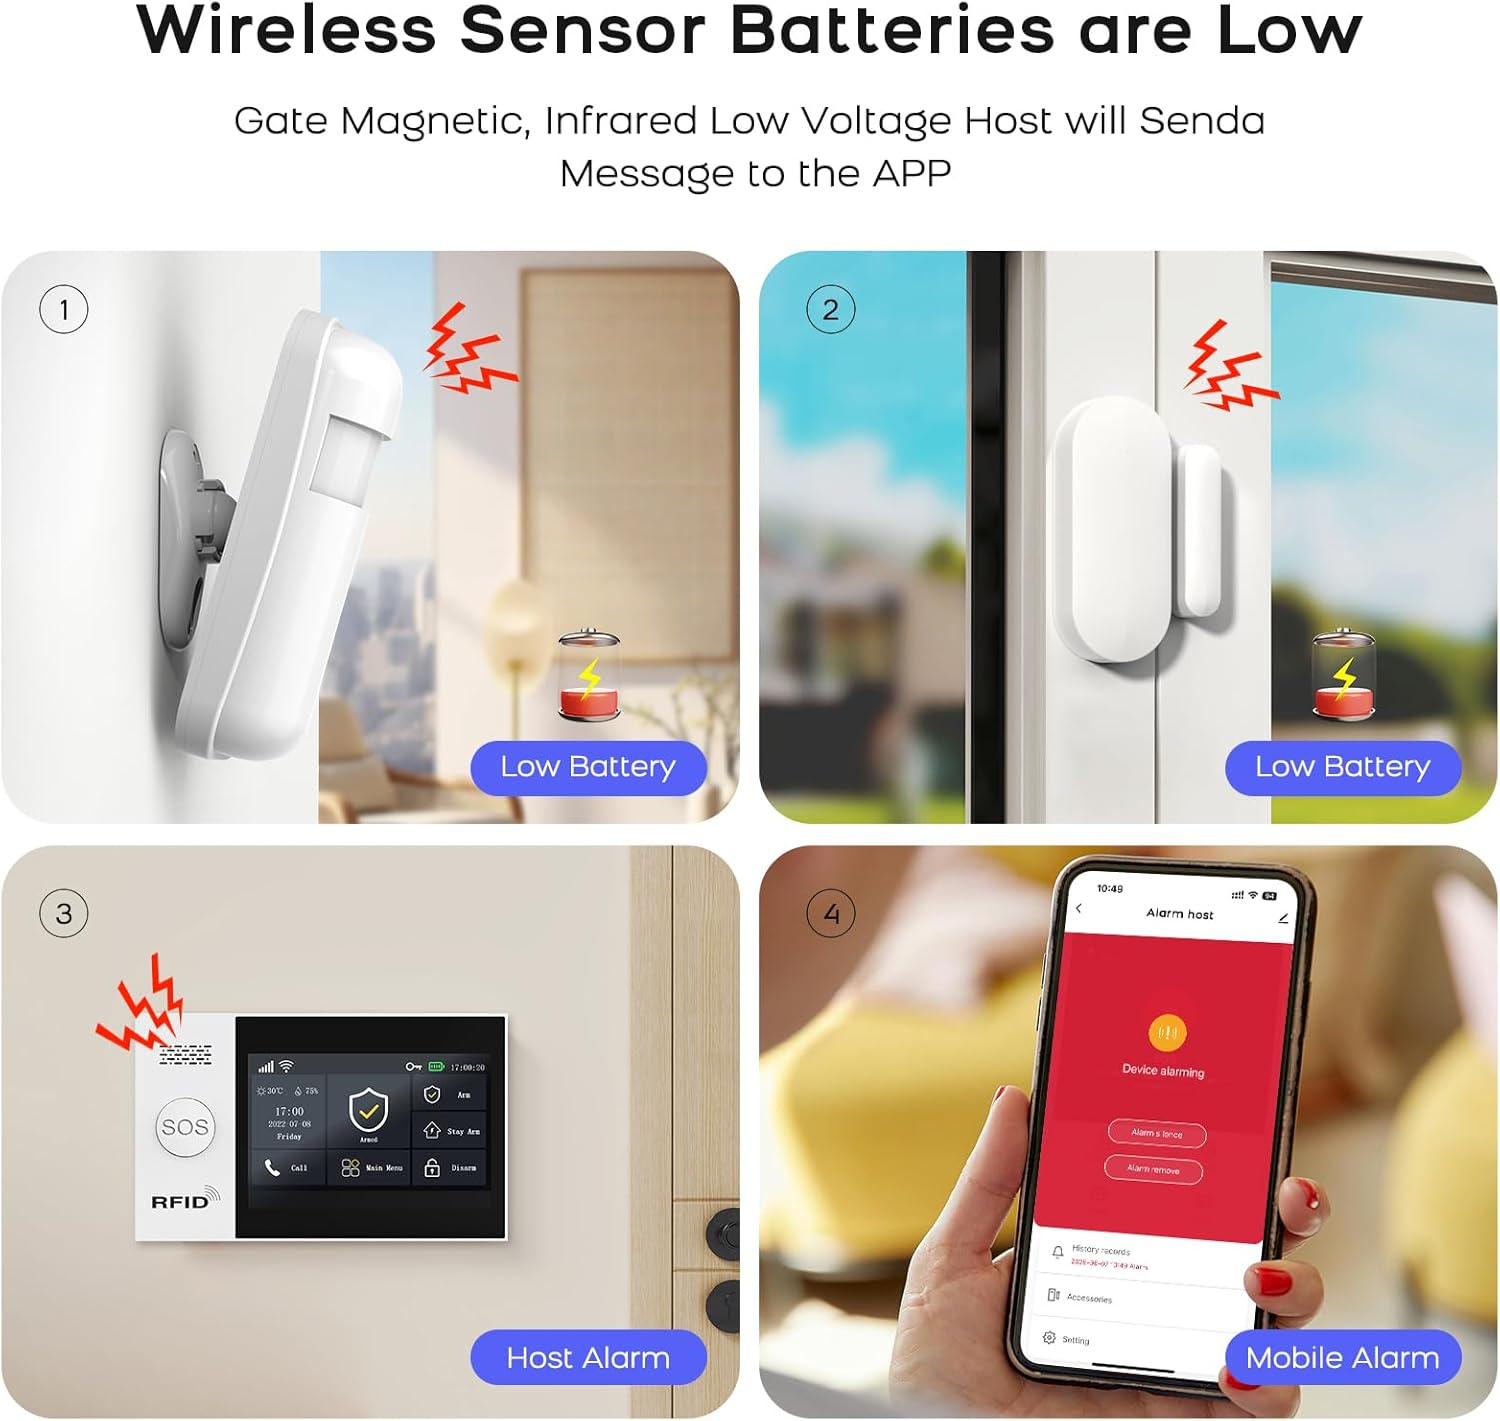
Image: Illustrates low battery warnings for wireless sensors, displayed on the sensors, alarm host, and mobile app.
7.2. Cleaning
Wipe the alarm host and sensors with a soft, dry cloth. Do not use liquid cleaners or abrasive materials.
8. Troubleshooting
- No Wi-Fi Connection: Ensure your Wi-Fi network is 2.4 GHz. Check your Wi-Fi password and router settings. Restart the alarm host and try connecting again.
- SIM Card Not Recognized: Ensure the SIM card is correctly inserted and active. Verify it is a 2G GSM SIM card.
- Sensor Not Pairing: Follow the pairing instructions in the manual carefully. Ensure sensors are within range of the alarm host and have fresh batteries.
- False Alarms: Check sensor placement to avoid triggering by pets or environmental factors. Adjust sensitivity settings if available.
- No App Notifications: Ensure the Smart Life/Tuya app has necessary permissions on your phone and that your phone has an active internet connection.
9. Specifications
| Feature | Specification |
|---|---|
| Model Number | QEK-A107S-B |
| Manufacturer | PGST |
| Dimensions (Host) | 18 x 12 x 3 cm (7.09 x 4.72 x 1.18 inches) |
| Weight (Host) | 600 g (1.32 lbs) |
| Display | 4.3-inch TFT Touch Screen |
| Connectivity | WiFi (2.4 GHz only), GSM (2G) |
| Power Source | Battery (Lithium Polymer) |
| Battery Capacity | 1000 mAh (approx. 5.5 hours backup) |
| Material | Plastic |
| Installation Method | Self-adhesive / Wall-mounted |
| Compatible Apps | Smart Life, Tuya Smart |
| Voice Assistant Compatibility | Amazon Alexa, Google Assistant |
| Siren Output | 120 dB (wired siren included) |
10. Warranty Information
Please refer to the manufacturer's official website or your purchase documentation for detailed warranty information regarding the PGST QEK-A107S-B Home Alarm System. Warranty terms typically cover manufacturing defects for a specified period from the date of purchase.
11. Customer Support
For technical assistance, troubleshooting, or any inquiries regarding your PGST QEK-A107S-B Home Alarm System, please contact PGST customer service. Contact details can typically be found on the manufacturer's website or in your product packaging.


