
Introduction
Thank you for choosing the Flamaker ADL250911 5-Drawer Tall Dresser. This manual provides essential information for the safe assembly, proper use, and maintenance of your new furniture. Please read these instructions carefully before beginning assembly and retain them for future reference.
Safety Information
Your safety is paramount. Please observe the following precautions:
- Anti-Tipping Device: Always install the included anti-tipping device to secure the dresser to a wall. This prevents accidental tipping, which can cause serious injury or death, especially to children.
- Weight Limits: Do not overload drawers. Distribute weight evenly. The top surface has a limited weight capacity.
- Assembly: Assemble the dresser on a soft, clean surface to prevent scratches. Ensure all fasteners are securely tightened before use. Periodically check and re-tighten all connections.
- Children: Do not allow children to climb on or play with the dresser. Keep small parts away from children during assembly.

Image: Illustration of the anti-tipping device, showing how to secure the dresser to the wall to prevent accidents. A child is shown interacting with a dresser, highlighting the importance of this safety feature.
Setup and Assembly
This dresser features a simple assembly design. Follow the steps below for proper setup.
Before You Begin:
- Verify all parts are present according to the included parts list (refer to the separate assembly diagram for detailed component identification).
- Gather necessary tools: typically a screwdriver and possibly a hammer.
- Clear a spacious area for assembly.
Assembly Steps:
- Assemble the main frame of the dresser according to the provided diagrams. Ensure all panels are correctly oriented.
- Attach the curved stabilizing base to the bottom of the dresser. This design enhances stability and weight distribution.
- Install the drawer slide rails onto the dresser frame. Ensure they are level and securely fastened.
- Assemble each of the five drawers. Attach the metal handles to the drawer fronts.
- Carefully insert the assembled drawers into their respective slots on the dresser frame.
- Install the anti-tipping device to the back of the dresser and secure it to a wall stud using appropriate hardware.
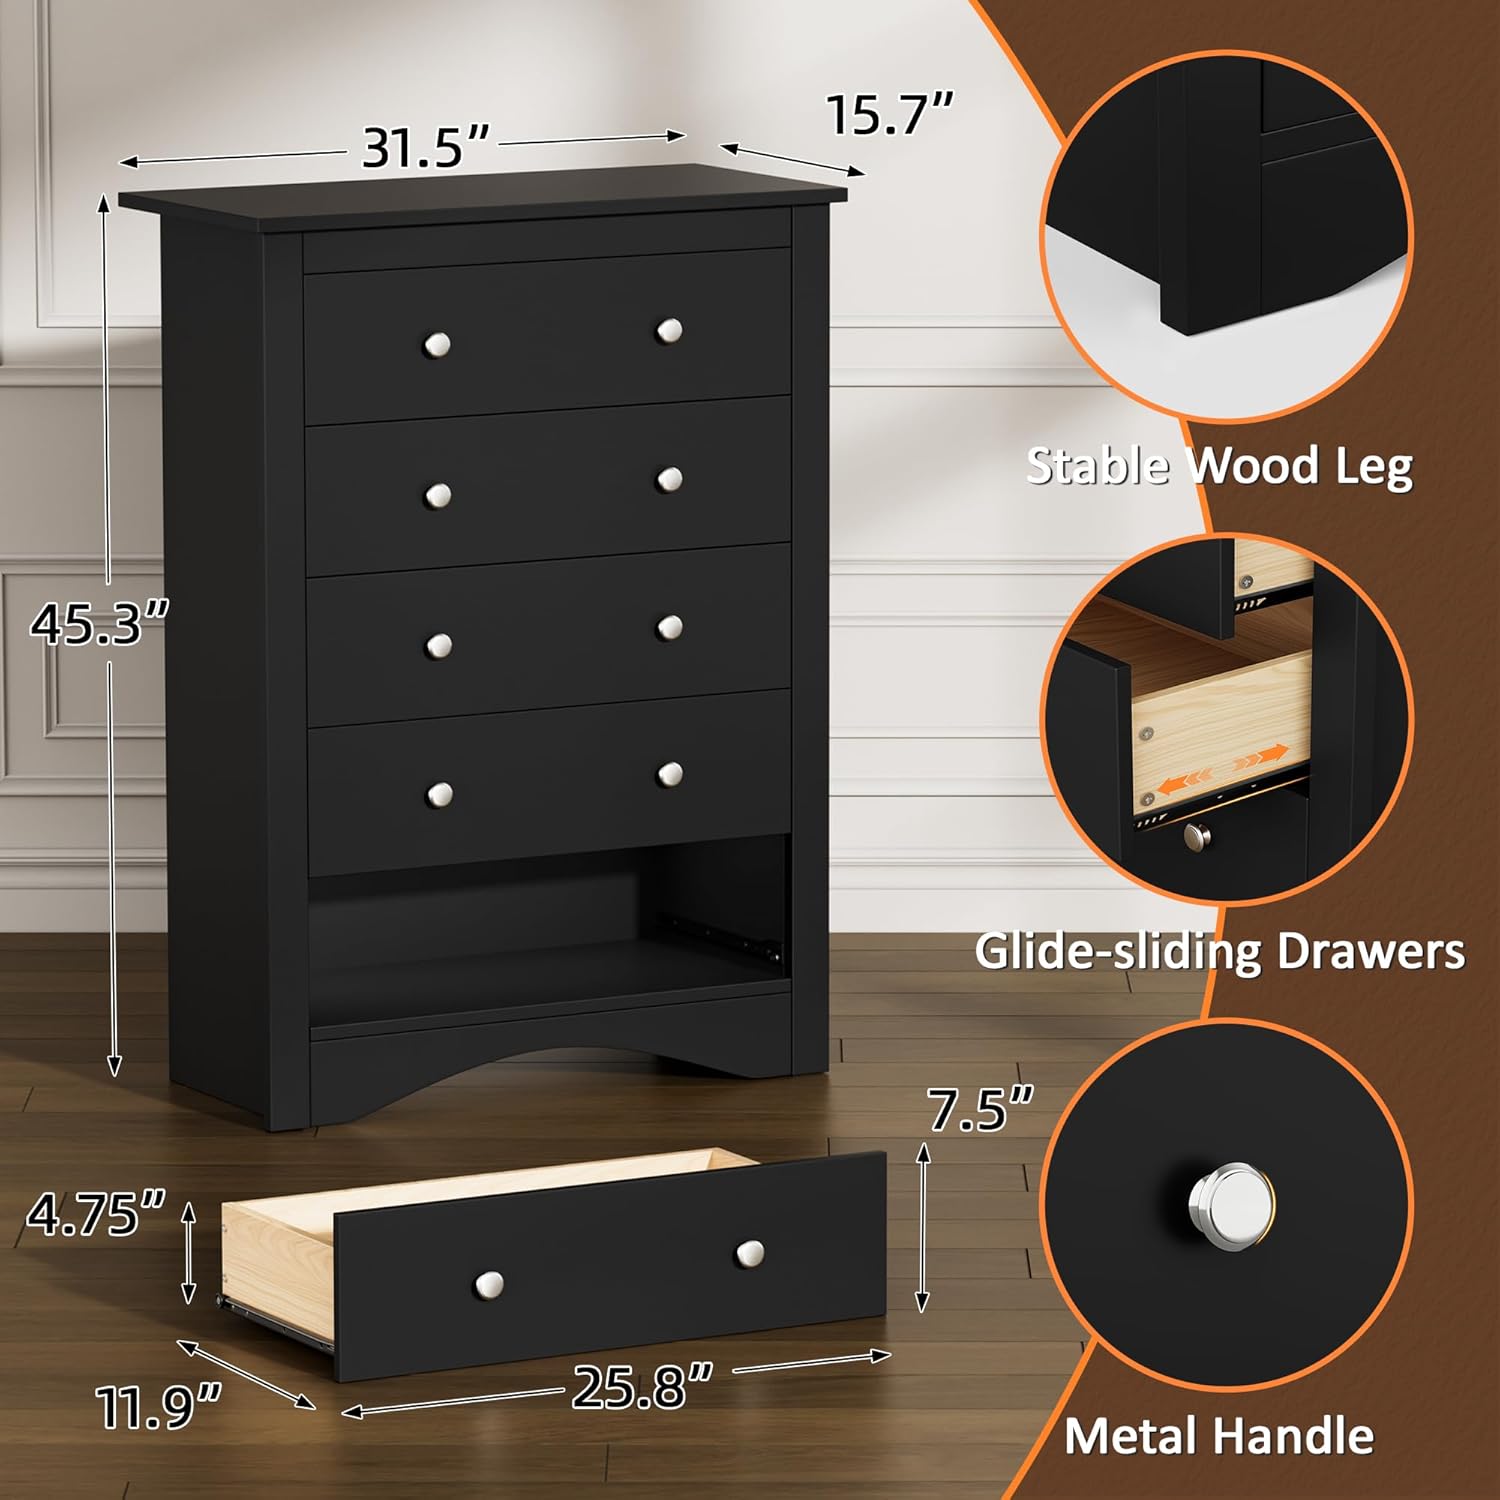
Image: Detailed view of the dresser with key dimensions (45.3"H x 31.5"W x 15.7"D) and features like stable wood legs, glide-sliding drawers, and metal handles highlighted.
Operating Instructions
The Flamaker 5-Drawer Tall Dresser is designed for efficient storage in various rooms.
Drawer Usage:
- Each drawer features smooth-gliding rails for easy opening and closing.
- Utilize the five spacious drawers to organize clothing, accessories, documents, or other household items.
- To open a drawer, gently pull the metal handle. To close, push the drawer firmly until it is fully seated.

Image: A drawer filled with various items, demonstrating the ample storage capacity. The internal dimensions of the drawer are shown as 25.8"W x 11.9"D x 7.5"H.

Image: A visual representation of the dresser's storage capabilities, showing icons for various items like T-shirts, pants, skirts, hats, scarves, and socks, indicating its versatility for organizing different types of belongings.
Maintenance
Regular maintenance will help preserve the appearance and functionality of your dresser.
- Cleaning: Wipe surfaces with a soft, damp cloth. Avoid harsh chemicals or abrasive cleaners, which can damage the finish.
- Tightening: Periodically check all screws and fasteners and re-tighten them as needed to ensure structural integrity and prevent wobbling.
- Drawer Rails: If drawers become stiff, apply a small amount of silicone lubricant to the slide rails.
- Spills: Clean up spills immediately to prevent staining or damage to the engineered wood material.
Troubleshooting
If you encounter issues with your dresser, refer to the following common problems and solutions:
| Problem | Possible Cause | Solution |
|---|---|---|
| Drawers do not slide smoothly or get stuck. | Misaligned drawer rails, debris in rails, or loose fasteners. | Check that drawer rails are properly aligned and securely fastened. Clean any debris from the rails. Apply silicone lubricant if necessary. |
| Dresser feels wobbly or unstable. | Loose assembly fasteners. | Ensure all screws and bolts are fully tightened. Verify the dresser is on a level surface. |
| Drawer falls out easily. | Drawer stop mechanism not engaged or damaged. | Inspect the drawer rails and drawer components for proper installation of any built-in stop mechanisms. Ensure drawers are not overloaded. |
Specifications
- Brand: Flamaker
- Model Name: Tall Dresser for Bedroom
- Item Model Number: ADL250911
- Product Dimensions: 15.7"D x 31.5"W x 45.3"H
- Number of Drawers: 5
- Material: Engineered Wood
- Color: Black
- Item Weight: 77 pounds
- Assembly Required: Yes
- Additional Features: Space Saving, Curved Stabilizing Base, Anti-Tipping Device
Warranty and Support
For any questions, concerns, or assistance with your Flamaker dresser, please contact customer support. While specific warranty details are not provided in this manual, please refer to your purchase documentation or contact the seller for warranty information.
Customer Support: Refer to your purchase platform or the Flamaker official website for contact details.