1. Safety Information
Please read and understand all safety instructions before using this product. Keep this manual for future reference.
- Do not expose the device to extreme temperatures, direct sunlight, or high humidity.
- Avoid dropping or subjecting the device to strong impacts.
- Do not disassemble or attempt to repair the device yourself. This may void the warranty and cause damage.
- Use only the specified charging cable and power adapter (5V/1A) to charge the device.
- Keep the device away from water and other liquids.
- Dispose of batteries according to local regulations.
2. Package Contents
- PRUNUS J-168 Digital Portable Radio
- USB-C Charging Cable
- Wrist Strap
- User Manual
3. Product Overview
The PRUNUS J-168 radio features a compact design with an intuitive button layout and a clear display.
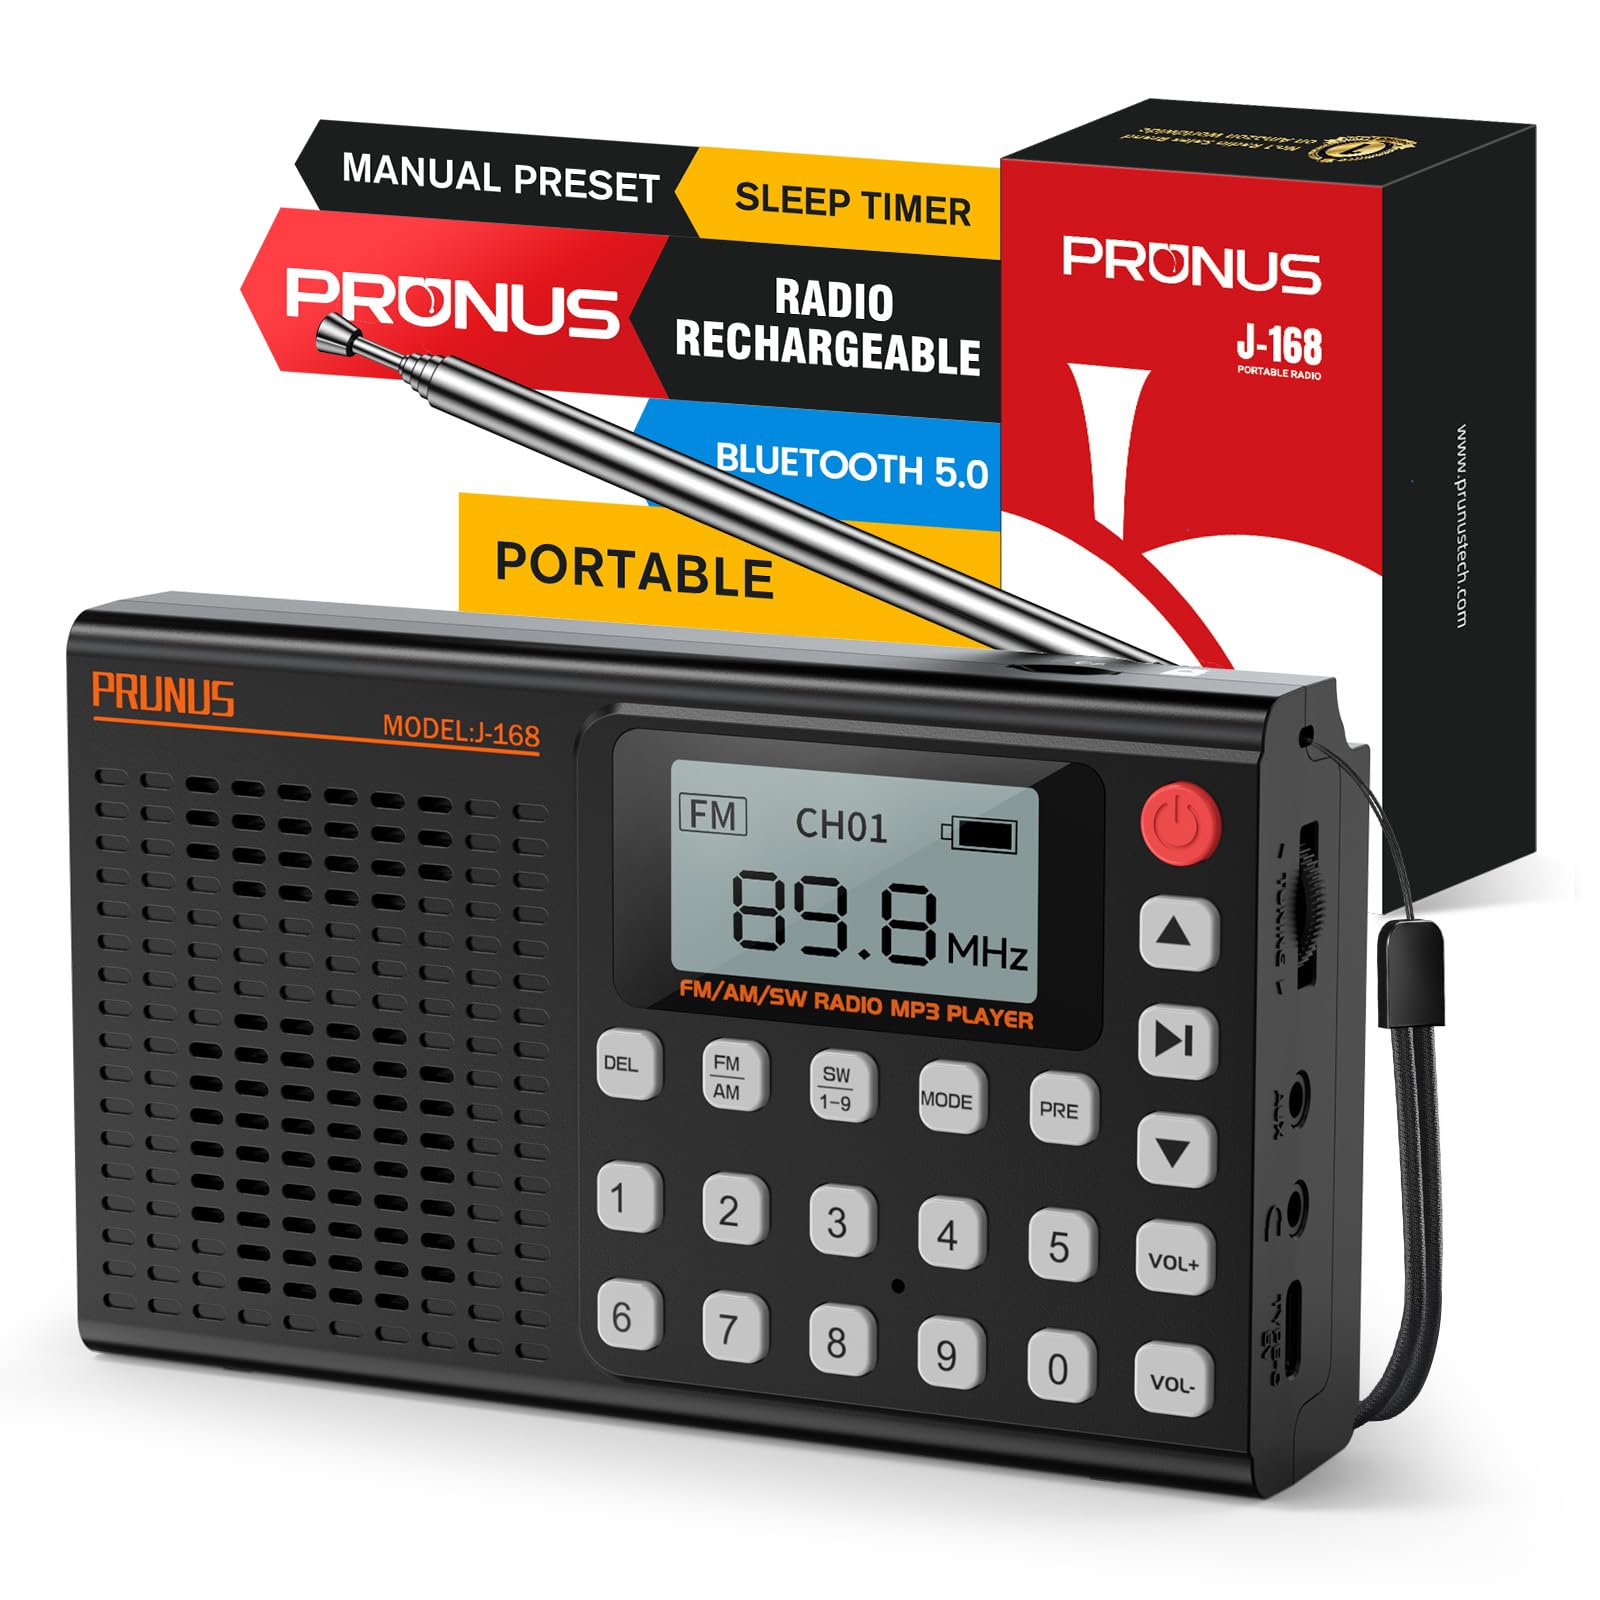
Image: Front view of the PRUNUS J-168 radio, showing the speaker grille, display, and numeric keypad.
Controls and Ports:
- Display Screen: Shows frequency, mode, battery status, and other information.
- Numeric Keypad (0-9): For direct frequency input and channel selection.
- DEL Button: Delete preset stations.
- FM/AM/SW Buttons: Select radio bands.
- MODE Button: Switch between radio, Bluetooth, TF card, and AUX modes.
- PRE Button: Preset/Recall stations.
- Play/Pause Button: Control playback in media modes.
- Previous/Next Track Buttons: Navigate tracks or search channels.
- VOL+/- Buttons: Adjust volume.
- Power Button: Turn the radio on/off.
- Telescopic Antenna: For improved radio reception.
- Tuning Wheel: For fine-tuning radio frequencies.
- USB-C Charging Port: For charging the internal battery.
- TF Card Slot: For playing music from a TF/Micro SD card.
- AUX Input: For connecting external audio devices.
- 3.5mm Headphone Jack: For private listening.
- Foldable Stand: For convenient placement on flat surfaces.
4. Setup
4.1 Initial Charging
Before first use, fully charge the radio. Connect the supplied USB-C cable to the radio's charging port and the other end to a 5V/1A USB power adapter (not included) or a computer's USB port.
- The battery indicator on the display will show charging status.
- A full charge typically takes 3-4 hours.
4.2 Antenna Extension
For optimal radio reception, extend the telescopic antenna to its full length (42 cm / 16.5 in).
Image: A hand extending the telescopic antenna from the top of the PRUNUS J-168 radio.
5. Operating Instructions
5.1 Power On/Off
Press the Power Button (red button on the top right) to turn the radio on or off.
5.2 Radio Mode (FM/AM/SW)
Press the FM, AM, or SW 1-9 buttons to select the desired radio band.
5.2.1 Auto Search and Store
In radio mode, press and hold the Play/Pause button to automatically search for and store all available stations. The radio will scan frequencies and save them to preset channels.
Video: Demonstrates auto-searching and storing radio stations. The display shows the frequency changing and channels being saved.
5.2.2 Manual Tuning
- Tuning Wheel: Rotate the tuning wheel on the side of the radio to adjust the frequency step by step.
- Direct Frequency Input: Use the numeric keypad to enter a specific frequency (e.g., for 104.3 MHz, press 1-0-4-3).
- Next/Previous Available Channel: Briefly press the Previous/Next Track buttons to jump to the next or previous available station.
5.2.3 Presetting and Recalling Stations
- To Preset: Tune to the desired station. Press and hold the PRE button. The display will show 'CHXX'. Enter the desired channel number using the numeric keypad, then press PRE again to confirm.
- To Recall: Enter the channel number directly using the numeric keypad (e.g., for CH14, press 1 then 4).
- To Delete a Preset: Select the preset channel you wish to delete. Press and hold the DEL button. Confirm deletion when prompted.
5.3 Bluetooth Mode
Press the MODE button until 'Bluetooth Mode' appears on the display.
- The radio will enter pairing mode, indicated by a blinking Bluetooth icon.
- On your smartphone or other Bluetooth device, search for 'PRUNUS J-168' and connect.
- Once connected, you can play audio from your device through the radio. Use the radio's Play/Pause and Previous/Next Track buttons to control playback.
Video: Shows connecting a smartphone via Bluetooth to the PRUNUS J-168 radio and controlling music playback.
5.4 TF/SD Card Mode
Insert a TF/Micro SD card (up to 32GB, FAT32 format) with MP3 audio files into the TF card slot. The radio will automatically switch to TF card mode or you can select it using the MODE button.
- Use the Play/Pause and Previous/Next Track buttons to control playback.
- The radio offers 6 EQ presets (Normal, Classical, Pop, etc.) for TF card mode.
5.5 AUX Mode
Connect an external audio device (e.g., MP3 player, smartphone) to the radio's AUX input using a 3.5mm audio cable. Press the MODE button until 'AUX Mode' appears.
- Audio will be played from the connected device. Control playback from the external device.
5.6 Sleep Timer
The sleep timer allows the radio to automatically turn off after a set period.
- Press the Sleep Timer button (often combined with another function, refer to button labels).
- Use the Previous/Next Track buttons to adjust the timer from 0 to 90 minutes.
- Confirm your selection. A clock icon will appear on the display when the sleep timer is active.
Video: Demonstrates setting the sleep timer on the PRUNUS J-168 radio, showing the timer adjustment and the clock icon appearing on the display.
5.7 Headphone Use
Plug 3.5mm headphones into the headphone jack for private listening. The radio's speaker will automatically mute.
5.8 Foldable Stand
The radio includes a foldable stand on the back for convenient upright placement on flat surfaces.
6. Maintenance
- Cleaning: Use a soft, dry cloth to clean the radio's surface. Do not use abrasive cleaners or solvents.
- Storage: When not in use for extended periods, store the radio in a cool, dry place.
- Battery Care: To prolong battery life, avoid fully discharging the battery frequently. Charge it regularly, even if not in use.
7. Troubleshooting
- No Power: Ensure the battery is charged. Connect the charger and try again.
- Poor Radio Reception: Fully extend the telescopic antenna. Try repositioning the radio or moving to an area with better signal.
- Bluetooth Not Connecting: Ensure the radio is in Bluetooth mode and your device's Bluetooth is enabled. Make sure the radio is not connected to another device.
- TF Card Not Playing: Ensure the TF card is inserted correctly and contains compatible MP3 files. Check if the card is formatted to FAT32.
- No Sound: Check the volume level. Ensure headphones are not plugged in if you want sound from the speaker.
8. Specifications
- Model Number: J-168
- Brand: PRUNUS
- Color: Black
- Material: Acrylonitrile Butadiene Styrene (ABS)
- Power Source: Rechargeable Battery
- Battery: 1 Lithium-ion (2000 mAh)
- Charging Port: USB-C (5V/1A)
- Max Power Output: 3 Watts
- Radio Bands: FM (87-108 MHz), AM (522-1710 kHz), SW (3.2-21.85 MHz)
- Connectivity: Bluetooth, AUX, TF Card
- Headphone Jack: 3.5mm
- Special Feature: Built-in Flashlight (Information not explicitly in feature bullets, but often a common radio feature. Removed as it's not in the provided feature bullets.)
- Dimensions: Approximately 13.9 x 8 x 3.2 cm (5.47 x 3.15 x 1.26 inches)
- Weight: Approximately 196 g (0.43 lbs)
9. Warranty and Support
This product comes with a standard manufacturer's warranty. For detailed warranty information or technical support, please refer to the contact information provided on the product packaging or the official PRUNUS website.


