
1. Introduction
The hygger Aquarium U-V Light with Timer is designed to effectively clean aquarium water by utilizing 254nm wavelength U-V light. This device helps to clarify cloudy green water, promoting a healthier environment for both freshwater and saltwater aquatic life. Its shielded housing ensures safe operation by preventing direct U-V light exposure.
- Highly Efficient Cleaning: Employs 254nm U-V wavelength to effectively clean green water, transforming cloudy water into crystal clear conditions.
- U-V Light Shielded Housing: Features a closed plastic ring and tight structure to prevent U-V light escape, protecting fish and humans. Includes a viewing window to safely check lamp status.
- 4 Modes Timing and Memory: Offers timer settings of 3H, 6H, 12H, or 24H. The device automatically manages on/off cycles and remembers previous settings.
2. What's in the Box
Upon opening your hygger Aquarium U-V Light package, you should find the following components:
- 1 x U-V light unit
- 2 x Stainless steel clamps
- 3 pairs of connector fittings (13mm/16mm/19mm)
- 2 x Suction cups
- 1 x User manual

Figure 2.1: Package Contents and Dimensions
3. Safety Information
WARNING: U-V light is hazardous to human eyes and skin. Avoid direct exposure to the U-V lamp without proper protection. The hygger U-V light is designed with a protective casing to prevent direct exposure during operation. Always ensure the unit is fully assembled and sealed before powering on.
- Do not use the product directly inside the fish tank. It must be connected to a hose and used in conjunction with a filter bucket, bottom filter, or water pump.
- Always unplug the unit before performing any maintenance, cleaning, or disassembly.
- Keep out of reach of children.
- Ensure all connections are secure and watertight to prevent leaks.

Figure 3.1: Shielded Housing for Safety
4. Specifications
| Feature | Specification (7W Model) |
|---|---|
| Model | HG250 |
| Light Power | 7 Watts |
| Suitable Tank Size | 30-70 Gallons |
| Voltage | 120 Volts (AC) |
| Product Dimensions | 1.97"L x 1.97"W x 9.05"H |
| Hose Adapter Dimensions | 13mm/16mm/19mm |
| Light Source Type | U-V-C Fluorescent |
| Power Source | Corded Electric |
| Material | Plastic |
5. Setup and Installation
The hygger U-V light is designed for external use, integrated into your existing aquarium filtration system. It should not be placed directly inside the tank.
5.1 Unboxing and Initial Assembly
Video 5.1: Unboxing and Initial Assembly of the hygger UV Light, showing components and how to connect the main unit.
5.2 Connecting to Your Filtration System
The U-V light unit must be connected in-line with an external canister filter, a sump pump system, or a dedicated water pump. Use the provided connector fittings and stainless steel clamps to ensure a secure, leak-free connection.
- Insert the U-V-C bulb: Carefully insert the U-V-C bulb into the main unit.
- Install the external quartz glass sleeve: Place the quartz glass sleeve over the bulb.
- Wipe off stains and water mist: Ensure the glass sleeve is clean and free of any residue.
- Reinstall and tighten the light cover: Securely screw the light cover back onto the unit.
- Screw on the hose fitting: Attach the appropriate size hose fittings to both ends of the U-V unit.
- Connect to the hose: Securely connect your aquarium hoses to the fittings using the stainless steel clamps.
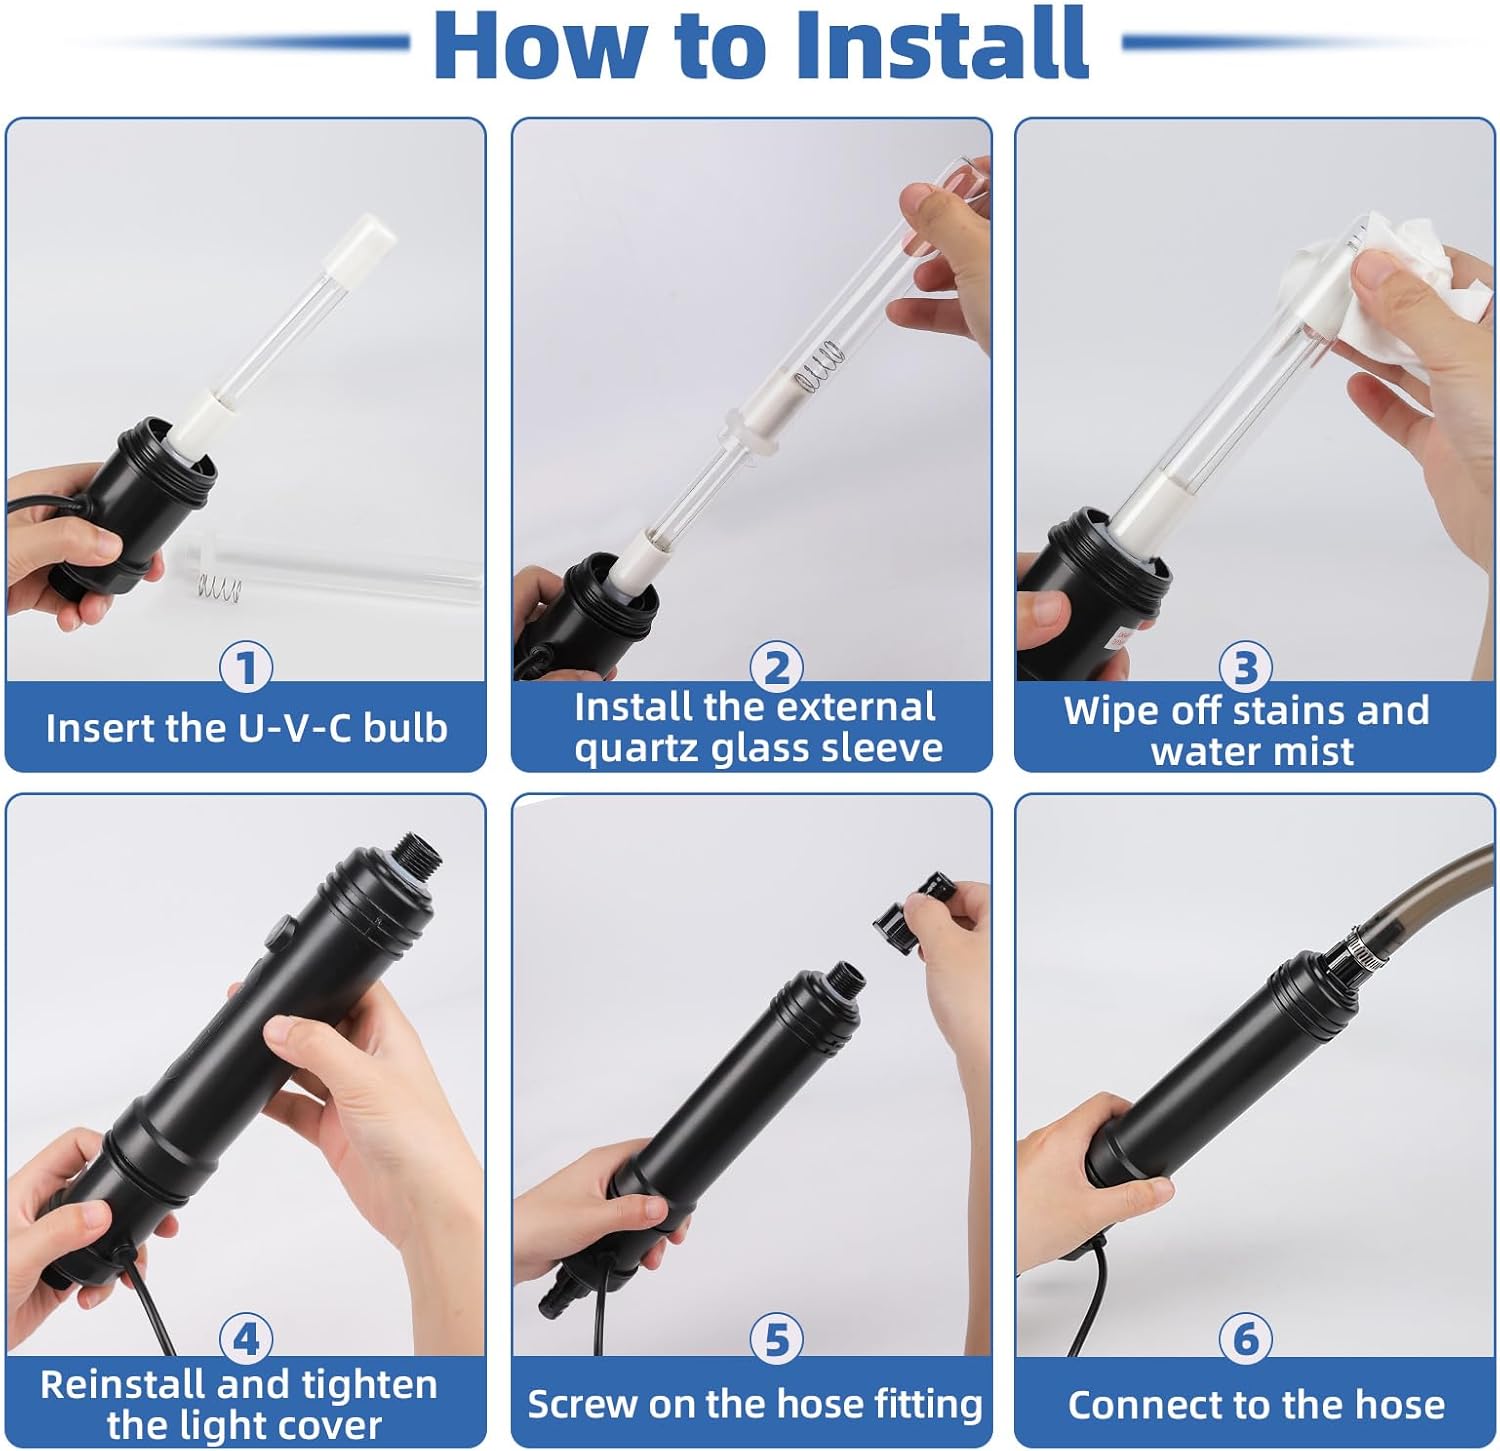
Figure 5.1: Step-by-step Installation Guide

Figure 5.2: Various Connection Methods with Filtration Systems
Video 5.2: Demonstration of the hygger UV Light installed in an aquarium sump system, showing water flow and the blue indicator light.
6. Operating Instructions
The hygger U-V light features a smart timer with memory function, allowing you to set the operating duration.
- Power On: Plug the U-V light unit into a power outlet. The indicator light on the controller will illuminate.
- Select Timer Mode: Press the power switch button on the controller to cycle through the available timer settings: 3 hours, 6 hours, 12 hours, or 24 hours. The corresponding indicator light will show the selected duration.
- Automatic Operation: Once a timer setting is selected, the U-V light will automatically turn on for the set duration and then turn off. It will remember your last setting for convenience.
- Continuous Operation: To run continuously, select the 24-hour mode.

Figure 6.1: Timer Controller with 4 Time Options
7. Maintenance
Regular cleaning of the U-V bulb and quartz sleeve is essential to maintain optimal performance. Algae and mineral deposits can reduce the effectiveness of the U-V light.
- Disconnect Power: Always unplug the U-V light unit from the power source before any maintenance.
- Disassemble: Carefully unscrew the end caps of the U-V unit to access the quartz sleeve and U-V bulb.
- Clean Quartz Sleeve: Gently remove the quartz glass sleeve. Clean it with a soft cloth or sponge and warm water to remove any deposits. For stubborn mineral deposits, a mild acid solution (like vinegar) can be used, followed by thorough rinsing.
- Clean U-V Bulb: Wipe the U-V bulb with a soft, dry cloth. Avoid touching the glass directly with bare hands as oils can leave residue.
- Reassemble: Carefully reassemble the unit, ensuring all O-rings are properly seated and connections are tight to prevent leaks.
Video 7.1: Disassembly and Cleaning of the hygger UV Light, showing how to access and wipe the bulb and housing.
8. Troubleshooting
- Cloudy Water Persists:
Possible Cause: Insufficient flow rate or U-V bulb degradation.
Solution: Ensure water is flowing through the U-V unit at an appropriate rate. The U-V bulb has a limited lifespan (typically 6-12 months of continuous use) and may need replacement. Clean the quartz sleeve to ensure maximum U-V penetration. - U-V Light Not Illuminating:
Possible Cause: Power issue or faulty bulb.
Solution: Check power connections. Ensure the timer is set correctly. If the bulb is old, consider replacing it. - Leaks at Connections:
Possible Cause: Loose fittings or incorrect hose size.
Solution: Ensure all hose fittings are tightly screwed and clamps are secure. Verify that the correct size hose adapters are used for your tubing. Apply thread seal tape if necessary.
9. Warranty and Support
The hygger Aquarium U-V Light comes with a 2-year warranty. For warranty claims, technical support, or replacement parts, please contact hygger customer service through their official website or the retailer where the product was purchased. Please have your model number (HG250) and proof of purchase ready.


