
1. Introduction
This manual provides essential instructions for the safe and efficient operation, installation, and maintenance of your Bennett Read Sponono 7KG Single Tub Compact Washing Machine. Please read this manual thoroughly before using the appliance and retain it for future reference.
The Bennett Read Sponono 7KG washing machine is designed for compact spaces, offering a convenient solution for your laundry needs with its single tub design for washing and spin-drying.
2. Safety Instructions
To reduce the risk of fire, electric shock, or injury when using your appliance, follow these basic precautions:
- Ensure the power supply voltage matches the rating label on the machine.
- Do not operate the machine with a damaged power cord or plug. Contact qualified service personnel for repairs.
- Keep the machine away from direct sunlight, heat sources, and damp environments.
- Do not wash items that are soiled with flammable liquids (e.g., gasoline, kerosene).
- Always unplug the machine before cleaning, performing maintenance, or if it will be unused for an extended period.
- Supervise children closely when the appliance is in use. This appliance is not intended for use by persons with reduced physical, sensory, or mental capabilities unless supervised.
- Ensure the machine is placed on a stable, level surface to prevent vibration and noise.
- Do not immerse the electrical parts of the machine in water.
- Avoid touching the spin tub until it has completely stopped.
3. Product Overview
Familiarize yourself with the components of your washing machine.

Figure 3.1: Front view of the Bennett Read Sponono 7KG Single Tub Compact Washing Machine. This image displays the overall design, including the top control panel and the side-mounted drainage hose.

Figure 3.2: Dimensions of the Bennett Read Sponono 7KG Washing Machine. The image indicates a height of 64.1 cm, a width of 40.5 cm, and a depth of 38 cm, highlighting its compact design.

Figure 3.3: Close-up view of the washing machine's premium glass lid. The transparent lid allows users to monitor the wash cycle without interruption.

Figure 3.4: Key features of the Bennett Read Sponono 7KG Washing Machine, including its 7KG compact design, super-efficient water use, wash & spin convenience, and modern styling.
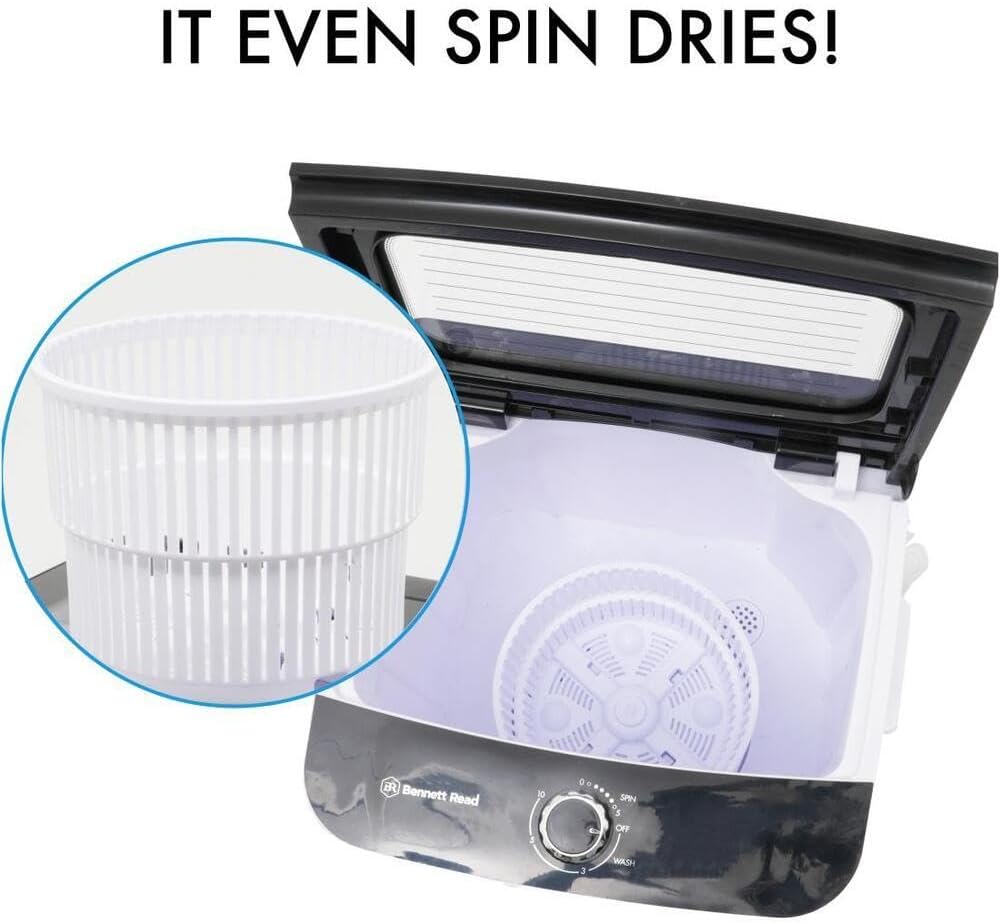
Figure 3.5: Illustration of the spin-dry basket inside the washing machine tub. This feature allows for partial drying of clothes after washing.
Main Components:
- Wash Tub: The main compartment for washing clothes.
- Spin Basket: Inserted into the wash tub for spin-drying.
- Control Panel: Features a dial for selecting wash/spin functions and timers.
- Lid: Transparent lid for viewing the wash process.
- Water Inlet: For filling the tub with water.
- Drain Hose: For discharging water.
4. Setup
4.1 Unpacking
- Carefully remove the washing machine from its packaging.
- Check for any damage during transit. If damaged, do not operate and contact your retailer.
- Remove all packing materials, including any protective films or tapes.
4.2 Placement
- Place the washing machine on a firm, level surface. Uneven surfaces can cause excessive vibration and noise.
- Ensure there is adequate space around the machine for ventilation and operation.
- Avoid placing the machine in areas exposed to direct sunlight or extreme temperatures.
4.3 Water Connection
- Connect the water inlet hose to a suitable water tap.
- Ensure all connections are secure to prevent leaks.
- Position the drain hose to allow for proper water discharge. The drain hose should be placed lower than the machine's base for gravity drainage, or into a sink/drain at an appropriate height.
4.4 Power Connection
- Plug the power cord into a grounded electrical outlet.
- Do not use extension cords or adapters.
5. Operating Instructions
5.1 Washing Procedure
- Load Laundry: Open the lid and place clothes loosely into the wash tub. Do not overload the machine beyond its 7KG capacity.
- Add Detergent: Add the appropriate amount of detergent directly into the tub with the clothes.
- Fill with Water: Fill the tub with water to the desired level. You can use the water inlet hose or manually pour water.
- Select Wash Time: Turn the control dial to the "WASH" setting and select the desired wash time (e.g., 5-15 minutes) based on the soil level of your clothes.
- Start Washing: The machine will begin the wash cycle.
- Drain Water: Once the wash cycle is complete, position the drain hose to discharge the dirty water.
- Rinse (Optional): For rinsing, refill the tub with clean water and run a short wash cycle (e.g., 3-5 minutes). Drain the water again. Repeat if necessary.
5.2 Spin Drying Procedure
- Prepare Clothes: After washing and rinsing, gently wring out excess water from the clothes.
- Load Spin Basket: Place the spin basket into the wash tub. Load clothes evenly into the spin basket. Do not overload.
- Secure Lid: Close the inner lid of the spin basket and then the main machine lid.
- Select Spin Time: Turn the control dial to the "SPIN" setting and select the desired spin time (e.g., 1-5 minutes).
- Start Spin: The machine will begin the spin cycle. Keep the lid closed during operation.
- Remove Clothes: Once the spin cycle is complete and the basket has stopped rotating, carefully remove the clothes.
6. Maintenance
6.1 Cleaning the Exterior
- Wipe the exterior of the machine with a soft, damp cloth.
- Do not use abrasive cleaners, solvents, or harsh chemicals.
6.2 Cleaning the Tub
- Periodically clean the inside of the wash tub to prevent detergent residue buildup.
- You can run a short wash cycle with hot water and a cup of white vinegar (without clothes) to help clean and deodorize the tub.
6.3 Lint Filter (if applicable)
Some models may include a lint filter. If your machine has one, clean it regularly to ensure efficient operation. Refer to the diagram on your machine for its location and removal instructions.
6.4 Storage
- If storing the machine for an extended period, ensure it is completely drained and dry.
- Store in a dry, well-ventilated area, away from extreme temperatures.
7. Troubleshooting
| Problem | Possible Cause | Solution |
|---|---|---|
| Machine does not start | Power cord not plugged in; power outage; lid not closed properly. | Check power connection; verify power supply; ensure lid is securely closed. |
| Water does not drain | Drain hose kinked or blocked; drain hose positioned too high. | Straighten drain hose; clear any blockages; reposition drain hose below the machine's base. |
| Excessive vibration or noise | Machine not level; clothes unevenly distributed in tub/spin basket. | Adjust machine to be level; redistribute laundry evenly. |
| Poor washing performance | Too much or too little detergent; overloaded tub; insufficient water. | Use correct detergent amount; do not overload; ensure adequate water level. |
If the problem persists after attempting these solutions, please contact customer support.
8. Specifications
| Feature | Detail |
|---|---|
| Brand | Generic |
| Model | Sponono 7KG |
| Type | Single Tub Compact Washing Machine |
| Capacity | 7 kg |
| Color | White And Black |
| Material | Metal, Plastic |
| Product Dimensions (L x W x H) | Length: 40.5 cm, Width: 38 cm, Height: 64.1 cm (approximate) |
| Package Dimensions | 50 x 41 x 41 cm |
| Item Weight | 7 kg |
| Special Features | Compact Design, Portable, Top Loading |
9. Warranty and Support
For warranty information, please refer to the documentation provided at the time of purchase or contact your retailer. Keep your proof of purchase for any warranty claims.
For technical support or service inquiries, please contact the customer service department of your retailer or the manufacturer. Ensure you have your model number and purchase details available when contacting support.