
1. Introduction
This manual provides detailed instructions for the installation, operation, and maintenance of your Zomolither Android 15 Car Stereo. Designed specifically for Honda CRV models from 2002 to 2006, this unit features a 9-inch Incell touchscreen, Wireless CarPlay, Android Auto, Bluetooth 5.0, GPS navigation, Wi-Fi connectivity, 32-band EQ, and FM/RDS radio. Please read this manual thoroughly before use to ensure proper functionality and safety.

Image 1.1: Zomolither Android 15 Car Stereo integrated into a Honda CRV dashboard, showcasing its main features.
2. Product Features
- Compatibility: Specifically designed for Honda CRV models 2002, 2003, 2004, 2005, and 2006.
- High Performance: Equipped with 4GB RAM and 64GB ROM for smooth operation.
- Display: 9-inch Incell touchscreen with 1280*720 ultra-high resolution, offering a thinner, brighter display with vivid visuals and responsive touch.
- Smartphone Integration: Supports Wireless CarPlay, Android Auto, and Mirror Link for seamless access to phone functions like calls, messages, music, and maps.
- Connectivity: Built-in Bluetooth 5.0 for stable hands-free calling and high-quality music streaming. Integrated Wi-Fi for app downloads and real-time traffic updates.
- Navigation: GPS navigation system with support for offline maps.
- Audio Quality: Features a 32-band Equalizer (EQ) for precise sound customization and clear audio.
- Radio: Built-in FM/RDS radio for receiving various stations with clear sound and quality, providing news, weather, and traffic information.
- Customization: Multiple User Interface (UI) themes to personalize the device's appearance.
- Multitasking: Split-screen function allows simultaneous use of two applications, such as navigation and music.
- Safety Features: AHD backup camera support for clear visuals during reversing and Steering Wheel Control (SWC) compatibility for convenient function switching.

Image 2.1: High-Definition Incell Screen technology for enhanced visual clarity and brightness.
3. Package Contents
Verify that all components are present in the package before proceeding with installation:
- 1 x Car Stereo
- 1 x GPS Antenna
- 1 x Power Cable
- 1 x RCA Cable
- 2 x USB Adapter
- 1 x Rear Camera Input Cable
- 1 x Installation Tool
- 1 x User Manual
- 1 x Rear Camera
- 1 x Microphone
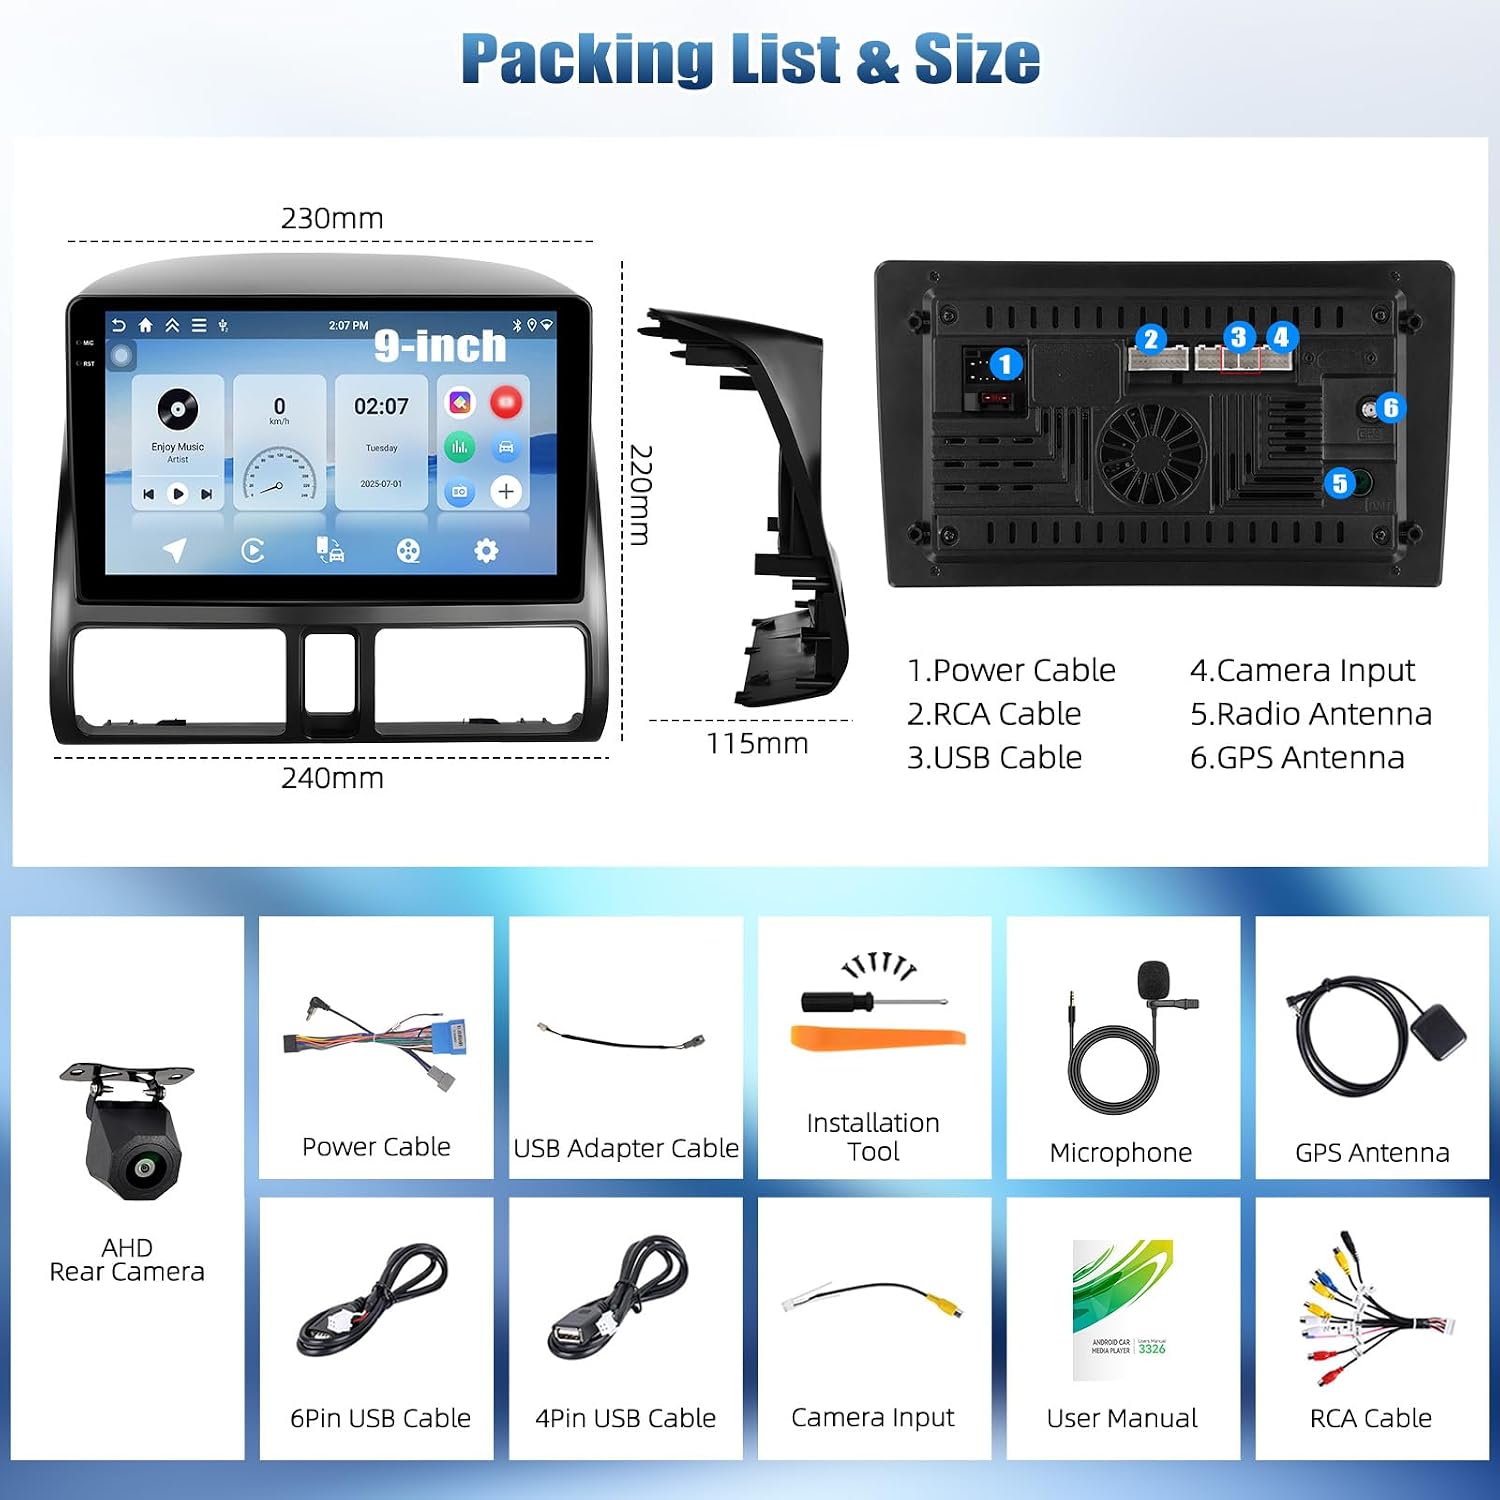
Image 3.1: Overview of the car stereo dimensions and all included accessories.
4. Installation Guide
Professional installation is recommended. Ensure the vehicle's power is disconnected before beginning installation. Refer to your vehicle's service manual for specific dashboard removal procedures.
4.1. General Installation
Carefully remove the original car stereo and dashboard trim. Connect the provided power cable, RCA cable, and USB adapters to the corresponding ports on the new car stereo and the vehicle's wiring harness. Secure the unit in the dashboard opening.

Image 4.1: Visual comparison of the dashboard before and after the Zomolither car stereo installation.
4.2. Wiring Diagram
Refer to the wiring diagram for correct connections. Ensure all cables are securely connected to prevent malfunctions.

Image 4.2: Comprehensive wiring instructions for the car stereo system.
4.3. Backup Camera Installation
Connect the AHD backup camera as follows:
- Connect the red wire (1) to the positive pole of the car's reversing light.
- Connect the black wire (2) to the negative pole of the car's reversing light.
- Connect the pink wire (3) from the radio power cable (labeled 'Reverse / Parking Sensor Control / Back in') to the camera's power cable.
- Connect the yellow RCA video cable (4) from the camera to the 'Rear Camera Input' port on the car stereo.
Image 4.3: Wiring instructions for the AHD backup camera.
5. Operating Instructions
5.1. Touchscreen Interface and Customization
The 9-inch Incell touchscreen provides an intuitive interface. Navigate through menus by tapping and swiping. You can customize the look and feel of your stereo with various UI themes and utilize the split-screen function for enhanced multitasking.

Image 5.1: Explore multiple user interface themes to personalize your car stereo.

Image 5.2: Utilize the split-screen feature to run two applications concurrently, such as navigation and music.
5.2. Wireless CarPlay Connection
To connect your iPhone via Wireless CarPlay:
- Open the 'S-Play' application on the car stereo.
- On your iPhone, go to Settings > Bluetooth and ensure Bluetooth is enabled.
- On the car stereo, navigate to Bluetooth settings and pair with your iPhone (e.g., 'BLINK_UNW2652'). Confirm the pairing request on both devices.
- Once Bluetooth is connected, the car stereo will prompt you to connect to CarPlay. Tap 'Turn on WLAN & Connect' if prompted.
- CarPlay will launch automatically, mirroring your iPhone's compatible apps to the car stereo display.
Video 5.2.1: Demonstrates the steps for connecting your iPhone to the car stereo via Wireless CarPlay.
5.3. Wireless Android Auto Connection
To connect your Android phone via Wireless Android Auto:
- Open the 'S-Play' application on the car stereo.
- On your Android phone, go to Bluetooth settings and ensure Bluetooth is enabled.
- On the car stereo, navigate to Bluetooth settings and pair with your Android phone (e.g., 'BLINK_UNW2652'). Confirm the pairing request on both devices.
- Once Bluetooth is connected, Android Auto will launch automatically, mirroring your Android phone's compatible apps to the car stereo display.
Video 5.3.1: Demonstrates the steps for connecting your Android phone to the car stereo via Wireless Android Auto.
5.4. Bluetooth 5.0
Bluetooth 5.0 provides a stable and fast connection for hands-free calling and audio streaming. Pair your phone with the car stereo via Bluetooth settings to make and receive calls directly from the touchscreen, and stream music from your device.

Image 5.4.1: Bluetooth 5.0 for hands-free calls and music streaming.
5.5. Wi-Fi & GPS Navigation
Connect the car stereo to a Wi-Fi hotspot (e.g., from your mobile phone) to access online maps, real-time traffic updates, and download applications from the Play Store. The built-in GPS module ensures accurate navigation even without an internet connection (with pre-downloaded offline maps).

Image 5.5.1: Online and offline GPS navigation with Wi-Fi and Bluetooth integration.
5.6. Mirror Link (Jlink) Connection
Mirror Link allows you to display your phone's screen directly onto the car stereo. This is useful for viewing videos or using apps not natively supported by CarPlay or Android Auto.
- Open the 'Jlink' application on the car stereo.
- Connect the car stereo to your mobile phone's hotspot via Wi-Fi.
- If connecting for the first time, click the provided link in the Jlink app to download the mobile client or scan the QR code with your phone.
- On your mobile phone, open the Jlink app and initiate screen casting.
- The phone screen will then be mirrored to the car stereo display.
Video 5.6.1: Demonstrates the process of connecting your mobile phone via Wireless Jlink for screen mirroring.
6. Audio Features
6.1. FM/RDS Radio
The built-in FM/RDS radio allows you to tune into your favorite radio stations. RDS (Radio Data System) provides additional information such as station name, song title, and traffic announcements where available.

Image 6.1.1: FM/RDS Radio interface for tuning and information display.
6.2. 32-Band Equalizer (EQ)
Customize your audio experience with the integrated 32-band equalizer. Adjust frequency bands to match your musical preferences and vehicle acoustics, ensuring clear and rich sound output.

Image 6.2.1: 32-band EQ interface for precise audio adjustments.
7. Advanced Features
7.1. Steering Wheel Control (SWC)
The car stereo supports steering wheel controls, allowing you to manage audio playback, answer calls, and navigate menus without taking your hands off the wheel. This enhances driving safety and convenience. Follow the on-screen instructions in the settings menu to map your steering wheel buttons.

Image 7.1.1: Setup interface for customizing steering wheel controls.
7.2. AHD Backup Camera
The included AHD backup camera automatically activates when the vehicle is put into reverse. It provides clear, wide-angle visuals with night vision capabilities, assisting in safe parking and maneuvering.

Image 7.2.1: AHD backup camera features for enhanced parking safety.
8. Specifications
| Brand | Zomolither |
| Model Name | A7103A4291H6MI2 |
| Operating System | Android 15 |
| Memory Storage Capacity | 64 GB |
| Screen Size | 9 Inches |
| Display Resolution | 1280*720 |
| Display Type | Incell Touchscreen (Capacitive, LED) |
| Connectivity Technology | Bluetooth 5.0, Wi-Fi, USB |
| Supported Navigation System | GPS (Worldwide Map Type) |
| Audio Output Mode | Stereo (32-band EQ) |
| Mounting Type | Dashboard Mount |
| Compatible Devices | Smartphone (Wireless CarPlay, Android Auto, Mirror Link) |
| Item Dimensions (L x W x H) | 9.45"L x 9.25"W x 4.33"H |
| Operating Temperature | -20°C to 70°C |

Image 8.1: The car stereo is designed to operate reliably across a wide temperature range.
9. Maintenance
To ensure the longevity and optimal performance of your car stereo, follow these maintenance guidelines:
- Cleaning: Use a soft, dry cloth to clean the touchscreen and exterior surfaces. For stubborn smudges, slightly dampen the cloth with water or a screen-safe cleaner. Avoid abrasive materials or harsh chemicals.
- Temperature: While the unit is designed for a wide operating temperature range, extreme prolonged exposure to direct sunlight or freezing temperatures can affect performance. Park in shaded areas when possible.
- Software Updates: Periodically check for software updates via the system settings to ensure you have the latest features and bug fixes.
- Cable Connections: Ensure all cables remain securely connected. Loose connections can lead to intermittent issues.
10. Troubleshooting
If you encounter issues with your car stereo, refer to the following common troubleshooting steps:
- No Power: Check all power cable connections. Ensure the vehicle's ignition is on. Verify the fuse in the power cable is intact.
- No Sound: Check speaker connections. Ensure the volume is not muted or set too low. Verify audio settings in the EQ.
- Bluetooth Connection Issues: Ensure Bluetooth is enabled on both the stereo and your phone. Delete previous pairings and try re-pairing. Move closer to the unit if possible.
- GPS Signal Loss: Ensure the GPS antenna is properly installed and has a clear view of the sky. Move the vehicle to an open area.
- Touchscreen Unresponsive: Try restarting the unit. If the issue persists, a factory reset might be necessary (note: this will erase all user data).
- Backup Camera Not Displaying: Check the camera's power and video connections. Ensure the vehicle is in reverse.
For persistent issues not resolved by these steps, please contact customer support.
11. Warranty and Support
Your Zomolither car stereo comes with a 1-Year Warranty from the date of purchase. This warranty covers manufacturing defects and malfunctions under normal use.
For technical support, warranty claims, or any questions regarding your product, please contact Zomolither customer service through the retailer where the product was purchased.