
1. Important Safety Instructions
Please read all safety instructions carefully before operating the Waitbird Steam Cleaner CB-03A. Failure to follow these instructions may result in electric shock, fire, or serious injury.
- Always ensure the appliance is unplugged from the power outlet before filling with water, cleaning, or performing any maintenance.
- Do not immerse the appliance in water or other liquids.
- Keep the appliance out of reach of children and pets.
- Use only clean tap water. Do not add any cleaning solutions, perfumes, or other chemicals to the water tank, as this can damage the unit and void the warranty.
- High Pressure Warning: The steam cleaner operates at high temperatures and pressure. Never attempt to open the water tank cap immediately after use. Allow the unit to cool down completely and release all residual pressure before opening.
- Burn Hazard: Steam is extremely hot. Avoid direct contact with steam. Use caution when handling accessories and operating the unit.
- Ensure the safety cap is fully tightened before heating. Operating with a loose cap poses a risk of burns or malfunction.
- If the unit leaks air after connecting accessories, press the steam switch once to release slight pressure imbalance. If leaking persists, contact support.
2. Product Overview
The Waitbird Steam Cleaner CB-03A is designed for chemical-free deep cleaning using high-temperature steam. It features a 1.1-liter water tank, rapid 5-minute heating, and a comprehensive set of accessories for various cleaning tasks.

Image: Waitbird Steam Cleaner CB-03A and its included accessories.
Key Features:
- High-Temperature Steam: Reaches 248°F for effective cleaning and sanitization.
- Large Water Tank: 1.1-liter capacity (recommended fill ≤ 900ml / 30 oz) for extended cleaning sessions.
- Rapid Heating: Ready in approximately 5 minutes.
- Chemical-Free Cleaning: Uses only water, ideal for homes with children and pets.
- Safety Features: Built-in child safety lock and automatic shut-off for overheating or dry-boiling.
- Portable Design: Lightweight with an ergonomic steam gun and shoulder strap for ease of use.
Included Accessories:

Image: Detailed diagram of the steam cleaner and its 21 accessories.
- 4 x Nylon Utility Brushes
- 2 x Brass Utility Brushes
- 3 x Ironing Towels
- 2 x Microfiber Mop Pads
- 2 x Extension Tubes
- 1 x Measuring Cup
- 1 x Glove
- 1 x Ironing Brush
- 1 x Shoulder Strap
- 1 x Glass Brush
- 1 x Big Nozzle
- 1 x Floor Brush
- 1 x Carpet Glider
3. Setup
Step 1: Filling the Water Tank
- Ensure the steam cleaner is unplugged and completely cool.
- Unscrew the safety cap counter-clockwise.
- Using the provided measuring cup, add up to 900ml (30 oz) of clean tap water into the tank. Do not overfill. Overfilling may cause leaks during heating or operation.
- Securely tighten the safety cap clockwise until it is firm.
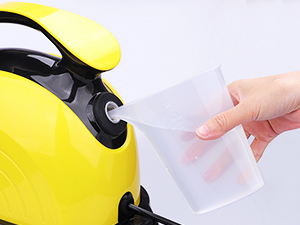
Image: Filling the water tank.
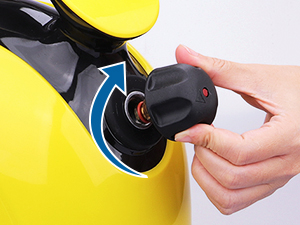
Image: Tightening the safety cap.
Step 2: Attaching Accessories
Select the appropriate accessory for your cleaning task and securely attach it to the steam gun or extension tube. Ensure all connections are firm to prevent steam leakage.
Step 3: Powering On and Heating
- Plug the power cord into a grounded electrical outlet.
- Press the Power ON/OFF button. The indicator light will illuminate.
- Allow approximately 5 minutes for the unit to heat up. The ready indicator light will change color (e.g., from red to green) when the steam is ready for use.
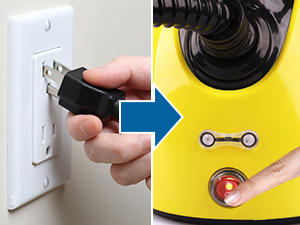
Image: Plugging in the steam cleaner.
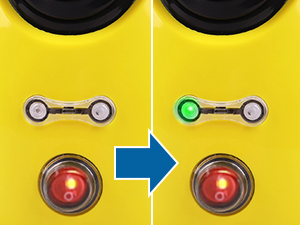
Image: Power button and ready indicator.
4. Operating Instructions
Steam Release Modes:

Image: Manual and Automatic Steam Modes.
- Manual Mode: Hold the steam button on the gun forward to release steam. Release to stop.
- Automatic Mode: For continuous steam, turn the steam lock to the right side. This will keep the steam flowing without needing to hold the button.
Adjusting Steam Volume:

Image: Steam volume adjustment dial.
Use the adjustable button on the steam gun to control the intensity of the steam output, from minimum to maximum, depending on the cleaning task.
General Usage Tips:
- Always test the steam on an inconspicuous area first, especially on delicate surfaces.
- Move the steam nozzle or brush slowly over the surface to allow the heat to penetrate and loosen dirt.
- Wipe away loosened dirt and moisture with a clean cloth as you clean.
- For stubborn stains, apply steam for a longer duration and use a brush attachment.
Applications:

Image: Versatile cleaning applications.
The Waitbird Steam Cleaner is suitable for a wide range of surfaces and applications, including:
- Floors: Sealed hardwood, laminate, tile, and grout.
- Carpets: Refreshing and spot cleaning with the carpet glider.
- Kitchens: Stoves, countertops, sinks, and ovens.
- Bathrooms: Tiles, grout, showers, and toilets.
- Upholstery: Sofas, chairs, and curtains (test in an inconspicuous area first).
- Automotive: Car interiors, seats, and floor mats.
- Windows and Glass: For streak-free cleaning.
5. Maintenance
After Each Use:
- Unplug the unit from the power outlet.
- Allow the unit to cool down completely. This is crucial as residual steam and pressure inside the tank are still dangerously high.
- Once cool, turn the unit upside down and press the vapor release button until all pressure is vented.
- Safely open the lid.
- Empty any remaining water from the tank.
- Gently unscrew the lid (one full turn) once it has cooled down to prevent it from getting stuck due to temperature changes and to maintain the integrity of the seals.
- Clean any used accessories with water and mild soap, then allow them to air dry.
Storage:
Store the steam cleaner and its accessories in a cool, dry place, away from direct sunlight and extreme temperatures. Ensure the unit is completely dry before storing.
6. Troubleshooting
Refer to the following common issues and solutions. If the problem persists, contact customer support.
- Problem: Steam does not stay hot indefinitely.
Solution: The high heat of steam naturally dissipates quickly. To maintain optimal performance, keep the unit energized during use.
- Problem: Cannot open the lid immediately after use.
Solution: Residual steam and pressure inside the tank are still dangerously high. Unplug the unit, turn it upside down, and press the vapor release button until all pressure is vented. Then, safely open the lid.
- Problem: Lid gets stuck after cooling.
Solution: Prolonged tightening can cause the lid to stick due to temperature changes. To prevent this, gently unscrew the lid (one full turn) once it has cooled down after each use. This maintains the integrity of the seals.
- Problem: Unit leaks air after connecting accessories.
Solution: First, press the steam switch once to allow steam to be released; this often resolves a slight pressure imbalance. If the leak persists, ensure accessories are securely attached. If the issue continues, contact support for troubleshooting or replacement parts.
- Problem: Not enough steam pressure.
Solution: Before heating, ensure the safety cap is fully tightened. If pressure is still low, allow the unit to cool completely, then reopen and securely fasten the cap, and reheat. Never operate with a loose cap due to burn risk.
- Problem: Overfilling causes leaks.
Solution: Never fill the tank completely to overflow. It is recommended to add no more than 900ml (30 ounces) at a time. If a leak occurs due to overfilling, contact support.
7. Specifications
| Feature | Detail |
|---|---|
| Brand | Waitbird |
| Model Name | CB-03A |
| Special Features | Carry Handle, Child Lock, Compact Design, High Pressure, Rapid Heat Up |
| Surface Recommendation | Carpet、Ceiling、Counter Top、Door、Floor、Grout、Tile、Upholstery、Wall、Window |
| Wattage | 1500 watts |
| Form Factor | Handheld、Stand Alone |
| Heat Time | 5 Minutes |
| Color | Yellow |
| Power Source | Corded Electric |
| Voltage | 230.0 V |
| Capacity | 1.08 Liters (Recommended fill ≤ 0.9 Liters / 30 oz) |
| Maximum Temperature | 248 Degrees Fahrenheit |
| Item Weight | 9.98 pounds |
| Package Dimensions | 20 x 12 x 7 inches |
| Manufacturer | Waitbird Ningbo Rongyida Electric Appliance Co.,Ltd |
8. Warranty and Support
Warranty Information:

Image: Warranty information.
The Waitbird Steam Cleaner CB-03A comes with a 12-month warranty from the date of purchase, covering manufacturing defects under normal use. Please retain your proof of purchase for warranty claims.
Customer Support:

Image: Dedicated customer support.
For any questions, technical assistance, or warranty claims, please contact Waitbird customer support. Contact details can typically be found on the product packaging or the official Waitbird website.

