1. Introduction
This manual provides essential information for the safe assembly, operation, maintenance, and troubleshooting of your VEVOR Automatic Clay Target Thrower. Please read this manual thoroughly before using the device to ensure proper function and to prevent injury or damage.

Figure 1: VEVOR Automatic Clay Target Thrower overview.
2. Safety Precautions
WARNING: Failure to follow these safety instructions may result in serious injury or death.
- Always wear appropriate eye and ear protection when operating or near the clay target thrower.
- Keep hands, feet, and all body parts clear of the throwing arm and target loading area when the device is powered on.
- Ensure the safety pin is inserted when the device is not in active use or when loading targets.
- Maintain a safe distance from the thrower during operation. The orange safety ring indicates the danger zone. Do not enter this area.
- Disconnect the power source (battery) when performing any maintenance, adjustments, or when the device is not in use.
- Operate the thrower only in open, clear areas, away from people, animals, and property.
- Ensure the thrower is securely anchored to the ground before operation to prevent movement.

Figure 2: Safety instructions for handling the clay target thrower, including the safety pin and release mechanism.
3. Package Contents
The VEVOR Automatic Clay Target Thrower package includes the following items:
- 1 x Clay Target Thrower Unit
- 1 x Foot Pedal with Extended Cord
- 2 x Extended Metal Spike Legs
- 1 x Ground Stake
- Necessary assembly hardware
4. Setup
- Assembly: Assemble the thrower according to the included diagrams. Ensure all bolts and fasteners are securely tightened.
- Placement: Position the thrower in a safe, open area, ensuring sufficient clear space for target trajectory.
- Anchoring: Insert the two extended metal spike legs and the ground stake firmly into the ground to provide stability during operation. This prevents the unit from shifting due to recoil.
- Power Connection: The thrower requires a 12V deep cycle battery (not included). Connect the alligator clips from the thrower's power cord to the corresponding terminals on the 12V battery. Ensure correct polarity (red to positive, black to negative).
- Foot Pedal Connection: Connect the extended foot pedal cord to the designated port on the thrower.
- Portability: The unit is designed for portability and can be transported in a truck bed.

Figure 3: Proper connection of the 12V battery to the thrower. Note: Battery is not included.

Figure 4: The thrower's components are designed to fit easily for transport.
5. Operation
- Power On: Ensure the safety pin is in place. Flip the power switch on the back of the unit to the 'ON' position. The throwing arm will cycle to its ready position.
- Loading Targets: Carefully load up to 28 clay targets into the magazine. Ensure they are stacked correctly to prevent jamming.
- Adjusting Launch Angle: Use the adjustment knob to modify the launch angle. This affects the throwing distance and trajectory. Tighter spring tension results in longer throws (over 45 yards).
- Launching Targets: Once ready, remove the safety pin. Step on the foot pedal to launch a clay target. The device is designed for automatic launches every 2 seconds when the pedal is pressed. Release the pedal to stop launching.
- Power Off: When finished, flip the power switch to 'OFF'. Press the 'RELEASE' switch to de-tension the throwing arm. Insert the safety pin into its designated slot to secure the arm in a safe, de-tensioned position.

Figure 5: Loading clay targets into the thrower's magazine, which holds up to 28 targets.

Figure 6: The adjustment knob allows for varying throwing distances and angles.

Figure 7: The extended foot pedal allows for hands-free operation from a safe distance.
6. Maintenance
Regular maintenance ensures the longevity and optimal performance of your VEVOR Clay Target Thrower.
- Cleaning: After each use, clean the unit to remove any dirt, dust, or clay residue. Use a dry cloth or soft brush.
- Lubrication: Periodically apply a light lubricant to moving parts, such as the throwing arm pivot points and spring mechanisms, to ensure smooth operation.
- Inspection: Regularly inspect all components for wear, damage, or loose fasteners. Tighten any loose bolts and replace worn parts as necessary.
- Storage: Store the thrower in a dry, protected area when not in use. Disconnect the battery before storage.
7. Troubleshooting
If you encounter issues with your VEVOR Clay Target Thrower, refer to the following common troubleshooting steps:
- Device Not Powering On:
- Check battery connections for secure contact and correct polarity.
- Ensure the 12V battery is charged. - Targets Not Launching or Launching Weakly:
- Verify the magazine is loaded correctly and targets are not jammed.
- Check the spring tension adjustment. Increase tension for stronger throws.
- Ensure the foot pedal is fully depressed. - Throwing Arm Not Cycling:
- Ensure the safety pin is removed before attempting to launch.
- Check for any obstructions in the throwing arm's path. - Unusual Noises During Operation:
- Power off the unit immediately and inspect for loose parts or obstructions.
8. Specifications
| Feature | Specification |
|---|---|
| Model Number | NH113 |
| Main Materials | Carbon Steel & Aluminum Alloy |
| Maximum Target Capacity | 28 Clays |
| Throwing Distance | ≥ 45 Yards |
| Input Voltage | 12V (Battery Not Included) |
| Net Weight | 12.3 kg (27.12 lbs) |
| Product Dimensions (L x W x H) | 800 x 440 x 750 mm (31.5 x 17.32 x 29.53 inches) |
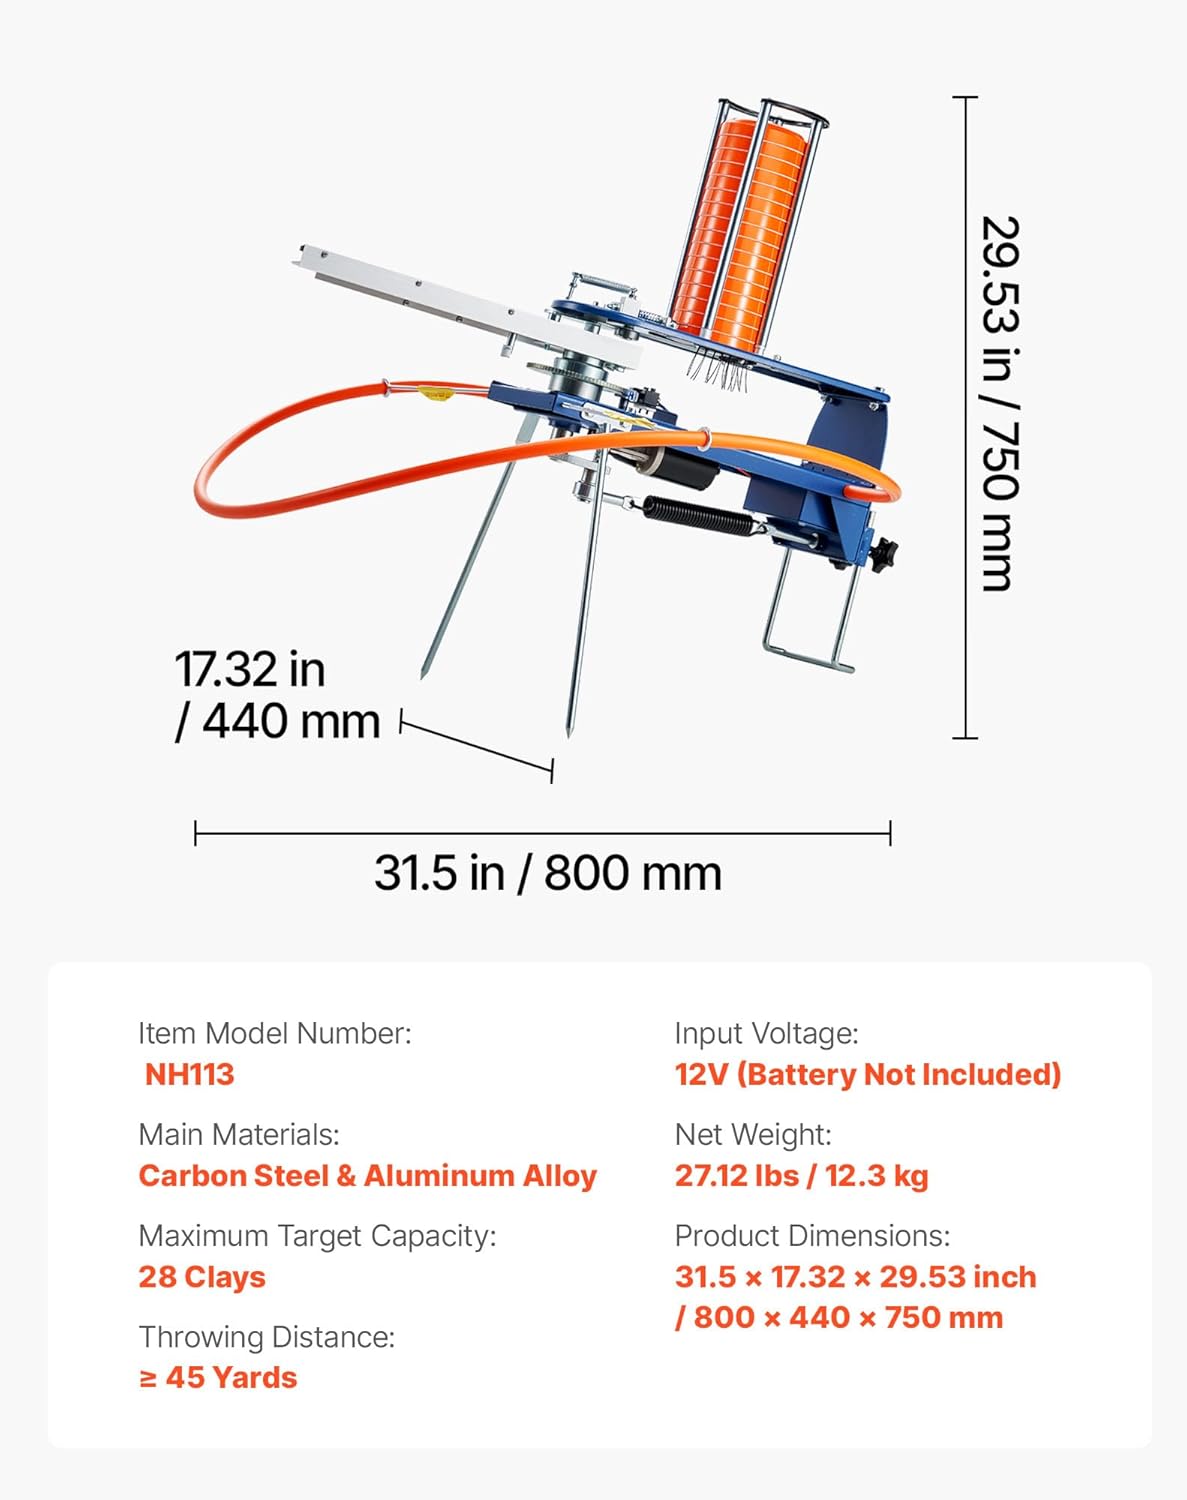
Figure 8: Detailed dimensions and specifications of the VEVOR Clay Target Thrower.
9. Warranty and Support
For warranty information or technical support, please refer to the contact details provided with your purchase or visit the official VEVOR website. Keep your purchase receipt as proof of purchase for any warranty claims.


