
Introduction
This manual provides detailed instructions for the installation, operation, and maintenance of your LTC Velo7 Max BE19000 Tri-Band WiFi 7 Router. Please read this manual thoroughly before using the device to ensure proper setup and optimal performance. Keep this manual for future reference.
Safety Information
- Use only the power adapter provided with the router.
- Do not expose the device to water, fire, or high humidity.
- Do not attempt to disassemble or repair the device yourself. Refer all servicing to qualified personnel.
- Ensure proper ventilation around the router to prevent overheating.
- Keep the device away from strong electromagnetic fields.
Package Contents
Verify that all items are present in your package:
- LTC Velo7 Max BE19000 Tri-Band WiFi 7 Router
- Power Adapter
- Quick Installation Guide (this document)
Product Overview
The LTC Velo7 Max BE19000 is a high-performance Tri-Band WiFi 7 router designed for ultra-fast networking. It features multiple ports for versatile connectivity and internal antennas for a sleek design.
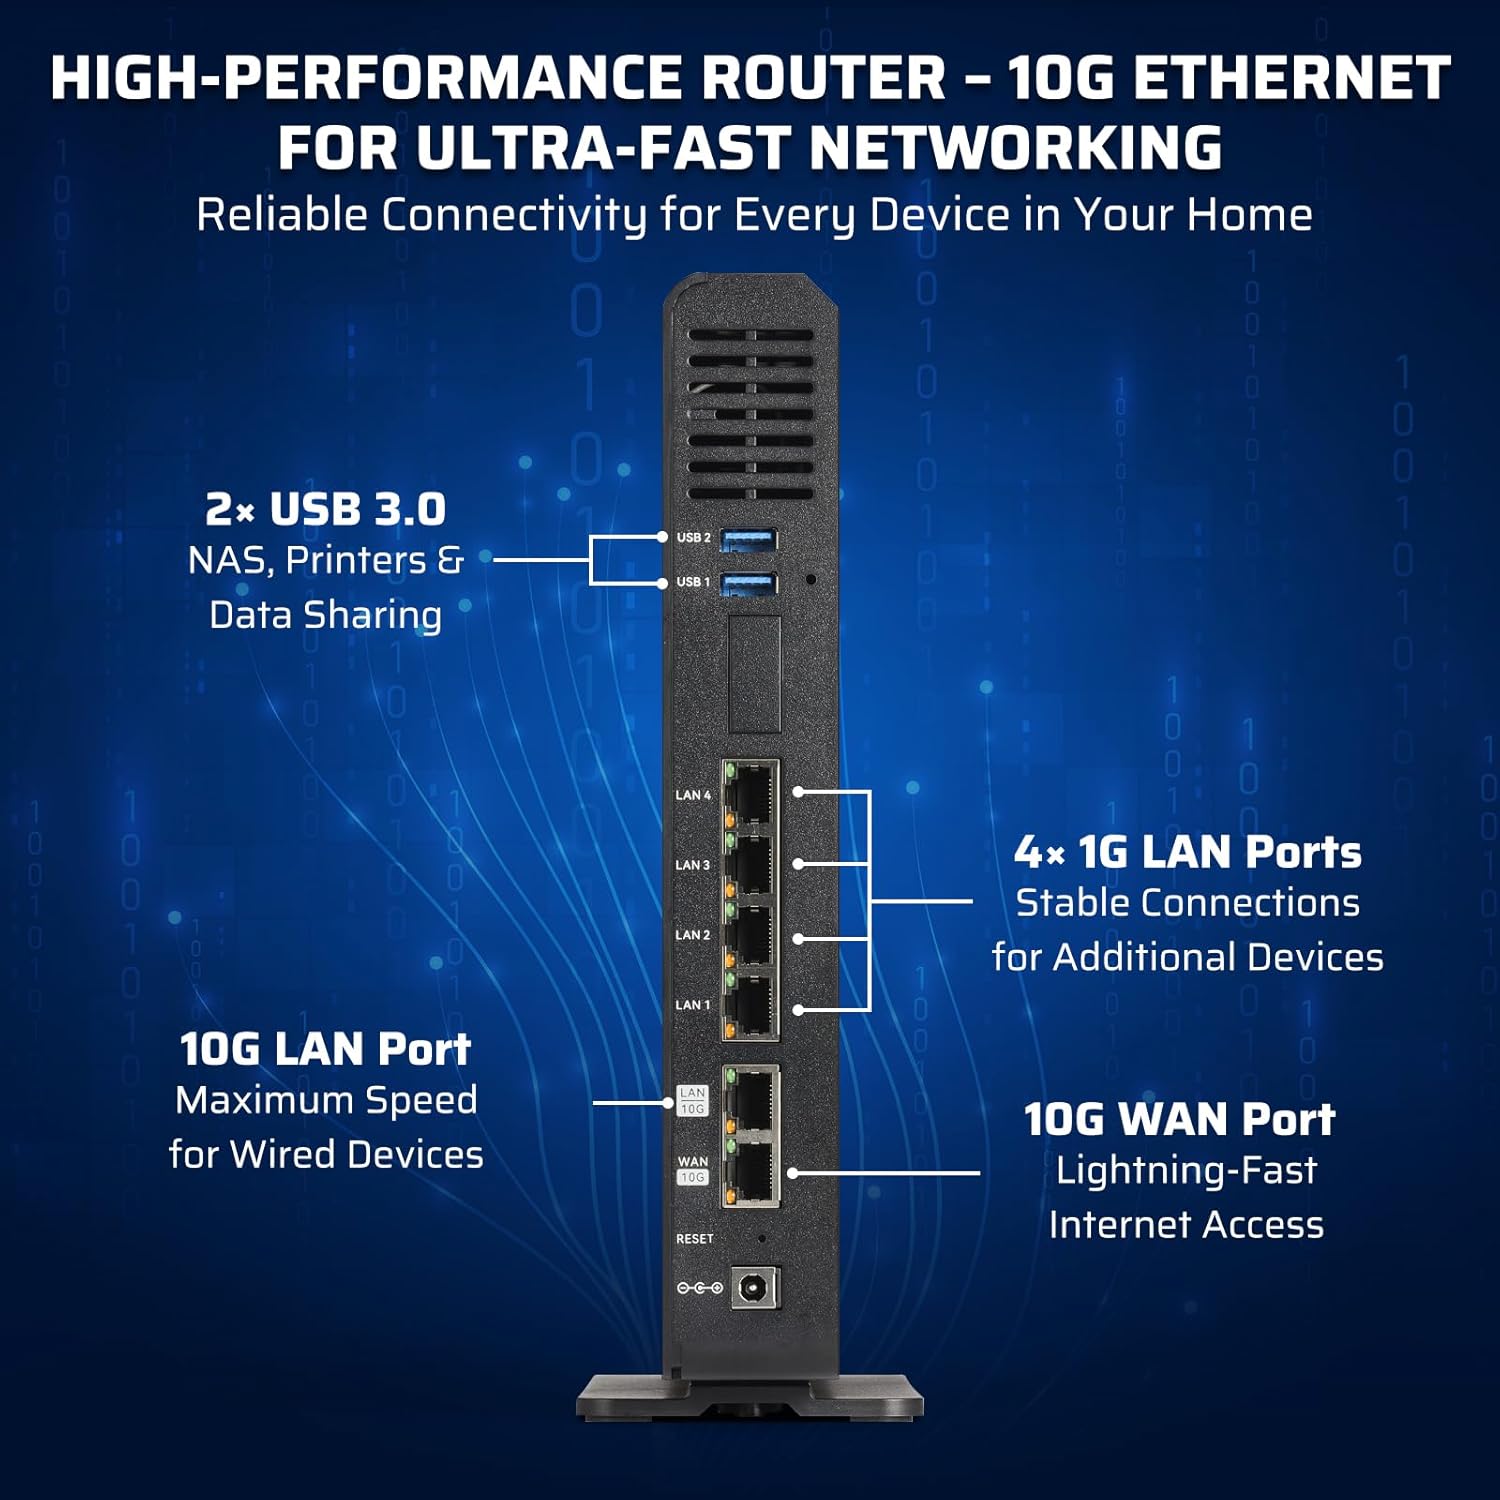
Image: Rear view of the LTC Velo7 Max BE19000 router, highlighting the 10G WAN port, 10G LAN port, four 1G LAN ports, two USB 3.0 ports, and the reset button.
Physical Components
- Power Port: Connects to the power adapter.
- Reset Button: Used to restore factory default settings.
- WPS Button: For easy Wi-Fi Protected Setup connections.
- USB 3.0 Ports (x2): For connecting external storage (NAS), printers, or other USB devices.
- 10G WAN Port (x1): Connects to your modem for internet access.
- 10G LAN Port (x1): For high-speed wired connections to devices like servers or gaming PCs.
- 1G LAN Ports (x4): For standard wired connections to computers, smart TVs, or other network devices.
- LED Indicators: Display the status of power, internet, Wi-Fi bands, and USB activity.
Setup
Initial Hardware Connection
- Power Off: Disconnect power from your modem and the router.
- Connect WAN Port: Connect one end of an Ethernet cable to your modem's LAN port and the other end to the 10G WAN port on your LTC Velo7 Max router.
- Connect Power: Connect the provided power adapter to the router's power port and then plug it into a power outlet.
- Power On: Power on your modem first, wait for it to fully boot up (usually indicated by stable LED lights), then power on your LTC Velo7 Max router.
- Verify LEDs: Wait for the router's Power and Internet LEDs to become stable, indicating a successful connection.
Accessing the Web Interface (LuCI)
The LTC Velo7 Max router uses the LuCI web interface for configuration.
- Connect to Router: Connect your computer to one of the router's LAN ports using an Ethernet cable, or connect wirelessly to the default Wi-Fi network (SSID and password are usually found on a label on the router).
- Open Browser: Open a web browser (e.g., Chrome, Firefox, Edge).
- Enter IP Address: In the address bar, type the router's default IP address (commonly
192.168.1.1or192.168.0.1) and press Enter. Refer to the label on your router if this address does not work. - Login: Enter the default username and password. These are typically
rootandpassword, or found on the router's label. It is highly recommended to change the default password immediately after your first login for security.

Image: A screenshot illustrating the LuCI web interface, showing various network configuration options and system status.
Operating
Network Configuration
- WAN Settings: Configure your internet connection type (DHCP, Static IP, PPPoE) under the Network > Interfaces section.
- LAN Settings: Adjust the router's internal IP address and DHCP server settings for your local network.
- Wi-Fi Settings: Navigate to Network > Wireless to configure your Tri-Band Wi-Fi networks (2.4 GHz, 5 GHz, and 6 GHz). Set unique SSIDs and strong WPA3/WPA2 passwords for each band.

Image: A visual representation comparing the speeds and benefits of WiFi 7, WiFi 6, and WiFi 5, highlighting WiFi 7's faster connections and ultra-low latency.
Advanced Features
- USB 3.0 Functionality: Connect a USB storage device to create a Network Attached Storage (NAS) for file sharing, or connect a USB printer to share it across your network. Configure these options in the LuCI interface.
- VPN Support: The router supports OpenVPN and WireGuard (via firmware update), as well as PPTP/L2TP. This allows for secure remote access to your home network or for encrypting your internet traffic.
- Firewall Protection: Utilize the advanced firewall features including DMZ, Port Forwarding, Filter Rules, ARP Protection, IP-MAC Binding, and DDOS Defense to secure your network.
- Parental Control: Manage and restrict internet access for specific devices or users, including content filtering and time limits.
- EasyMesh & WPS: Use EasyMesh for creating a seamless whole-home Wi-Fi system with compatible devices. WPS (Wi-Fi Protected Setup) allows for quick and easy connection of WPS-enabled devices.

Image: A graphic detailing the robust firewall protection features of the router, including DMZ, Port Forwarding, DDOS Protection, and ARP Protection/IP-MAC Binding.
Maintenance
Firmware Updates
Regularly check for and install firmware updates to ensure optimal performance, security, and access to new features. Firmware updates can typically be found in the System > Firmware section of the LuCI interface or on the manufacturer's website.
System Backup and Restore
It is recommended to back up your router's configuration before making significant changes or performing firmware updates. This allows you to restore your settings if needed. Look for backup/restore options under the System menu.
Factory Reset
If you encounter persistent issues or forget your login credentials, you can perform a factory reset. Locate the Reset button on the router (often a small pinhole button). With the router powered on, press and hold the Reset button for approximately 10 seconds until the LEDs flash, then release. The router will reboot with factory default settings.
Physical Cleaning
Keep the router clean and free from dust. Use a soft, dry cloth to wipe the exterior. Ensure ventilation holes are not obstructed.
Troubleshooting
No Internet Connection
- Check if your modem is working correctly.
- Ensure the Ethernet cable from the modem is securely connected to the router's 10G WAN port.
- Verify WAN settings in the LuCI interface match your ISP's requirements.
- Reboot both the modem and the router.
Slow Wi-Fi Speed or Drops
- Ensure your devices are connected to the appropriate Wi-Fi band (5GHz or 6GHz for higher speeds, 2.4GHz for wider range).
- Reduce interference by placing the router away from other electronic devices.
- Check for firmware updates.
- Adjust Wi-Fi channel settings in the LuCI interface to less congested channels.
Cannot Access Web Interface
- Verify your computer is connected to the router (wired or wireless).
- Ensure you are using the correct IP address (e.g.,
192.168.1.1). - Clear your browser's cache or try a different browser.
- If you forgot the password, perform a factory reset (see Maintenance section).
Specifications
Key technical specifications for the LTC Velo7 Max BE19000 Tri-Band WiFi 7 Router:

Image: An internal diagram of the router, showcasing its powerful MediaTek MT7988AV Quad-Core Processor, 8GB DDR4 RAM, and 2GB Flash memory, which contribute to its high network performance.
| Feature | Detail |
|---|---|
| Model Name | Velo7 Max |
| Model Number | VL7MX |
| Wi-Fi Generation | Wi-Fi 7 (802.11be) |
| Frequency Band Class | Tri-Band (2.4 GHz, 5 GHz, 6 GHz) |
| Data Transfer Rate | Up to 19 Gbps (19000 Mbps) total throughput |
| Processor | MediaTek MT7988AV Quad-Core |
| RAM Memory Installed | 1 GB DDR4 (Note: Some marketing materials may incorrectly state 8GB RAM. The actual installed RAM is 1GB.) |
| Flash Memory | 2 GB |
| Antenna Type | Internal (10 optimized antennas) |
| LAN Port Bandwidth | 1 x 10 Gbps, 4 x 1 Gbps |
| WAN Port Bandwidth | 1 x 10 Gbps |
| USB Ports | 2 x USB 3.0 |
| Operating System | LuCI (OpenWrt based) |
| Security Protocol | WPA2, WPA3 |
| Special Features | Internet Security, MLO, Parental Control, QoS, VPN |
| Voltage | 12 volts |
Warranty Information
The LTC Velo7 Max BE19000 Tri-Band WiFi 7 Router comes with a 1-Year Limited Warranty from the date of purchase. This warranty covers manufacturing defects and malfunctions under normal use. It does not cover damage caused by misuse, accidents, unauthorized modifications, or external factors. Please retain your proof of purchase for warranty claims.
Support
For technical assistance, troubleshooting, or further inquiries, please refer to the official LTC support channels. Visit the LTC website for FAQs, updated firmware, and contact information.
For additional resources and community support related to the OpenWrt operating system, you may visit the official OpenWrt website and forums.


